Taro Root/ Arbi Fry:

A perfect side dish to enjoy with humble curd rice or Rasam rice. It is flavourful, healthy, and easy to make a side dish.

Now prepare the Taro root or Arbi;  if you are new to the usage of Arbi, please go through my detailed description of handling Arbi, how to cook etc., in “Understanding the roots and tubers.” And go down until Tubers, and you would find the Taro/Arbi under Number 7, and it is HERE.

Now, the procedure for Arbi Fry:

Ingredients:

Arbi root – ¼ kg

Salt – as needed

Turmeric – ½ tsp

Red chilli powder – 1tsp

Tamarind powder or paste – ½ tsp

Coriander powder – ½  – 1 tsp

Hing – one pinch

Garam masala powder – ½ – 1 tsp

Curry leaves – 1 – 2 springs

Oil – 2 – 3 tablespoons

Rice flour – 1 to 2 tablespoons

Method:

-Wash the Arbi root, cook for one whistle in a pressure cooker. Peel the skin and slice it ( ½ inch thick pieces).

-Take one bowl, put these slices, all the masalas from salt to garam masala from the ingredient list. Let it sit for half an hour to 1 hour.

-Take one iron skillet, heat oil, put curry leaves, then marinate taro, toss-up and down in a slow flame.

When it is slightly crisp, sprinkle some rice flour and toss further and enjoy with your meal to make it crispier.

Tips: For example, while roasting Arbi, adding little rice flour when 3/4 is done gives it a crisp texture and does not get sticky and mushy. And the necessity to use excess oil also does not arise, thus making it healthier.


Mullu Sauthe Guliyappa / Cucumber Appe:

Like Kendathadya, this is one more recipe, which I love and cherish the fond memories of my childhood. This recipe is usually made with heirloom cucumber of our region, which is flavorful and watery compared to commercially available salad cucumber.

Ajji, my maternal grandma or my aunt used to prepare this dish for the evening snack. It used to be real fun, sitting in front of the wood fire, chatting with ajji, holding the plate full of two types of Guliyappa. One is the sweeter version with added jaggery, and the other is savoury, with added onion, chilli, and curry leaves. It is pure bliss, and we never recreate the moment of such a warm, comfortable atmosphere in today’s world.

Now, we would see the procedure of making Sweet and Savory version –

Ingredients:

Dosa rice – 1 + 1 cup

Cucumber – 1 Big

Fresh grated Coconut – ½ + ½ cup

Salt

Jaggery – ½ cup (grated)

Onion – 1 medium

Curry leaves

Green chilli

Method:

-Wash, Soak rice in two bowls separately for 3 to 4 hours. Drain soaked water before grinding. (We are using an oozed water out of cucumber for grinding rice)

-Make jaggery syrup by boiling grated jaggery with very little water, sieve the liquid to remove all the impurities.

-Take one big cucumber, peel the skin, make halves, remove the inner core and seeds and grate it. Mix salt to the gratings, leave aside for 5 minutes.

When cucumber oozes its water, strain it through a sieve by extracting all oozed water and collecting it for grinding rice.

-Now, grind the batter for a sweeter version, take one set of drained rice, add ½ cup of Coconut, jaggery syrup, required amount of cucumber water and grind into not so smooth batter.

-To this batter, add tightly packed one cup of cucumber gratings and whip the mixer grinder to mix it thoroughly with the batter.

-Remove this batter to one vessel and allow to rest for 2 to 3 hours. (Resting the batter would help to make Guliyappa softer and flavorful)

-Now, it is time to make batter for the Savory version. Grind the same as the sweet version without adding jaggery. After adding and mixing the cucumber gratings, add chopped onion, green chilli and curry leaves.

-Remove this batter to one vessel and allow to rest for 2 to 3 hours. (Resting the batter would help to make Guliyappa softer and flavorful)

-After the resting period, heat the Appe/ Paddu pan, pour little ghee into each mould. When the paddu pan is hot, pour the batter, cook in a low flame, turn around, cook both sides properly, and enjoy the flavourful and delicious Sweet and Savoury Cucumber Guliyappa.


Halasina hannina Guliyappa/ Jackfruit Paddu:

Jackfruit is an integral part of our kitchen during the Summer months. In our native, it is an everyday affair to make something or the other out of home-grown huge jack fruits. A lot of family bonding happens during its chopping, separating the fruit bulbs and cleaning. After cleaning, it is time to think about what to make? One says Dosa, other one Kottige or Guliyappa. Even after making all these delicacies if it is in excess, then it is time to make Berati and preserve it for a long.

Guliyappa is usually an instant thing if the rice has been soaked and ready. But I like Paddu out of fermented batter. Let us see how I make it.

Ingredients:

Dosa rice – 2 cups

Jackfruit – 1 big bowl

Coconut – 1 small bowl

Jaggery – I piece (according to taste) Or Jaggery Syrup as needed.

Salt

Method:

-Wash, soak Dosa rice in water for 3 to 4 hours. Clean jack fruit bulbs by removing fibre and seed.

– Drain the water, grind Rice, jaggery ( I would suggest using jaggery syrup), salt, coconut and chopped jackfruit with adding minimal water.

-The batter should be a little coarse, and the consistency should be like idli batter (should neither thick nor thin)

-Allow fermenting overnight in cold weather, or 2 to 3 hrs is enough.

-Heat Appe or Paddu pan. When it is hot, pour ¼ tsp of ghee or oil.

-Pour the batter into each mould, close the lid, and cook for a few minutes.

-Flip the side and cook the upper side as well.

-Serve with chutney. We normally prefer Ginger and coconut chutney as a side dish for jackfruit items.

-Repeat the process and enjoy your breakfast or brunch or dinner.

Note:

For ginger chutney: Fry red chillies with little oil and grind this with coconut, salt, tamarind, and a piece of ginger.

Dum Aloo:

Dum Aloo is originally from Kashmir. Normally baby potatoes are deep fried and dunked in a mild and flavorful gravy. Here I have made it without deep frying as well as without peeling the outer skin. I normally avoid removing outer skin of potatoes due to its nutritional value as well as the taste.

In dum aloo, curd is the main ingredient, which is used as a souring agent with the additional Indian spices. Dum aloo tastes very good with any Indian flat breads or with mild Pulav.

Ingredient:

Baby potatoes – 15

Onions – 3 medium size

Green chillies – 2

Ginger – 1 tsp (freshly chopped)

Oil – 3 to 4 table spoons

Fennel seeds – ½ tsp

Turmeric – ½ tsp

Red chilli powder – 1tsp

Garam masala – 1 tsp

Salt

Coriander powder – 1 tsp

Coriander leaves – 3 to 4 table spoons

Hung Curd – ¼ cup

Cashew chunks – 2 table spoons

Hot milk – ¼ cup

Kishmish / Dried grapes – 2 table spoons

Method:

-Soak cashews in Hot milk and keep aside.

-Wash potatoes, make half or quarter pieces according to its size.

-Heat 1 table spoon of oil and roast potato pieces a little and keep aside.

-Take one mixer jar, dry churn onions, ginger and green chillies.

-Heat oil in a kadai, add fennel seeds, roughly churned onion – ginger- chilli.

-Fry until it is light brown, add all the powders, salt and fry for a while and add roasted potatoes, cup of water and cook in a low flame.

-When potato is done, it is a time to switch off the gas. Never add curd while boiling the mixture, it curdles immediately.

-Now mix in curd, chopped coriander and mix everything, adjust the consistency by adding water and boil this mixture by switching on the gas.

-When gravy is ready, you would see a shiny layer at the surface. Switch off the gas.

-Now make a paste of cashew and milk and garnish the curry with cashew paste and dry grapes and serve with Roti or Pulav.


Vegetable Pulav (Bangalore Style):

Vegetable Pulav is very versatile and made in many ways. Each house or family has their own favourite recipes. But this one is found in any small darshini or small eateries in Bangalore. It is a native Bangalore style Pulav which is green in colour due to the usage of Pudina and coriander leaves. It is fried with onion and other masalas and ground to paste. Selection of the vegetable is also unique. With other vegetables, Knol khol, double beans as an added attraction, when compared to normal Pulav. Added to all this, we find deep fried bread croutons.  

Ingredients:

Basmati rice – 3 cups (small steel tumbler)

Beans – 10

Carrot – 1

Knol khol – 2

Green peas – ¾ cup

Double beans – ¾ cup

Lemon – 1

Bread slices – 3

For Masala: (please refer the picture)

Oil – 2 table spoons

Cinnamon – 4 to 5 small pieces

Clove – 4

Cardamom – 2

Black pepper – 10 to 15

Cumin – 1 table spoon

Onion – 2 (medium)

Green chillies – 5 to 8

Ginger – 2-inch piece

Garlic – 12 to 14

Mint / Pudina leaves – 1 fist full

Coriander leaves – 1 fist full

Fresh Coconut – 1 small cup

Seasoning:

Oil – 8 to 10 table spoons

Cumin – 1 tea spoon

Bay leaves – 3 half pieces

Marathi moggu – 2

Star anise – 2

Method:

-Wash rice a couple of times, soak and keep aside.

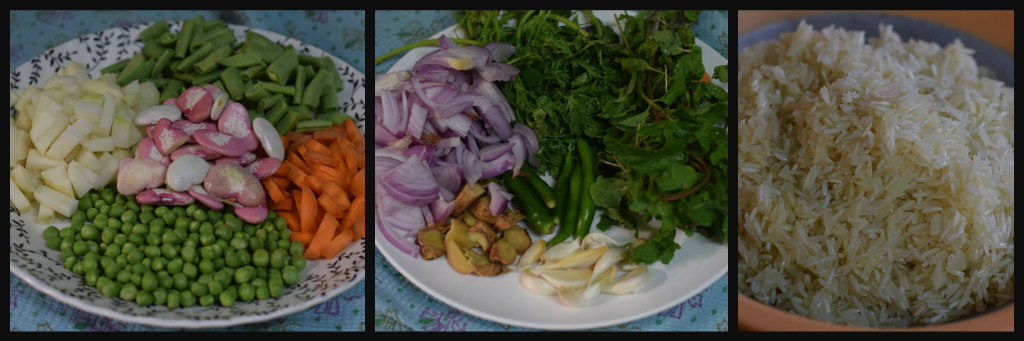
-Wash pudina, coriander leaves, Chop veggies, onions etc. If you are adding double beans and green Peas keep it ready.

-Now prepare ground masala: Take everything under masala and keep it ready by washing or chopping.

-Take one wok, heat oil, drop all the dry spices from cinnamon to cumin.

-Fry onions, garlic, ginger, green chillies when onion becomes transparent add pudina and coriander.

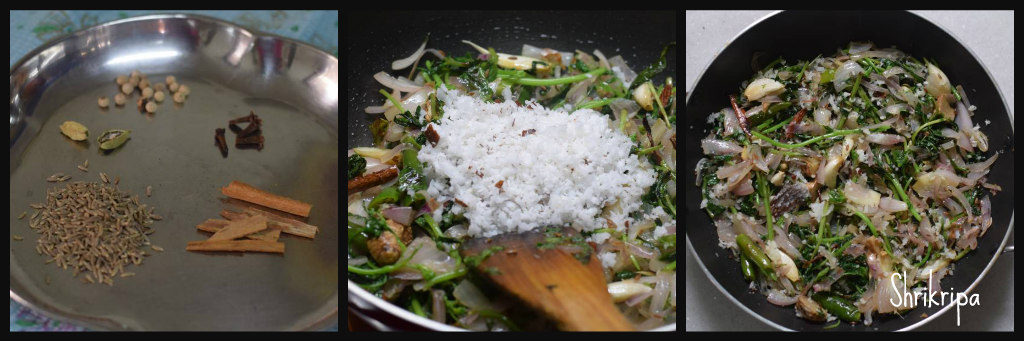
-Fry until it wilts. Add coconut and fry for 2 minutes and switch off the gas.

-Cool, grind into paste by adding very minimum water. Keep aside.

-Now we would move towards the main preparation. It is the time to drain the soaking rice.

-Take one pressure cooker, pour oil for the seasoning, drop all the dry spices from cumin to star anise, fry for 2 minutes.

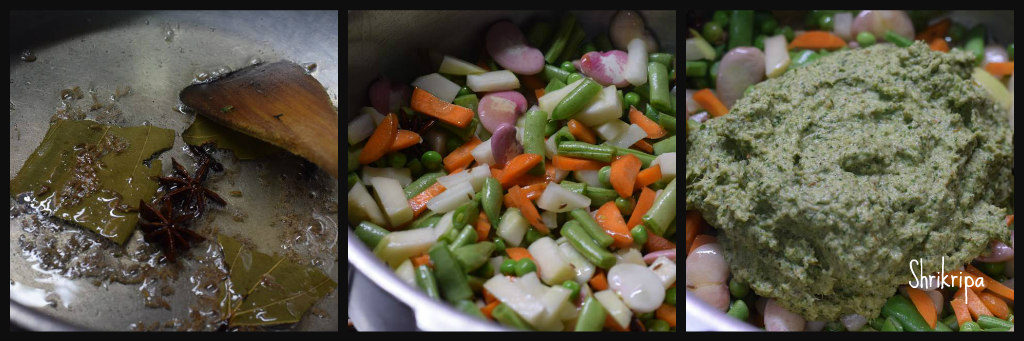
-Now put all the veggies, green peas, double beans and fry nicely until raw smell vanishes and all the pieces coats with the oil.

-Next comes the turn of adding ground green masala and salt. Fry nicely and lastly add drained rice and fry for couple of minutes.

-Add water (I normally add 1: 2 for Basmati rice or Sona masuri rice) If you are using small grain (Jeera rice) Use 1: 1 ½ ratio for water. Here 1 is rice and 2 or 1 ½ is water.

-Use rice measured cup for water measurement.

-Check for salt and squeeze lemon and close the lid. Cook for 1 whistle and keep it in a simmer for 2 to 3 minutes.

-During this time, we can prepare bread croutons. Usually bread pieces will be deep fried, drained and added.

But, I normally avoid deep frying and make it like this.

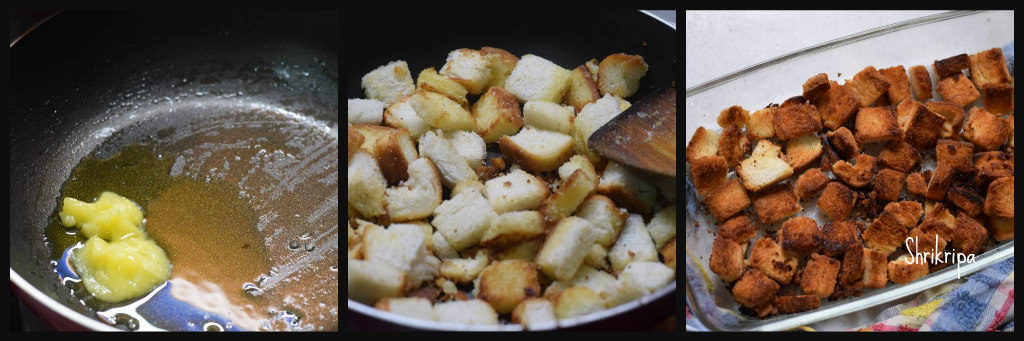
-Take one tawa, drop couple of spoons of ghee or oil, when it is hot, drop the bread pieces and fry for 2 to 4 minutes, until all the bread pieces coats partially and half roasted.

-Now switch off the gas, spread those bread pieces in a baking dish, bake for 20 minutes or until it is crisp in a pre-heated oven or convection microwave at 170-degree C.

-When Pressure relieves, open the cooker lid and mix in bread croutons and mix well. Close the lid and leave for some time to soak all these bread pieces to absorb the aroma.

-Then serve with Onion raita at the side.


Kantola Tawa Fry:

Kantola has many names like Spine gourd, Teasel Gourd, phagila, Mada hagala, locally we call this as “Kaadu peere” in Mangalore. Kantola is one of the famous and nutritious vegetable of coastal region and some Eastern parts of states. This monsoon vegetable is loved by all. This resembles a bitter gourd in structure, but not in taste. It is a crunchy mild flavoured vegetable.  It is a great health food as it is rich in proteins, iron and anti-oxidants and low in calories. It is high in fibre too.       

In my family, we usually relish this in tawa fry form. Let’s see how I do this.

Ingredients:

Kantola: 5 to 6

Salt to taste

Red chilli powder – ½ tsp

Turmeric – ½ tsp

Asafoetida / hing powder – ¼ tea spoon

Coconut oil – to shallow fry

Ingredients for outer cover:

Chiroti/fine rawa – 1 small cup

Rice flour – 1 table spoon

Salt

Asafoetida  powder – ¼ to ½ tsp.

Red chilli powder – 1 tsp

Method:

-Wash Kantola and slice them into a very thin slices. Don’t remove outer skin or inner seeds. Use as it is.

– Sprinkle salt, red chilli powder, hing, turmeric on these slices and mix this nicely by using your hand and   keep aside for 10 to 15 minutes to marinate.

-While marinating it will leave some water and it helps to hold outer coating.

 – Now take one bowl, dry mix all the ingredients like fine rawa, rice flour,salt, asafoetida, red chilli powder, for outer cover.don’t add any water.

– Now take each marinated Kantola piece and roll both the sides over rawa mix, keep aside after coating one by one.     

-Take one iron Dosa tawa ,heat it ,keep 6 to 7 coated pieces over it and pour one or two teaspoon of coconut oil and fry nicely on one side.

-After some time, flip the side, once again pour one tsp of coconut oil and fry this side too.

– After frying both the sides, serve this as a side dish with dhal -rice, Rasam –rice or curd- rice.

  Note: You should use coconut oil and more asafoetida to get authentic taste.


Baby potato fry:

Baby potatoes are naturally sweetish with thin outer skin. I usually don’t peel baby potato skin, due to its richness in taste as well as vitamins and minerals as well. This potato fry tastes great as it is or as a side dish with plain dal or Rasam.

I am preparing this potato fry from so many years and my guests usually love this and ask for the recipe, so I thought of sharing the recipe with my readers, as well. It is made with very minimal oil and one can indulge in it, as much as they want.

DSC03768_Fotor

How I make:

Ingredients:

Baby potatoes – ½ kgs

Salt- as needed

Oil – 2 table spoons

Curry leaves – 2 springs

Turmeric – ½ tea spoon

Red chilli powder – 1 tea spoon

Coriander powder – 1 tea spoon

Garam masala powder – ½ tea spoon

Amchur/ dry mango powder – ½ tea spoon

Method:

-Soak baby potatoes for some time, scrub a little and clean properly.

-Cut all the potatoes in half.

-Take water in a sauce pan, boil, add halved potatoes in this water and cook until it is tender but firm.

Ribbet collage 1

-When you keep the potatoes in between your thumb and fore finger and press, it should crack.

-Switch off the gas, drain the water.

-Now take one tawa, heat oil, splutter curry leaves, add drained potato pieces and fry for 2 to 3 minutes.

Ribbet collage 2

-Add all the powders, salt and fry until you get a little charred texture.

-Check the taste and adjust the masala accordingly.

-Serve either as a starter or side dish with rice and dhal.

DSC03780_Fotor

NOTE: If you have Ready Tawa fry masala (MDH brand) use 3 to 4 tsp of that, omit coriander powder, garam masala, red chilli powder and amchur powder.


Marakesavu Pathrode:

Pathrode, name itself will make any Mangalorean drool. That too if it is marakesavu leaf, fun is even more. Marakesavu is non-itchy, seasonal colocasia leaves. It is one more classic monsoon special from Mangalore. Pathrode is usually served with coconut oil either plain or pan fried by slicing.

pic main

Marakesavu is commonly known as hitchhiker elephant ear and botanical name of this leaf is Remusatia vivipara. Leaf is large, oval, leathery textured, glossy on both the sides. Foliage disappears in winter and emerges after the first rain during monsoon. Grows widely on big tree trunks or in-between the stones, mainly emerges from the moss bed. The name itself suggests about its habitat. Here, “Mara” is Tree and “Kesavu” is colocasia.

collage 1

We will see the Procedure-

Ingredients:

Dosa rice – 3 cups

Fresh Coconut – 1 ½ cup

Dried red chillies – 12 (Roasted)

Hing – ¼ teaspoon

Salt

Jaggery – 1 table spoon

Tamarind – 1 table spoon (if normal colocasia use little more)

Marakesavu – 3 bundles

Coconut oil – for serving

Method:

Wash the leaves, remove stem and trim.

  Wash and soak rice for 3 hours.

  Fry red chillies by putting very little oil.

collage 2

Grind soaked rice, coconut, tamarind, jaggery, salt, roasted red chillies into smooth paste by adding sufficient water.

  Batter consistency should be like Dosa batter.

  Now, we are ready to make Pathrode.

collage 3

  Take biggest leaf from the lot, place upper glossy part downwards and apply ground batter on back side of the leaf. (pc:step 1)

 After applying on the first leaf, keep second one (slightly smaller than the first one)

Proceed with the application. After applying on second leaf, keep the third leaf then fourth one and proceed.(pc: step 2&3)

collage 4

  Now lift sideways, and fold. Make it like a mat. Apply some batter on these folds as well.

  Roll from the tip and proceed until the end and apply some batter on outer shell and keep this in a water filled idly steamer.

collage 5

  Cook this for 45 minutes to one hour, depending on the quantity of the content inside the vessel, in a low fire.

collage 6

  Serve fresh with coconut oil by slicing these cooked rolls or apply coconut oil and fry these in an iron tawa on both the sides and enjoy as it is for breakfast or with lunch or dinner.

NOTE:

-Tamarind is a key ingredient while making Pathrode.

– If it is Mara Kesavu, it is non-itchy and quantity of the tamarind doesn’t matter.

– If you are using normal colocasia leaves, tamarind plays a very crucial part, in removing the itchiness of the leaves. Use little more quantity than normal.

– You can prepare this same recipe by using big spinach leaves as well.

Instant Paddu:

This Recipe happened by fluke and I felt it was a very good option for kid’s tiffin boxes and basically my daughters loved it and they were asking me to include this as a regular item. So, I was thinking of sharing it with you all, lovely readers.

Last week when I made some biryani for kids and hubby’s tiffin box, no one was interested to carry a raita with them and I was left with one big bowl of onion and tomato raita. I wanted to utilise that sweetish raita in some way and thought of preparing rawa Paddu.

I took an inspiration from rawa idly mix and proceeded like that. Instead of adding only Rawa, I included millet idly rawa too and believe me, it was so tasty and the kids were saying “it was oozing with flavour and no side dish or chutney was needed” for this.

pic 7

Now we will see, how I proceeded –

Ingredients:

Normal Rawa – 1 cup

Millet rawa- 1 cup

Ghee – 1 table spoon

Mustard – 1 tsp

Urad dal- 1 tsp

Cumin- ½ tsp

Hing- ¼ tsp

Curry leaves – 1 or 2 springs(chopped)

Eno fruit salt – 1 Tsp

Curd – 2 cups

Chopped onion -1

Chopped tomato – 1

Chopped coriander – little

Salt

Sugar

Method:

-Make seasoning by taking ghee in one pan, when it is hot, add mustard. After mustard splutters, add urad dal, cumin, hing, chopped curry leaves and fry for a minute.

-Add plain rawa and millet rawa fry until it becomes grainy in texture.

pic 1

-Remove from the flame and cool the mixture into room temperature.

– Before preparing batter, take the curds, chopped onions, tomato, coriander leaves, salt and sugar mix nicely by adding Eno fruit salt.

pic 2   pic 3

– Now add seasoned, cooled rawa mix and give a stir. Mixture should be little watery kind at this point. Keep aside for 5 to 10 minutes so that batter will become thick now due to soaking of all the moisture by rawa.

-If batter is too thick you can add little more curds and adjust the consistency. It should be like idly batter and consistency should be little thick.

pic 4   pic 6

-Keep Appam or Paddu tawa, when it is hot keep it in a simmer, pour ½ tsp of ghee to every hole and pour the required amount of ready batter.

pic 5  pic 8

-Close the lid, cook for a while. Then flip and cook other side as well and then serve either as it is or with any chutney.

Note:

-Here I have used little millet idly rawa, you can use any millet rawa as well.

-If you don’t have access to millet rawa, you can use only rawa too.

– Here I have used Uppittu rawa/plain semolina/Bombay rawa.

-I did seasoning part on previous night and kept it aside for cooling. So that, morning it will be easy to mix and proceed to make Paddu.

-You can make this rawa mix and store it for a future use.

Pumpkin Tawa Fry

Two years back I had a pumpkin vine in my kitchen garden. We enjoyed so many delicacies from its flower and we used to love the  tawa fry of the flowers a lot. Even now my daughter remembers the taste of it and asks me to make them. Last week she asked me to try pumpkin tawa fry, instead of the flower and it turned out to be absolutely delicious and she was happy too. It is a blend of all kinds of flavours, the sweetness and hing combine to make it a great side dish.

pumpkin-tawa-fry

Here I have used green colored young pumpkin –

Ingredient:

Pumpkin slices – 20

For marinating:

Salt – 1 teaspoon

Hing – ¼ tsp

Red chilli powder – ½ tsp

Outer cover:

Chiroti /fine rawa – 3 table spoon

Rice flour – 2 teaspoon

Powdered Hing – ½ tsp

Salt – to taste

Red chilli powder – 1 tsp

Turmeric – ½ teaspoon

Coconut oil – 3 -4 table spoon.

Method:

  • Slice pumpkin into ¼ “thickness, with outer skin intact.

pic-1

  • Put marinating ingredient and mix this and keep aside for 1 to 2 hours.
pic-3
Rawa coated pumpkin pieces
  • Take one bowl: mix all the ingredients under outer cover- rawa, salt, rice flour, hing, red chilli powder, turmeric – and mix without adding water.
  • Whenever you are ready to make it, heat iron Dosa griddle, dip each piece in the rawa mix, coat both the side nicely and keep them for frying on the hot iron griddle.
  • Roast both the sides by applying sufficient coconut oil.

pic-9

  • It can be served as an appetizer or side dish for a South Indian lunch.

-Hope you will like the dish as much as we did 🙂

Have a nice day! Cant wait to put up more dishes for you 😀

P.S: If any of my ideas inspire you to create something on the similar lines, I would feel highly flattered. But please, do respect the effort I take in conceptualizing and executing, please give a direct link to my work when you are inspired by mine. Thanks for understanding 🙂