Homemade Pumpkin Puree/Preserve:

Pumpkin is usually considered as fall / Winter vegetable even though it grows all year round without any issues. Pumpkin vine needs least attention compared to growing other vegetables. It is low in calories, high in anti-oxidants, Vitamins, minerals as well as high on natural source of Beta carotene.

I normally make use of pumpkin in many forms and one such form is Pumpkin Puree. When home grown, organic pumpkin is available, it is an awesome way to store the goodness and use it as needed in your cooking from making pastas to baking.

Usually puree can be made by using two methods. Either on stove top or by baking. I normally prefer stove top method. In this method, I don’t even remove the outer skin. In this way, we can retain the added goodness.

How I make is –

Ingredients;

Pumpkin – 1 kg

Water – 1 cup

Method:

-Wash pumpkin, remove inner core and seed part.

-Chop pumpkins into bite size pieces.

-Take one tawa, spread all the pieces and sprinkle water and cook those pieces until done.

-When pumpkin pieces are well cooked, water also evaporates.

-Cool and grind this into puree.

-Store this in a freezer by putting it in an air tight container and use whenever it is needed.

Pumpkin/Cheenikayi Kalasu:

Pumpkin Kalasu is a traditional recipe of our community. It is a semi solid, sweetish coconut based curry, which goes very well with hot rice or Chapati.

Usually we use tender, greenish sweet pumpkin for this curry, paired with white Kabuli chana.

Ingredients:

Green sweet pumpkin – ½

White chana – 1 cup

Coconut – 1 bowl

Cumin – 1 tsp

Red chilli – 1 to 2

Salt

Jaggery

Red chilli powder – ½ tsp

Seasoning:

Coconut oil – 1 tsp

Mustard – 1 tsp

Red chilli – 1

Curry leaves – 1 string

Method:

  • Soak white chana for 7 to 8 hours or overnight.
  • Cut pumpkin into half; remove inner soft pith and seed. Chop this into small pieces with skin intact.
  • Wash soaked chana, put fresh water and cook in a pressure cooker for 3 whistles.

  • When pressure relieves, open the lid and add chopped pumpkin, salt, red chilli powder and jaggery. If needed add little more water and cook until pumpkin is done.
  • Now grind coconut, cumin and red chilli into fine paste by adding required amount of water.
  • Add this masala to cooked veggie. Adjust the consistency by adding water. Consistency should be semi solid. Boil this and add seasoning.
  • For seasoning heat coconut oil, mustard, red chilli and curry leaves.
  • Enjoy this curry with hot rice or Chapati.


Massoppu by using Anne Soppu / Water spinach:

Massoppu is nothing but mashed greens with cooked lentils, which is the staple food of Bangalore- Mysore region and is an excellent accompaniment with either Ragi balls or rice. Usually Massoppu is prepared with mixed greens, which is available throughout the year.

We all know the fact that leafy greens are source of iron, calcium, vitamins, antioxidants and fibre and it is the best gift of nature.  Apart from the regular greens we sometimes find unique, seasonal, never seen greens with local soppu/ green vendors in the early morning hours, when they visit our locality. Only few people know the usage of local, seasonal edible greens which was consumed in rural India for centuries. These super foods are sold only in the hand pushed carts in our cities and sadly not at all available in modern super stores.

 Anne soppu comes under such category. After staying in Bangalore for 20 long years I had never seen this green and when I came across it this last week, asked my soppu vendor. He said, it is Anne soppu and is very tasty. Then comes my right hand, house help who grew up in rural Bangalore and knows every green which grows locally. She said, not only is it tasty, but also very nutritious.

According to her, Anne soppu grows wild, like a weed in between paddy or Finger millet/ Ragi fields during monsoon. It has long, arrow shaped leaves and crunchy, hollow stem which breaks very easily, while bending. It is known as Water spinach in English and Kalmi saag in West Bengal. Here is her recipe, which I made and relished and dedicating this post of mine to her.

How I proceeded with is –

Ingredients:

Toor dal – 1 cup

Anne soppu – 4 small bundles

Onion – 1

Garlic- 1 whole

Green chillies – 5 to 6

Tomatoes – 4

salt

For Seasoning –

Oil / ghee – 1 table spoon

Mustard – 1 tsp

Cumin – 1 tsp

Hing – ¼ tsp

Red chilli – 2

Curry leaves – 1 string

Method:

-Greens are like this-

-Clean the greens by discarding thick stem portions by hand.

-Wash and keep aside.

-Wash toor dal, chop onions, tomatoes.

-Take one pressure cooker, shift washed dal and pour water till just above the dal.

-Now place tomatoes, green chillies, onion, garlic, washed greens, salt and cook for 2 to 3 whistles.

-When pressure relieves, churn roughly in a hand blender or hand-held churner.

-Adjust the consistency of dal by adding water and adjust the salt and boil once.


-Now do seasoning by heating oil or ghee, splutter mustard, cumin, hing, red chilli and curry leaves and pour over boiled dal.

-Enjoy with hot rice and raw onions or with any sort of papads or tawa fries like me 😊


Thambittu Unde / Brown Rice Laddu:

Brown rice laddu is also known as “Thambittu unde” in our coastal region of Karnataka. It is an age-old recipe of my aunt’s family. This tasty laddu is very dear to my heart, which I used to relish whenever I visited my maternal uncles place.

Brown rice, also known as boiled rice/matta rice/Kerala rice is very healthy and packed with many nutrients, at the same time it is gluten free and you can have it without any hesitation. It requires very minimum ingredients but tastes heavenly.

Now we will see the procedure –

Ingredients:

Brown rice /matta rice – 500 grams.

Fresh Coconut – 1 (grated)

Jaggery – 500 grams (used organic, hence the colour is dark)

Ghee – 50 -100 ml

Cardamom powder – 1 tsp.

Cashew bits – ½ to 1 cup

Method:

-Wash rice once or twice, drain completely and Spread this on a clean cloth and let it air dry. It takes one to two hours. After one to two hours, check the moisture.

-If it is completely dry while handling, it is ready to use.

-Heat one thick bottomed wok/vessel, add dried rice little by little and roast, it will pop a little and texture will become brittle and little puffy.

-Do this procedure in 3 to 4 batches and cool.

-When it cools down, make powder either in a mixer jar or nearby flour mill. Sieve this powder and keep aside.

-Now dry roast grated coconut until it emits fragrance. Keep aside. (you can use mixer jar and pulse once or twice to get uniform tiny gratings. This would help in uniform roasting)

-Boil jaggery by putting one cup of water. When it melts sieve this solution to remove any impurities.

-Take this liquid and boil further till it reaches one thread consistency. At this stage you will hear “Tup” “Tup” bubbling sound too (this is the clue which I have received from the elders)

-When it reaches one thread consistency, mix in roasted coconut gratings, ghee, roasted cashew bits, rice powder and cardamom powder.

-Mix nicely. At this stage mixture will be too wet to handle. So, keep aside for half to one hour, till mixture becomes little dry and ready to handle.

-When you feel it is ready, take a small amount in a hand and make laddu and keep aside.

-When all the mixture gets over and you have finished the process, store these laddu’s in an airtight container. This laddu stays good for long even in room temperature.


Chapati Roll /Kati roll (with White Chana):

Rolls are very easy to have, when you are on the move. Kati roll is a generic name for any kind of rolls. This is a famous Indian street food, which is originated from Calcutta.  in its original form, Skewer roasted kebab was placed and wrapped with a roti. Over the years, many variants have evolved and any filling either veg or non-veg all of which now comes under this category and called as Kati roll with the name of the filling attached with it. Hence, we can call this roll as Chana Kati roll 😉

It is another easy, healthy, nutritious and tasty recipe. This recipe is well balanced with the required amount of carbohydrate, protein, fiber and fat. Easy to prepare and eat for busy people and for school going kids. Here I have used Sweet Potato roti to enhance the nutrition. You can use plain roti as well.

Ingredients:

Ready Roti’s – 6 to 8 (sweet potato roti or plain roti)

For the filling:

White chick peas/Kabuli chana – 1 cup

Onion – 1 (chopped)

Tomato – 1 Chopped

Ginger garlic paste – 1 tsp.

Cumin seeds -1 tsp

Red chilli powder – 1 tsp.

Cumin powder – ½ tsp.

Garam masala – ½ tsp.

Coconut milk powder – 3 tsp. (I use Maggi coconut milk powder)

Turmeric powder – ¼ tsp.

salt to taste

 Oil – 1Tblsp.

For the topping:

 Onion chopped – ½

Coriander leaves- chopped

Salt pinch

Lemon – half

Method:

-Soak Chana at night or 7 to 8 hours. Cook with salt and required amount of water. Drain and keep aside.

Now to prepare the stuffing:

Take one Tawa and put 2 tsp. of oil, cumin and chopped onion. Sauté till it is done. Sprinkle little turmeric, add ginger garlic paste, fry till raw smell disappears.

-Now add tomato, and all the powders (red chilli, garam masala, cumin, salt), add cooked chana, coconut milk powder and sprinkle water (2 to 3 tbsps.)

-Mash a little and when it starts boiling and masala coats well, remove from the flame.

How to assemble:

-Mix all the ingredients from the Topping together (onion, chopped coriander leaves, salt, lemon juice) and keep the mixture aside.

-I normally make little bigger, elongated Roti’s (not round) for rolls.

-When Roti, Filling mixture, everything becomes cool, take one aluminium foil and keep one Roti over it.

-Spread the prepared Chana at one end, sprinkle onion topping.

-Now comes the folding part. You can roll in two methods.

-One is straight away, roll and both the ends can be sealed by folding aluminium foil.


-Second method is, Fold at each end of the roti, then roll like a mat.

-In this way, roll is automatically sealed by itself and here you can avoid usage of an Aluminium foil and can carry directly in a Lunch box.


Sweet Potato Roti / Chapati:

Today I am going to share one among my family’s favourite dishes, Sweet potato Parata/ roti. Sweet potato is a large starch, tuberous root vegetable. This tuber is not only readily available and very versatile but also contains vitamin B6, Vitamin C, Vitamin D, minerals like magnesium, iron and potassium along with beta carotene. When It is home grown, the joy doubles. It is an awesome tiffin box option for school going kids as well. I normally use these roti’s for preparing rolls, which stays fresh, soft for longer duration and enhances the taste of the roll with its natural sweetness. 

Ingredient:

Sweet potato – 2

Whole wheat powder – as needed

Kalonji / Onion Seed – 1 Tsp.

Milk – ½ cup

Oil – 2tsp

Salt – to taste

Method:

  • Boil sweet potato, remove skin and mash the flesh in a bowl or a food processor.

  • To this add onion seed, salt, milk, oil, along with whole wheat powder by adding little by little water prepare dough.
  • Take enough dough and prepare roti, just like our regular roti.

      Note: You can add flaxseed powder while making dough to enhance the nutritional value of this Roti.

Vegetable Pulav (Bangalore Style):

Vegetable Pulav is very versatile and made in many ways. Each house or family has their own favourite recipes. But this one is found in any small darshini or small eateries in Bangalore. It is a native Bangalore style Pulav which is green in colour due to the usage of Pudina and coriander leaves. It is fried with onion and other masalas and ground to paste. Selection of the vegetable is also unique. With other vegetables, Knol khol, double beans as an added attraction, when compared to normal Pulav. Added to all this, we find deep fried bread croutons.  

Ingredients:

Basmati rice – 3 cups (small steel tumbler)

Beans – 10

Carrot – 1

Knol khol – 2

Green peas – ¾ cup

Double beans – ¾ cup

Lemon – 1

Bread slices – 3

For Masala: (please refer the picture)

Oil – 2 table spoons

Cinnamon – 4 to 5 small pieces

Clove – 4

Cardamom – 2

Black pepper – 10 to 15

Cumin – 1 table spoon

Onion – 2 (medium)

Green chillies – 5 to 8

Ginger – 2-inch piece

Garlic – 12 to 14

Mint / Pudina leaves – 1 fist full

Coriander leaves – 1 fist full

Fresh Coconut – 1 small cup

Seasoning:

Oil – 8 to 10 table spoons

Cumin – 1 tea spoon

Bay leaves – 3 half pieces

Marathi moggu – 2

Star anise – 2

Method:

-Wash rice a couple of times, soak and keep aside.

-Wash pudina, coriander leaves, Chop veggies, onions etc. If you are adding double beans and green Peas keep it ready.

-Now prepare ground masala: Take everything under masala and keep it ready by washing or chopping.

-Take one wok, heat oil, drop all the dry spices from cinnamon to cumin.

-Fry onions, garlic, ginger, green chillies when onion becomes transparent add pudina and coriander.

-Fry until it wilts. Add coconut and fry for 2 minutes and switch off the gas.

-Cool, grind into paste by adding very minimum water. Keep aside.

-Now we would move towards the main preparation. It is the time to drain the soaking rice.

-Take one pressure cooker, pour oil for the seasoning, drop all the dry spices from cumin to star anise, fry for 2 minutes.

-Now put all the veggies, green peas, double beans and fry nicely until raw smell vanishes and all the pieces coats with the oil.

-Next comes the turn of adding ground green masala and salt. Fry nicely and lastly add drained rice and fry for couple of minutes.

-Add water (I normally add 1: 2 for Basmati rice or Sona masuri rice) If you are using small grain (Jeera rice) Use 1: 1 ½ ratio for water. Here 1 is rice and 2 or 1 ½ is water.

-Use rice measured cup for water measurement.

-Check for salt and squeeze lemon and close the lid. Cook for 1 whistle and keep it in a simmer for 2 to 3 minutes.

-During this time, we can prepare bread croutons. Usually bread pieces will be deep fried, drained and added.

But, I normally avoid deep frying and make it like this.

-Take one tawa, drop couple of spoons of ghee or oil, when it is hot, drop the bread pieces and fry for 2 to 4 minutes, until all the bread pieces coats partially and half roasted.

-Now switch off the gas, spread those bread pieces in a baking dish, bake for 20 minutes or until it is crisp in a pre-heated oven or convection microwave at 170-degree C.

-When Pressure relieves, open the cooker lid and mix in bread croutons and mix well. Close the lid and leave for some time to soak all these bread pieces to absorb the aroma.

-Then serve with Onion raita at the side.


Spinach Surprise- Pasta with Spinach and Paneer

 Spinach Surprise is an Italian Pasta dish, which I prepare for my daughters and it is one of their favourite pasta dishes, which is a one pot filling, healthy meal.

 In this dish, I normally put 3 layers and then bake it and serve with seasoned bread or garlic bread.

In this, first layer would comprise of spinach pockets, with seasoned paneer filling.

Second layer is Pasta with white sauce and third and final layer is Grated cheese mixed with bread crumbs and a dollop of butter here and there. After baking, I normally serve this with seasoned bread or garlic bread with some tossed and seasoned veggies at the side.

It is a wholesome homemade pasta and comparatively low in calorie as well.

We will see, how I prepare-

Ingredients:

 For 1st layer / Spinach pockets with Paneer filling:

Large spinach leaves – 20 -22

Paneer/Cottage cheese – 100 grams, grated
Butter – 1 – 2 tsp
Onion – 1 small
Green Chilli – 2, minced
Red Chilli flakes – 1/4 tsp
Salt to taste

For 2nd Layer / Pasta in White sauce:

Pasta – 1 cup
Butter – 2 tbsp
whole wheat flour – 2 – 4 Tbsp
Milk – 2 – 4 cups

Grated cheese – 2 table spoons
Garlic salt (if you don’t have garlic salt, add chopped garlic and salt)

Oregano

Red chilli flakes

If u want to add any vegetables, you can add, or you can make only white sauce as well.

For 3rd and Final layer:

Bread crumbs – 2 table spoons

Grated cheese – 4 table spoons

Method:

For the 1 st layer / Spinach pockets with Paneer filling:

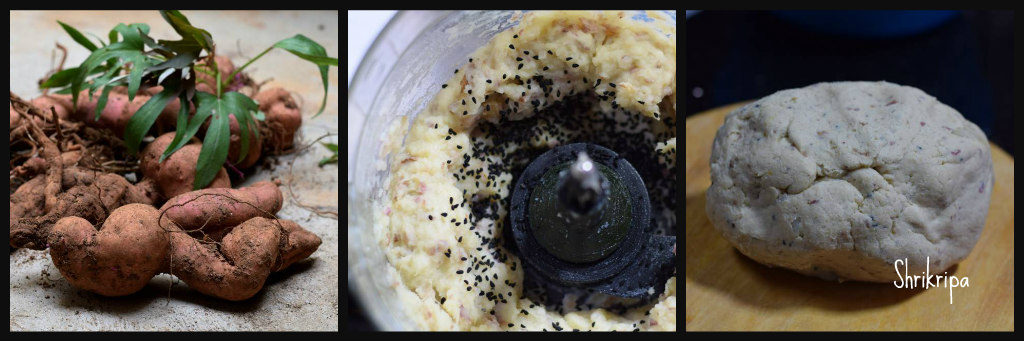
-Blanch spinach in boiling water, drain, pass through cold tap water and keep aside.

-Grate paneer, chop onion, green chillies.

– Take one tawa, heat butter, fry onion, green chilli, sprinkle some garlic salt, chilli flakes and switch off. Mix in grated paneer.

-Fill this mixture in spinach leaves, fold or roll like a mat and make a pocket.

-Place all this ready paneer filled spinach pockets in a baking dish.

For 2nd Layer / Pasta in White sauce:

-Cook pasta in enough water, drain and keep it ready.

-Take one tawa, melt butter over low flame, fry whole wheat flour until it turns light brown.

-Switch off the gas, add milk slowly while stirring and make a uniform mixture.

-Heat this mixture and boil. When it reaches the required consistency, add in cooked and drained pasta, garlic salt, oregano, red chilli flakes and grated cheese.

-Pour this over spinach pockets and it is our 2nd layer.

-While pouring, it should be little runny, after baking, it would turn out perfect.

Now comes the 3rd and Final layer:

-Mix grated cheese, bread crumbs and sprinkle all over. It should cover uniformly.

-Sprinkle a dollop of butter here and there (I have grated cold butter)

Bake this in a pre-heated oven for 10 – 15 minutes at 180 °C or until light brown and serve as it is or with seasoned bread toast.

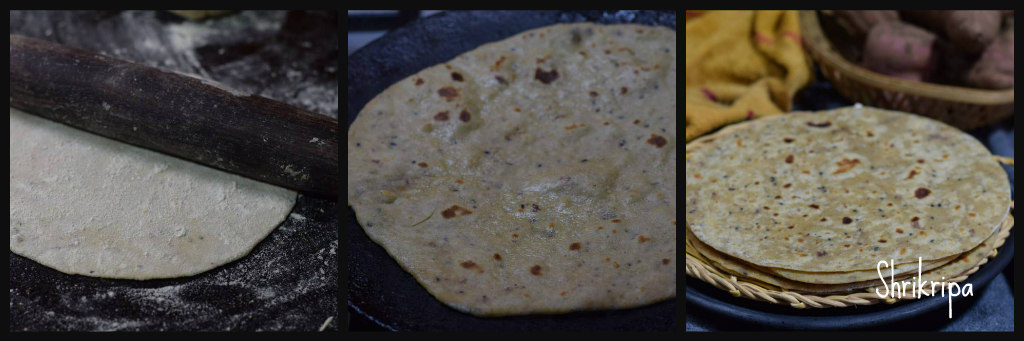
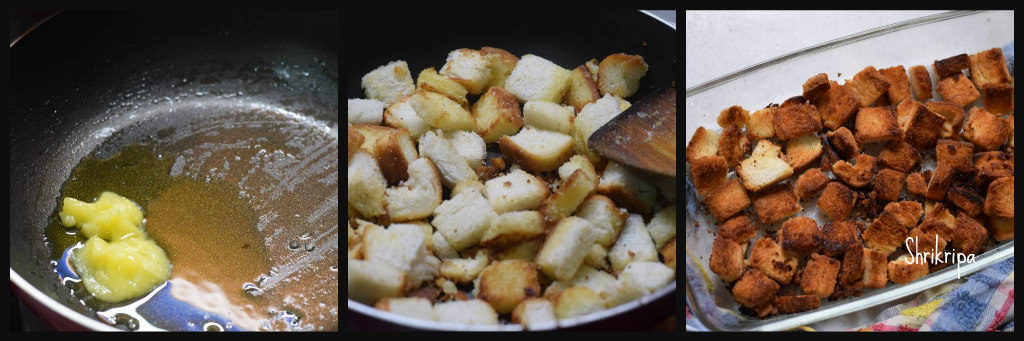
How to season a bread:

-Mix one table spoon of butter, one to two table spoons of Hot and sweet tomato sauce or ketch up, 1 tea spoon of oregano.

-Apply this mixture over sliced bread and bake this in a pre heated oven for 5 minutes or roast it on a hot tawa on a stove top.

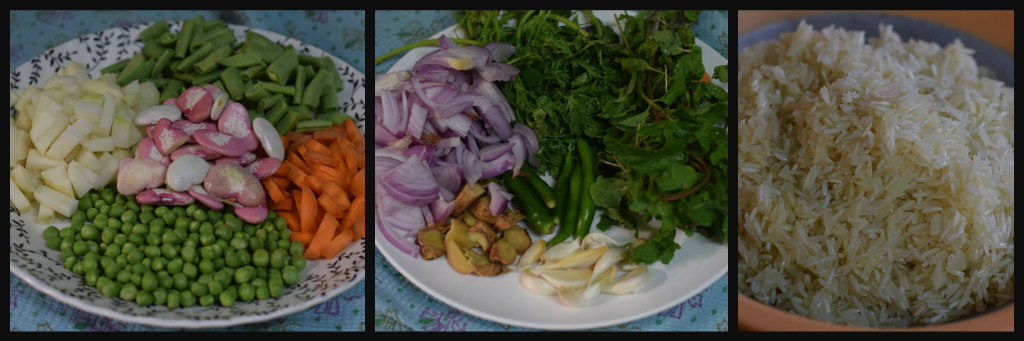
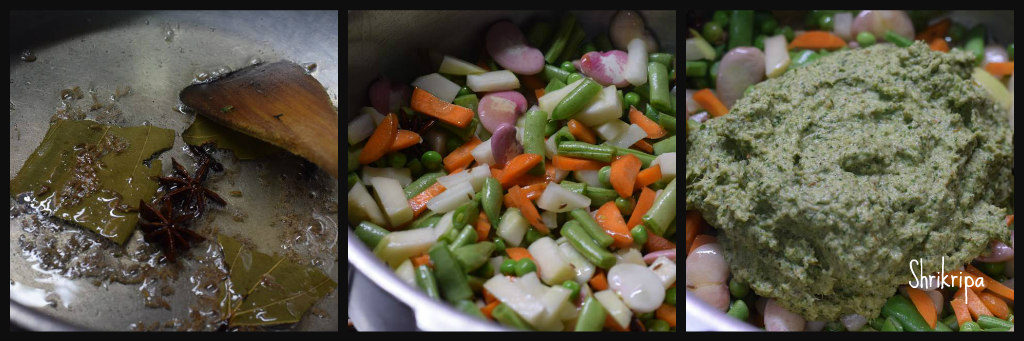
How to make tossed vegetable side dish:

-Take whatever vegetables you want to include. Dice one onion.

-Blanch beans and drain.

-Now take one tawa, heat some olive oil, drop onions fry for a while.

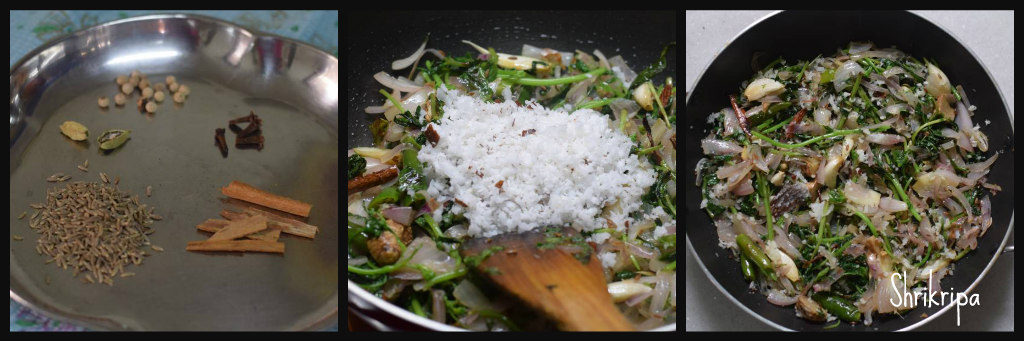
-Now add all the veggies (I have taken beans, carrots, zucchini, winged beans) and toss for a couple of minutes.

-Add seasoning like garlic salt, red chilli flakes and oregano and serve.