Peek a Boo “Baked Gulab Jamun cheese cake”:

Long ago, I mean in and around 2015 I tried the No bake cheese cake with hidden Jamun inside on the event of my hubby’s birthday. I was wondering what to make, and I thought, why not a mix of what he likes? He loves Badam milk and Gulab jamun; so, I thought of combining these two flavours and made a jamun cheese cake and he did wonder about the flavour. The upper layer of almond milk flavour went well with the Gulab jamun and the cheese cake was a very big hit! At that time, my recipes used to publish on Readoo and you can see it over here.

Today, we are celebrating our 20th year of marriage as well as 2nd year of my blogging. So, I thought of improvising my idea and went ahead with the same flavour but baked version as well as non-baked top layer.

To mark the occasion, I made my signature cheese cake flavour with a little additional twist and here is the recipe-

Ingredients:

For the first layer (Crust):

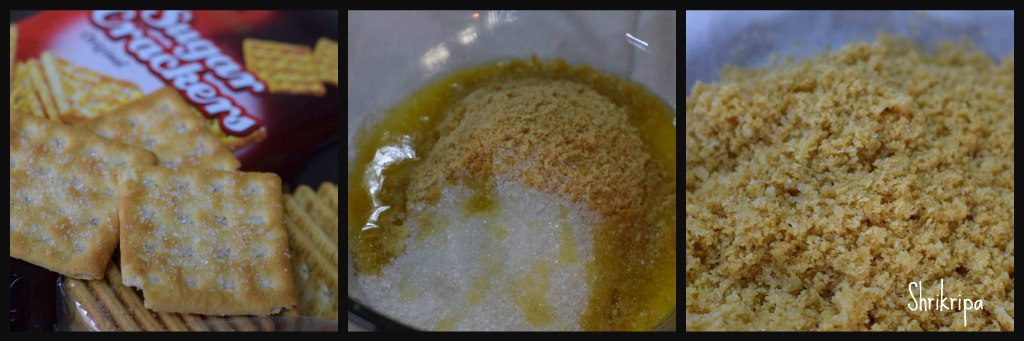
Choice of any crackers biscuits – 1 ½ cup to 2 cups (powdered)

Sugar – 5 to 6 table spoons

Melted butter – 1/3 cup

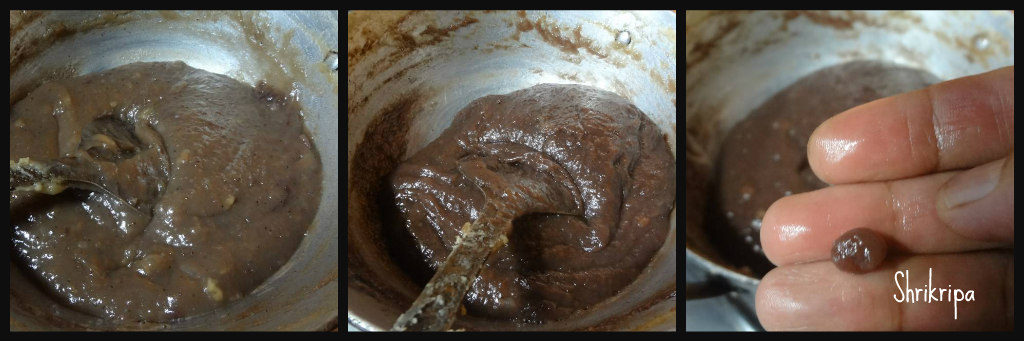
Gulab Jamuns – Dried (sugar syrup removed)

Method:

-Pre- heat oven at 165°C

-Combine all the ingredients from biscuits powder, sugar and melted butter. It becomes like a wet crumb.

-Take a 9 to 10” spring-form baking dish, press this crumb at the base by using any one of your measuring cups.

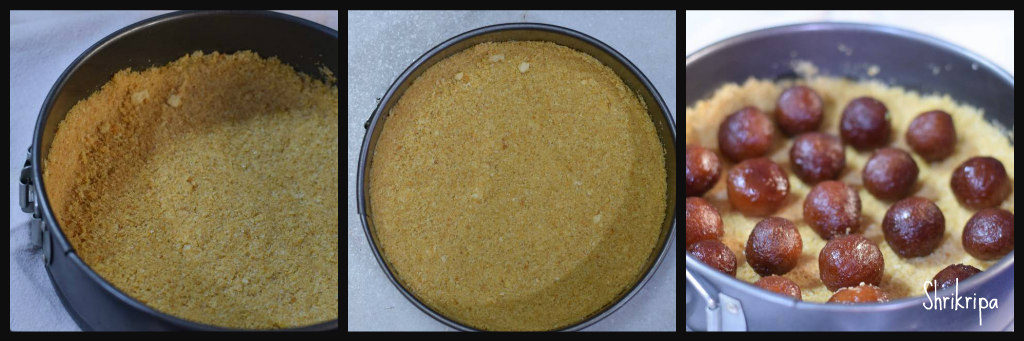
-Crumb should be slightly above the base at the edges.

-Before heading towards the second layer, arrange all the Gulab jamuns according to your wish.

For the second layer (Filling):

Cream cheese – 3 tubs (238 grams or 250 grams)

Sugar – 1 ½ cup

Eggs – 4 (separated)

Lemon juice – 1 table spoon

Vanilla extract – 1 tea spoon

Method:

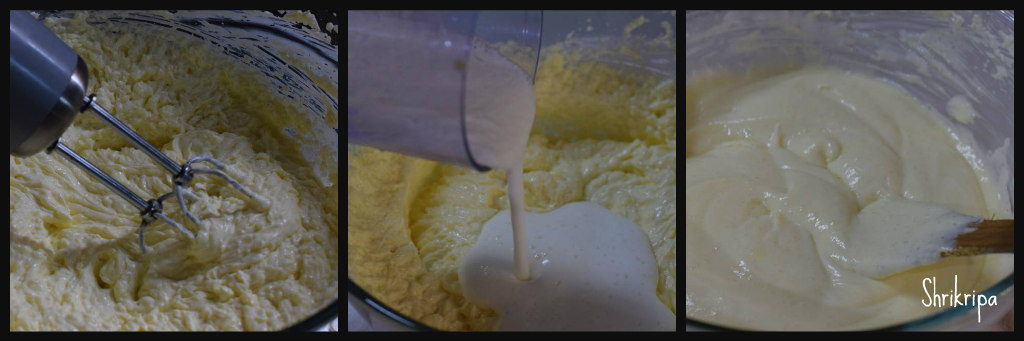
-Mix together Cream cheese, sugar, 4 egg yolks, lemon juice and vanilla.

-In another bowl, beat 4 egg whites until frothy and little stiff as well as creamy.

-Fold egg white with cream cheese and pour the mixture over the first layer/Gulab jamun layer.

-Bake for 45 minutes to 1 hour or until done, in a preheated oven at 165°C.

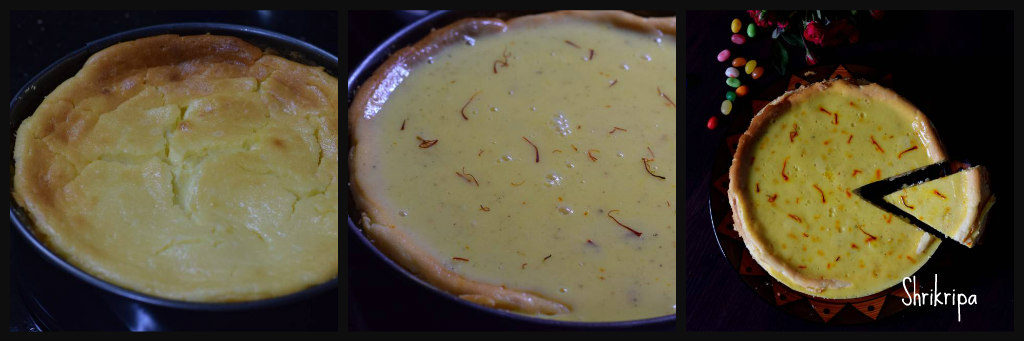
-When it is done, you will find a raised dome like a structure and 2 to 3 slits at the centre. After switching off the oven, leave the cake inside the oven at least for an hour with the oven door closed.

-After an hour, remove it and chill in the refrigerator by enclosing it in cling wrap, if you are not adding the 3rd layer immediately or proceed for a third layer.

For the 3rd Layer (Glaze):

Milk – 1 ¼ cup

-Veg gelatin -1 tsp

Badam milk – 4 tsps

Custard powder – 1 tsp (vanilla flavour)

Saffron strands – generous amount

Method:

-Dissolve gelatin in ¼ cup of milk.

-Dissolve custard powder, Badam milk powder and add saffron to one cup of milk and start heating.

-When it is hot, add in gelatin added milk and boil for 2 minutes.

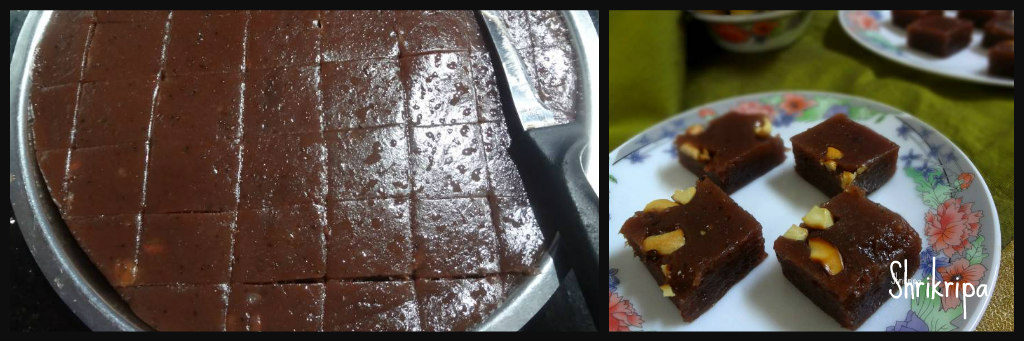
-Pour the mixture over the ready cooled cake. When it is set and becomes cool, cover the cling wrap and keep it a refrigerator to cool.

-It needs at least an overnight or 8 hours of cooling. I kept it for 20 hours. It tasted as I was expecting and loved the outcome and it surely made my special day a memorable one.


Chole Bhature (Chana Bhatura) and Alu subzi:

Do I need to introduce every one’s favourite dish? It is basically a deep-fried bread with the fermented / proofed flour dough which Is served with semi dried chick pea curry and potato dry Subzi. This is how we eat or were introduced to this loved-by-all dish.

To prepare we need –

For Chole:

Ingredients:

Chana / white chickpea – 1 cup (soaked and swelled)

Black salt – 1 table spoon

Amla powder / Anardana powder – 1 tea spoon

Oil – 1 table spoon

Ghee – 1 table spoon + 1 tea spoon

Onion – 1 (chopped)

Green chilli – 1 (slit)

Ginger – ½ inch (sliced)

Garlic – 4 (crushed)

Tomatoes – 2 (chopped)

Turmeric – 1 ½ tea spoon

Red chilli powder – 1 tea spoon

Coriander powder – 2 tea spoons

Cumin powder – 1 tea spoon

Garam masala – 1 ½ tea spoon

Kasuri methi – 1 table spoon

Salt

Coriander leaves – chopped

Method:

-Cook soaked chana with enough water, black salt and amla powder. It would take any where between 5 to 6 whistles in the pressure cooker.

-Take one tawa, Heat oil and 1 table spoon of ghee. Add onion, green chilli, garlic and ginger fry until it is transparent and light brown.

-Add in all the masalas, from turmeric to Kasuri methi and salt fry for a while. Add tomato, continue frying until tomato wilts. If needed sprinkle some cooked water from the chana and cook tomato well.

-Cool this mixture and grind this into a smooth paste by adding ladle of cooked chana as well. (it would help gravy to thicken)

-Now mix in this paste with cooked chana and start boiling until oil oozes out and garnish with chopped coriander leaves and 1 tea spoon of ghee.

 Now we will move towards Bhature / Bhatura :

Ingredients:

Whole wheat – 2 ½ cups

Maida – 1 cup

Chiroti Rava – 1 cup

Curd – ½ cup

Water – ½ cup

Salt

Sugar – 1 tea spoon

Yeast – 1 tea spoon

Oil – 2 tea spoons

Method:

-Take Luke warm water- mix in curd, sugar, salt and yeast. Close the lid and wait until it proofs and bubbles.

-Dry mix all the flours or you can take only Maida as well. Make a dough by using yeast water and apply an oil and keep aside for 2 to 3 hours or until doubles the volume.

-When it is ready or time to serve, roll a small disc and deep fry.

Now one more dish, which is purely an optional item:

Alu Subzi / potato dry:

Ingredient:

Potatoes – 5 to 6

Mustard oil – 2 table spoons

Sun flower oil – 2 table spoons

Cumin – 1 tea spoon

Turmeric – ½ tsp

Coriander powder – 1 to 2 tsp

Red chilli powder – 1 to 2 tsps.

Amchur powder – 1 tsp

Garam masala – 1 tsp

Little Subzi masala – 1 tsp (optional)

Sugar – 1 pinch

Salt

Coriander leaves – chopped (to garnish)

Method:

-Cook potato in pressure cooker for 1 whistle. Peel the skin and dice.

-Take one tawa, heat oil, cumin, diced potatoes, all the powders and fry until masala is coated and becomes little crispy.

Garnish with coriander greens.

For deep fried chillies and Onions :

I normally slit the chillies, put a drop of lemon and salt inside and marinate. While frying bhature, deep fry and serve.

Half the onion, slice width wise and separate the layers by hand and sprinkle some salt and chopped coriander.

While plating, place Bhature, chana , potato, little onions and one chilli and serve with love 😊


Lemon pickle with Green pepper corns and Mango ginger:

It is a plain, no masala pickle. You can feel the freshness of each ingredient in every bite. Taste of the pickle activates your taste buds and instantly uplifts the mood.  It is a perfect pair for plain curd rice, without even the added seasoning. It is very hard to explain the goodness of this pickle in words.

This pickle needs hardly any preparation. A cup of sea salt and couple of glasses of water. That is it.

Raw material can be mixed and matched according to the availability.

I had home grown Mango ginger rhizomes with me, hence added. It can be replaced by a plain, regular ginger and raw green pepper can be with chopped green chillies or small bird eye chillies.

When I saw these home-grown green peppers at my in-law’s place, I couldn’t resist and plucked some of the strings while returning. I used to love this pickle during my childhood and felt nostalgic by thinking about its taste. Wanted to introduce the same to my daughters and planned to prepare the same.

Green pepper corns are unripe pepper corns, which are berries. It has mild peppery flavour compared to black pepper. Pepper creepers are very common in our coastal houses. It will be seen hugging and climbing into either jack fruit tree or Areca tree.

We all know the goodness of pepper corns. If we mix this with Mango ginger and lemon, nothing like it. Mango ginger is known for its anti-oxidant and anti-inflammatory properties and lemon is for Vitamin C. It is an overall package of goodness which we feed to our body. 

This is how we normally prepare this pickle and it stays good for six months even without any refrigeration or added oil.

Ingredients:

Lemon – 12 -15

Green pepper corns – 10 -12 strings

Mango ginger – 100 – 150 grams

Salt – 1 cup

Water – 2 cups

Method:

-Wash, all the three raw materials. Dry and keep it ready by air drying or wiping on a clean cloth.

-Chop Lemon into 8 pieces, mango ginger rhizomes into bite size pieces and remove pepper corns from its stalk.

-Boil water, salt until you see a white salty layer at the sides of the vessel.

-Add lemon, mango ginger and pepper to boiling salt water, cook for 2 minutes or until lemon peel is slightly bent outwards or pepper corns turns little lighter in shade.

-Switch off the gas. Cool completely and store it in a clean, glass jar.

-Within 4 to 5 days, it will be ready to consume.


Steel cut Oats and lentil Dosa:

It is a no rice urad dal Dosa. I have used Steel cut oats  or broken Oats instead of rice and avoided rice fully in this batter. These oats are considered as cut pieces of original grain. It is healthy compared to quick cooking oats. It takes much longer time to cook but when it is soaked and ground, almost tastes like rice and you can’t figure out the difference. This is Gluten free, high in fibre, protein and iron. It is low in glycaemic index.

I have bought Kosh broken oats to try out my experiment and it is whole oat grains cut into smaller pieces. It looks like broken wheat. When it is cooked, tastes like our broken wheat with outer thick skin with nutty taste. Loaded with insoluble fibre which helps in our gut health as well. Because of its low glycaemic property, it is a very good option for diabetic people and its fibre level will help to keep them full for longer hours.

I have used my regular plain Dosa batter recipe. I simply avoided rice and added broken oats.

Ingredients:

Steel cut Oats – 2 cups

Urad dal – ½ cup

Methi – 1 tea spoon

Chana dal – 2 table spoons

Poha – 1 fist full (optional)

Salt

Method:

-Wash oats, urad dal, methi, chana dal twice and soak this with poha (if you are using) for 3 to 4 hours.

-Grind this soaked ingredient by adding soaked water little by little with added salt.

-Ferment this batter over night or 8 to 10 hours according to the climatic condition.

-When it is ready, mix nicely, adjust the consistency of the batter and start making dosas by heating iron griddle.

-Take one ladle spoon of batter, spread into thin Dosa, pour oil or ghee and roast on one side, then flip and cook the other side, remove and serve with chutney or sambar.

Eggless- Gluten free -Almond and Pista Cookies:

This Diwali, I tried to make some variations in egg-less Indian cookie, which is known as Nankatai. It is basically egg-less and has no usage of baking soda or powder in it. It is very old, home style traditional recipe. I wanted to try out Green gram flour in baking and tried a very basic recipe. In India, we normally don’t use eggs in the festival time.

Ingredients:

Green gram flour / moong dal flour – 1 cup

Butter – 100 grams

Sugar – ½ cup

Almond bits – ¼ cup

Pista bits – ¼ cup

Cardamom powder – ½ tsp

Method:

-Beat butter and sugar until fluffy and soft, either by using hand or Food processor.

-Now add Cardamom powder and beat one more time until it is mixed.

-Now add flour and mix until u gets uniform mass. Add in Pista and almonds and make a dough.

-Now take one cling film sheet and keep this dough over it, on a flat surface and make squarish or round log, maintain uniform shape and cover with wrapping. Keep it under refrigeration for an hour.

-Now take your baking tray and line with a butter paper.

-After one hour, remove this dough from the fridge and unwrap the Clingfilm cover, make slices of ½” thickness and arrange these pieces in a lined baking tray.

– Bake in a pre-heated oven at 170°C for 14 to 18 minutes.

-This cookie is totally gluten free, hence initially it would be very fragile, and will be firm after it comes to room temperature.

-Cool this on a wire rack and store this in an airtight container.

-My family just loved it and hope you also like it as much as we did.


Gujiya / Dry fruits Karanji/ Karjikai:

Deepavali aka Diwali is an important festival of India and is spread between three days. Indian festivals are incomplete without sweets and savouries. In India, each festival has its own significance in celebration as well as its menu. Gujiya is one of them and has a very important role during Diwali.

Gujiya is a deep-fried flour-based delicacy, with different fillings in different regions. It is known by a different name in each region. Outer cover will be the same and inner stuffing varies from Rava – sugar, coconut – jaggery, coconut – sugar, mawa (milk solids) with dry fruits or with only dry fruits are traditionally seen. Nowadays you get to see so many variations from chocolate to cheese filling as well as baked version.

In North India, after frying the Gujiya, they usually dip it in a sugar syrup and outer cover would be wet and shiny. In south India, we normally deep fry and serve as it is and it’s known as Karanji / Karjikai.

I used to follow Chef Sanjeev Kapoor and learnt so many recipes from him and this is one such recipe. Over the years, I tweaked it a little and adjusted it according to our taste and it has one added advantage of longer shelf life, due to the usage of milkmaid instead of khoya.

Ingredients:

For the outer cover / shell:

All-purpose flour – 2 ½ cups

Salt – ¼ tsp

Ghee – 6 table spoons

Water – As needed (normal water)

Oil – for Deep frying

For the stuffing /filling:

Desiccated coconut – 200 grams

Semolina – 2 table spoons

Almonds – ¼ cup

Cashew – ¼ cup

Raisin – ¼ cup

Cardamom – 1 tsp

Condensed milk – 1 tin (400 grams)

Method:

For the outer cover-

-In a bowl, add flour and pour ghee. Rub the ghee and flour by using your hand for 5 to 10 minutes. 

-After a while, flour would resemble like a semi wet crumb.

-Now add required amount of water to make a firm dough.

-Cover the dough with wet cloth and keep aside for half an hour.

Note: Dough approximately holds ½ cup of water.

In the meantime, prepare the stuffing –

-Roast semolina in a low flame, switch off the gas. Mix in all the other ingredients from almond to condensed milk.

-Keep it until mixture is non-sticky while touching. 

-Now comes the actual procedure. You can use three methods.

  1. Use Gujiya mould.

     2.Take a dough, roll into big thin circle, use cookie cutter to make small, uniform circle.

  1. Take little dough, make small poori like discs.

Here I have followed the third method.

This quantity has yielded 28 Gujiya.

-Divide the dough, make roundels, fill the stuffing, close into half.

-Dip your hand in water, now, start folding the edges from one corner and go on folding like a half diamond shape at regular intervals until you reach the other end.

-Keep this ready, stuffed, yet to fry Gujiya to air dry.

-Repeat the procedure and finish off the filling work.

-Heat the oil for deep frying in low temperature.

-When oil is hot, drop one by one Gujiya, fry in a low flame to get good results.

-When everything is fried and cooled, store it in an air tight container.

NOTE:

To get a perfect Gujiya – these points are very important. 

1- Rubbing the ghee + flour. 

2-Frying in a low fire 


Banana Halwa:

Banana or Plantain Halwa was an integral part of my childhood. Usually this Halwa is made by using Kerala big banana which is called as” Nendra variety” but in our home, we used to have lots of overripe bananas from our family farm. To finish off all those overripe small bananas (Kadali variety of Mangalore), amma used to make Halwa or Banana Preserve/ Berati all the time. It was a very regular sweet at our house hold. Today I will share this recipe to all our readers-      

Ingredients:

Over ripe banana – 22

Sugar – 1 bowl

Ghee – ½ to ¾ cup

Cashew nuts – 2 tbl sp.

Method:

-Put all the peeled bananas to mixer grinder and make a smooth paste. Measure this by using any bowl of your choice.

-If this paste is 3 cups in quantity take one cup of sugar in that same measurement cup. So, your ratio of banana paste and sugar will be 3:1.

-Fry cashew bits in a teaspoon of ghee and keep aside. Grease one plate with ghee and keep it ready.

-Take one thick bottomed kadai, put this paste and keep gas flame in a very low flame and cook for a while.

-When it changes its colour to milky white and then to a pale colour and when you smell the banana flavour in the air, add sugar and mix this in at a regular interval.

-Add ghee 2 table spoons at a time in-between while stirring. If you feel that the banana paste needs a little more ghee, add up to ¾ cup, some varieties of bananas need very less ghee and some need more.

-Now we will see, how we decide the quantity of ghee. While stirring if you feel that the mixture is a little dry and the bottom part becomes a little brown, keep adding it.

-If the ghee starts oozing at the sides, it is an indication to stop the addition of ghee.

-Now we will see how you know the doneness. It is very simple, keep on stirring until mixture leaves the sides of the kadai and ghee oozes out from the mixture.

-You can add cashew pieces at this stage or spread those pieces in a greased plate like me. After you are done with this, it is almost ready to shift to the plate.

-Before shifting I prefer to check, by taking one small peanut sized portion of the mixture and rolling it in-between your thumb and forefinger to make a small ball like structure. If it holds a ball like structure and does not stick to your finger, it is ready.

-Now remove from the flame, shift to a greased plate and pat this mixture evenly by using a flat, greased (apply some ghee) back of the spoon.

-Keep this aside for two or three hours to cool. Then cut this into the desired shape and store it in an airtight container.

-You can store this Halwa for a really long time (up to a month or two).


Homemade Corn flakes Mixture / Corn flakes Chiwda:

Corn flakes is nothing but maize flakes, which is flattened maize. Indian savouries are an integral part of any festivities. When Diwali festival is around the corner each one would think about what to make. When it is an easy and super fast savoury you need, nothing like it than this recipe. It is very handy, when you have time constraints but still want to make homemade stuff and enjoy.

Maize flakes or Corn flakes or flattened maize is available in almost all departmental stores.

Ingredients:

Maize / Corn flakes – 500 Grams

Oil – to deep fry

Tamarind powder or Amchur powder – 2 tsp.

Salt – to taste

Sugar powder – to sprinkle.

Seasoning:

Oil – 4 tbl sp

Peanuts – 4 tbl sp

Mustard- 2 tbl sp

Cumin- 1 tbl sp

Hing – 1 tsp

Curry leaves – 7 -8 springs

White sesame seeds – 2 tbl sp

Turmeric powder – 2 tsp

Green chillies – 3 -4 Chopped

Dry Coconut bits – 3 tbl sp

Coriander leaves – 3 tbl sp

Method:

-Deep fry maize flakes by putting little by little at hot oil and drain the excess oil and keep it ready.

– When it is ready, keep everything ready for seasoning.

– Chop green chillies, curry leaves, coriander leaves.

– Slice coconut and make bite size pieces.

-Make sugar powder and keep aside.

-Now take one big kadai, put oil. When it is hot add peanuts.

-When it is half done, add mustard. After it splutters go on adding Cumin, hing, curry leaves and green chillies one by one.

-When curry leaves become crisp add coconut bits and fry a little.

-Lastly add chopped coriander leaves and fry nicely until coconut bits becomes brown.

-Now add all the powders- turmeric, salt, tamarind and sugar.

-Switch off the gas, add deep fried corn flakes and mix thoroughly until it holds all the masalas.

– Don’t put lot of pressure while mixing, if you do so, crunchy flakes will break and will not hold the shape.

-After mixing, cool and store this in an airtight container. This stays good for one month or more.

Enjoy homemade crunchy munch with evening tea.