Antinunde /Dry fruit laddu with edible gum:

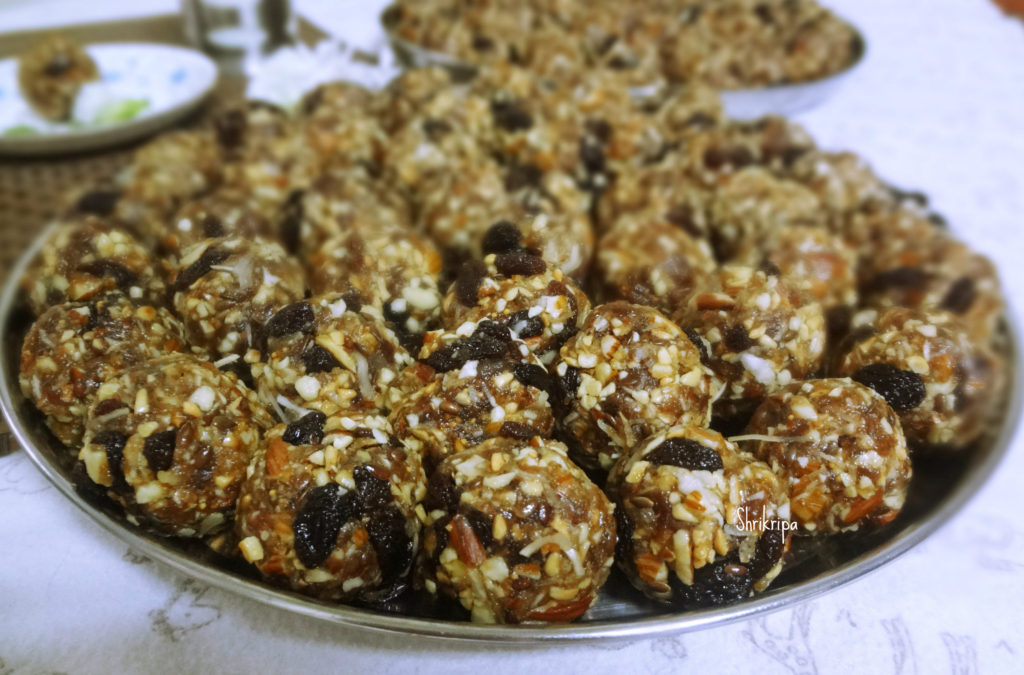
Antinunde aka dry fruits laddu with edible gum is a super food for everyone, especially new moms or girls in their puberty, especially after their first cycle of menstruation. I came to know about this super food through my close friend’s mom, Chandu aunty.

According to her, if you are using it for a girl, after her first cycle. Traditionally it is a practice that, 5th day onwards girl should consume a little amount of ghee, small piece of copra (which is dried coconut) followed by one dry fruit laddu and a cup of milk for continuous 48 days. It is believed that, all the combined nutrition of dry fruits, edible gum and milk will take care of her and retain the calcium, iron and much needed supplements through the natural form.

If you are using after delivery, for a new mom as a postpartum supplement, method will be slightly different and here we should take care of the new born baby’s health as well. In this case, lady should consume, 1 spoon of postpartum lehya (which is a mixture of so many ayurvedic natural medicines) followed with little ghee, piece of dry coconut, one laddu and a glass of milk from 11th day onwards until 3rd month. Initial 1 ½ months content of the sesame should be more (for example 1 cup) other than this one should use ½ tsp of ajwain as well and after 2nd half one should decrease the quantity of sesame to half and quantity of the dried dates and edible gum should be more to pass on the supplements to the baby as well.

Other than these two instances, one can enjoy these delicious laddu at any given point of time with a whole lot of goodness. I will show you how I prepare this for a regular use –

DSC08344_Fotor 1

Ingredients:

Dates – 300 grams

Almonds – 100 grams

Cashew – 50 grams

Raisins – 50 grams

Fig – 50 grams (optional)

Melon seeds – 50 grams (optional)

Flax seeds – 25 grams (optional)

Desiccated coconut – 50 grams

Edible gum – 40 to 50 grams

Jaggery – 100 grams

Saffron – 10 strings

Nutmeg – 1 pinch (grated)

Cloves – 4

Ghee – 2 to 3 table spoons

Method:

-Chop dates and dry grind this in a small jar of the mixer grinder.

-Chop almonds and cashews 

-Dry roast saffron then coconut powder for 3-4 minutes, till you get a nice aroma.

-Dry roast flax seed.

-Heat one teaspoon of ghee and fry one by one, cloves, almond, cashew, melon seed and raisins.

-Put one more teaspoon of ghee to same tawa, fry those edible gum crystals, until it pops up and becomes fluffy.

Ribbet collage 2

-Make powder of this by using mixer jar and keep aside.

-Lastly, fry those chopped or churned dates and add all these items together in a bowl and keep aside.

-Now take jaggery in a small vessel and take ½ a cup of water, boil and sieve this to remove any impurities.

-Put this sieved liquid in a thick tawa, in which we have fried all those dry fruits.

Ribbet collage 1

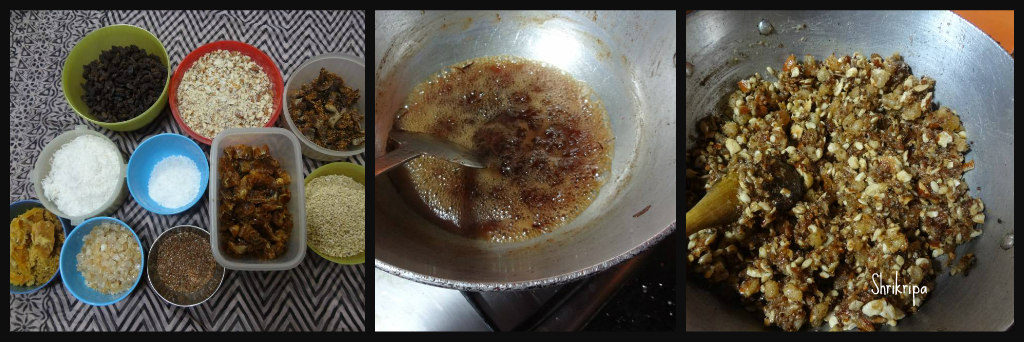
-Boil this until it reaches one thread consistency. Switch off the gas.

-Mix in all those fried items, nutmeg powder, saffron and mix nicely.

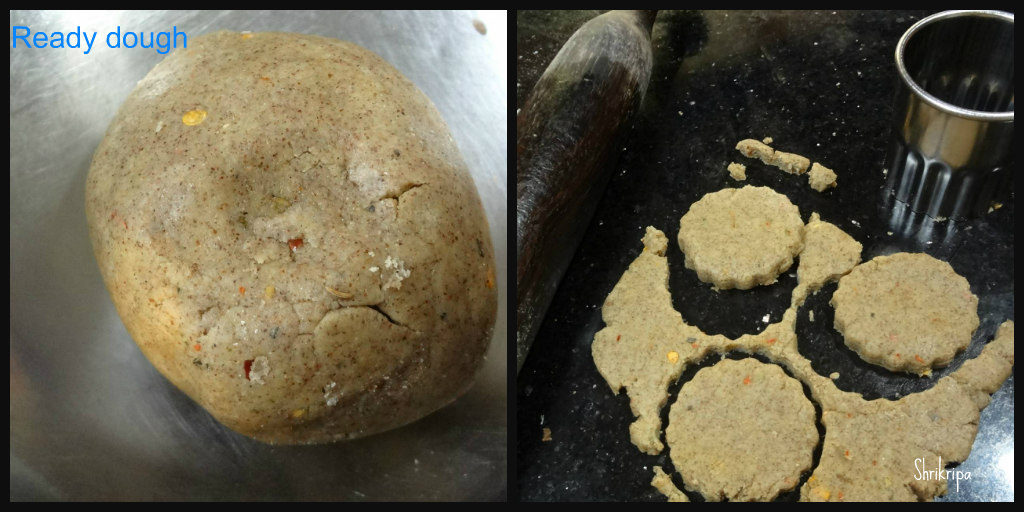
-Rub your hand with little ghee and start to make laddu’s. 

DSC08333_Fotor 2

-Eat one laddu a day and enjoy.

Note:

  • Ratio of dry fruits and jaggery is 600 Grams:150 grams. If Fig is added, you can reduce a little.
  • I normally use normal dates, traditionally they use dried dates.
  • Instead of dry coconut (copra) I have used desiccated coconut.
  • One can use palm jaggery while making it for a new mom or use palm jaggery half and regular jaggery half.
  • My kids don’t like either poppy seeds or sesame seeds, instead I have added Melon seeds and flax seeds.
  • I normally add sugar candy crystals to enhance the crunchiness.

Sambrani gadde Palya /Chinese potato stir fry:

Chinese potato is commonly known as koorka or kooka. These are tiny tubers, with deep brown skin, unlike potato. Otherwise, it looks like baby potatoes. It is a less known, neglected vegetable and tastes good with a very little seasoning or additives. It is high in nutritional value and carbohydrate.

Ingredients:

Chinese potato – ½ kg

Salt

Coconut oil – 2 teaspoons

Mustard seeds -1 teaspoon

Urad dal – 1 teaspoon

Hing – ¼ tsp

Dried Red chillies – 2

Curry leaves – 2 strings

Onion – 1/2 ( chopped)

Tamarind – 1/2 tsp (soak it in a tbl sp of water)

Turmeric – ½ teaspoon

Red chilli powder – 1 tsp

Jaggery – ½ teaspoon

Grated coconut – 2 tablespoons

Method:

-Soak Chinese potato for 20 minutes, it will help in cleaning as well as while peeling the outer skin.

-After washing, peel outer skin by scraping it and keep immerse in water. 

-Chop like a match stick and immerse it in water to avoid blackening. 

-Now take a thick vessel, add little water, turmeric, salt, jaggery and boil. Add drained kooka pieces and cook in low heat, until it is firm and soft.

-Now, proceed with the seasoning. Take one Kadai, heat  1 a spoon of coconut oil, splutter mustard, add urad dal, hing, broken red chillies, onion and fry for 2 min.

-Add cooked kooka, red chilli powder, little tamarind water, freshly grated coconut and fry for a while.

-Lastly, add 1 tsp of raw coconut oil, curry leaves, mix everything, close the lid and keep this for 2 to 5 min on a low flame. 

-Flavour of Raw coconut oil and curry leaves would give a nice aroma to this side dish. Enjoy hot rice and dhal topped with ghee.


Manni / Porridge-Initial Baby Food:

Regarding baby food lots and lots of notions are there. What to feed, when to start solids, which age is ideal etc. According to me, each situation or each baby is different than the other. In my condition, it was twin babies and almost 20 days pre-mature too.

With two babies, breast feeding was not sufficient, and I started this porridge in a very diluted form (For 200 ml of water, I used to use 1 tsp of powder) as early as 40 days of their birth. Yes, my father who is a doctor himself, advised me to start this instead of any packaged milk powder or cow’s milk. I used to feed them this a couple of times in a day (100ml at a time) as a top food to suffice their needs.

Jaggery is very good for infants and this is the only way they get their iron supplement, if they are on top food. This is what our paediatrician told me. According to her suggestion, I used to add tiny jaggery piece while preparing porridge.

When days passed by I did increased the quantity of porridge powder and when they became 4 to 5 months old, I started feeding them one small bowl of porridge by using spoon.

If you are raising your brows while reading this, Yes!!! My daughters are healthy grown up teenagers now. I personally never ever recommend readymade food over natural food.

How to Prepare Porridge Powder:

pic 1_Fotor

Ingredients:

Finger millet / Ragi – 500 gms

Whole wheat – 500 gms

Almonds- 100 gms

Method:

  • Clean Ragi and whole wheat by rinsing couple of times with water.
  • Drain water completely.
  • Spread this on a clean cloth and dry in the shade.
  • When it is dry, take little by little and dry roast for a couple of minutes to remove any remaining moisture.
  • You can use almond by roasting or without as well.
  • Cool this by spreading it again.
  • Take a mixer jar and powder it, sieve it and collect the fine powder and proceed.
  • Cool this and store this powder in an air tight container.
  • If you want to store this for too long, keep it in a fridge.

How to prepare porridge:

  • Take water according to your requirement, add powder and mix thoroughly.

Ribbet collage 2

  • If you are feeding for two to three-month-old, by using feeding bottle, take ½ to 1 tsp of powder,100 ml of water and boil. (adjust according to the requirement)
  • If you want a little thicker consistency, take 2 tsp of powder and 100 ml of water and boil.

Ribbet collage 3

  • Add jaggery or rock candy (kallu sakkare)
  • Boil this by stirring in a low flame, when it is cooked, it becomes a little shiny and transparent (top becomes glossy).
  • Remove from the fire. If you are okay with addition of milk, add couple of spoons of milk and adjust the consistency, or adjust with water and feed the baby either by feeding bottle or spoon.


Crunchy Ice cream:

I am celebrating my blog’s first anniversary, what more reason do we need to celebrate than this? I chose to prepare our all-time favorite “crunchy ice cream” which I whipped up a couple of years back, after tasting this yummilicious blend of fresh cream, chocolate, Vanilla ice cream with crunchy rice crispies, which we enjoyed during our Malaysia trip at Dip n Dip’s This recipe is a crowd pleaser, child friendly as well as perfect for any family gathering and celebrations.

DSC02177_Fotor main

Ingredients:

Fresh cream – 200 grams

Cooking chocolate – 100 -150 grams

Sugar – 2 tsp

Rice crispy – 100 grams

Vanilla ice cream – as needed

Chocolate vermicelli or sprinkles – little

Method:

-Grate cooking chocolate or make small chunks.

Ribbet collage 1

-Take one sauce pan and boil fresh cream, cooking chocolate, sugar into sauce consistency.

-Now Take 4 serving bowls. Pour Rice crispies at the base.

Ribbet collage 2

-Next, pour Hot chocolate sauce and place one ball of ice cream.

pic main_Fotor

-If you want, you can sprinkle some chocolate vermicelli/ sprinkles and some more sauce and enjoy with your family.

Mixed millet Masala Cookies:

Millets are a very good alternative to normal All-purpose flour or whole wheat flour in gluten free baking. You can’t even recognize the core ingredient. It is gluten free as well as high in nutritional value too.

When I was trying out some recipes for the 2017 Millet calendar, I dished out a couple of recipes, which had turned out super tasty, and at the same time, healthy, filling and as an alternate snack for kid’s tiffin boxes as well.

I tried pizza based seasoning in this cookie recipe and it tasted super delicious.

pic main

Ingredients:

Mixed Millet flour – 1 cup

Butter – 50 grams

Sugar – 2 table spoons

Salt – ½ teaspoon

Baking powder – ½ teaspoon

Baking soda – ½ teaspoon

Curd – 2 table spoons

Pizza seasoning or Oregano – 1 tea spoon

Chilli flakes – 1 tea spoon

Cumin – 1 tea spoon

Grated cheese – to decorate.

Method:

  • Mix flour, salt, baking powder, baking soda, pizza seasoning, chilli flakes and cumin and keep aside.
  • Now beat butter and sugar until it becomes fluffy and creamy. Add in curd and beat once again.
  • Mix in flour mixture and bind all the ingredients together, the resultant dough will be like Chapati dough.

Ribbet collage 1

  • Take dough little by little, roll it into half inch thickness and take a cookie cutter and cut.
  • Arrange this in a lined baking tray.
  • Sprinkle grated cheese on top.
  • Bake this in a pre-heated oven at 170 ºC for 10 to 12 minutes.

pic 2

Note:

  • Here mixed millet flour is store bought pre- mixed flour.
  • Alternately one can mix two to three millet flours and make their own flour or use all purpose flour as well.


Moringa / Drumstick leaves powder:

In our coastal area, we never used Moringa in any other form than using its pods which we call as drumstick as a vegetable. During my growing age, I tasted only drumstick in our style cooking. After marriage and coming to Bangalore, slowly I got used to its greens and blooms. My house- help, normally brings organic and home-grown drumstick greens in the spring season.

Moringa greens are packed with vitamins and nutrients and it is considered as a new superfood of the world. The leaves are rich in vitamins, calcium, iron and protein. I have read that, one ounce of moringa powder boasts seven times more vitamin C than oranges, 4 times more beta carotene than carrots, 3 times more potassium than bananas and 2 times more protein than yogurt.

Moringa leaves can be cooked like any other greens and included in our day to day cooking. Apart from that, we can dry it and keep it in a powdered form to add in our day to day consumption in the form of juice, smoothie or in seasonings. It is known to help with anxiety, lethargy, acidity, skin ailments and diabetes. After reading so much about this super food, I made an attempt to make homemade powder to include it in our diet and recipe is here –

main_Fotor 1

Ingredients:

Moringa Fresh leaves

Method:

-Wash the greens as it is with small branches intact, without removing leaves. And drain water.

-Spread these greens on a clean cloth indoors. No sun light is needed for this.

Ribbet collage 1

-After 2 days of drying, you will be able to remove all the tiny leaves without any hassles.

-Remove all the sticks and discard.

-Dry further for couple of days, until it is crisp to touch.

-Powder and collect fine powder by sieving.

Ribbet collage 2

-Spread this fine powder and dry for couple of hours to remove any traces of moisture.

-Store this in a clean jar and use as needed.


Stuffed Capsicum (South Indian style)

Stuffed capsicum is usually done with potato, paneer, cheese or moong dal. In this recipe I have used coconut and onion which is mixed with south Indian style masala powder for the filling. It can be relished with plain roti or rice as a side dish. It is very tasty, and we relish it every now and then, whenever I get to catch hold of tiny capsicums. This recipe I learnt almost a decade ago by Radha athe. She is a treasure house of North canara traditional recipes and I have learnt so many things from her.

main 3

Ingredient:

Capsicum – ½ kg (small sized)

Onion – 2 to 3

Coconut – 1 cup

Salt – as needed

Tamarind powder – ½ tsp

Oil – 2 table spoons

For masala powder:

Chana dal – 2 table spoons

Urad dal – 1 tea spoon

Cumin – 1 tea spoon

Hing – small pea size

Dried red chillies – 6 to 8

White sesame seed (til) – 1 tea spoon

Mustard – ½ tea spoon

Turmeric – ½ tea spoon

Method:

-For masala, dry roast Chana dal, urad dal, cumin, white sesame and mustard and keep it aside.

-Next take couple of drops of oil and fry red chillies and hing.

-Cool everything and make powder by using mixer jar.

-Now take one bowl, add chopped onion, grated coconut, salt, tamarind powder and required amount of masala powder (don’t pour at once, use as required).

-Here salt and masala should be on a slightly higher side, because while cooking, even capsicum will absorb the masala and salt.

-Next wash small sized capsicum, make a round mark near the stalk region and cut open that top part. If possible, keep it intact.

Ribbet collage 1

-Remove inner seed part and clean inside.

-Fill ready coconut and onion masala and close it with upper stalk part and make it firm.

-Now take one wide nonstick pan, pour oil and heat.

-Place all the masala filled capsicum and sprinkle little water and close the lid.

-Cook in a simmer, check in between and turn the sides.

Ribbet collage 2

-All the sides should be uniformly cooked and outer skin should have charred effect.

-When it is done, switch off and serve hot with rice or plain phulka’s.


Indian Gooseberry/Amla Thokku:

Indian gooseberry is a sour and tangy fruit with many medicinal values as it is a rich source of vitamin C. It is known as Nellikai in Kannada, Amla in Hindi. This berry has been used for years in Ayurvedic medicines as well as in Home remedies.

I used to get Amla Thokku from an “Iyengari shop”. I wanted to replicate this lip smacking Thokku at home. Hence, I began my experiment with the same and tried it a couple of times with some minute tweaks. I finally achieved the taste of the original Thokku and now it is my yearly ritual to prepare this in the season and preserving it for my year-round usage. This recipe has minimal ingredients and is very easy to prepare.

main 2

Now to the recipe:

Ingredients:

Amla – 300 grams.

Green chillies – 80 -100 grams

Mustard seeds – 2 tbsp.

Salt –to taste

Turmeric powder – 1tsp.

Method:

-Wash amla, pat dry them and remove the seeds.

-wash green chillies and pat dry them as well.

-put mustard and turmeric in a small mixer jar and powder it. Now add cleaned gooseberry and green chilies little by little and churn (dry grinding), take this out and keep it in a clean bottle, mix in salt and keep this bottle tightly closed in a cool, dry place.

-Every day mix this Thokku with a dry spoon/spatula, until it is set (almost 10 days), check for salt (it should be a little salty)

– After it sets, store this in a fridge.

Ways to Use this Thokku:

  • You can have this Thokku with white rice and little ghee.
  • You can also have it with curd rice.
  • Lassi: mix 1 tea spoon of Thokku in thin butter milk and drink as spicy, tangy lassi.
  • Make raita with curd: In a vessel take one table spoon of Thokku, add little curd and chopped onion, mix nicely and relish this raita with plain rice.

raita 3

  • It helps to reduce acidity and soothes. It also helps to regain appetite when you are not well.

Onion Garlic Kulambu / Poondu – Vengaya Kulambu:

As I said in earlier post of Tamilnadu style Idli, Kulambu is a very good side dish for idli, if you like sweet and sour kind of taste. We all enjoyed this flavourful curry with idli and I had promised to post this recipe in my earlier post. Basically, it is a simple curry with tamarind base, which has shallots and garlic as the main veggies in it. Once again, all thanks to Senguttuvan Subburathina and his wife, Jayanthi Senguttuvan for this amazing recipe. I have made some changes to suit our requirement.

pic main

Ingredient:

Peeled garlic – 20

Shallots /sambar onions – 20

Tamarind – small lemon size.

Salt

Jaggery – as needed.

Red chilli powder – 1 tea spoon

Sambar powder – 1 tea spoon

Hing – pea size

Turmeric – ½ tea spoon

Coconut – ¼ cup

Rice flour – 1 tea spoon

Seasoning: Gingelly oil – 1 tea spoon, refined oil – 1 tea spoon, fenugreek seeds – ½ tea spoon, mustard – 1 tea spoon, curry leaves – 1 spring.

Method:

-Remove outer skin of shallots and garlic. If shallots are big, make couple of pieces.

-Soak tamarind in one cup of water.

-Take a vessel, do seasoning by pouring both the oils, when it is hot, add fenugreek, when it is light brown, add mustard. When it crackles, add curry leaves.

Ribbet collage 1

-Add garlic and shallots and fry for a while. Meanwhile add turmeric, hing and toss for a while.

-Add tamarind water, red chilli powder, sambar powder, salt, jaggery and cook onions and garlic.

-Grind coconut and rice flour into smooth paste and add the paste to cooked onion.

Ribbet collage 2

-Adjust the consistency by adding some water, check the seasoning like salt, sweet and hot. If needed add and adjust the taste.

– Boil this for 5 minutes, so that rice flour and coconut paste also cooks and becomes little thick.

-When it is ready, enjoy with hot idlies.

Note:

-Original recipe is a little hot, hence I reduced the quantity of chilli and sambar powder.

-Usage of gingelly oil gives the authentic taste. If you are not accustomed to its taste, mix half of any vegetable oil.

-Usage of coconut paste is optional.

-We like little thick texture Kolumbu, so I added rice flour as well. It gives a little creamy texture and is also tasty.


Tamilnadu Style Idli and Dosa Batter:

It is a Two in one bonanza—Yes!!!!

I always wondered how to get a pillowy soft kind of idli which is a speciality of Tamilnadu. In our coastal side, idli turns out soft but has a little grainy texture, not spongy which we get in all Tamilian eating joints. During one such discussion in our Foodie group, we asked to provide Tamilian style idli recipe with our ever energetic, multitalented uncle Senguttuvan. I really was not expecting this kind of response after one week. He and his wife literally took all the trouble and wrote step by step procedures with pictures, some tricks and notes. Added to that, there were a couple of video’s too. I was really overwhelmed and wanted to give its due credit by publishing this recipe in my blog after preparing it myself at home and we all loved it.

pic main

I tried his Idli recipe and paired it with another hit recipe of his Onion Garlic Kolumbu. It was a pair made in heaven kind of breakfast. I will post the Kolumbu recipe next and once again all thanks to Senguttuvan Subburathina and his wife Jayanthi Senguttuvan for this amazing recipe. Now, over to his words as it is and my pictures-

Here we go!

Ribbet collage 1

The selection of Rice is important. Boiled Rice (Idly rice) with patches of white will help in better softness of Idly.

We use whole white Urad Dal. Not broken one. (why? This also help soft Idly they say. I am not sure)

Fenugreek (Methi /Menthya Seeds)

Salt to taste.

Water as required.

Only the above ingredients go into making of this Idly / Dosa batter.

Wash the Rice 2-3 times with water and soak in clear water for 2hrs.
Simultaneously, wash Urad Dal and Menthya seeds and soak in water.

Ribbet collage 2

THE RATIO IS – RICE 4:1 URAD DAL. One TeaSpoon of Menthya.

Use of wet grinder is recommended. Heat generated during use of Mixie / blender spoils the Batter making. Though ice water usage will minimize the effect in mixie.

First, Grind the Urad Dal first, using the same water in which it was soaked. Grind for 25 mins adding water little by little so that a soft thick fluffy batter consistency is reached.

Ribbet collage 3

Transfer to a vessel and start grinding the Rice adding water little by little as you grind. About half an hour of grinding will give a little coarseness in batter. This thick batter is to be added to the Urad/ Fenugreek mixed batter.

Add required ROCKSALT (to taste) and mix well with hands. This is important. The good bacteria in hands help fermentation of batter. Take care to choose a vessel that will allow 25% raise in the height of batter after fermentation.

Ribbet collage 4

Normally, the batter is prepared by noon around 2pm. By night, around 8-9 pm, the batter is well fermented, for Chennai weather. In cold climate, it is recommended to switch the light on in OTG and keep it in, so that the warm light helps in faster fermentation.

At 9pm, when you find the batter well fermented, mix it well with ladle and close and keep refrigerated.

As and when required, take the small quantity of batter in a separate vessel and use that portion leaving the main portion of batter under constant refrigeration, so that it does not get further fermented.

The batter is ready for Idly / Dosa preparation the next day morning. Mix well and use for fresh fluffy Idly.

Use a drop of oil in each pit of Idly plate and spread oil so that Idly comes out smooth. We cook Idly in pressure cooker without placing the weight. It just takes 7 minutes to get fluffy Idlies cooked.

After removing the Idly plates from cooker allow a minute or two to cool down and remove the Idly for easy removal.

Ribbet collage 5

For Dosa preparation:

dosa main
Remove small quantity of this batter to another vessel and add little water mix well and use. A thick Dosa or thin roast Dosa can be prepared with same batter.

Trust the above details help.

Note from Me:

-In Bangalore weather it takes more time to ferment. It took me almost 16 hours.

-I personally feel very lazy to remove urad dal after grinding. So, I add soaked rice and continue grinding as it is. It also works just fine.