Vegetarian lasagna:

Who doesn’t love Lasagna/lasagne? It is a baked dish consisting of layers of cooked sheet pasta, pureed tomato sauce, and a preferred filling, such as vegetable or meat and topped with cheese.

 It is an ultimate one-pot meal, and when it is homemade, without using All-purpose-flour nothing is like it. Here I am, sharing my slightly healthier version lasagne pasta recipe.

Lasagne made from scratch:

I have used a circular glass baking pan that is 10” wide.

For dough:

For 4 circular thin lasagne sheets, I took –

Flour – 1 ½ cup ( ¾ cup whole wheat + ¾ cup All purpose flour)

Salt

Water

Olive oil – 2 tsp (approx.)

Method:

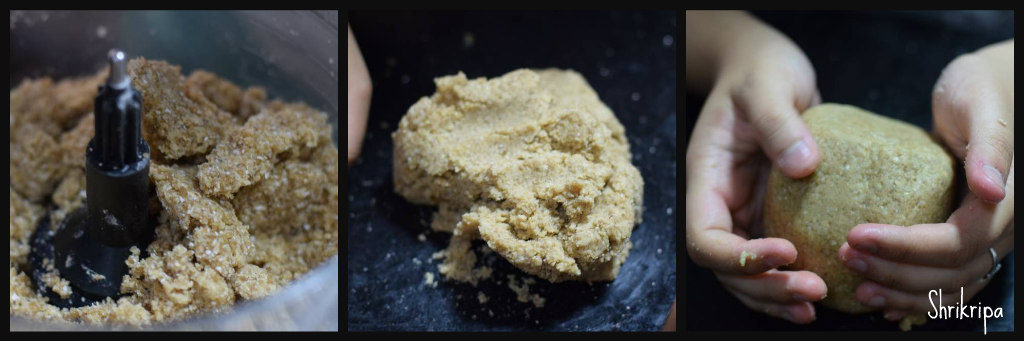
For the Lasagne sheet:

Take Flour, and salt, make a stiff dough using sufficient water, knead until soft, apply oil and keep it resting until you make other things.

For Marinara /Red sauce:

-Blanch 4 tomatoes ( take ½ cup of water, chopped tomatoes, microwave for 3 min), cool, grind.

-Boil with required seasoning ( garlic salt, oregano, little jalapeno seasoning etc.) and two tablespoons of  Hot and sweet tomato ketchup and adjust the consistency by adding water.

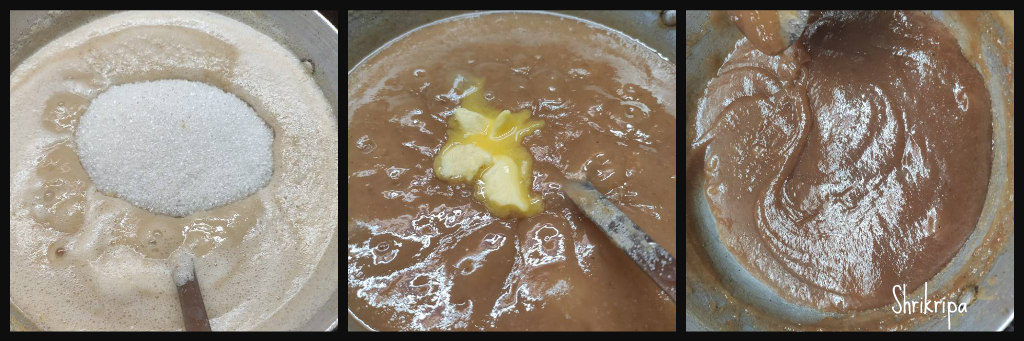
For Bechamel/ white sauce:

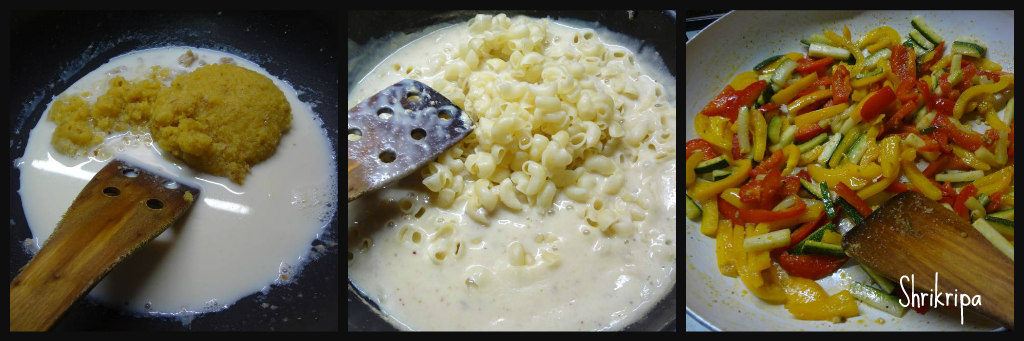
I usually make the veggie-loaded sauce and use it as a filling. ( ½ of zucchini, yellow and red bell pepper, half onion)

-Roast 2 tsp of whole wheat flour OR all-purpose Flour with little butter, whip in a mixer jar with a cup of milk, and keep it ready.

-Heat tawa, add little butter /olive oil, and fry the onion until it turns light brown. Add veggies and fry for a while. Add all the seasonings according to your choice. I usually use garlic salt, red chilli flakes, oregano, and a little jalapeno seasoning.

-Next, add Flour mixed with milk, adjust the consistency by adding extra milk, boil and keep it ready.

Final Layering:

Prepare lasagne sheets one by one. Heat water in a wide vessel, take out the ready dough, divide it into 4, roll it into a circular one, and put it into boiling water; when it is done, it pops up. Remove, drain, and cool it by spreading. Repeat the process.

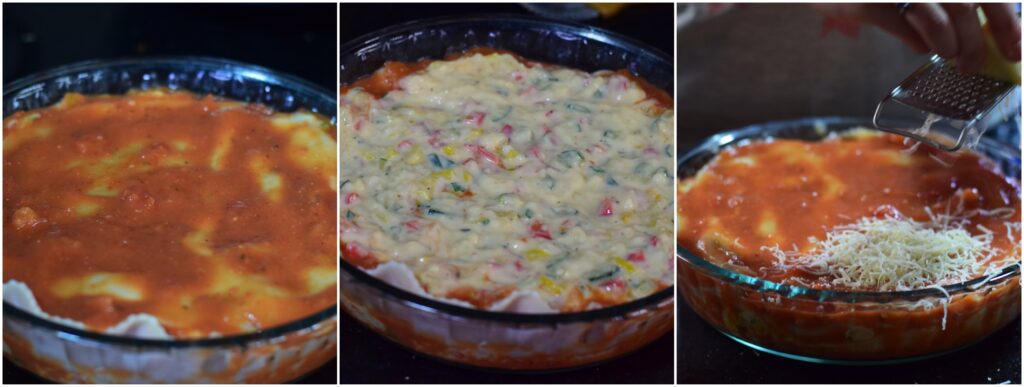
-For assembling, take the glass bowl in which you bake. Spread one layer of marinara sauce.

Place one cooked sheet, then spread one layer of veggie-loaded white sauce.

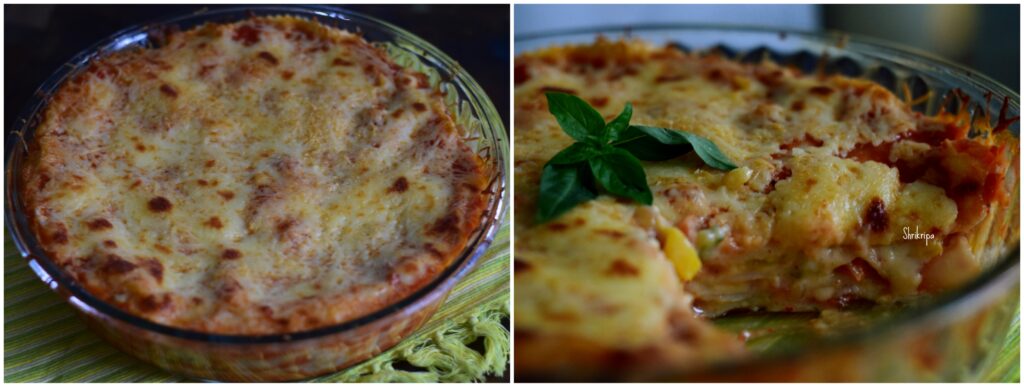
-Repeat the process once again. Marinara, lasagne sheet, veggies, last, end with the marinara sauce and grated cheese, and bake at 180 °C preheated oven until the top layer is light brown. Remove, and serve hot.

Air potato onion soup:

I am fortunate enough to experiment with this rare tuber for Roots and Tubers 2020 calendar project—by Sahaja Samrudha noble cause of supporting farmers and introducing all the nutritious and most ignored products to the community at large.

Who doesn’t love soup? That too in winter months. This Air Potato onion soup recipe is earthy, delicious, healthy and soothing to our souls.

It uses simple everyday ingredients. In place of Air potato, one can use our regular potato. It doesn’t use fresh cream, so it is excellent for people with a sensitive gut. It is easily adaptable to make vegetarian or vegan.

If you are new to the usage of Air potato, please go through my detailed description regarding the aerial tuber, how to cook etc., in “Understanding the roots and tubers.” And go down until Tubers, and you would find the Air potato under Number 8, and it is HERE

Ingredient:

Air potato – 2 

Spring onion – 3 to 4 springs

Sweet corn – 2 tablespoons

Butter – 1 tablespoon

Garlic – 3 cloves

Seasoning – oregano or any preferred choice of yours.

Pepper powder – ½ tsp

Method:

-Peel potato, dice. Chop spring onion.

-Heat butter, sauté Spring onion and garlic, add potato, sweet corn and fry for a while.

-Add salt, preferred herbs as a seasoning, pepper and mix everything. Add sufficient water and cook.

-Churn the content, adjust the consistency by adding water. Boil, adjust the seasoning and serve.

Guava Cake:

This cake was totally experimental and turned out to be a soft, delicious coffee cake with the mild taste of guava with a sweet tinge. One more thing, I am happy about this cake is the usage of cake seed and 100% whole wheat. Usually, when I attempt a new flavour, I prefer half and half.

Here, cake seed is nothing but Caraway seeds, which has a distinct flavour.

If you need to make eggless, please go ahead with any egg replacer. I usually use flax gel as an egg replacer, and it turns out best and gets an additional nutrition quotient.

For flax gel: -To make flax gel: The necessary ratio is 2 ½ tsp of flaxseed powder and three tablespoons of hot water, and then you whisk in the mixture until it becomes gelatinous to replace one egg.

Ingredients:

Whole wheat flour – 1 ½ cup

Baking powder – ¾ tsp

Baking soda – ¾ tsp

Salt – a pinch

Caraway/Cake seed – 1 tsp

Eggs – 2

Butter – 100 grams

Vanilla – 1 tsp

Sugar – 1 cup (used brown sugar)

Guava puree – ½ cup ( recipe is here)

Milk – 2 to 4 tablespoons (to adjust the consistency)

Method:

-Dry mix all the dry ingredients-whole wheat flour, salt, caraway seed, baking powder and soda, by sieving 2 to 3 times or with a wire whisk.

-In another bowl, beat guava puree, butter, eggs by adding one by one. Add sugar, vanilla essence and beat until sugar almost dissolves.

-Fold in dry ingredients, adjust the consistency by adding milk. The batter should be a little stiff.

-Take a loaf pan, line with parchment paper, pour the dough, bake in a preheated oven at 180°C for 40 -50 minutes or until done.

-take out, cool and slice.


Guava Cheese/ Perad/halwa :

When the neighbour comes and hands me a big bag full of substantial sized overripe guavas, I knew, it is going to be a strenuous task. I need to deal with my mindset of ‘no wastage.’ First thing, came to my mind was my favourite Guava cheese.

When I was reading about the guava cheese, its origin, it traces back to Portuguese settlers in Brazil where it’s known as Goiabada. I am guessing that is how this recipe landed with them in Goa and is known as Perad/Peraad.

In simple terms, guava cheese is nothing but guava halwa. It doesn’t taste like cheese. Its texture is something you can easily bite into, yet is slightly chewy, somewhat like our Banana halwa, with a grainy texture, of course with added guava taste. Colour of the cheese depends on the variety of the Guava. If it is white, the colour turns our light brown, like mine. I usually mix a half red and half white variety of Guava to get beautiful hue.

Ingredients:

Overripe Guava – 2kgs

Sugar – 800 grams to 1 kg (acc to your palette)

Salt – ½ tsp

Butter – 3 tablespoons

Lemon juice -1 tablespoon 

Method:

-Wash, chop the fruit into quarters—Cook with sufficient water for two whistles, cool.

-Pulse it in a mixer jar along with cooked water, sieve the Puree, separate the seed and its roughage.

-Weigh the pulp. For 2 kgs of pulp, I have taken 800 grams of sugar. You can take up to one kg if you prefer sweeter.

-Take one thick bottomed Kadai, add the pulp and boil for 20 minutes or until it starts boiling. Allow 10 minutes more to boil and add sugar and salt, continue to cook in a low flame.

-When the mixture turns pinkish brown add butter and proceeds to cook further. When it starts leaving the sides, add lemon juice, cook ten more minutes.

-Remove the mixture to the greased plate, leave 4 to 6 hours and then cut.

-Stays good for 3 to 5 months without any problem, at room temperature, stored in an airtight container.


Vegetable Pasta in Pumpkin Sauce:

Do you feel strange? While reading “pumpkin”, that too in pasta? No need to feel!! It tastes good at the same time; it is a delicious, nourishing one-pot meal. You can check all my Pasta recipes, which has one thing or the other to make enjoyable of otherwise bland white sauce, which I usually plan for my daughter, who hates bland Bechamel white sauce.

Pumpkin is the most neglected all-round vegetable, even though considered as fall/winter vegetable in other parts of the world. It is low in calories, high in antioxidants, vitamins, minerals as well as high on the natural source of Beta carotene. Hence, whenever I have a fresh homegrown pumpkin is around, I make Pumpkin puree and store it in my freezer. In that way, it is handy whenever it is needed to make pasta or needed for baking.

We would see the procedure –

Ingredients:

Any pasta – 1 cup (of your choice)

Pumpkin Puree – ½ to ¾ the cup (according to your taste)

Veggies – 1 bowl (I have used zucchini, three colour bell peppers)

Butter or olive oil – 2 tablespoons

Whole wheat flour – 2 to 3 tablespoons

Milk – acc to the requirement

Garlic salt

Red chilli flakes

Italian seasoning

Grated cheese  – as you wish (it is purely optional )

Method:

– Drop pasta in boiling water in which,1 tsp of oil and little salt has been added and cooked.

-When it is done, drain the cooked pasta.

-Cool the pasta by pouring cold water and set aside.

– Chop the veggies and keep aside.

– Make white/pumpkin sauce: put some butter, fry wheat flour (3 TBL sp), add milk and mix nicely. Till it smooths out.

-Add pumpkin puree, drained pasta, garlic salt, red chilli flakes, Italian seasonings and give one boil, keep aside.

-I always keep pumpkin puree in the freezer. The recipe is here.

-In another Tawa, add either butter or olive oil, put chopped or sliced veggies, add req amount of red chilli flakes, garlic salt.

-when it wilts, add ready pumpkin sauce(wth pasta), grated cheese. Check for seasoning. Serve. 


Rice Nippattu:

In our Native, Nippattu is nothing but savoury Rice crackers. We normally buy our favourite Rice Nippat from “Popular sweet mart”,  from my native town, Putter.

Maybe around 5 -6  years ago, while conversing, my husband asked me to replicate this particular item at home. I was thrilled to hear this and sat down with a couple of Nippattu, pen and paper. I noted down the ingredients one by one after tasting it bit by bit.

Then comes the trial session. At first, I used roasted urad dal powder and rice flour and used a roti presser for pressing. It turned out a little thick and hard.

After a couple of trials with different proportions, addition, and deletion of a couple of ingredients. I succeeded in replicating our favourite snack and it was published long ago in Readoo at that time. Finally, during this Deepavali, I did manage to publish in my own space 😀 

Now we will see how it is made –

Ingredients:

Rice flour – 2 cups

Urad dal – ¼ cup

Chana dal – 2 tbl sp

Butter – 1tbl sp.

Green chillies – 4

Red chillies – 2

Cumin – 1 ½ tbl sp

Black sesame seed – 1 tbl sp.

Curry leaves – 6 strings

Asafoetida /hing – ½ tsp

Salt

Oil- for frying

Method:

-Soak chana dal in water for 2 hours.

-Cook urad dal with one cup of water for two to three whistles in cooker. Mash it by hand or whisker.

-Now add butter, soaked-drained chana dal, jeera, sesame seeds, hing, salt, chopped green chillies, red chillies, and curry leaves.

-Mix nicely and add rice flour. If needed, sprinkle some water while mixing.

-Make firm dough and keep aside for 5 minutes.

-Take small amount of dough and make roundels.

-Pat these into flat thin discs on greased wax paper or butter paper or any thick plastic sheet.        

-Now keep Coconut or any preferred oil for deep frying. When oil is hot, add patted flat discs and deep fry until it is golden brown.

-Enjoy with evening tea!


Mexican Rice Bowl:

One of the much-loved foods for my daughters is the Californian Burrito rice bowls. It is a healthy, balanced meal which has protein, carbohydrate, good fat as well as all the goodness of vegetables. As  rice eaters, it used to be our choice as a go to meal.

When my daughters asked me to replicate their favourite meal at home, I tried my best to attain the taste and it was turned into a super hit and it got a thumbs up from everyone. So, thought of sharing my recipe in my blog as well.

Here, I have teamed up garlic – celery flavoured rice , Red beans/ dry rajma , pan roasted capsicum – zucchini, Tomato – sweet corn salsa , Avocado guacamole, and healthy sour cream by mixing hung curd with little mayonnaise.

Let us see how I made this: For 4 servings

For Garlic – Celery Rice:

Rice – 1 ½  cup (small grain rice)

Butter – 1 tablespoon

Garlic – 6 ( sliced)

Celery greens with stalk – 2

Salt , pepper

Method:

-Wash rice, Boil 6 to 8 cups of water in a vessel , add little salt, 1 tsp of oil. When it starts boiling, add rice, cook for 7 to 8 min ( al dente ). Drain the starch , cool, and keep aside.

-For seasoning, take one wok, heat butter, add garlic, chopped celery, and toss until it is done. Add little salt, pepper powder, and mix in cooled rice. Adjust the seasoning.

For Dry Rajma/ Red beans:

Rajma/ Red kidney beans – ¾ cup

Butter – 1 tbl sp

Onion – ½

Tomato – 1

Garlic – 4 cloves (sliced)

Cumin powder – 1 tsp

MDH  curry powder – 1 tsp (or any other masala of your choice)

Red chilli powder – 1 tsp

Turmeric – ½ tsp

Salt

Chopped coriander leaves – 1 tbl sp

Method:

-Take a short variety of Kashmiri Rajma. Soak for 7 to 8 hrs. Cook soaked beans in sufficient water for 6 to 8 whistles in a pressure cooker. Remove the content and do the seasoning.

-take the cooker, add butter, fry garlic and onion, add turmeric, red chilli powder, Curry powder, cumin powder, salt and if you prefer add pinch of sugar as well,  fry for 2 min and add chopped tomatoes.

-When tomatoes become mushy, add cooked rajma, close the lid, switch off after the first whistle.

-Open the lid, keep it in a simmer to drain, remaining water content. When it is semi solid, garnish with coriander leaves and switch off.

For Pan roasted Capsicum – zucchini :

Capsicum – 2 (diced)

Zucchini – ½ (diced)

Onion – 1 (diced)

Salt , seasoning of your choice or red chilli flakes or slit green chilli

Olive oil or butter

Method: Heat oil or butter, if you are adding green chilli, add now. Then diced veggies and toss until it is half cooked, sprinkle salt and preferred seasoning.

For Sweet corn – Tomato salsa:

Cooked sweet corn – ½ cup

Tomato – 1 big

Onion – ½

Green chilli – 1

Salt

Lemon – ½

Chopped coriander – little

Method: Chop onion, tomato , green chilli into tiny bits ,add salt, lemon juice and mix. Garnish with chopped coriander.

For Guacamole:

Recipe is here 

For low calorie Sour cream:

Take a 2 tbl spoon of hung curd, mix it with garlic mayo and beat a little.

How to Assemble:

Take one wide bowl, serve 1 serving spoon of prepared rice, then beans, roasted veggies, salsa in a circular manner. Top it with Guacamole and sour cream and serve with couple of tortilla chips or without chips.

Mango Yogurt Parfait:

Everyone loves mango season and enjoy as much as possible before it vanishes from the fruit carts.

Today, I am sharing my little healthier version of mango parfait, when compared to other versions, which usually has loads of fresh creams.

Here, I normally use digestive biscuit base, hung curd with little fresh cream which is flavoured with fresh cardamom ( I like cardamom with mango 😀 ) , Chopped fresh fruit , lastly garnished with crushed almond praline (chikki).

Let us see the procedure , which suffice for 4 tall glasses –

Ingredients:

For Biscuit base:

Digestive biscuits – 12

Sugar – 1 to 2 tbl sp of brown sugar ( can use normal sugar as well)

Butter – 1 tbl sp

For Fruit base:

Mangoes – 2 (Alphonso works well)

Sugar – 1 tsp

For Cream base:

Hung curd or yogurt – 1 to 1½  cup ( adjust accordingly)

Fresh cream – 50  to 100 grams ( adjust accordingly)

Sugar – 3 to 4 tbl sp ( according to your taste)

Cardamom powder – ½ tsp

For Almond Praline: ( you can use cashew as well)

Brown sugar  – 2 tbl sp ( you can use normal sugar as well )

Slivered almonds – ½  cup

Butter – 1 tbl sp

Method:

-Make Praline by heating sugar until it turns brown liquid form without stirring or disturbing in low flame. When it turns golden, add almond, butter give a stir and spread on kitchen counter.

-When it is cool, take the crunchy block and crush by using pestle . keep aside.

-Now, Chop mangoes into small chunks, add sugar and give a stir and keep it in a fridge.

-Next, Biscuit base. Crush biscuits make a powder. Add sugar, butter, and mix all these by using your hand. It should hold the shape, while pressing in between your palm and fingers.

-Now, for the cream base, take a wire whisk ,beat hung curd, add cream, sugar, cardamom powder and whisk until it is creamy.

Now comes the assembling part:

-Take 4 tall glasses. First pour 2 spoons of yogurt mix. Over to that, biscuit crumb, then chopped mangoes.

-Repeat the same sequence: yogurt, crumb , fruit. Lastly divide all the leftover curd equally into 4 glasses at the top and garnish with almond praline and serve, enjoy your treat.


Lemon Tart with Healthy Flour:

Lemon tarts are a real pleasure to have. When I have homemade lemon curd, usually I make it a point to use it in my baking and enjoy the tangy taste. Usually first preference would be Lemon thumb print cookies by using healthy flours. Then comes the Braided bread and lastly, lemon tart, which my daughters just love to have and this time, one of my daughters tried to bake it and she enjoyed the healthy baking process. At first, we did try by using Oats and whole wheat together and second batch with only whole wheat flour. Both the trials worked out just fine. Oats and whole wheat tart shell was more like a cookie with added flaky texture and whole wheat shell was like any normal tart shell.

We normally like mini cup cake size of lemon tart, due to its tangy and sweet taste. So, giving the measurements for 12 – 14 mini tarts.

This is an Egg-less version and I will update both the versions.

How we did:

Ingredients:

Flour – ¾ cup

Salt – ¼ tsp

Cold butter – 50 grams

Brown sugar – ¼ cup

Cold water – as needed.

Lemon curd – As needed

Method:

-If you are taking whole wheat flour, take ¾ cup. If you want to mix oats or any other flours of your choice, go ahead and use half the quantity of oats flour (by grinding ) or any other flour and half whole wheat flour.

-Now, take flour of your choice, salt and dry mix nicely. Add sugar powder and mix thoroughly.

-Add cold butter by cutting into chunks. Mix everything by using hand or processor. Until mixture looks crumbly.

-Now add couple of tablespoons of chilled water and make a dough. Keep it in an airtight box and allow to rest under refrigeration for 45 minutes.

-Pre heat oven at 170°C . Remove dough and roll the dough by using flour dusted platform.

-Take a cookie cutter, lay those circles in greased  mini muffin pan. Bake for 10 minutes.

-Remove, fill with lemon curd, once again keep it in the oven and continue baking for 5 more minutes.

-Remove, cool and enjoy sweet and tangy/ lemony treat.


Peanut Cookies with Millet :

When I was trying out some recipes for 2019 Millet calendar, I dished out a couple of recipes, which had turned out super tasty, and at the same time, healthy too.

Here, I have used Samai rice which is known as Little millet in English. I had some little millet flour and made fresh Peanut powder at home and proceeded. It had turned out super delicious as well as creamy/buttery, and at the same time crunchy on the outside.

Ingredients:

Samai flour/ any millet flour – 1 cup

Whole wheat flour – ¼ cup

Peanuts – 1 ½ cup (roasted)

Powdered Sugar or Jaggery – ½ cup

Salt – ½ tsp

Butter – 100 grams

Method:

-Grind peanut in a mixer jar as fine as possible.

-Take one bowl, cream butter and sugar, salt. Add flours, powdered peanut and make a dough.

– Make a uniform sized ball, arrange in a lined baking tray.

– Bake this for 12 to 14 minutes in a pre-heated oven at 170 C.

-When it is done, remove carefully and cool. Store this in an airtight container.