Millet roti/ pulka :

Millets are “no glutenous” flours. To attain soft-edged, easy to roll roti’s, we need to prepare the proper, pliable dough. When you want to prepare roti dough, you can either add little rice flour or whole wheat flour to millet flour. Even though it is not a traditional method, it works out just fine to my family needs. It remains soft even after cooling, easy to make and works out just perfect for any rolls or wraps.

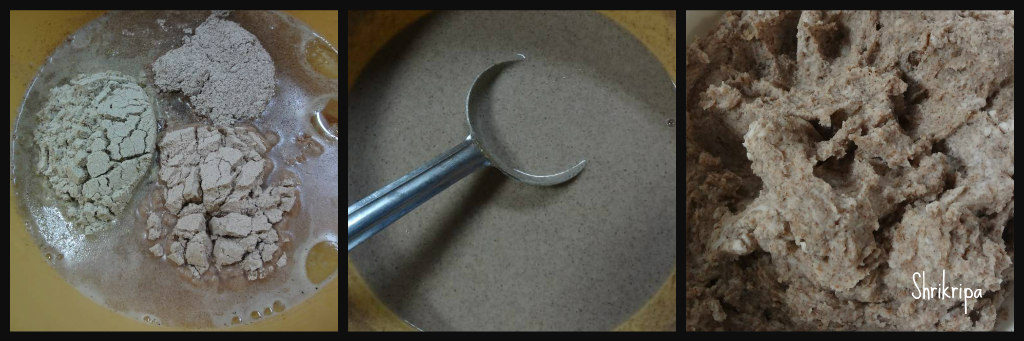
How: First, make a porridge of millet flour or a mixture of two to three millet flours by boiling water, salt,0ne a spoon of any cooking oil. When it starts boiling, add millet flour and cook until it is glossy.

When it is cool, add rice or whole wheat flour and make a dough. In this way, you would get very soft pulkas.

How I usually do is –

Ingredients:

Ragi flour – ½ cup

Bajra flour – ½ cup

Jowar flour – ½ cup

Whole wheat flour- as needed

Water- 2 cup

Salt

 Oil -1 tsp.

Method:

-Take two cups of water, add oil, salt and boil. Now add millet flours and keep this for 2 to 3 minutes or until it cooks. Now remove from the flame and keep aside.

-When it is ready to handle, add whole wheat flour, make a firm ball like Chapati dough. Cover and keep this aside for 10 minutes for resting.

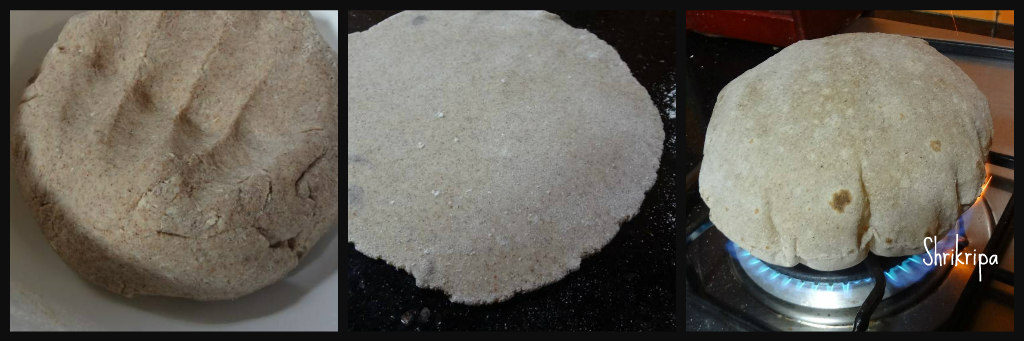
-Then start making a little thicker Chapati than the regular Chapati/ pulka’s and cook both the sides and place it on fire to fluff and serve either as it is or by applying ghee or oil.

NOTE:

-To make Glutenfree roti, add rice flour instead of whole wheat flour. 

-To make an initial porridge, you can use the microwave as well. 


Instant Stuffed Brinjal:

Tiny brinjals are very delicious in dry curries as well as in gravies. When I have plenty of home grown organic brinjals, I normally make this quick dish, which can be handy as well as tasty when you are super lazy to cook. If chutney powder (any chutney powder will do) is around, within no time you will be able to make this delicious dish. It can be relished as a starter, side dish or with curd rice.

Ingredients:

Tiny Brinjals – 12

Garlic Chutney powder – 2 to 3 table spoons

Hucchellu/ gurellu or Nigella seed powder – 1 tea spoon (optional)

Red chilli powder – 1 tea spoon

Amchur powder – ½ tea spoon

Salt

Turmeric – ½ tea spoon

Cooking oil – 2 tea spoons

Method:

-Hucchellu powder is purely optional. If you have roasted Hucchellu powder, use it.

-Take one bowl, mix chutney powder, gurellu powder, salt, turmeric, red chilli powder, amchur powder, salt.

-Wash brinjal, make 2 slits (+ shape) and fill this mixture and keep aside. If any mixture is remaining, keep aside.

-Take one kadai, add oil. When oil becomes hot, add masala filled brinjals and toss for couple of minutes.

-Sprinkle little (1 table spoon) water and close the lid and cook in a low flame.

-Once again sprinkle water in between and cook until brinjal shrinks and cooks properly.

-Lastly, sprinkle remaining masala mixture, give one stir and serve as you wish.


Rava idli with Oats/ Semolina idli with Oats:

I normally used to make plain Oats idli, earlier. It is our favourite breakfast item and I wanted to make a slight change while preparing and used my Rava idli making method with oats added in it and served with Potato Sagu as how I serve normal Rava idli. It tasted good and we started liking this method instead of making plain Rava idli. This is one more instant and handy recipe for me and works just fine even in kid’s lunch box as well. Addition of oats increases the nutritional value of the dish. So, whenever excess curd is there, this is one more recipe to indulge in that too without any grinding and prior planning.

I normally prepare the dry mixture the previous night and keep it ready to cut short my early morning job. It works very well. Dry mix consists of seasoning and roasting part.

How I make –

Ingredients:

Normal Rava / Semolina – 2 cups

Oats – 2 cups

Curds – 2 cups

Water – 3 cups

Eno fruit salt – 1 tea spoon

Salt

Coriander leaves – ¼ cup (chopped)

Seasoning:

Ghee or oil – 2 table spoons

Mustard – 1 tea spoon

Urad dal – 1tea spoon

Chana dal – 1 tea spoon

Hing – ¼ tea spoon

Cumin – 1 tea spoon

Cashew bits – 2 table spoons (optional)

Curry leaves – 2 springs (Shredded)

Method:

-Take one kadai, do seasoning part. Heat ghee, splutter mustard, then add urad and chana dal.

-When dals become red, add cashew, hing, cumin, curry leaves and fry for 1 minute.

-Add Rava and roast for a while (until it is grainy) and add oats and proceed the roasting process for some more time. (May be 2 minutes more).

– Add in chopped coriander and mix until it distributes evenly and wilts a little.

-Switch off the gas and leave this mixture to cool. (I usually prepare this much in the previous night and keep it ready)

-Next comes the batter preparation. Use room temperature mixture. Don’t use hot Rava mixture to make idli batter.

-Take one big bowl, pour in curd and water (here I normally take one cup of liquid to each cup of oats and 1 ½ cup of liquid to each cup of rawa) It is a very simple calculation 😊

-Add salt and Eno fruit salt (you can use cooking soda as well) beat a little to attain frothy texture.

-Add seasoned Rava and oats mixture to this and mix.

-Now comes the idli steaming part.

-Take one cooker, pour one cup of water at the base and heat.

-Rinse idli mould by using fresh water. (it is an alternate to greasing the mould)

-Pour ready batter to idli mould, keep it in a steamer and steam cook for 10 minutes.

-Remove, cool, de mould and serve with chutney or potato Sagu.


Barley Pongal:

Come Summer, our ancestors used to drink Barley water to keep their body cool. Otherwise Barley gruel or water is used mainly during illness- diarrhoea, urinary tract infection. As it is a natural diuretic, it increases urination and helps to flush out any toxins or infection causing bacteria from the body. Here I have used this super cool grain in making Pongal, south Indian breakfast dish.

Barley has two varieties, one is with outer cover which is called hulled barley and other one is more processed, without outer cover and is called De hulled or pearl barley. Compared to hulled, pearl is little less in fibre but cooks faster and is ideal for our day to day cooking.

Barley is known for its low glycaemic index, which makes it an excellent option for diabetics. Over all it is good for all and we can include it in our day to day cooking in one form or the other and take a benefit from this age-old grain for sure.

Although Barley is very good for health, it contains gluten and people who have sensitive digestive system or are allergic to gluten should avoid this grain.

Recipe is like this-

Ingredients:

Barley Rawa/ grits – 2 cups

Green gram/moong dal – 1 cup

Green chillies – 2

Ginger – ½ inch

Grated coconut – 3 table spoons

Ghee – (to serve)

Seasoning:

Ghee – 1 table spoon

Mustard – 1 tea spoon

Cumin – ½ tea spoon

Hing – ¼ tea spoon

Curry leaves – 1 spring

Method:

-Dry roast moong dal for 2 to 3 minutes.

-Wash moong and barley grits together and keep aside for a while.

-In the meantime, prepare for the seasoning.

-Take one cooker vessel, do seasoning, heat ghee, splutter mustard, add cumin, hing, curry leaves, chopped green chillies, chopped ginger (slivered) and fry for two min.

-Add water (around 8 to 9 cups) and boil. Add salt, coconut gratings and keep it for boiling.

-Add soaked dal and barley mixture and close the cooker lid.

-Cook for 3 whistles and switch off the gas.

-When pressure releases, open the cooker lid, give a stir and adjust the consistency.

-Pour a couple of spoons of ghee to enhance the taste or you can completely skip the ghee if you are into low calorie diet.

-Serve with coconut-ginger flavoured chutney.


Mug Pasta or One Bowl Pasta:

When my daughter had a holiday in between her exams, she has demanded for this treat for an afternoon lunch. She was alone on that day and I prepared it only for her and she was happy with the result. Today, I made it once again for my twins and I wanted to share the recipe with all my readers.

If you have seen my earlier posts of pastas I normally add any flavours to the white sauce. One of my daughters doesn’t like the bland taste, and here I thought of using tomato to give a little tangy taste.

I have used cooked elbow macaroni pasta. You are free to use any kind of pastas.

My daughter wanted Broccoli, capsicum and onion as veggie filling.

Then comes, grated cheese. I have used mozzarella cheese.

Here I am going to give for 2 big cups (meal for 2 kids)

DSC_4781_Fotor

Ingredients:

Macaroon – 1 cup

Broccoli – ½ cup

Capsicum – 1

Onion – 1

Olive oil or butter – 2 tsp

Tomato – 2

Whole wheat flour – 2 tea spoons

Milk – ½ cup

Seasonings – of your choice

Garlic salt – as needed

Mozzarella cheese – as needed

Method:

-At first, cook tomato in a sauce pan by adding half a cup of water. Remove and cool.

Ribbet collage

-In the same saucepan, blanch broccoli in boiling water and drain. It will help to remove any pesticide traces.

-In the same sauce pan, add required amount of water, little oil, salt and boil. Add pasta and cook into al Dante. Drain and keep aside.

-Chop onion, capsicum.

-Take one tawa, add 1 tea spoon of butter, toss all the three veggies (onion, broccoli and capsicum) by adding garlic salt, pizza seasoning, red chilli flakes or any other seasoning of your choice.

-Now tossed vegetable is ready and kept aside.

-Now we will make a pasta sauce.

-Fry whole wheat flour with butter or olive oil.

Ribbet collage 2

-Take one blender, mix fried whole wheat, milk and cooked tomato with water in which it has cooked.

-Churn and make a paste.

-Cook this paste in a sauce pan by adding garlic salt, any seasoning. I have added crushed rosemary, jalapeno pepper and garlic salt seasoning.

-When it starts boiling and becomes shiny and thick, switch off the gas.

-Now comes the assembling part.

Ribbet collage 3

-Take 2 Big ceramic mugs, if it is not available, use any baking dish.

-At first, pour couple of spoons of the prepared pasta sauce. Add grated cheese according to your wish.

-Add half of cooked pasta as a layer. Then half of veggie mix. Over to this, pour half the quantity of pasta sauce.

Ribbet collage 4

-Once again repeat the action. Empty all the remaining pasta, then veggies, pasta sauce.

Ribbet collage 5

-It will reach till the rim. Take one thick kitchen towel and place the mug and tap a little.

-All the sauce will settle,  sprinkle grated cheese on top.

Ribbet collage 6

-Bake these ready mugs in a pre-heated oven at 180C for 10 to 15 minutes or until cheese melts or becomes light brown.

-Serve with Love 😊


Soppavare/Winged beans stir-fry:

Soppavare name itself is very much nostalgic. We had a widespread vine in our front yard and we used to relish a whole lot of Mangalorean traditional recipes in our childhood days.

Winged bean is a nutritionally very rich, tropical vine, which needs warm weather, but in the winter season. Almost all parts of the plant are edible, and vine produces unique shaped bean with four-winged edges.

It is rich in vitamins, minerals and many nutrients. When it is cooked, bean has nutty flavour and is consumed in many forms from salad to stir fries or in a form of curry.

My family relishes on this simple stir-fried salad with this simple seasoning.

DSC05152_Fotor 1

Ingredients:

Winged beans – 10 -15

Olive oil – 2 tsp

Garlic salt – 1 tsp

Chilli flakes – ½ – 1 tsp

Method:

Ribbet collage 1

  • Wash and slice the beans.
  • Heat one non-stick tawa add olive oil, add chopped beans, garlic salt and red chilli flakes.
  • Stir fry for a while and serve as it is or with curd rice or as you wish.

Neer Dosa:

Hi all! Today I’m posting a south Karnataka special- Neer Dosa! Its literal translation to English is watery Dosa and we call this as “Thellavu”. It is soft lace like and many people enjoy this Dosa. Friends always want to have this Dosa when they visit our home and it is a joy to prepare and eat. Everyone keeps asking for the recipe and I thought I would post it. So, here’s how you make this simple, soft and delicious Dosa. This Dosa stays fresh for hours and very good option for tiffin boxes or gatherings. One can prepare in advance and keep it in a hot box.


Ingredients needed:

Dosa rice -2 cups

Salt

Iron griddle /tawa.

Method:

  • Wash and soak Dosa rice at night or 2 to 3-hour soaking is needed.

dosa rice

  • In the morning grind this soaked rice into fine paste with water (I use soaked water while grinding, it gives nice aroma for the Dosa) and salt as per requirement.
  • Make batter into pourable consistency like this and check for the salt.

Ribbet collage 1

  • Now keep Iron griddle for heat.
  • When it is ready, apply oil like this.
  • Pour one serving spoon of batter like how we make Rawa Dosa, you can see it in the picture above.
  • Now close the lid by keeping the gas on full flame.

Ribbet collage 2

  • After two minutes, remove the lid and keep the gas in simmer the edges of the Dosa rise a little(See in 2nd picture “cook in a simmer”)
  • Now flip this Dosa on the plate, leave for 2 minutes, then fold (upper shiny part will stay upwards) 
  • Now keep repeating this with the remaining batter and stack one over the other or take one big plate and stalk one opposite another alternately.
  • This type of folding will help to keep Dosa without sticking to one another.

neer dosa 7

  • Serve these Dosa with coconut and grated jaggery mixture or coconut chutney. People even enjoy Neer Dosa with Egg curry or Chicken curry as well.

Note:

  • Use soaked water while grinding.
  • If you are using any other variety of rice,please add half cup of fresh coconut to give softness to Dosa.

Spaghetti squash palya/stir-fry:

Spaghetti squash is oblong shaped spring vegetable. Like any other squash it has creamy yellow outer hard skin and inner core and seed part. It is rich in vitamins, rich in antioxidants and low in carbohydrate. Hence it is loved by weight watchers and one can enjoy this super magical veggie in many forms after baking it for a half an hour. After initial baking/cooking ,inner flesh tends to become thread like texture and which can be enjoyed in many ways as salads, as substitution for noodles etc.

I wanted to try this vegetable from so long. In my recent visit to USA, I asked my sister to bring this veggie when I was at her place. She did struggle a lot to find this vegetable in the Summer and finally managed to find one and handed it over to me. I knew it was extensively used as a substitute to noodles in salads, hence I wanted to incorporate it in our south Indian cooking and tried simple palya and it tasted great with rice and Rasam.

palya 2

Ingredients:

Spaghetti squash – 1

Red chilli powder – 1 tea spoon

Salt

Turmeric – ½ tea spoon

Jaggery – 1 tea spoon

Grated fresh coconut – 2 table spoons

Seasoning:

Coconut oil – 1 table spoon

Mustard – 1 tea spoon

Urad dal – 1 tea spoon

Cumin – ½ tea spoon

Red chilli -1 (broken in to half)

Curry leaves – 1 spring

Method:

How to remove or prepare spaghetti, out of squash before making palya-

Ribbet collage 1

If you have not used spaghetti squash before, there are couple of things one should know. First you should cut this veggie into half lengthwise and carefully remove the seeds and attached fibre. Place these two pieces on a lined cookie sheet or any baking tray. Next spray some olive oil or any other vegetable oil and bake this in a pre-heated oven for 30-40 minutes at 180 ®C or until it is cooked and water oozes and accumulates at the centre hollow region.

Ribbet collage 2

Next, remove from the oven, cool a bit. Take one fork and scrape all over and see the magic. Yup!!! You will see lots of noodle like strands and collect all these and keep it ready for further cooking.

How to make Palya:

-Take one kadai/wok add oil and heat. Splutter mustard, add urad dal, cumin, red chilli.

Ribbet collage 3

-When urad dal becomes light brown, add curry leaves, collected spaghetti squash strands, salt, jaggery, red chilli powder and little water.

-Cook until veggie absorbs all the flavours and water dries up. Garnish with coconut gratings.

palya 3

-Serve with rice or roti.


Sorekayi Kottige / Bottle gourd steam dumpling:

Sorekayi is nothing but humble bottle gourd, which we usually neglect to use in our daily diet, which incidentally has numerous health benefits. In our native, bottle gourd is mainly used to treat stomach illness or jaundice. It is believed that, it has the power (anti-inflammatory properties) to heal our Liver and intestine during the illness. Bottle gourd has close to 90% water content and is great on the stomach and light on digestion. Apart from this, bottle gourd juice is very good for weight watchers, diabetics and for a healthy heart too. We have so many traditional preparations of bottle gourd and all are very low in calories and tasty too.

DSC06039_Fotor

Ingredients:

Dosa rice – 2 cups

Bottle gourd – 1 or 2 (according to size)

Salt

Banana leaves or turmeric leaves – to wrap

collage 1

Method:

-Wash Dosa rice and soak it for 3 hours.

-Grate bottle gourd by using big hole of a grater or chop it into very small chunks.

-Grind soaked rice into a fine paste with minimal amount of water and salt.

-Mix chopped or grated veggie and rice batter.

-If you are using turmeric leaves, wipe it and use as it is.

-If you are using banana leaves, take banana leaf, hold it over a gas flame (for wilting) then clean it with a wet cloth.

– If you are using turmeric leaves, use 2 leaves, place it in a “Plus” position, now pour one serving spoon of batter and fold the leaves like a packet.

collage 2

-If you are using banana leaf, pour batter, fold side wise, then close the ends.

collage 3

-Steam cook these ready packets in a water filled idly steamer for 30 minutes to 40 minutes in a medium heat.

collage 4

– Serve this kottige with jaggery syrup with ghee / Honey, coconut chutney or sambar.


Idly/Idli Batter:

Idli is very basic, staple breakfast of south India. It is very healthy steam cooked rice and lentil cake which is very nutritious too. Each place has their own rice and lentil ratio or proportion and grinding technique also changes from region to region. In Mangalore, we soak rice and dal separately and grind very fine paste of urad dal and either we mix rice rawa or we are grinding the rice, we keep it a little coarse, hence this batter will be a little coarse. After fermenting the batter, the next day we proceed to make idlies by using either idly stand or idly cups. In our region, idly cups are regular and very common in every house hold and we use special type of idly steamer and invariably we use this for so many kinds of steam cooking.

pic 14

Ingredients for idli batter:

Idly rice or Idly rawa – 2 cups

Urad/Black gram dal – 1 cup

Poha – 1 fist full

salt

Method:

-Wash and soak rice in one vessel. If you are using idli rawa, you can wash idly rawa and put very little water and keep aside.

collage 1

-Wash Urad dal and poha in another vessel and soak for 3 to 4 hours.

-At first, drain excess water from urad dal and put this into wet grinder.

-Grind this into smooth paste by adding water in-between while grinding.

-When urad dal batter becomes fine and smooth, its consistency becomes almost double and colour of the batter looks milky white.

collage 2

– When you think urad dal batter is ready, add soaked rice or rice rawa by draining its soaked water.

-You can use this water while grinding or adjusting the consistency of the batter or to wash wet grinder at first to remove the dough that is stuck on the stone.

-Grind this into small rawa consistency by adding salt and remove this ready batter into big vessel. If you are using rice rawa ,allow batter to mix for couple of minutes and then remove.

-I usually grind urad dal first, then mix in drained rice so that batter mixes uniformly and becomes light and airy. 

– Batter consistency should be a little thick and when u hold and drop the batter it should not drop very easily and it should stick to the spoon.

pic 7

-Close the lid and keep this batter for 8 to 10 hours or more (according to outside weather where you live) for fermentation.

-Next day morning fill idly steamer or pressure cooker with sufficient water, place the porous plate at the centre of the vessel and keep this on the fire.

collage 3

-Mix fermented batter vigorously, if needed add water and adjust the consistency keep it ready.

-Rinse the idly moulds in fresh water once, it will act as a non-sticky layer between idly and mould.

-When water starts boiling, pour one spoon of batter into respective moulds and steam cook.

collage 4

-If you are using cups, cook this in a steamer for 15 to 20 minutes. Cups holds more batter than idly stand.

-If you are using idly stand, 7 to 8 minutes of steam cooking is sufficient.

-When it is done, switch off the gas, open the lid and remove moulds outside.

-Once it is cool, remove idly and serve with chutney or sambar or with your choice of side dish.

NOTE:

-Use wet grinder to get awesome soft idlies.

– Use soaked and drained water from the dal or rice while grinding. It will enhance the taste.

-Always mix and pour the batter to the moulds, only after water starts boiling.