Ragi Rotti:

Ragi rotti, either you love it or hate it. It is one of the healthiest meals in the Mysore-Bangalore region. Unlike a dosa, where the fermented batter is poured and swirled, we pat the pliable batter by hand.

Even though it was a part of the rural part of Karnataka or in traditional cooking, it has now got its due credit by being considered “Superfood”, diabetic-friendly, calcium-rich, gluten-free, and what not!

Ragi rotti with peanut/Huchellu(Niger seeds) chutney is a healthy and authentic breakfast in Bangalore.

The Rotti and chutney, which I learnt from a couple of my friends, then adapted to make my version, according to my family requirement is here,

Ingredient:

Ragi/ finger millet flour – 2 to 3 cups

Cooked rice – ½ cup

Grated coconut – ¼ cup (optional)

Chopped onions – 2 to 3 (medium size)

Chopped green chillies – 2 to 3

Chopped coriander leaves – ½ cup

Chopped Curry leaves – 2 tbl sp

Chopped pudina – 2 tbl sp (optional)

Salt

Hot water – as needed.

Method:

-Take one wide steel bowl, dry mix everything from ragi flour, cooked rice, chopped green chillies, onions, coriander, curry leaves, pudina, coconut gratings and salt.

-Make a pliable dough by adding sufficient boiling hot water.Keep it aside for 5 to 10 minutes to absorb the seasoning and soak.

-When you want to make rotti, take one piece of banana leaf or butter paper.

-Take a little rotti dough in your moist hand, and start patting in a circular motion by wetting your hand in the water now and then.

-Make 3 or 4 holes here and there if you want the crispier version. Sprinkle one teaspoon of oil over this patted rotti and keep it ready.

-Heat iron skillet and cook oil sprinkled rotti by putting upside down on it. After 2 to 3 minutes, peel off a banana leaf or butter paper.

-Sprinkle little oil over it and flip. Cook and serve hot with peanut chutney or Huchellu chutney.

Note:

-Keep one bowl of water at a reachable distance to dip your hand in-between.

– wetting your hand will help avoid the dough sticking to your fingers while patting.


Khara Pongal/ Ven Pongal :

Ahh..what to say about humble Pongal? It is one of the comfort food for any South Indian. It is most prevalent in Tamilnadu as a Ven Pongal and a Khara Pongal at Bangalore.

Be it breakfast or as popular Tiffin Item or Lunch or Dinner in a chilly winter season, with added healing properties of ginger, black pepper, hing and loads of ghee to soothe your soul.

It is one of the wholesome, one-pot meals. As the Makarasankranthi festival is around the corner, I would love to share the recipe I follow at home and loved by my family.

Ingredients:

Rice – 1 cup

Moong dal /green gram dal – 1 cup

Ghee – 2 tbl spoons

Cumin – 1 tsp

Hing – ¼ tsp

Green chillies- 2 (slit)

Ginger – 1′ ( julienne)

Curry leaves – 1 spring

Turmeric – 1 tsp

Milk – 1cup

Water – 7 cups

Salt

Fresh coconut gratings – ½ cup

Tempering: Ghee – 1 tbl sp, mustard, cumin- 1 tsp, black pepper – 1 tsp – 2 tsp, curry leaves – 1 spring, chopped cashew nuts – 1 to 2 tbl spoons.

Extra ghee – to serve ( optional)

Method:

-Dry roast yellow moong dal for 2 to 3 minutes. Cool it. Wash rice and dry roasted moong together and soak it for some time, or you can use it directly.

-Take a cooker, add 2 tbl sp ghee, add cumin, hing, green chillies, ginger, curry leaves and turmeric and fry for 2 minutes.

-Now drain the rice and moong dal, add-in, mix everything and add water, milk and boil.

-When water starts boiling, add salt, coconut, close the lid, and cook for three whistles.

-Crush black pepper and cumin by putting them together in a mortar and pastel. Keep it ready.

-After opening the lid, make tempering by heating ghee, splutter mustard, add crushed pepper and cumin, curry leaves, cashew bits and fry until the cashew becomes light brown. Pour over the tempering on ready Pongal.

-Mix everything, serve with tamarind gojju, sambar, Raita or chutney.

NOTE: I usually use Broken rice, which is used explicitly for Pogal and available in all the local Rice traders here in Bangalore.

If it is not available, I would prefer to use Jeeraga samba rice/ small grain rice/ sannakki.


Menthe Idli /Fenugreek sweet idli:

We Indians do not need any introduction for methi. Methi seeds are an integral part of our day to day cooking and has an important role in our cooking, even though it is used in a minuscule portion.

Fenugreek or Methi is a power packed, nutritionally rich and produces heat in our body. Hence, the usage of methi is recommended in winter months to keep our body warm and disease free. Traditionally methi has been used as a seed as well as greens. It plays a main part in post-partum/ after delivery diet of Indian ladies. It is believed that it helps in breast milk production.

Today, I am going to share our age old, traditional recipe, which I used to relish during my childhood.

It is a semi sweet idli and tastes really good with methi flavour and is usually served with coconut – ginger chutney, to give it a bit of a kick.

Ingredients:

Dosa rice – 2 cups

Methi – 1 fistful ( approx. 2 tablespoons)

Jaggery –  2 / 2 block  ( according to the taste)

Poha – ½ cup

turmeric powder – 1/2 tsp (optional)

Method:

-Soak methi and rice separately for 4 hrs , after washing it properly.

-Grind methi into a fine paste, by adding sufficient water.

-Add soaked rice into it, add salt, jaggery and grind, until rice turns into small grainy texture. Like a small rava consistency.

-After grinding, remove the batter, it should be a little watery. Now add turmeric, poha into the batter, mix properly, leave overnight or until it ferments. It takes a little longer in cold regions.

-Next day, mix nicely, make idlies in an idli mould, like a regular idli.

-Serve with coconut – ginger chutney.

Chutney in brief: Fresh coconut, roasted red chillies, fresh ginger, little tamarind, and salt.


Mangalore Buns:

Mangalore Buns is a mildly sweet, deep-fried poori which has a honeycomb texture inside.  It is pure bliss to have this super tasty breakfast occasionally. The main ingredient of this delicacy is Banana and curd. That is the reason it has the fragrance, a little sour, melt-in-a-mouth texture and a sweetish taste.

In Mangalore, each hotel in any nook and corner will offer this super yummy dish throughout the day as a snack. Usually, they serve this with coconut chutney or super thin dhal which is called Thovve.

In our household, we relish this with Thovve. Thovve is nothing but cooked Toor dal boiled with slit green chillies, lots of asafoetida/hing and salt and seasoned with coconut oil or ghee, mustard and curry leaves.

Usually, buns are prepared by using all-purpose flour, but I normally make this by using whole wheat as a healthy choice.

Ingredients:

Whole wheat flour – 3 to 4 cups

Curd – ½ cup

Sugar – 6 to 7 teaspoons

Salt – 1tsp

Cooking soda – 1 teaspoon.

Bananas – 4 (small variety)

Cumin seed – 1 tablespoon.

Coconut oil – 2 teaspoons.

Oil- to fry

Method:

-Take one mixing bowl; pour in curd, sugar, salt, and cooking soda. Mix nicely in a circular motion by using your hand.

-When sugar dissolves, add in bananas and mash or add mashed bananas. Now add cumin.

-Starts making the dough by adding Whole wheat flour or All-purpose flour or half and half, however you prefer.

-Dough should be a little sticky, hope you are clear over here, if not please refer to the above picture and refer to my fingers.

-At this stage, pour in coconut oil and coat this on the outer side of the dough. Now keep this oil-applied dough in a bigger container or in that same vessel by closing the lid.

-It should ferment, rise and becomes double. It will take almost 7 to 8 hours in normal weather. In cold areas, even more, time is needed. I keep it for almost 20 hours rising in Bangalore weather.

-Next day morning, Keep oil in a thick Kadai for heating. When it becomes hot, take the fermented dough and keep it ready.

-Don’t mix or knead the dough. Take a small amount of dough, make this into a ball and roll the ball into discs with thickness as shown, by applying flour while rolling. (please refer to the above picture).

-Check the oil, if it is hot start frying buns.

-Slip the rolled disc into hot oil, when it comes up, immediately starts pressing from the back of the frying spoon. (please refer the picture no. 1) Now disc will fluff (No. 2) and fry nicely on both sides.

-Serve these fluffy and soft buns either with Thovve or coconut chutney.


Ubbu Rotti : ( In a Traditional way)

Made Ubbu Rotti for today’s lunch, one of the most laborious and very tasty dishes of south canara region. It is a simple rice flat bread and made by soaking Red rice. This is an age old, gluten free and healthy flat bread.

Ubbu Rotti is made as well as served in different styles. Each household has their own method even though the basic ingredient is the same Red rice which is also known as boiled rice or Kerala Matta rice.

In our household we make the Rotti by soaking Red rice and Idli rice in hot water and ground to smooth batter with salt. The ready batter is then cooked on a low heat to make a dough. Then it is pressed into discs by keeping in-between the two plantation leaves. In our native, people use clay tawa to cook the roti. I normally use my Iron Roti tawa. After cooking on both the sides, normally in villages, we put it on “Kenda” (hot burning firewood) to puff up nicely. Here I normally use direct gas flame to do the same. It is low in calorie as well as very healthy and tasty.

While serving, some families prefer chutney and some Malabar spinach gravy. It depends on one’s family preference. In our household, my Mom used to serve Garlic or Onion chutney and Mom -in -law used to serve with Raw mango chutney.

I have mentioned that it is laborious at the beginning itself. You must be thinking by now, why? It is very simple and straight forward and sounds easy as well. I am telling you, it is one of the most difficult recipes to master! Because it needs a lot of patience and time. Roti cooks really slow and vanishes very fast as well 😉 Once you get a hold of it, you can make it very easily. So, if you attempt and practice you will get the hang of it and can make easily.

Ingredients:

Boiled rice – 1 cup

Idli rice – 1 cup

Salt

Coconut oil – to apply

Method:

-Wash rice and soak it for one to two hours by adding hot boiling water and close the lid.

-Grind into smooth batter by adding enough water.

-Cook the batter( I normally add 1 tsp of coconut oil to batter to enhance the taste)  until it forms a dough consistency.

-Take out and cool a little and start making the discs.

-Take small banana leaves, wash and keep it ready as well as a roti presser or two wooden planks to press.

-Take a big lemon size dough and knead a little and form a round shape.

-Take one banana leaf, place it on a roti presser. Place the dough roundel over it and close it with another leaf and press the presser. If you are using plank, do it exactly like this by using the plank.

-Heat the griddle, place the discs (including banana leaf) over the hot iron griddle. Cook in a medium heat.

-Flip the sides couple of times, when roti cooks, leaf will become loose and at that moment, remove the leaf and discard it.

-continue to cook the roti, until you see the light brown spots. Now it is the time to place it on the direct fire and do it. Some would puff, some would not or partially puff.

-That is it. Remove, apply some coconut oil and enjoy with Onion/garlic chutney or Raw mango chutney or Malabar spinach curry.


Chole Bhature (Chana Bhatura) and Alu subzi:

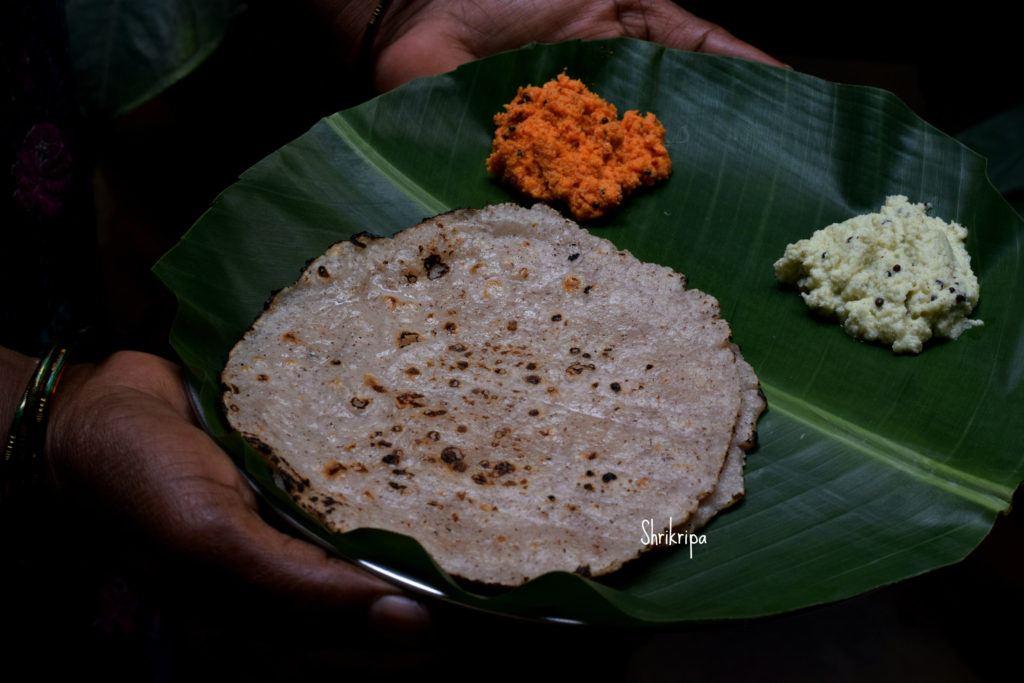
Do I need to introduce every one’s favourite dish? It is basically a deep-fried bread with the fermented / proofed flour dough which Is served with semi dried chick pea curry and potato dry Subzi. This is how we eat or were introduced to this loved-by-all dish.

To prepare we need –

For Chole:

Ingredients:

Chana / white chickpea – 1 cup (soaked and swelled)

Black salt – 1 table spoon

Amla powder / Anardana powder – 1 tea spoon

Oil – 1 table spoon

Ghee – 1 table spoon + 1 tea spoon
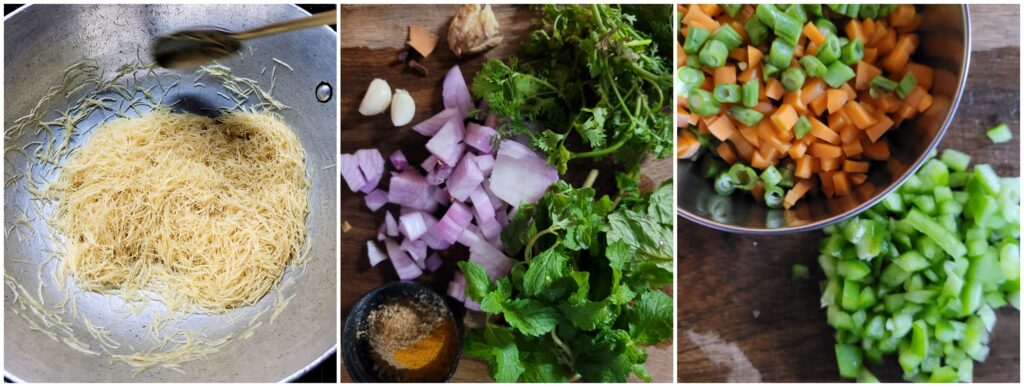
Onion – 1 (chopped)

Green chilli – 1 (slit)

Ginger – ½ inch (sliced)

Garlic – 4 (crushed)

Tomatoes – 2 (chopped)

Turmeric – 1 ½ tea spoon

Red chilli powder – 1 tea spoon

Coriander powder – 2 tea spoons

Cumin powder – 1 tea spoon

Garam masala – 1 ½ tea spoon

Kasuri methi – 1 table spoon

Salt

Coriander leaves – chopped

Method:

-Cook soaked chana with enough water, black salt and amla powder. It would take any where between 5 to 6 whistles in the pressure cooker.

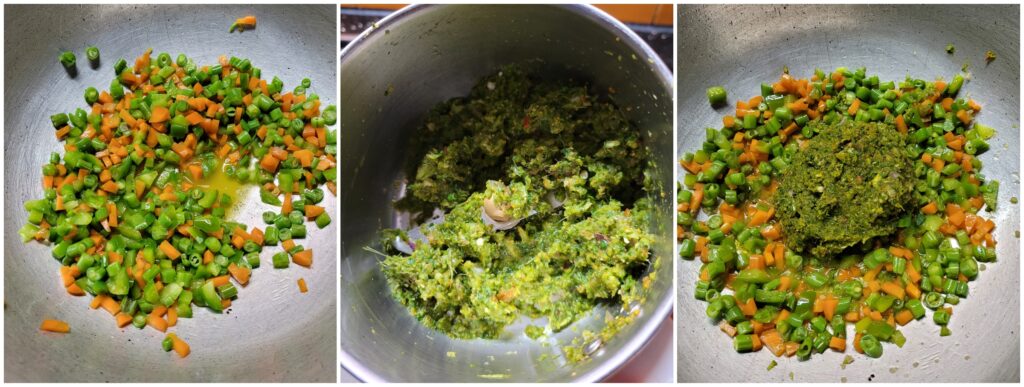
-Take one tawa, Heat oil and 1 table spoon of ghee. Add onion, green chilli, garlic and ginger fry until it is transparent and light brown.

-Add in all the masalas, from turmeric to Kasuri methi and salt fry for a while. Add tomato, continue frying until tomato wilts. If needed sprinkle some cooked water from the chana and cook tomato well.

-Cool this mixture and grind this into a smooth paste by adding ladle of cooked chana as well. (it would help gravy to thicken)

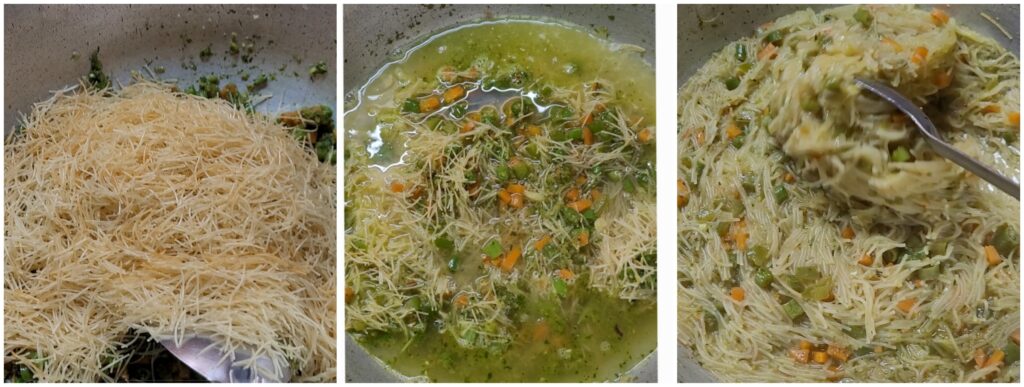
-Now mix in this paste with cooked chana and start boiling until oil oozes out and garnish with chopped coriander leaves and 1 tea spoon of ghee.

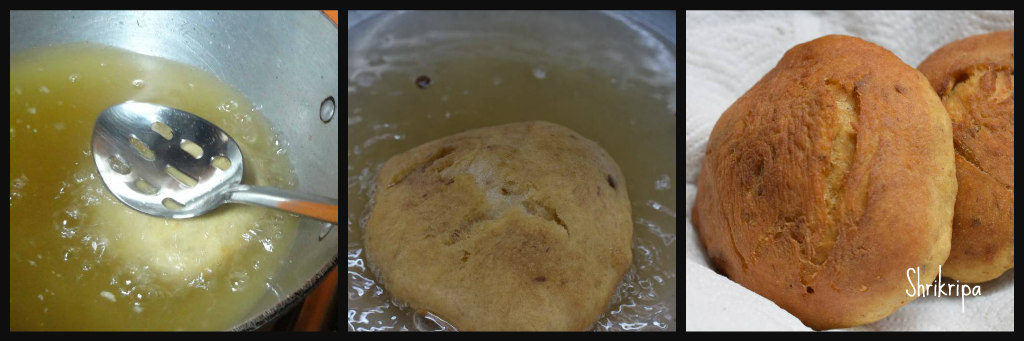
 Now we will move towards Bhature / Bhatura :

Ingredients:

Whole wheat – 2 ½ cups

Maida – 1 cup

Chiroti Rava – 1 cup

Curd – ½ cup

Water – ½ cup

Salt

Sugar – 1 tea spoon

Yeast – 1 tea spoon

Oil – 2 tea spoons

Method:

-Take Luke warm water- mix in curd, sugar, salt and yeast. Close the lid and wait until it proofs and bubbles.

-Dry mix all the flours or you can take only Maida as well. Make a dough by using yeast water and apply an oil and keep aside for 2 to 3 hours or until doubles the volume.

-When it is ready or time to serve, roll a small disc and deep fry.

Now one more dish, which is purely an optional item:

Alu Subzi / potato dry:

Ingredient:

Potatoes – 5 to 6

Mustard oil – 2 table spoons

Sun flower oil – 2 table spoons

Cumin – 1 tea spoon

Turmeric – ½ tsp

Coriander powder – 1 to 2 tsp

Red chilli powder – 1 to 2 tsps.

Amchur powder – 1 tsp

Garam masala – 1 tsp

Little Subzi masala – 1 tsp (optional)

Sugar – 1 pinch

Salt

Coriander leaves – chopped (to garnish)

Method:

-Cook potato in pressure cooker for 1 whistle. Peel the skin and dice.

-Take one tawa, heat oil, cumin, diced potatoes, all the powders and fry until masala is coated and becomes little crispy.

Garnish with coriander greens.

For deep fried chillies and Onions :

I normally slit the chillies, put a drop of lemon and salt inside and marinate. While frying bhature, deep fry and serve.

Half the onion, slice width wise and separate the layers by hand and sprinkle some salt and chopped coriander.

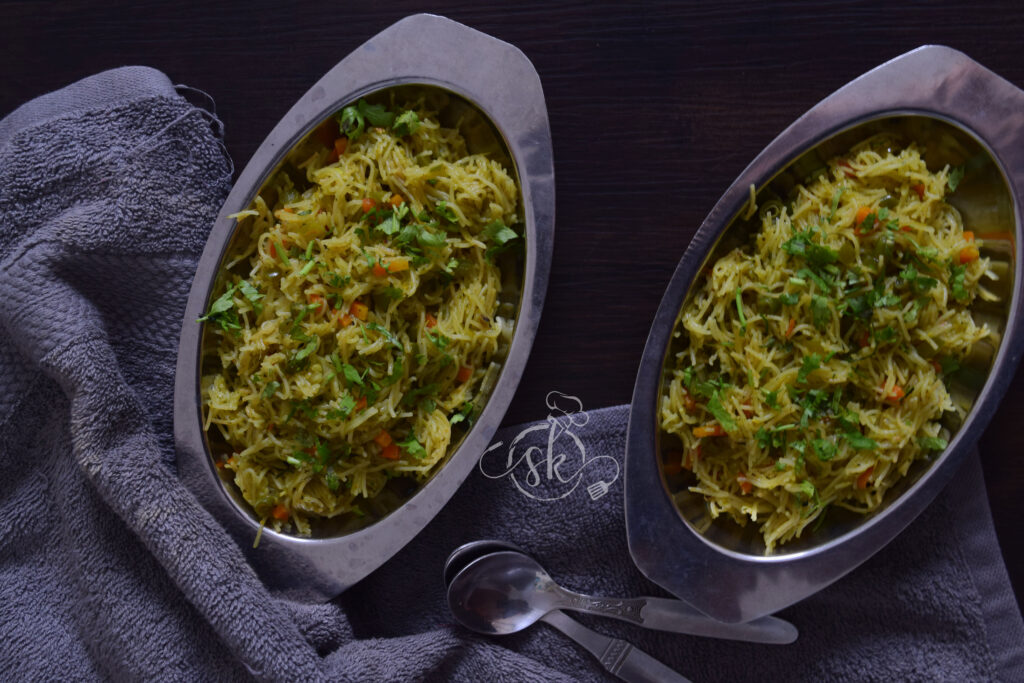
While plating, place Bhature, chana , potato, little onions and one chilli and serve with love 😊


Red cabbage Sandwich:

Red cabbage or purple cabbage? This vegetable has an identity crisis. Red or purple, it is one and the same and this vegetable has numerous health benefits as well. It is a cruciferous vegetable and can be consumed both raw and cooked.

It is a power house of Vitamins, Minerals such as Iron and calcium and dietary fibre . I normally avoid buying cabbages, due to its high pesticide content. Now a day, we do get organic cabbages here in Bangalore. Hence, there is an opportunity to have this beautiful veggie in a raw form as well. When we were shopping, my daughter remembered my Red cabbage sandwich, which I used to prepare for her when she was small and asked me to prepare the same. So, picked up and made this sandwich and tried one rice recipe as well. In coming days, you can expect my new recipe of Red cabbage and sweet corn one pot meal.

Now I will share my sandwich recipe from the scratch-

Ingredients:

Shredded red cabbage – 2 cups

Onion – 1 big

Garlic mayonnaise – 2 table spoons

Honey mayonnaise – 2 table spoons

American mustard – 1 tea spoon

Hung curd – 1 to 2 table spoons (to adjust the consistency)

Oregano – 1 tea spoon

Tomato ketch up – 1 to 2 tea spoons

Red chilli flakes – ½ tea spoon

Grated cheese – 2 table spoons

Bread of your choice – 1 loaf

Butter – to apply while roasting.

Method:

-Take one bowl, put shredded cabbage, chopped onion, garlic mayo, honey mayo, American mustard and hung curd. Mix nicely.

-Now mix in Oregano, chilli flakes, tomato ketchup and grated cheese.

– Mix and make a spreadable mixture. Now your sandwich stuffing is ready.

-Take one slice of bread, spread this mixture and close another bread slice over this.

-Apply butter on both the slices at outer side and keep it in a pre-heated sandwich maker.

-When outer surface becomes light brown, remove and proceed to make remaining sandwiches.

-If you want an extra zing, you can serve this with tomato ketch up or as it is.

Rava idli with Oats/ Semolina idli with Oats:

I normally used to make plain Oats idli, earlier. It is our favourite breakfast item and I wanted to make a slight change while preparing and used my Rava idli making method with oats added in it and served with Potato Sagu as how I serve normal Rava idli. It tasted good and we started liking this method instead of making plain Rava idli. This is one more instant and handy recipe for me and works just fine even in kid’s lunch box as well. Addition of oats increases the nutritional value of the dish. So, whenever excess curd is there, this is one more recipe to indulge in that too without any grinding and prior planning.

I normally prepare the dry mixture the previous night and keep it ready to cut short my early morning job. It works very well. Dry mix consists of seasoning and roasting part.

How I make –

Ingredients:

Normal Rava / Semolina – 2 cups

Oats – 2 cups

Curds – 2 cups

Water – 3 cups

Eno fruit salt – 1 tea spoon

Salt

Coriander leaves – ¼ cup (chopped)

Seasoning:

Ghee or oil – 2 table spoons

Mustard – 1 tea spoon

Urad dal – 1tea spoon

Chana dal – 1 tea spoon

Hing – ¼ tea spoon

Cumin – 1 tea spoon

Cashew bits – 2 table spoons (optional)

Curry leaves – 2 springs (Shredded)

Method:

-Take one kadai, do seasoning part. Heat ghee, splutter mustard, then add urad and chana dal.

-When dals become red, add cashew, hing, cumin, curry leaves and fry for 1 minute.

-Add Rava and roast for a while (until it is grainy) and add oats and proceed the roasting process for some more time. (May be 2 minutes more).

– Add in chopped coriander and mix until it distributes evenly and wilts a little.

-Switch off the gas and leave this mixture to cool. (I usually prepare this much in the previous night and keep it ready)

-Next comes the batter preparation. Use room temperature mixture. Don’t use hot Rava mixture to make idli batter.

-Take one big bowl, pour in curd and water (here I normally take one cup of liquid to each cup of oats and 1 ½ cup of liquid to each cup of rawa) It is a very simple calculation 😊

-Add salt and Eno fruit salt (you can use cooking soda as well) beat a little to attain frothy texture.

-Add seasoned Rava and oats mixture to this and mix.

-Now comes the idli steaming part.

-Take one cooker, pour one cup of water at the base and heat.

-Rinse idli mould by using fresh water. (it is an alternate to greasing the mould)

-Pour ready batter to idli mould, keep it in a steamer and steam cook for 10 minutes.

-Remove, cool, de mould and serve with chutney or potato Sagu.