Kesari bath:

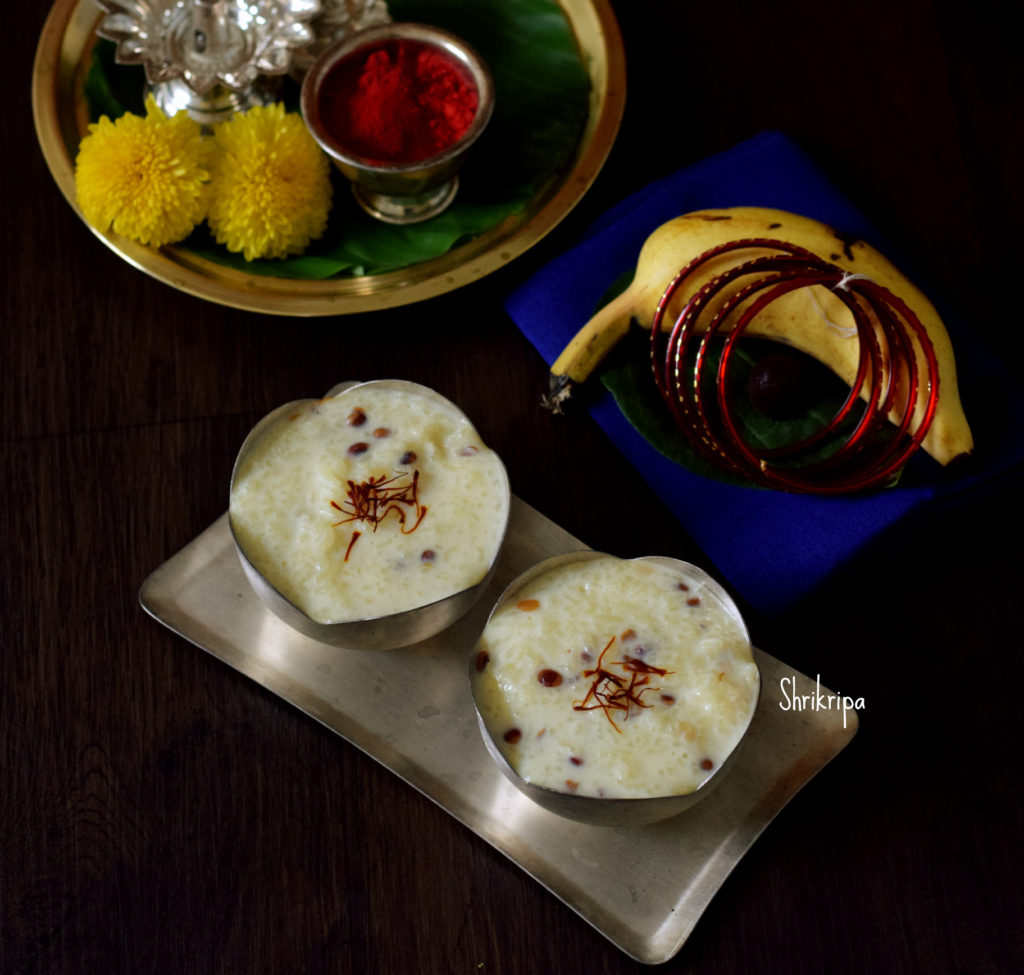
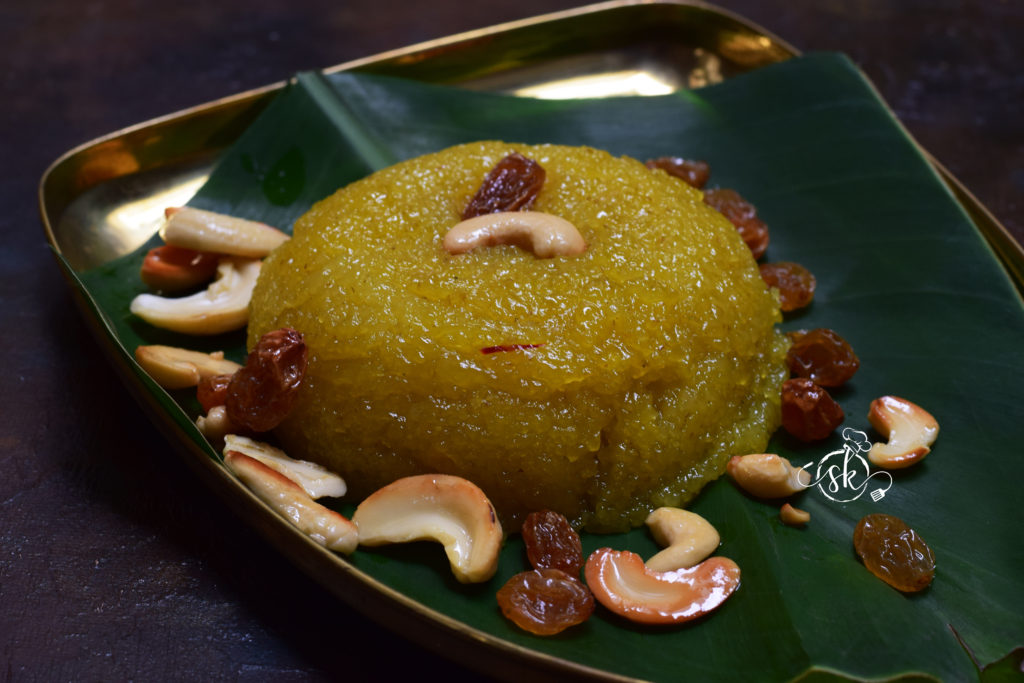
Kesari bath is made in many ways. Traditionally, it is made with Bansi Rava, and that is how my husband likes it. Since it is our Anniversary, presenting one of the much-cherished desserts and an integral part of our wedding menu.

Today, I am celebrating five years of blogging and 23 years of our togetherness with the much-loved sweet of my Husband, Kesari bath.

It is a simple sweet, with minimal ingredients like Bansi Rava, Sugar, Saffron and ghee, garnished with ghee fried cashews and raisins. Earlier I used to eyeball the measurements and prepare. The traditional measure and this foolproof recipe, which we cherish, is by my friend Madhu.

For measurements, use any tumbler of your choice.

Ingredients:

Bansi Rava- 1cup

Water-3cup

Sugar – 1 ½ to 2 cups ( Acc to your sweet level)

Salt – ¼ tsp

Cardamom powder – 1 tsp

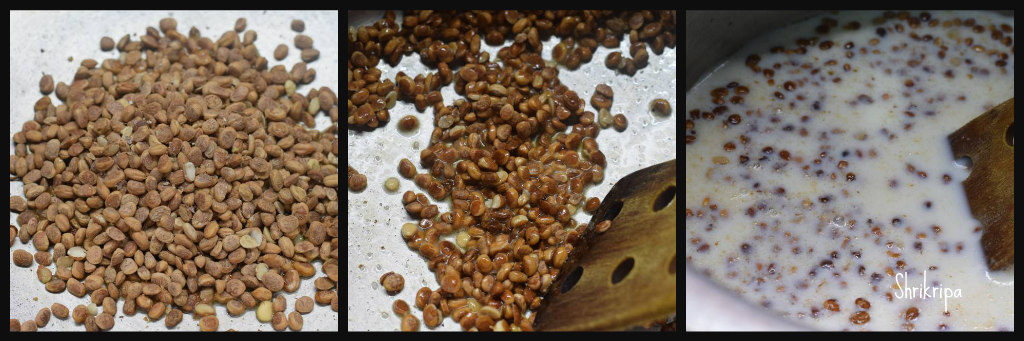
Saffron – 10 to 12 strings (soak it in hot water or milk)

Ghee- ½ cup or a little more, as needed.
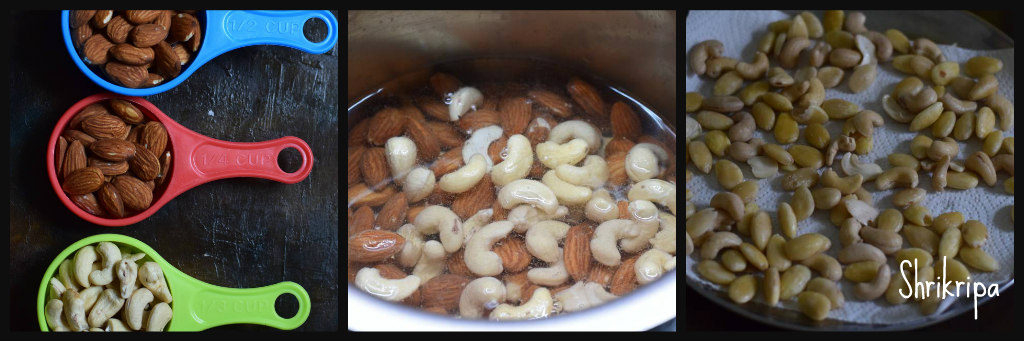
Cashews 10-15

Dry grapes- 15-20

Method:

-Take a small cup, add saffron, pour little hot milk or water, and allow soak.

-Keep water to boil in a saucepan.

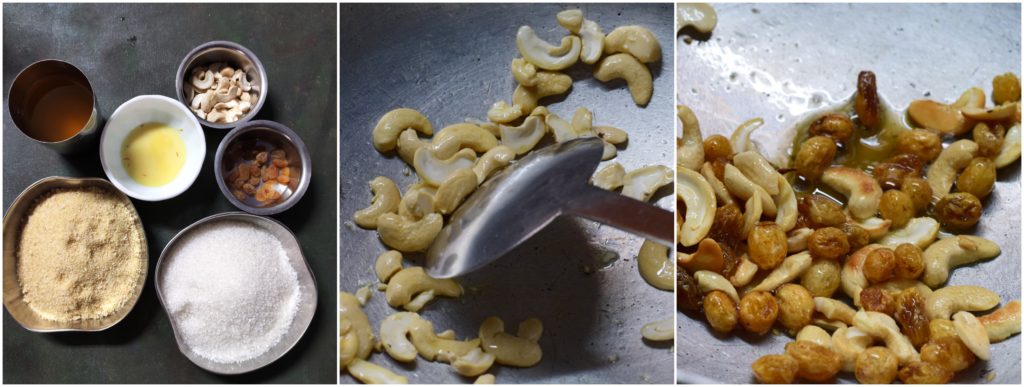
-In a pan, add a tablespoon of ghee, fry cashew and dry grapes and keep aside.

-In the same pan, roast Bansi Rava till a pleasant aroma comes and turns grainy.

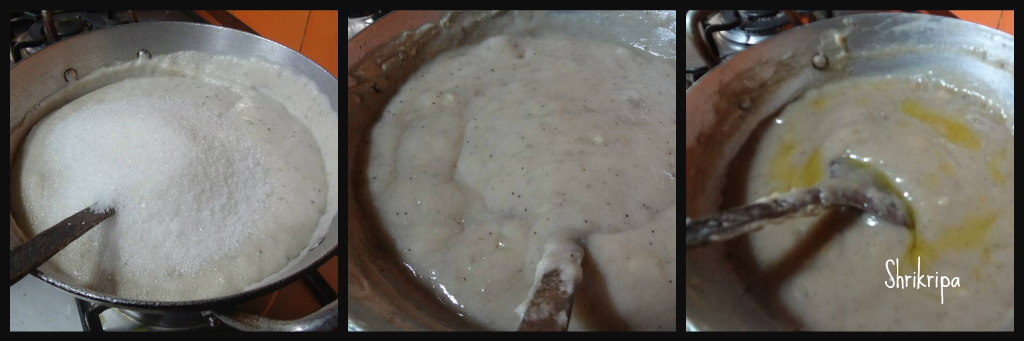
-Add salt and pour boiling water and allow to cook on a low flame.

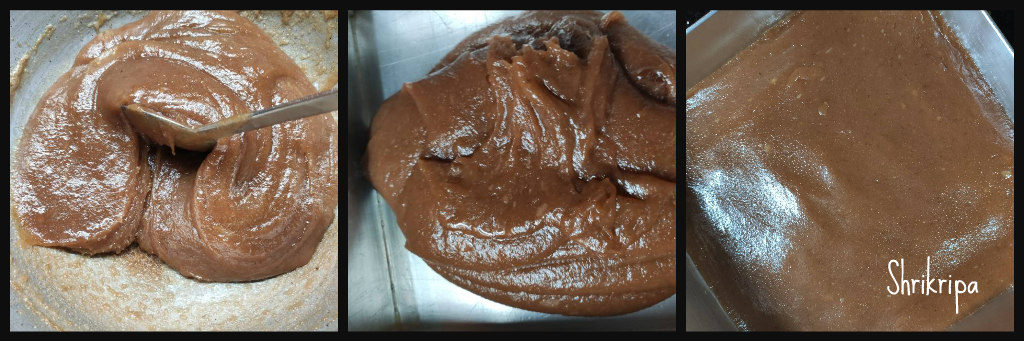
– Once Rava is cooked, add sugar stir well to make sure there is no lump.

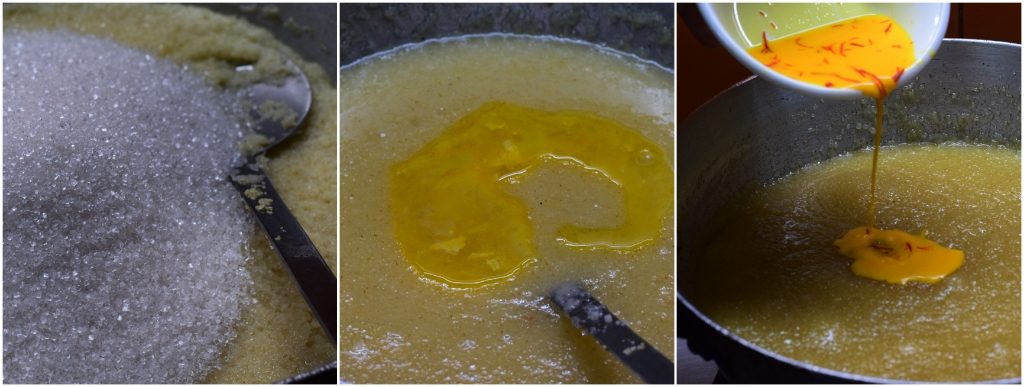
-While stirring, In every small interval, add ghee and proceed to stir.

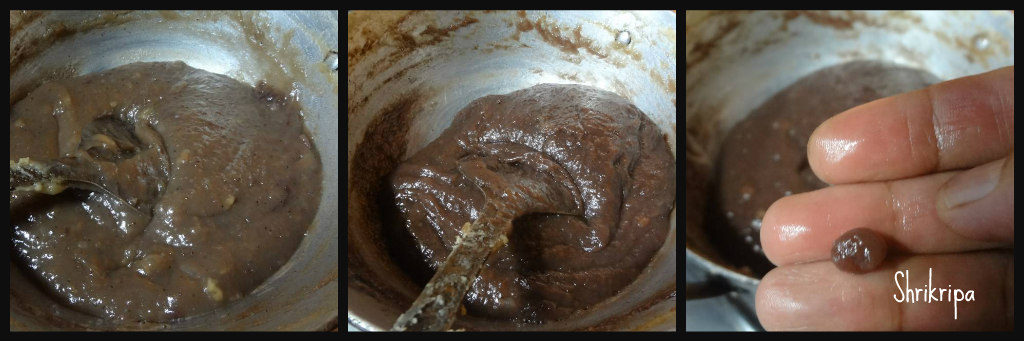
– After 10 minutes of stirring, you can add saffron laced milk and mix well.

– Keep adding ghee little by little and mix well. Cook this mixture until ghee starts leaving from the sides.  Finally, add cardamom powder,  dry fruits mix well.
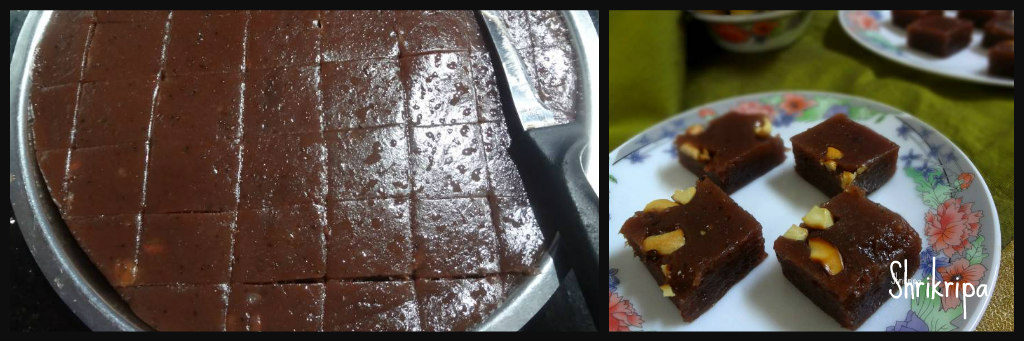
Serve hot.

NOTE:

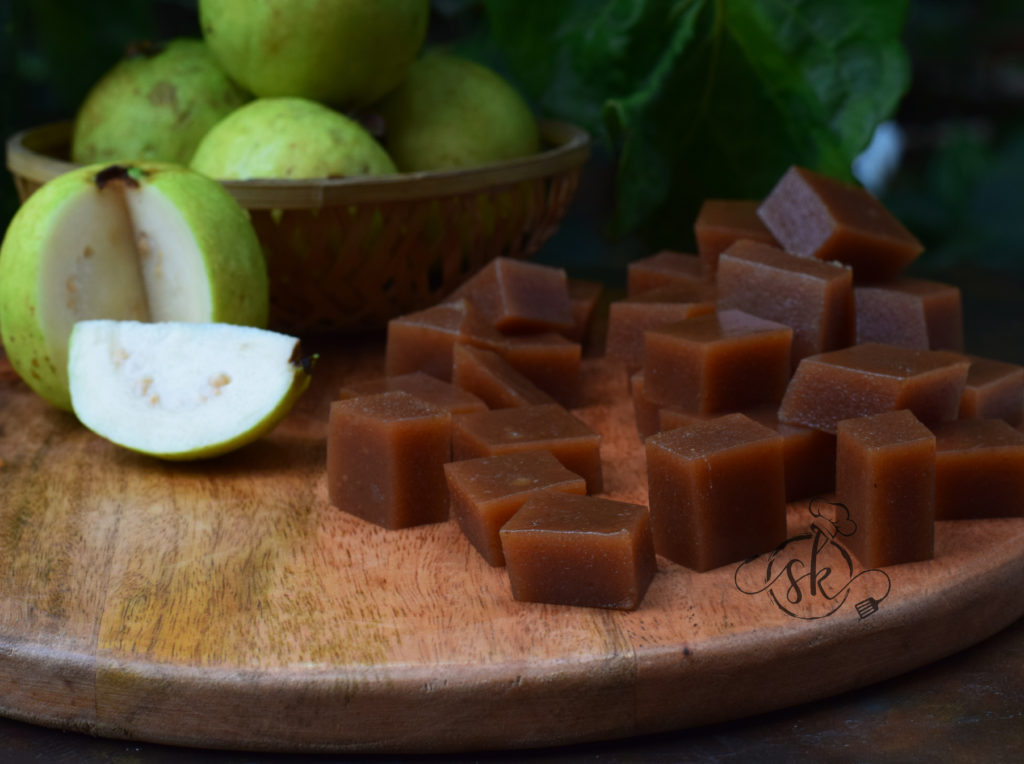
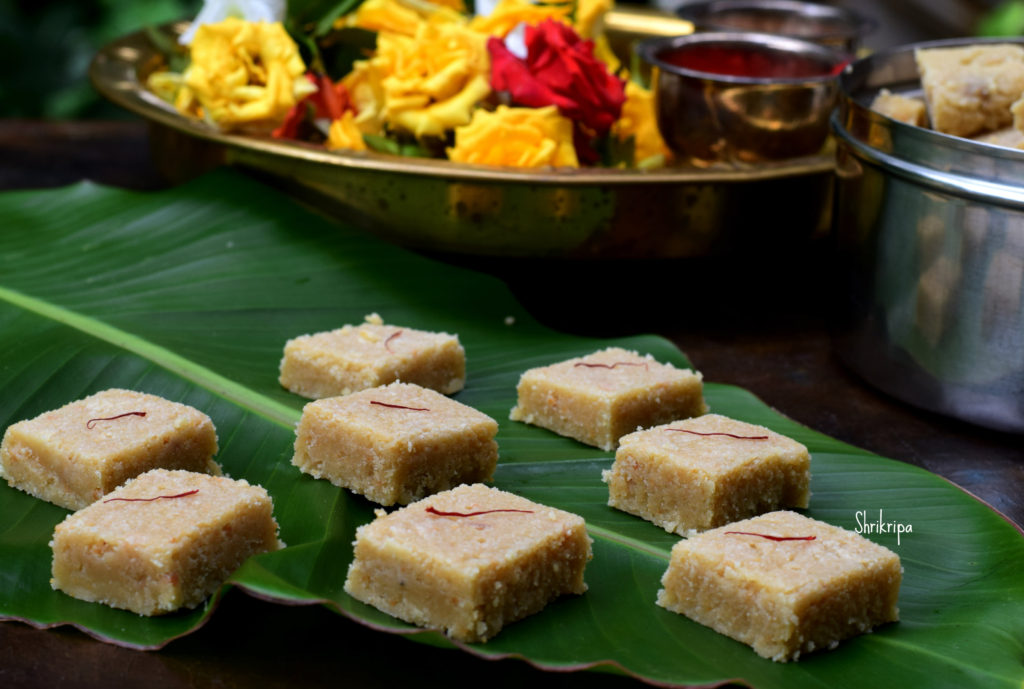
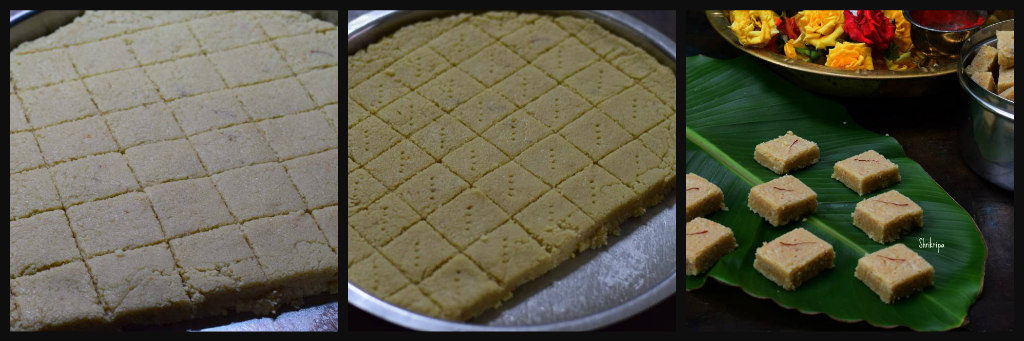
If you wish to make square pieces out of it, when the Kesari bath is done, Spread the content on a ghee applied plate.

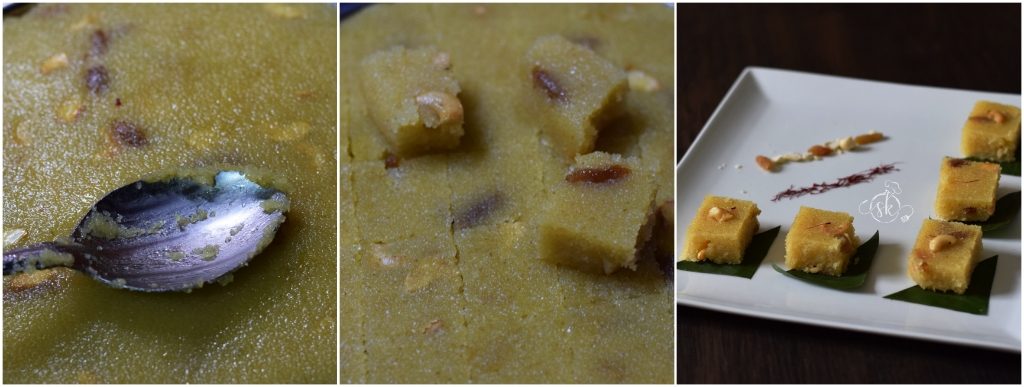
Allow to cool, mark the shape, get the perfectly shaped pieces, and store them in an air-tight container.

Guava Cheese/ Perad/halwa :

When the neighbour comes and hands me a big bag full of substantial sized overripe guavas, I knew, it is going to be a strenuous task. I need to deal with my mindset of ‘no wastage.’ First thing, came to my mind was my favourite Guava cheese.

When I was reading about the guava cheese, its origin, it traces back to Portuguese settlers in Brazil where it’s known as Goiabada. I am guessing that is how this recipe landed with them in Goa and is known as Perad/Peraad.

In simple terms, guava cheese is nothing but guava halwa. It doesn’t taste like cheese. Its texture is something you can easily bite into, yet is slightly chewy, somewhat like our Banana halwa, with a grainy texture, of course with added guava taste. Colour of the cheese depends on the variety of the Guava. If it is white, the colour turns our light brown, like mine. I usually mix a half red and half white variety of Guava to get beautiful hue.

Ingredients:

Overripe Guava – 2kgs

Sugar – 800 grams to 1 kg (acc to your palette)

Salt – ½ tsp

Butter – 3 tablespoons

Lemon juice -1 tablespoon 

Method:

-Wash, chop the fruit into quarters—Cook with sufficient water for two whistles, cool.

-Pulse it in a mixer jar along with cooked water, sieve the Puree, separate the seed and its roughage.

-Weigh the pulp. For 2 kgs of pulp, I have taken 800 grams of sugar. You can take up to one kg if you prefer sweeter.

-Take one thick bottomed Kadai, add the pulp and boil for 20 minutes or until it starts boiling. Allow 10 minutes more to boil and add sugar and salt, continue to cook in a low flame.

-When the mixture turns pinkish brown add butter and proceeds to cook further. When it starts leaving the sides, add lemon juice, cook ten more minutes.

-Remove the mixture to the greased plate, leave 4 to 6 hours and then cut.

-Stays good for 3 to 5 months without any problem, at room temperature, stored in an airtight container.


Mangalore style Traditional Chakkuli/Chakli:

Today, I am going to post my mom’s chakli recipe – which used to be made on the same day of the festival/ pooja to offer as an offering to the god. This recipe does not need much planning. In our tradition, offerings to the deity should be done on the same day. It cannot be made beforehand nor readymade from the shop.

Here, you can take any tumbler as a measuring device.

Dosa rice – 1 cup

Urad dal – ½ cup

Poha or Sabudana – 1 tablespoon

Salt

Butter – small lemon size

Sesame seeds – 1 to 2 tsp

Method:

-Wash, soak dosa rice for an at least 2 hours.

-Dry roast urad dal until light brown and poha or Sabudana until crisp. Cool and make a fine powder.

-Sieve and collect those rough powder, repeat the grinding process to get fine powder. Keep it aside.

-Now, take soaked rice, grind into smooth paste with very minimal water and required salt.

-Now mix rice batter, sieved powder, butter, sesame seeds and make a smooth dough by adding required water, if needed.

-Heat coconut oil or any vegetable oil, prepare chakli’s by using chakli press. Drain excess oil, cool and store in a sir tight container.

Almond Cashew Mawa Burfi:

Who does not love Almond or Kaju Katli? Here I have combined the much loved two raw materials,  with milk solid/ khoya, to give a melt in a mouth Indian dessert, In the form of burfi.

Almond cashew mawa Barfi is a super delicious, easy to make, melt in mouth Indian sweet or fudge recipe. A perfect sweet to make on any special occasion! Or festive time.

Ingredients:

Almond – ¾ cup

Cashew –  1/3 cup

Khoya /mawa – ½ cup / 100 grams ( unsweetened)

Sugar – 1 ½ cup

Water – ½ cup

Ghee – ¼ cup

Saffron – 10 – 12 strands

Method:

-Heat a cup of water, soak almond and cashew. Close the lid and keep it for 2 hours.

-After two hours, peel the almonds, drain the water, spread these on kitchen towel to remove extra moisture.

-Grind them in a small mixer jar, by using pulse option by giving intervals for mixing in between to get a smooth paste. Grease one steel plate and keep it ready as well.

-Now, take one thick kadai, pour sugar, water, and boil until it reaches one thread consistency. It takes hardly 5 minutes, after initial boil.

-Add in Almond, cashew paste, after it melts and forms a homogeneous mix, add in grated Mawa.

-Stir everything in a low fire, without leaving hand. While stirring, add a tsp of ghee at regular interval and add saffron strands as well.

-When mixture leaves the sides, as well as thickens, check for the doneness. Take out little mixture, hold a small quantity, in between your thumb and forefinger, try to make a ball. Formed ball should shine as well as should not stick to your finger.

-If it passes the test, switch off the gas, and keep stirring for another 5 to 7 minutes, if any ghee is remaining, pour in between stirring.

 -Take the greased plate, pour the mixture, and spread evenly and leave it for 10 minutes. Mark the line and keep it aside for cooling. After cooling, take out pieces, store it in an airtight box.


Banana Halwa:

Banana or Plantain Halwa was an integral part of my childhood. Usually this Halwa is made by using Kerala big banana which is called as” Nendra variety” but in our home, we used to have lots of overripe bananas from our family farm. To finish off all those overripe small bananas (Kadali variety of Mangalore), amma used to make Halwa or Banana Preserve/ Berati all the time. It was a very regular sweet at our house hold. Today I will share this recipe to all our readers-      

Ingredients:

Over ripe banana – 22

Sugar – 1 bowl

Ghee – ½ to ¾ cup

Cashew nuts – 2 tbl sp.

Method:

-Put all the peeled bananas to mixer grinder and make a smooth paste. Measure this by using any bowl of your choice.

-If this paste is 3 cups in quantity take one cup of sugar in that same measurement cup. So, your ratio of banana paste and sugar will be 3:1.

-Fry cashew bits in a teaspoon of ghee and keep aside. Grease one plate with ghee and keep it ready.

-Take one thick bottomed kadai, put this paste and keep gas flame in a very low flame and cook for a while.

-When it changes its colour to milky white and then to a pale colour and when you smell the banana flavour in the air, add sugar and mix this in at a regular interval.

-Add ghee 2 table spoons at a time in-between while stirring. If you feel that the banana paste needs a little more ghee, add up to ¾ cup, some varieties of bananas need very less ghee and some need more.

-Now we will see, how we decide the quantity of ghee. While stirring if you feel that the mixture is a little dry and the bottom part becomes a little brown, keep adding it.

-If the ghee starts oozing at the sides, it is an indication to stop the addition of ghee.

-Now we will see how you know the doneness. It is very simple, keep on stirring until mixture leaves the sides of the kadai and ghee oozes out from the mixture.

-You can add cashew pieces at this stage or spread those pieces in a greased plate like me. After you are done with this, it is almost ready to shift to the plate.

-Before shifting I prefer to check, by taking one small peanut sized portion of the mixture and rolling it in-between your thumb and forefinger to make a small ball like structure. If it holds a ball like structure and does not stick to your finger, it is ready.

-Now remove from the flame, shift to a greased plate and pat this mixture evenly by using a flat, greased (apply some ghee) back of the spoon.

-Keep this aside for two or three hours to cool. Then cut this into the desired shape and store it in an airtight container.

-You can store this Halwa for a really long time (up to a month or two).


Steamed Modaka / Steamed Rice dumpling with Coconut Jaggery filling:

Ganesha Festival aka Vinayaka Chaturthi is the time, when we indulge in so many varieties of traditional delicacies- Genasale, patholi, Chakkuli or Chakli– to name a few. Two varieties of Modaka (steamed and deep fried) Panchakajjaya, Halittu (nothing but rice noodles), Guliyappa are the main things which we normally find in our region.

Ganesha has one more name as a “Modaka Priya” means, he loves to eat Modaka. Steamed medakas are also known as Ukkarisida Modaka / Ukdiche modak in India.

Which is ground rice batter, which is cooked until it reaches a ball form and kneaded and stuffed with a coconut jaggery filling and steam cooked.

Some people or in some region, people do use rice flour, instead of soaked and ground batter.

Now a days, people make various kinds of modak from, khoya, chocolate, dry fruits etc. But traditionally it is done in this way.

Procedure goes like this –

Ingredients:  

Dosa rice /white rice – 2 cups

Grated coconut – 1 cup

Grated Jaggery – ½ cup (to taste).

Ghee/ Clarified butter – 4 tsp.

Salt to taste

Modaka mould – (optional)

Method:

-Wash rice and soak it for 2 to 3 hours.

-Grind soaked rice into smooth paste by adding water and salt.

-Now keep thick bottomed kadai, pour the ground batter and add some water to make thin consistency.

– Now add 2 tsp of ghee and start heating this mixture by continuous stirring. When it becomes little thick and forms a mass, switch off the gas and keep it aside to cool.

-When it is ready to handle, knead it further and form a smooth dough.

-Cover the dough with wet cloth, to retain moisture.

In the meantime, make sweet coconut-jaggery mixture. In a thick bottomed vessel add jaggery and ½ cup of water and heat. If you find some impurities in jaggery syrup, sieve this liquid and heat further and add fresh grated coconut and cook until it is sticky and forms mass. Add remaining ghee to this and mix. Now stuffing is ready.

Method to make Modaka by using mould-

-Grease the mould by using ghee.

-Take a lemon sized dough at a time, knead a little and use.

-Close the mould, apply the dough all around the mould, fill a tea spoon of coconut jaggery mixture by leaving very little place at the neck of the mould.

-Now take a tea spoon of dough and seal it. Now Stuffed Modaka is ready.

-Proceed until all the dough is over and arrange all these medakas in an idli steamer.

-Steam cook for 15 to 20 minutes.


If you are using Rice flour or Modaka flour:

Ingredients:

Rice flour – 2 cups

Water – 2 cups

Salt

Ghee – 1 tea spoon

Method:

-Boil water by adding salt, ghee in a thick bottomed pan.

-When water starts to boil, add rice flour and keep in a simmer for 5 minutes.

– Switch off the gas. After some time, knead the dough and follow the same procedure as above. 

-While kneading, if needed , sprinkle some hot water and proceed.

-Proceed until all the dough is over and arrange all these medakas in an idli steamer.

-Steam cook for 15 to 20 minutes.

Note:

-If you don’t have Modaka mould, take a lemon sized dough, make a 4” disc by using your thumb and fore finger of both hands.

-Keep this in your left palm, in a cup shape, put filling (smaller in size) and cover it. Arrange all these medakas in an idli steamer.

-Steam cook for 15 to 20 minutes.


Chakkuli / Chakli:( Traditional Way)

Chakli is a default and very important savory in Ganesh Chaturthi offerings. This chakli is the one, I have learnt from my close family friend which she prepares during the Krishnashtami / Janmashtami festival which is very important in their Iyengari community.

She usually prepares Chakkuli flour little ahead of the festival. This can be stored in room temperature for up to 6 months. If ready chakli flour is in hand, you can make these super soft butter chaklis in no time and can relish whenever you want.

First, I would explain how to prepare the powder and then we will move towards chakli making.

For Chakli Flour:

Use One glass for measurement.

Ingredients :

Sona masuri or Dosa rice – 4 cups

Urad dal – 1 cup

Method:

-Wash Rice and Urad dal separately, couple of times.

-Drain water, keep this in a strainer for some time.

-Then spread this on a clean towel and dry this for couple of hours by keeping it indoors.

-When it is dry, if you feel little cold while touching, it is ok.

– Keep one kadai, when it is hot, pour rice little by little and heat a little in batches. You should fry only for 2 minutes.

-Spread this on a towel or paper and cool.

-Next Dry roast washed and dried Urad dal until it is light brown and emits nice fragrance.

-Cool these two ingredients and give it to nearby flour mill and make powder.

-After powdering, mix everything nicely or sieve couple of times and keep it in a cool dry place. It is your Basic Chakli flour.

For Chakli:

Ingredients:

Chakli flour – 1 cup

Butter – 2 table spoons (small lemon sized ball)

Salt

Hing – ½ tea spoon

White sesame seeds – 1 tea spoon

Water – to bind the dough

Oil – For frying

Method:

-Take one wide bowl, put flour, salt, hing, sesame, butter and rub everything nicely.

-Pour water little by little and bind to make a dough. It should be soft and non-sticky.

-Set aside this dough for 5 to 10 minutes or until oil heats.

-Take oil in a kadai, when it is hot, start making chakli on a piece of paper or butter paper, by using chakli press.

-Drop these chaklis in hot oil and fry in a low flame.

-When it is done, remove and drain the excess oil and cool.

-Store these chaklis in an air tight container.

NOTE:

-When you drop the chaklis, initially you will hear bubbly noise and gradually noise becomes less and stops. That is the time, you should remove the ready, fried chaklis.


Rice kheer:

As a south Indian, moreover in Mangalore, we normally make Akki Payasa aka rice kheer as a prasadam for some poojas, either by adding jaggery or sugar by adding coconut milk or normal milk and it usually in thin consistency. If it is thick, it is known as pindi payasam and I have already posted the recipe earlier. I learnt this recipe from my close friend Surekha, who hails from Allahabad, all thanks to her for such a wonderful tasty kheer recipe. It is one of my daughter’s favourite as well. 

In this recipe, washed rice is cooked in milk, until done and in this process, milk condenses and yields creamy texture and kheer holds melt in the mouth texture as well. Speciality of this kheer is, addition of nutty flavoured Chironji or Charoli. It tastes a little like almonds and are tiny roundels in shape and good substitute to almonds as well. Which contains good fat, vitamins, minerals and dietary fibres in a considerate amount.  This is an ideal recipe for any kind of festival, potluck party.

Now we will see the procedure –

Jeera samba rice / small grain rice – 1 cup (you can use any fragrant rice)

Chironji – 100 grams

Milk – 1 to ½ litre (boiled)

Saffron – 10 strands

Sugar – 1 to 1 ½ cup (according to your sweet level)

Method:

-Wash rice, soak rice for 10 minutes.

-Soak saffron in 2 table spoons of hot milk and keep it aside.

– Take one thick kadai, add little ghee and fry Chironji until light brown.

-Add milk to this vessel and heat this. When it starts boiling, add soaked and drained rice.

-Cook in a very low flame, until rice is done and soft.

-If additional milk is needed, please add the extra amount. Each rice is different, so, please take care while adding milk.

-Now add sugar and saffron with soaked milk into it and boil. When kheer is ready, you will see the top glossy layer and it is the time to switch off the gas.

-Serve this kheer hot or cold, however you like to have it.


Aralu laddu / Puffed Paddy snow ball:

Aralu, Hodalu or Puffed paddy is made by roasting paddy itself. Usually we see puffed rice in the market. Puffed paddy is very rare to find nowadays. It has a very important role in any divine occasions like marriage, Ganapathi havan, Nag Panchami or chauthi festivals in our region.

Normally we don’t eat rice preparations during vrath (fasting) and Aralu fits the bill. Aralu or puffed paddy is prepared by roasting the paddy in an iron tawa. Usually in villages, they do it in an open air. Normally, in open air, wood fire setting will be laid, iron tawa is heated uniformly by putting little sand into it. When sand becomes hot, fist full of dried paddy would be dropped and tossed regularly until paddy puffs and bursts into white popped rice. It is not cooked or done by using water and it is done by roasting. That is the reason it is considered as Pure /auspicious thing and used in prasadam or any divine purposes.

We can make this and use as a regular energy ball as well. It has all the goodness that our body needs. It fits the bill as #eatlocal #healthy #natural #ironrich #fibrerich #refinedfree #holistic #glutenfree #healthysnack #kidfriendly as well.

We normally get puffed paddy in two forms. Either whole or powdered.

Here in this laddu, I have used powdered form. If you have whole paddy, nothing to worry. Make powder by using mixer jar and use it.

I have used chikki jaggery which is also known as Antu bella. One can use normal jaggery as well.

Ingredients:

Powdered puffed paddy – 1 ½ cup

Jaggery – ½ cup (I have used chikki jaggery)

Black Sesame – 2 tea spoons

Broken peanuts – 3 to 4 table spoons

Ghee – 2 table spoons

Water – 2 table spoons

Cardamom powder – ½ to 1 tea spoon

Method:

-Clean puffed paddy powder, by removing any leftover paddy husks and keep it ready.

-Dry roast peanuts, remove outer skin and make it into halves or use roasted and halved peanuts itself.

-Dry roast sesame seeds as well.

-Dilute jaggery in water by boiling. When jaggery melts, sieve and collect. In this way, we can discard the impurities from the jaggery.

-Take one thick bottomed kadai, add jaggery solution, 1 table spoon of ghee and boil until it reaches one thread consistency.

-If you are confused with this stage, take one small tumbler, filled with water. Drop the jaggery mixture and see. If jaggery becomes hard when it drops, and you can make a ball when you press and rotate it by placing in between your thumb and forefinger.

-Mix in puffed paddy powder, roasted sesame, peanut halves, cardamom powder, remaining one table spoon of ghee and mix everything.

-Switch off the gas.

– Apply little ghee on your palm and start making roundels. Sometimes, In-between If it cools down completely, it doesn’t bind, and you can keep the vessel on fire, re heat a little and proceed and finish off the mixture by making roundels.


Shankarpali/Diamond biscuits:

Shankarpali is a traditional Maharashtrian, deep-fried snack. It was introduced to us by our neighbour aunty. It is a very light, flaky, melt-in-the-mouth, a small, irresistible cookie that is deep-fried and not baked. It has a good shelf life, and one can enjoy it even after Diwali.

Traditionally, Shankarpali is made by using All-purpose flour. Here, I have used Whole wheat flour and oat flour and did not feel any change other than the colour of the final product.

If you want to use All-purpose flour, follow this recipe, replace the flour, and proceed.

Ingredients:

Milk – 1 cup

Ghee – ½  cup

Sugar – ¾ cup ( I have used Brown sugar)

Salt – 1 tsp

Cooking Soda – ¼ tsp

Flour – 3 ½ to 4 cups (as required) ( All-purpose flour OR Whole Wheat and Oat Flour)

Oil – to deep fry.

Method:

-Take one bowl or food processor, beat milk, ghee and sugar until frothy.

-In another bowl, take 2 cups of whole wheat flour and ½ cup of oats flour, salt, cooking soda and dry mix everything.

-Add the mixed flour to the liquid ( beaten milk and sugar), add some more whole wheat flour and make a soft, pliable dough by adding whole wheat flour little by little.         

– Cover this bowl and keep it aside for 15 minutes. Meanwhile, Keep the oil on a low flame to deep frying.

-Take a small portion of the dough, roll it into a thick ¼ inch circle, like a Roti. Remove the outer curved portion and make a square. ( it is optional to get only square pieces)

-Take a pizza cutter or any other zigzag cutter and cut this flattened disc. Now deep fry it on a low flame.

-When it becomes light brown, take it out and spread it on a tissue paper laid plate.

-When it is cool, store this in an airtight container.

NOTE: Keep the gas flame to a simmer and maintain the temperature of the oil. If oil is overheated, the shankarpali would turn into deep brown/ half-done and charred.