Tiffin Sambar:

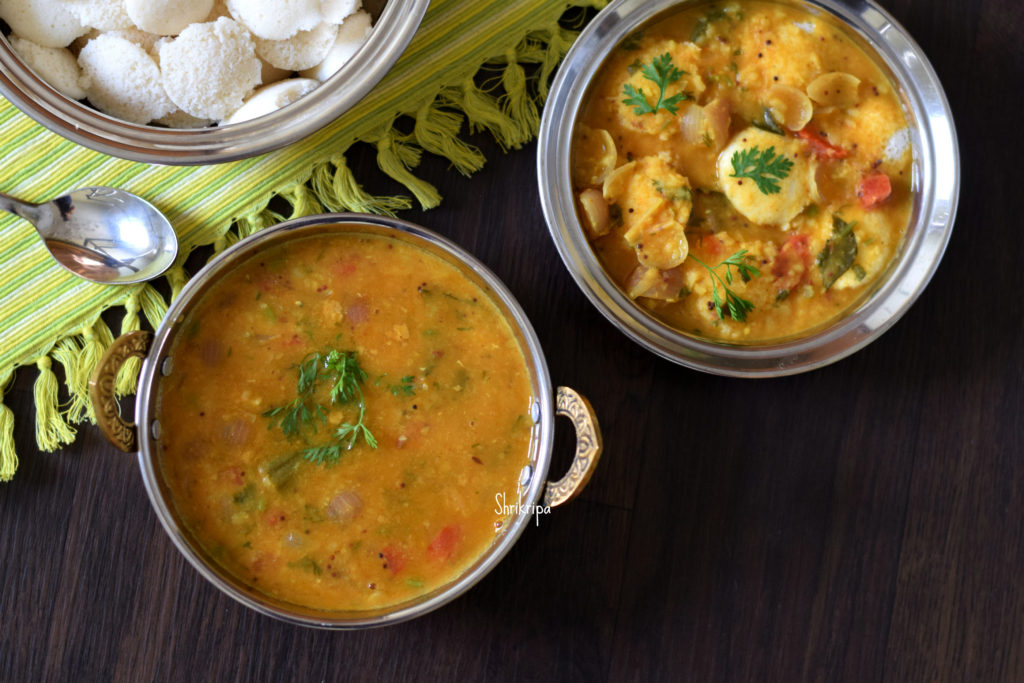
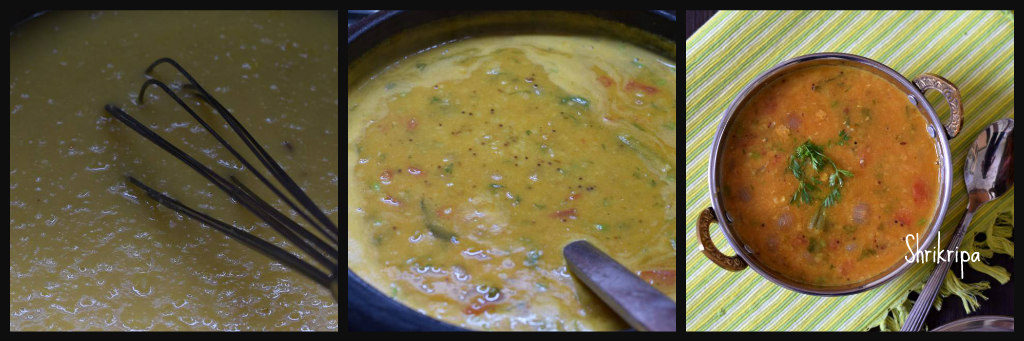
Tiffin usually depicts south Indian breakfast. Normally Idli, Dosa, Pongal. This particular sambar is very good combination with Idlies or dosas as well as goes very well with mini idlies which normally known or served as 14 idlies, mini idlies or button idlies at restaurants.

In this sambar, we don’t use any coconut and basically a seasoned mixed dhal with sambar powder as well as baby onions, tomatoes and with or without drumstick pieces.

Ingredients:

Toor dal – 1 cup

Moong dal – ½ cup

Green chillies – 2 (slit)

Baby onions /shallots – 20 (halved)

Tomato – 1 (chopped)

Drum stick – 1 (Cut into 2” pieces) (optional)

Tamarind – 1 tsp

Salt

Jaggery – 1 tsp

Turmeric – 1 tsp

Sambar powder – As needed

Chopped coriander leaves – 2 table spoons

Seasoning:

Oil – 2 table spoons

Mustard – 1 tsp

Cumin – 1 tsp

Hing – ½ tsp

Curry leaves – 1 string

Method:

-Wash and cook toor and moong dal in a pressure cooker. Mash and keep aside.

-Take one tawa, do seasoning. Heat Oil, splutter mustard, cumin, hing and curry leaves.

-Fry onion until it is transparent. Add turmeric, green chillies, tomato and drumstick pieces as well as salt and fry until tomato cooks.

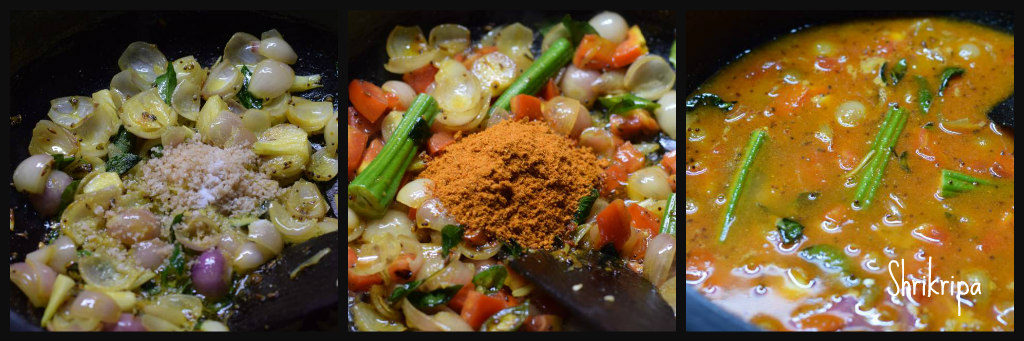
-Add Sambar powder toss for 2 minutes and pour tamarind water, jaggery and boil.

-Add Cooked dal and adjust the consistency and boil nicely.

-Garnish with chopped coriander and serve as a side dish for any south Indian breakfast items.

-If you are serving with Button idlies/ mini idlies Pour one to two serving spoons of sambar, place 14 idlies and once again pour some sambar over those idlies and serve.


Surnoli: (Bread dosa/ Buttermilk dosa)

Surnoli is a traditional breakfast recipe of south canara; it is also called as bread dosa or buttermilk dosa. This is usually prepared if you have left over buttermilk or curds in excess. Usually we make this by adding jaggery.

Here I am giving both sweet and normal dosa version.

Ingredients:

Dosa rice – 3 cups

Fenugreek seeds – 2 tsp.

Beaten rice /poha – 1 ½ cup

Salt – to taste

Buttermilk /curd – 2 cups

Grated coconut – from half coconut or 2 fists full.

Eno fruit salt – 1 tsp. each (for sweet/normal version)

Grated jaggery – according to taste (2 to 3tbl sp) (For sweeter version)

Turmeric powder – 1 tsp. (for sweeter version)

Method:

  • Wash dosa rice, fenugreek and beaten rice twice; discard water. Pour curds and soak this for 3 to 4 hours.
  • Grind this in to a smooth paste by adding coconut and salt to an idly batter consistency (little thicker than normal dosa)
  • If butter milk is very sour add milk while grinding or else you can add water too (if batter is too thick)
  • Now divide this batter into two, take out one portion of batter into a steel vessel in which you keep it for fermenting. This is our normal dosa batter.
  • For sweeter version, add turmeric and jaggery to the mixer jar and grind until it is homogenous.
  • Remove this batter to another vessel and keep it for fermentation.
  • Next day morning add 1 tsp. Eno fruit salt to both the batter and leave it aside for 10 min.

  • Make a dosa by pouring one serving spoon of the batter on hot iron griddle, don’t spread.
  • You will see thousands of holes on upper surface, smear with butter(Vegan’s can avoid) and cook this in a low flame by closing it with a lid.
  • Cook this dosa only on one side and don’t flip.

    -Spongy bread dosa is ready to serve and indulge in it with homemade butter or any chutney. Here I have served this with Onion-coconut chutney.

Indian Gooseberry preserve/Amla Jam:

Indian gooseberry is a sour and tangy fruit with many medicinal values as it is a rich source of vitamin C, calcium etc. It is known as Nellikai in Kannada, Amla in Hindi. This berry has been used for years in Ayurvedic medicines as well as in Home remedies, because it is rich in antioxidants. I make it a point to store Amla in a couple of forms every year- normally by Sun drying and making a jam instead of doing traditional morabba etc.

Usually early morning, weekly 3 to 4 times I do include this jam in my breakfast. It is very good for hair, skin, eye sight and overall health of a human body.

How I make –

Ingredients: 
Amla/Gooseberry (grated)-1 cup 
Sugar -1 cup 
Water -1 cup 
Red Chilli powder-¼ tsp 
Black pepper powder -¼ tsp 
Kesar – 5 -6 strings 
jeera powder -½ tsp 
Turmeric -¼ tsp 
Salt -As per taste 

Method: 

– Wash, cut open and remove the seeds. Put gooseberry either in food processor or chopper. U will get nice uniform chunks, or you can directly grate it.

-Take one thick bottomed pan, add water, grated amla, sugar. Mix well. Cook in low heat.

-When it is half done, add all the other masalas, salt and cook further.

-When mixture becomes shiny and forms a single thread, when you touch in between your fore finger and thumb.

-Switch off, cool and store it in a glass bottle.

-Stays good for one year, in cool weather like Bangalore.


Mangalore Buns:

Mangalore Buns is a mildly sweet, deep-fried poori which has a honeycomb texture inside.  It is pure bliss to have this super tasty breakfast occasionally. The main ingredient of this delicacy is Banana and curd. That is the reason it has the fragrance, a little sour, melt-in-a-mouth texture and a sweetish taste.

In Mangalore, each hotel in any nook and corner will offer this super yummy dish throughout the day as a snack. Usually, they serve this with coconut chutney or super thin dhal which is called Thovve.

In our household, we relish this with Thovve. Thovve is nothing but cooked Toor dal boiled with slit green chillies, lots of asafoetida/hing and salt and seasoned with coconut oil or ghee, mustard and curry leaves.

Usually, buns are prepared by using all-purpose flour, but I normally make this by using whole wheat as a healthy choice.

Ingredients:

Whole wheat flour – 3 to 4 cups

Curd – ½ cup

Sugar – 6 to 7 teaspoons

Salt – 1tsp

Cooking soda – 1 teaspoon.

Bananas – 4 (small variety)

Cumin seed – 1 tablespoon.

Coconut oil – 2 teaspoons.

Oil- to fry

Method:

-Take one mixing bowl; pour in curd, sugar, salt, and cooking soda. Mix nicely in a circular motion by using your hand.

-When sugar dissolves, add in bananas and mash or add mashed bananas. Now add cumin.

-Starts making the dough by adding Whole wheat flour or All-purpose flour or half and half, however you prefer.

-Dough should be a little sticky, hope you are clear over here, if not please refer to the above picture and refer to my fingers.

-At this stage, pour in coconut oil and coat this on the outer side of the dough. Now keep this oil-applied dough in a bigger container or in that same vessel by closing the lid.

-It should ferment, rise and becomes double. It will take almost 7 to 8 hours in normal weather. In cold areas, even more, time is needed. I keep it for almost 20 hours rising in Bangalore weather.

-Next day morning, Keep oil in a thick Kadai for heating. When it becomes hot, take the fermented dough and keep it ready.

-Don’t mix or knead the dough. Take a small amount of dough, make this into a ball and roll the ball into discs with thickness as shown, by applying flour while rolling. (please refer to the above picture).

-Check the oil, if it is hot start frying buns.

-Slip the rolled disc into hot oil, when it comes up, immediately starts pressing from the back of the frying spoon. (please refer the picture no. 1) Now disc will fluff (No. 2) and fry nicely on both sides.

-Serve these fluffy and soft buns either with Thovve or coconut chutney.


Mango Pickle (North Indian style):

This pickle happened due to my daughters. It is a perfect accompaniment for any parathas or Thepla. I came to know about this recipe from my friend Kavita, who had gifted me this pickle, prepared by her. When it was about to finish my daughters insisted that I prepare it at home and this is the result of their insistence. I want to thank Kavita, who did answer all my queries patiently and guided me through the process.

According to my friend, Thothapuri variety of mango tastes good for this masala. Hence I tried with the same.

Ingredients:

Mango – 1 kg (used Thothapuri variety)

Salt

Turmeric – 1 table spoon

Mustard oil – 1 cup

For Masala:

Red chilli powder – 2 table spoons

Hing – 1 table spoon

Fennel seeds -2 table spoons

Kalonji – 2 table spoons

Yellow mustard seeds – 3 table spoons

Fenugreek/Methi seeds- 1 ½ table spoons

Method:

-Wash, dry and cut the mango into pieces.

-Marinate these pieces with 2 fistful of salt, 1 table spoon of Haldi/ turmeric and mix thoroughly by using dry hand.

-Keep this for two hours and drain the oozed-out water and reserve it for future use.


-Spread these marinated mango pieces over dry cloth and dry under partial sun light or air dry.

-In the evening , remove those shrunken mango pieces and once again mix it with oozed out salted water which we have reserved from previous Marination process.

– The next (second) morning, drain and repeat the process of drying.

-On the second evening, those mango pieces will be ready to mix masala.

-First heat half a cup of mustard oil until it is very hot, then cool it.

-Take all the ingredients from fennel seeds to methi seeds and lightly pound in a small mixer jar by using pulse option. Don’t make fine powder.

-Now take one bowl, mix in all the masalas, sun dried mango, additional salt and mix nicely by using your clean and dry hand.

-Fill the mixture in a glass bottle and pour cooled mustard oil and cover the bottle with muslin cloth and keep it under sunlight for 1 week or partial sunlight.

-After one week, pickle would reduce in quantity. Pour remaining half of mustard oil by heating at first, then cooling it.

-Cover the cloth and repeat the process of keeping it in sunlight for some more days.

-Now it is ready to consume.


How to chop young jack fruit: Beginner’s guide

 Tender jackfruit is an integral part of our traditional cooking. In our region, we start to consume raw jack in different stages and each developing stage of jack has its own unique traditional recipes and is considered as a delicacy. I have shared many recipes of jackfruit in my blog and it is available in my blog archive or you can find in recipe index as well.

Nowadays, people follow many forms of diets and Jackfruit is used extensively in other parts of the world as well. As a plant-based meat alternative, young jack is considered as a Vegan meat.  It suits very well as a vegan meat, due to its fibrous structure and its neutral flavour works very well in cooking savoury dishes and soaks the added flavours.

Tender jackfruit is a super food, which is high in vitamins, minerals and dietary fibers and at the same time, less in calories, salt and fats. Now a day, it is available in almost all parts of the globe as fresh or frozen.

If you get a whole young/ green/ tiny raw jackfruit, what you would do? How to chop? What is the procedure we normally follow? These are the aspects I want to share in this post and I am sure, you would try to use these techniques while chopping the fruit by yourself.

Wanted to include the chopping/ cleaning procedure from a long time, it is tedious to do photography with my latex laden hand while chopping. This post is all thanks to my mother in law, who offered me a helpful hand in chopping, and I grabbed the opportunity to click pictures and the result is here –

First thing is –

  • Centre core part of jackfruit contain a sticky, white latex also known as sap. So, before chopping, apply some cooking oil to your hand and the knife that you use.
  • We normally use traditional vegetable cutter. in which, half-moon shaped knife fixed into raised wooden plank in which, person sits over and holds the vegetable in both the hands and cuts and moves it against the blade. The sharp edge of the knife will face the user. In this method, large sized vegetables can be handled with ease.
  • If you are using the knife or any other material, before cutting – spread a couple of newspapers beneath the work area.
  • Keep a couple of tiny pieces of papers ready, it would be handy while removing the latex.
  • Take one bowl of water as well.
  • Now, take one young jack fruit, make half and slice them to length wise.
  • Clean the oozed-out latex by using tiny paper pieces.

  • Now remove outer thorny skin as well as inner core.
  • It is ready to chop, as per your requirement or the recipe.
  • Make pieces as required and put it in a water containing bowl.

  • Drain the pieces, discard water and proceed to cook or store it in a zip lock and refrigerate or freeze it.
  • Wash your gummy hand by applying little oil once again, rub both the hands and wash it by using normal hand wash.


Baked Carrot Halwa:

Baked halwa is an experiment to attempt halwa in an easy manner.   This halwa is not a grainy textured one, it is very smooth and flavourful.

I was thinking of trying out carrot halwa by baking and felt like using my regular carrot halwa ratio in this as well to maintain nice colour and flavour by using Delhi Red carrot which is available only during the winter months as well as the regular orange one.

In this recipe, at first, I have cooked the carrot, then pureed and baked. The recipe goes like this –

Ingredients:

Red carrot – 1 kg

Regular carrot – ½ kg

Milk – ½ cup

Sugar – 2 to 3 cups (according to your taste)

Cardamom – 1 tsp

Saffron – 8 – 10 strings (optional)

Salt – one pinch (it really helps in balancing the taste)

Ghee – ½ cup

Slivered almonds – (roasted)

Method:

-Wash, slice the carrots. Take one pressure cooker and cook carrot by adding milk and saffron until 2 to 3 whistles.

-When cooked carrot comes to room temperature, churn it into a puree by adding sugar or you can do it like me.

-Now take this puree, mix in sugar, cook until sugar dissolves and add ghee, salt and cardamom. check the sugar and if needed adjust according to your taste.

-Transfer this mixture into a baking dish and bake this in a pre-heated oven at 180 °C for 40 to 60 minutes or until top layer becomes dark and bubbly.

-Remove from the oven and spread the almond slivers at the top and you can proceed to enjoy as it is or with a scoop of ice cream.