Fresh Pigeon pea and Methi Pulav:

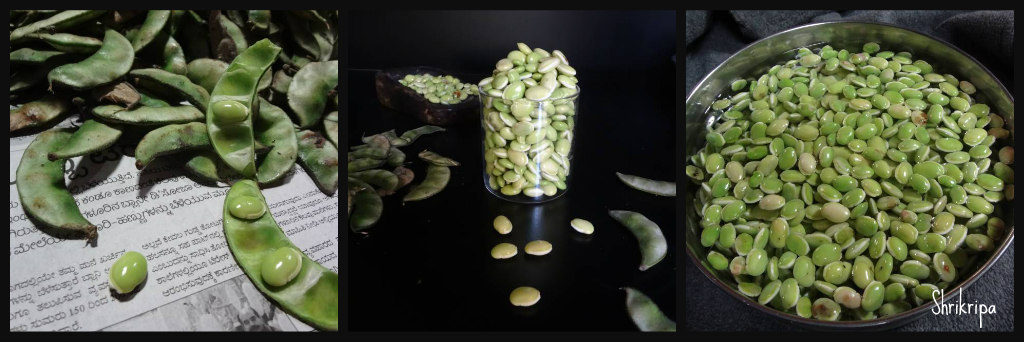
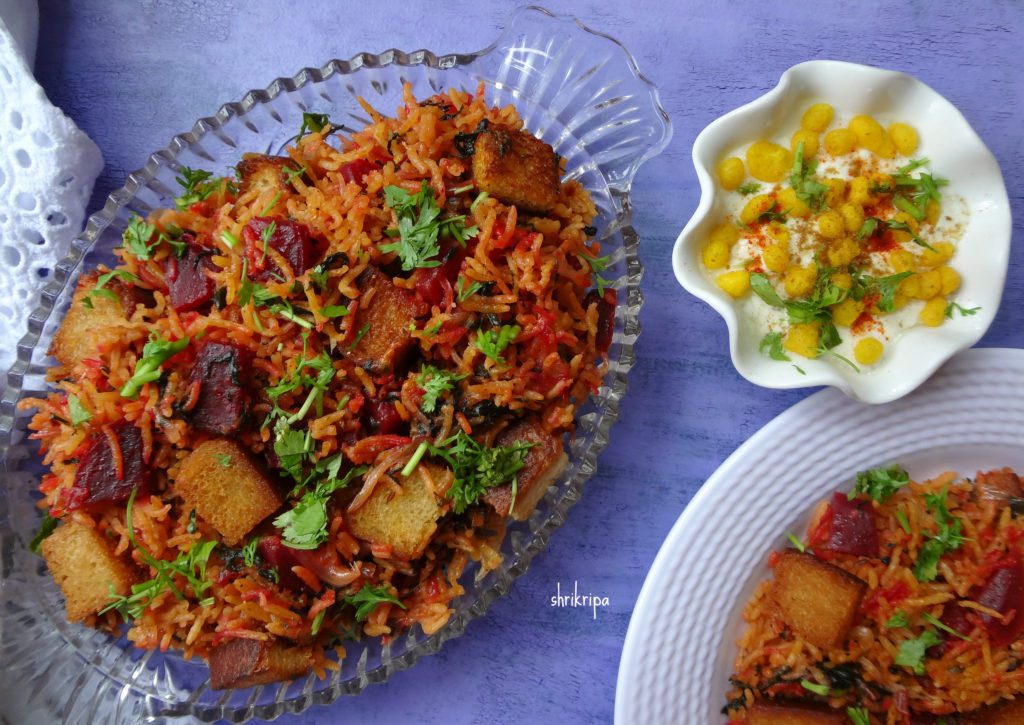
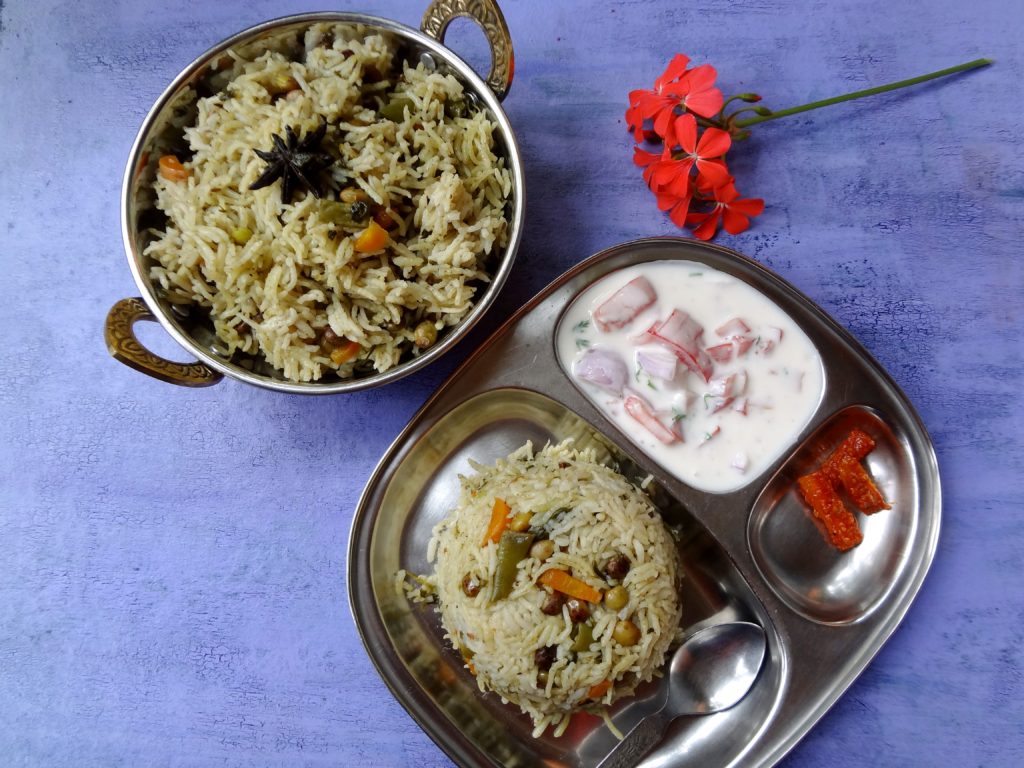
Winter is that time of the year, where you can relish all the fresh produce from the bean family. One such bean is Thogari kayi/Fresh Tuvar/Pigeon peas. These are beautiful green pearls with maroon spots all over them and we can make so many varieties of dishes from them. This rice dish is a very easy, one pot meal which has the goodness of Tuvar dal, methi leaves with coconut flavour which will enhance the flavour of the dish to another level.

DSC05585_Fotor

Recipe goes like this-

Ingredients:

Rice – 3 cups

Onion – 2

Fresh Pigeon peas – 1 cup

Fresh methi leaves – 1 small bundle

Veggies of your choice – 1 cup (French beans, carrot)

Ghee /oil – 2 to 3 table spoons

Bay leaves -2

Cumin – 1 tea spoon

Mace – 1

Marathi moggu – 2

To grind: Little coriander leaves, Cinnamon one stick,3 to 4 green chillies and 1-inch ginger.

Coconut milk – 1 cup

Lemon –  ½

Salt

Method:

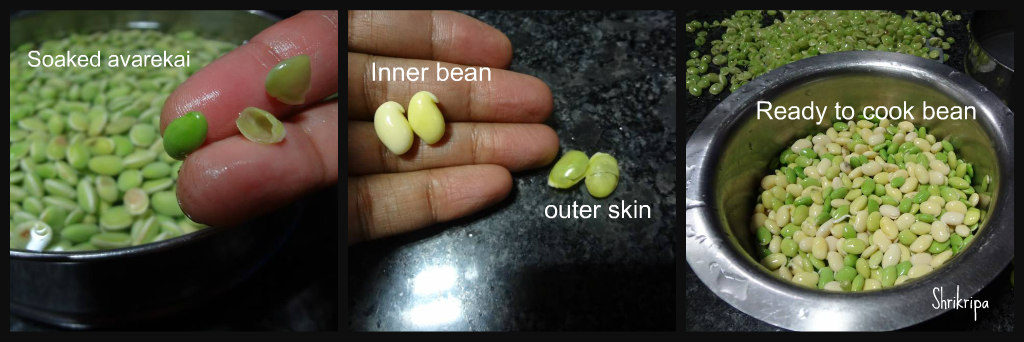
-At first take a fresh Tuvar bean pod, remove outer thick green skin and separate the green bean with the beautiful red spots. Collect all the shelled beans.

Ribbet collage 1

-Wash rice and soak for 10 minutes, drain and keep aside.

-Chop onions, methi leaves and vegetables of your choice.

-Grind a paste of coriander leaves, cinnamon, green chillies and ginger by adding little water and keep.

-Take one cooker, add oil and ghee or only ghee. Drop whole masalas like bay leaves, cumin and mace.

Ribbet collage 2

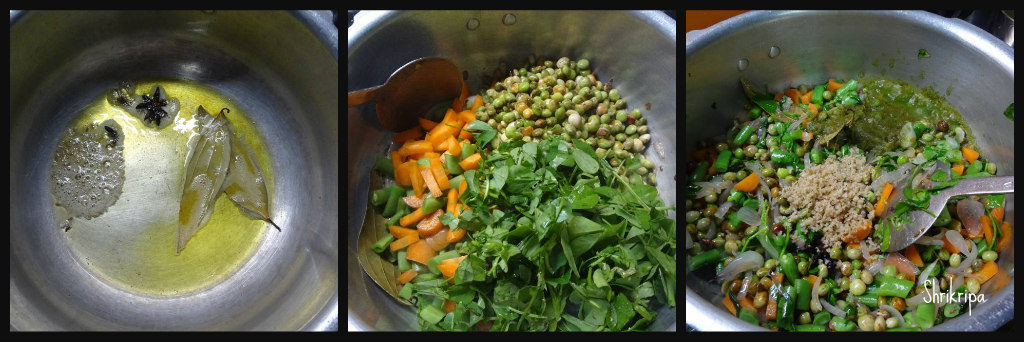
-Fry onions until brown and add methi leaves, fresh tuvar, chopped veggies and fry until it wilts.

-Add salt, ground masala and fry for 2 minutes and add drained rice and fry for a minute.

Ribbet collage 3

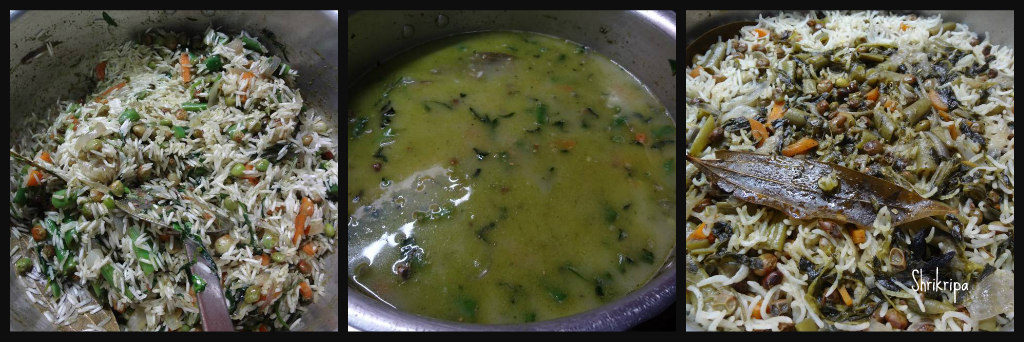
-Add coconut milk and 5 cups of water, juice of half lemon, boil, close the lid and cook until one whistle and 2 minutes into simmer.

DSC05591_Fotor

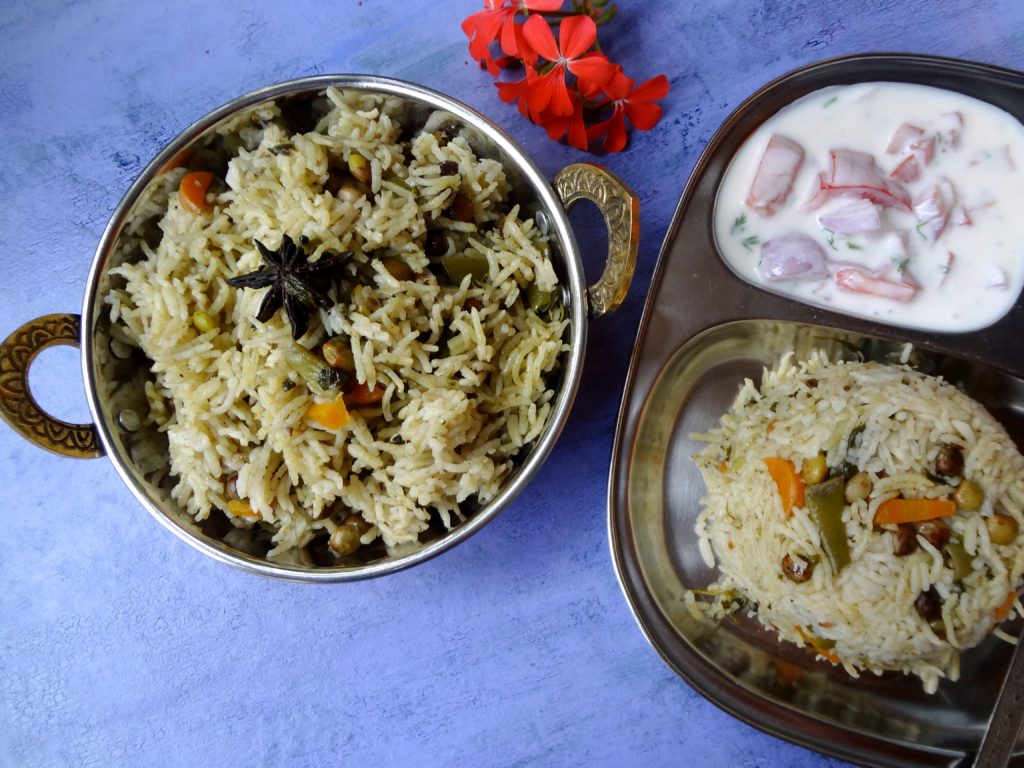
-Serve with any kind of raita.


Energy cake:

This energy filled cake has millets, oats, coconut flour. Usually after extracting coconut milk from the fresh coconut, the residue that remains will go into the trash. Coconut residue is very high in fibre. It is much healthier than wheat bran or oats bran. I usually collect this residue, after extracting the milk for any south Indian kheer, and use it in my baking as it is, by storing it under refrigeration for a couple of days.

This energy bar is a little softer than a normal crunchy bar. So, I named it as Energy cake. Shelf life is any where between 2 to 3 days at room temperature, Up to 10 days under refrigeration. If it was under refrigeration, please re-heat to get soft texture.

DSC05271_Fotor

Ingredients:

Oats – 1 cup

Mix millet flour – 1 cup

Coconut residue – ¾ to 1 cup (You can use coconut flour or desiccated coconut as well)

Brown Sugar – ¾ cup

Butter – 100 grams

Honey – 2 table spoons

Milk – ¼ cup

Cooking soda – ½ tea spoon

Vanilla essence – 1 tea spoon

Choco chip and almond flakes – to garnish

Method:

-Pre-heat oven, line a baking tray.

-In one bowl, combine oats, 2 flours and mix thoroughly.

Ribbet collage 1

-Take one sauce pan, heat butter and sugar. When sugar melts, switch off.

-Add in honey, milk,vanilla and cooking soda and mix.

-Pour the frothy wet mixture over oat and flour mixture and fold the batter.

Ribbet collage 2

-Batter will be a little thick and heavy. Pour the mixture and spread evenly on a lined baking tray.

-Garnish with Choco chips and almond flakes and press a little.

Ribbet collage 3

-Bake this in a pre-heated oven at 180 C for about 25 to 30 minutes or until done.

-Cool, cut into pieces and serve as a snack or a breakfast bar.


Oats cookies with kisses:

Wanted to use Hershey’s “Kisses” in baking from so many days, finally I did try out this and my kids liked it too. These are a real treat for kids and at the same time filled with high fiber and are healthy because of the usage of Whole wheat flour and oats. I like lemon flavor in my cookies, if you don’t want to use lemon you can add vanilla or cardamom too.

main_Fotor

Now we will see how I made this.

Ingredients:

Whole wheat flour -1 cup

Powdered oats – 1 cup

Sugar -1 cup

Baking soda -1 tsp.

Grated lemon zest- ½ to 1 tsp.

Ghee /Clarified butter – ½ cup

Milk – 3  to 4 table spoons (to bind)

Hershey’s Kisses chocolates for decoration.

Method:

-In a mixer jar, powder oats, measure and keep aside.

-powder sugar and keep aside.

-Now take one mixing bowl, take all the dry ingredients like whole wheat flour, oats powder ,sugar powder ,baking soda ,lemon rind and mix it thoroughly by using hand ,so that flavor will spread uniformly.

-Now mix in melted ghee and bind it together. If it is a little dry, add one to two table spoons of milk, if it binds and holds a shape well and good. Otherwise add one more table spoon of milk and make a ball like Chapati dough.

-Now pre-heat your oven in 180C.

-Line your cookie tray with butter paper or aluminum foil and keep it ready.

-Take one small cookie scoop or a Table spoon to shape the dough into semi-circle balls, and place them on a parchment covered baking/cookie tray.

Ribbet collage 1

-Bake 12 to 15 minutes or until base becomes light brown in colour.

-While baking process is going on, keep kisses chocolate ready by removing its cover.

-When it is done, take out the tray and immediately press a chocolate into the center of each cookie.

Ribbet collage 2

-Base of this chocolate will melt a little, so it holds firmly after it cools down. Cookie will crack around the edges.

-Now don’t disturb these beauties and allow them to cool completely. It will take anywhere between one to two hours to cool completely.

-Because of the heat, chocolate will become very soft and after some time it will hold its shape and become firm.

-Then you can store this in an airtight container.


Homemade Lemon curd

Fruit curd is a dessert spread and topping usually made with citrus fruit, such as lemon, lime, orange or tangerine. Other flavor variations include passion fruit, mango, and berries such as raspberries, cranberries or blackberries. Wikipedia

Every year a cousin of mine, gifts me with these home-grown cuties and I love these kinds of lemon’s flavor especially in baking.

Today I will post how to make “Homemade Lemon curd”. Homemade lemon curd is quick and easy and so much more mouthwatering than the shop-bought variety. Made by cooking (by using double boiler method) a mixture of fresh lemon juice, grated outer skin/rind, sugar, butter, and eggs, lemon curd is enjoyed on buttered toast, and is a delicious filling for breads, tarts, cakes and cookies. In the coming posts, I will explain the usage of curds one by one.

Equipment needed: Wire whisk (egg beater) and nice, sharp grater with tiny holes, so that it will help to remove only the lemon’s outermost layer (coloured layer) inner white layer will be bitter, 2 vessels.

DSC05033_Fotor

Ingredients:

Had 4 big lemons and took all those.

zest of 1 lemon and juice of 4 lemons
200g sugar
100g butter (cut into chunks)
3 eggs

-Collect lemon zest, lemon juice and assemble everything.

Ribbet collage 1

-Put lemon zest, juice, sugar and the butter, into a basin kind of a vessel (Step 2) over a pot of boiling water, make sure that the bottom of the basin doesn’t touch the boiling water (step 1).

-Stir with a whisk until the butter melts (step 3)

Ribbet collage 2

-Mix in eggs (beat lightly before adding by using fork), after adding eggs, whisk in between, until it is thick, it should be heavy (should stick to the whisk) (step 4 to 6)

Ribbet collage 3

-It took me around half an hour to complete the process.

-Remove from the heat and stir occasionally till it cools…transfer the content to clean glass jar and store it in a refrigerator.


Tandoori vegetables:

Tandoori items are a real treat in its own way. If we make this at home in a little healthier way, we can relish it as a wholesome salad for dinner as well. I usually use hung curd and sandwich green chutney, which I usually make and keep in handy for a quick sandwich or Bhel preparation in the evenings.

The sandwich chutney I make has coriander leaves, pudina, garlic, cumin, sugar, salt, green chillies, dry mango powder and a little ready sev or boondi as a thickening agent. I will post the recipe in detail as a separate post, in the near future.

For Tandoori vegetables, I normally prefer Gobi florets, Broccoli florets and American corn pieces.

DSC05644_Fotor

Ingredients:

Gobi /Cauliflower – 1 Small

Broccoli – 1 Small

American sweet corn – 2

Salt

Tandoori Masala – 1 table spoon

Hung Curd – 3 table spoons

Green sandwich chutney – 2 to 3 tea spoons

Garlic Mayonnaise – 1 ½ tea spoons

Cumin powder – ½ tea spoon

Butter – 1 table spoon

Method:

  • Break open required number of florets (I took 8 each) from Cauliflower and broccoli.
  • Rinse in water, drain.
  • Make 4 pieces from each corn.
  • Boil water in a big vessel, add salt (around 1 table spoon) and Tandoori masala.

Ribbet collage 1

  • Blanch Cauliflower, broccoli and sweet corn separately, one after the other.
  • Drain and keep aside.
  • Now Take one vessel, make a preparation for Marination. Mix in Hung curd, sandwich chutney, mayonnaise, cumin powder and a little salt.

Ribbet collage 2

  • Put blanched veggies, mix everything nicely and keep it under refrigeration for 3 to 4 hours.
  • When you want to grill, pre-heat the oven at 220°C opting a grill mode.
  • Heat the butter, pour over the marinated veggie, mix thoroughly and place the veggie pieces on a lined baking tray and grill for 20 minutes or till top part becomes a little black and looks charred.

Ribbet collage 3

  • Time to serve this with mint dip.

DSC05646_Fotor

Note:

I usually marinate in the morning hours and grill it in the evenings.

For mint dip: If you have sandwich chutney, take 1 teaspoon of chutney, 1 teaspoon of mayonnaise, 2 table spoons of Hung curd, adjust the salt and add a pinch of sugar.


Pineapple Menaskai/ Gojju:

Menaskai/Menaskayi is one of our coastal specialities, which is a hot, sweet and sour, sesame flavoured coconut-based curry. Normally made with bitter or tangy things like Bitter gourd, raw mango, wild mango or pineapple. We even prepare by mixing Bitter gourd and raw mango as well. It is a common dish in any of our elaborate menus for festivities, usually served on a plantain leaf, like poojas or weddings. This same curry is prepared in a little different way in other parts of Karnataka and known as “Gojju”.

Here, the main trick is-balancing of all the flavours.

If you are preparing with sour vegetable or fruit, there is no need to add additional tamarind. For example, if you are preparing raw mango or mixture of bitter gourd and raw mango Menaskai, there is no need to add tamarind. If you are using pineapple, tamarind should be added.

Here I have used pineapple and the procedure goes like this-

Ingredients:

Pineapple – 1/2 (chopped into bits)

Raw mango – 1/4 (chopped into bits)

Tamarind – gooseberry size (if the mango is not available)

Jaggery – as needed

Salt

Green chillies – 2 (slit)

For masala:

Fresh Coconut gratings – 1 to 1 ½ cups

Methi seeds – 1/4 tsp

Urad dal – 2 teaspoons

Sesame seeds – 2 teaspoons (U can use black or white)

Dried red chillies – 8 – 10 (we use Byadagi variety)

Coconut oil – 2 to 3 teaspoons (1 for roasting + 1 for seasoning + 1 tsp to garnish)

Mustard – 1 tsp

Dried red chilli -1

Curry leaves – 2 springs

Method:

-Clean pineapple by removing the outer skin, chop into bite-size pieces.

Ribbet collage 1

-Cook pineapple pieces and mango pieces or tamarind with little water, turmeric, salt, jaggery, green chillies and curry leaves.

-Dry roast sesame seeds. Now fry all the masalas for grinding. First heat 1 tsp of oil, put methi(fenugreek) seeds. When it is light brown, add all the other ingredients like urad dal,  red chillies and fry until urad dal is light brown. Now it is the time to put coconut and fry further for 2 minutes or until you smell the nice aroma.

-Cool the mixture, grind into a paste by adding sesame seeds and sufficient water as well.

-Add this paste to the cooked pineapple, check for salt and jaggery. Adjust the consistency by adding water and boil nicely in a simmer for 5 to 10 minutes.

-After boiling, add 1 tsp of raw coconut oil as well as the seasoning with coconut oil, mustard, red chilli and curry leaves. Close the lid and leave it to soak all the masalas for half an hour.

-Serve with hot rice.

Note:

-After boiling, the gravy should be a little thicker than normal sambar.

-Taste should be sweet, sour, hot. So adjust the addition of jaggery accordingly.

– We usually relish this dish the next day of preparation, usually with Neer Dosa or chapati/Roti. 😊


Hitikida avarekalu/ Deskinned Hyacinth bean curry:

Avarekai has many names like Lablab or Hyacinth bean.

Avarekai is an integral part of every household of native Bangalore or Mysore region during every winter. People wait for its arrival. Winter special lima bean is called “Sogadavare” and it has double the aroma of what we get normally throughout the year.

DSC05495_Fotor

Initially I used to struggle with avarekai recipes and never used to get that authentic touch. Now over the years, I have mastered this authentic, tasty curry and my family started liking it and we do enjoy our share of this traditional curry with soft dosas.

If you are using fresh beans, it is a little time-consuming process. During the season we even get the deskinned ones. If you have frozen beans, curry making is an easy task.

At first, we will see the procedure of de skinning –

-At first take a fresh bean pod, remove outer thick green skin and separate the light yellowish green bean. Collect all the shelled beans, soak it in water for 3   to 4 hours.

Ribbet collage 1

 Now starts your time consuming real exercise. Dip your hand in water, remove soaked beans and start deskinning by keeping the bean in between your thumb finger and fore finger and press a little, you will see the transparent outer skin would flip and inner bean will come out. Continue the exercise until it is done and collect deskinned “Hitikida bele” and proceed to make very tasty curry.

Ribbet collage 2

Now we will see the procedure of “Hitikida bele saaru” /Curry

Ingredient-

Deskinned Avarekai – 1 big bowl

Onion – 1 for seasoning

Oil – 3 table spoons

Ghee – 2 tea spoons

Mustard – 1 tea spoon

Curry leaves – 2 springs

Green chillies – 4 (3 for grinding + 1 for seasoning)

Garlic – 8 cloves (4 for grinding + 4 for seasoning)

Coconut – 2 cups

Tamarind – marble size

 Coriander seeds – 2 tea spoons

Cumin – ½ tea spoon

Cinnamon – ½ inch

Clove – 2

Ginger – ½ inch piece

Coriander leaves – ½ cup

Method:

-Cook avarekai with required amount of water and salt. You can opt for a cooker or an open vessel. Slow coking gives a better result for this curry.

– Next is the masala preparation. Fry Coriander, cumin, cinnamon, cloves. When coriander becomes light brown, add garlic, ginger, green chillies, coriander leaves,tamarind and coconut and fry until it emits a nice aroma.

Ribbet collage 3

-Switch off the gas, cool the content and grind this in to a smooth paste by adding required amount of water.

-Now do the seasoning, heat oil, splutter mustard, curry leaves, garlic, green chilli, chopped onion and fry until onion becomes light brown.

Ribbet collage 4

-Add ground masala paste and fry for a couple of minutes. Add cooked avarekai and add enough water.

-At this time, consistency of the curry should be a little watery, as cooking proceeds and after some resting time, it becomes thick and becomes perfect.

Ribbet collage 5

-Boil this mixture until you see a thin creamy layer at the top.

-Switch off and pour 2 tea spoons of ghee, give one mix and close the lid. Rest this for some time, and serve with dosas, chapati’s or plain rice or jeera rice.

DSC05491_Fotor

Note:

-I usually prepare this curry in the night, and re heat and serve with dosas in the morning.

-In this way, it absorbs all the flavours and sets properly.


Akki Rotti Payasa /Rice flat bread kheer:

Happiness is when one of your readers messages you regarding this recipe, which he used to relish in his childhood and attempted a couple of times without any success. He wanted to know the exact recipe for the same, with proper measurements. When he explained about this payasam, I was clueless and thought it must be his grand mom’s own creation to fulfil the needs of her big family by making it easier. He patiently explained the process about how his grand mom used to prepare it and What amazed me was, as a small child, he has seen and observed how his grand mom does etc. After listening to his explanation, it was like a dream to me.  I couldn’t resist, and wanted to try it out As soon as possible. The next day was my wedding anniversary and I grabbed the opportunity and started my experiment. It indeed was a treat and I was super duper happy with the result. Here is the recipe and I am dedicating it to that great soul from whom this recipe came to light and my reader who has shared his childhood nostalgic memories with me by explaining it patiently.

DSC05209_Fotor5209 main

Now we will see how I proceeded with the recipe-

Ingredients:

Dosa rice – 1 small cup

Salt

Jaggery – 4 small cubes

One fresh coconut – to extract milk

Cardamom powder – 1 tea spoon.

Banana leaves – 2 pieces

Ghee – 1 tea spoon

Cashew pieces – 2 table spoons

Method:

-Wash and soak Dosa rice for 2 hours.

-Grind the rice into smooth paste with sufficient water (use soaked water itself) and salt.

Ribbet collage 1

-Batter should be of spreadable consistency (little thinner than regular Dosa batter)

-Next is a coconut milk extraction:

Ribbet collage 2

-Take fresh gratings, put one cup of water and grind into smooth paste and extract milk through sieve. This milk is a thick milk and is used at the end. Hence, it should be kept aside separately.

-Now once again take roughage of the coconut, put one more cup of water and grind, sieve the paste and it is our second extraction of milk.

-Repeat the process and take out a third extraction as well and if you are using the roughage of the coconut in any other purpose, you can store it in a freezer for future use.

– Take one wide thick bottomed vessel, Pour diluted, very thin milk (3 rd. extraction) and jaggery. Boil nicely.

Ribbet collage 3

-Now pour second extraction of milk (thin milk) and boil further.

-Now start preparing Rotti, take one clean banana leaf, spread a ladle of rice batter and spread as thin as possible and flip this leaf over boiling jaggery solution.

Ribbet collage 4

-Within 2 minutes, it will be ready to remove. Now start pulling your banana leaf by peeling it slowly.

-After peeling, if at all some cooked Rotti part remains, take one flat ladle and remove and put it in the boiling jaggery solution.

-Repeat the procedure, until batter finishes. I did it 4 times.

-Now boil this further for 3 to 4 minutes and mix it in-between by using very light hand.

Ribbet collage 5

-It is the time to use thick first extract of the coconut milk.

-When it starts boiling, remove from the flame. Add cardamom powder and ghee fried cashews and serve hot.

DSC05211_Fotor5211 main 2

Note:

  • We liked this dessert as a Hot option.
  • When it cools down, at room temperature it tastes good.
  • Under refrigeration, if Rotti pieces becomes slightly hard, one can relish after re heating.

Red Amaranth and Beet Pulav:

Red amaranth is very beautiful and a natural source of energy, rich in iron and a whole lot of micro nutrients and fibre. It is very high in calcium and very good for all ages, from infants to adults.

On the other hand, beets are also packed with anti-oxidants, Folic acid and Iron. Which is considered as a super food to fight anaemia.

When my home grown red amaranth is harvested, this rice dish is what we love to eat, by adding Beetroot chunks to enhance the nutritional value. One can enjoy this one pot super tasty dish with any form of yogurt based side dish or even with plain yogurt and pickle. One can carry this in a tiffin box as well. It is a very good idea to feed greens to those who don’t like them, without they even noticing 😉

This time, when I harvested red amaranth, I thought of using fresh ground masala and it really tasted divine, oozing with flavours.

second 2

Ingredients:

Basmati Rice – 3 cups

Beet root – 1 big

Red Amaranth – 1 Small bunch

Onions – 2 (sliced)

Ghee/oil– 3 table spoons+1 tea spoon

Cumin -1 tea spoon

Bay leaves – 2 (small)

Ginger garlic paste – 1 table spoon

Milk – 1 cup

Curd -1 cup

Brown Bread – 3 slices

For Fresh masala:

Coriander – 1 tea spoon

Cumin – ½ tea spoon

Cardamom -2

Cloves- 2

Cinnamon – 1”

Black pepper – 8

Nutmeg – 1 pinch

Dried Red chillies – 2

Fenugreek seeds – ¼ tsp

Method:

-Wash rice and soak for 15 minutes.

-Wash Beetroot, chop into bite size pieces.

– Wash Amaranth greens, chop.

-Dry roast fenugreek seeds. When it is slightly brown, add all the other ingredients under masala and fry.

Ribbet collage 1

-Make a powder and keep it.

-Now take one pressure cooker. Add ghee or oil, fry cumin and bay leaves.

Ribbet collage 2

-Add sliced onion, fry until it is brown.

-Add ginger garlic paste, fry for 2 minutes.

-Add beetroot, chopped greens, fry until green wilts.

Ribbet collage 3

-Next add fresh ground masala powder, drained rice, salt.

-Mix everything and add milk, curd , 4 cups of water and 1 tea spoon of ghee,close the lid.

-After one whistle, keep it in a simmer for one/two minutes and switch off the gas.

Ribbet collage 4

-Now make small square size pieces of brown bread and deep fry and drain out excess oil.

-When pressure releases, add bread croutons and lightly mix everything.

second 3

– serve with any raita or plain curd and pickle.


Soppavare/Winged beans stir-fry:

Soppavare name itself is very much nostalgic. We had a widespread vine in our front yard and we used to relish a whole lot of Mangalorean traditional recipes in our childhood days.

Winged bean is a nutritionally very rich, tropical vine, which needs warm weather, but in the winter season. Almost all parts of the plant are edible, and vine produces unique shaped bean with four-winged edges.

It is rich in vitamins, minerals and many nutrients. When it is cooked, bean has nutty flavour and is consumed in many forms from salad to stir fries or in a form of curry.

My family relishes on this simple stir-fried salad with this simple seasoning.

DSC05152_Fotor 1

Ingredients:

Winged beans – 10 -15

Olive oil – 2 tsp

Garlic salt – 1 tsp

Chilli flakes – ½ – 1 tsp

Method:

Ribbet collage 1

  • Wash and slice the beans.
  • Heat one non-stick tawa add olive oil, add chopped beans, garlic salt and red chilli flakes.
  • Stir fry for a while and serve as it is or with curd rice or as you wish.