Homemade lemon curd is pretty much going with anything. It is perfect for cookies, tarts, bread or bun, or topping with any dessert.
These sweet lemon rolls are packed with delicious flavours with a lemony tinge that pairs well with tea or coffee as a snack option.
If you are a lemon fan like me, this is for you. It is an alternative to the cinnamon roll, a lemon roll!!

The recipe which I follow is easy to make.
To make 8- 10 rolls
For the Dough:
Milk – 1 cup ( I usually take skimmed milk)
Butter – ¼ cup ( 50 grams)
Sugar – ¼ cup
Active dry yeast – ¾ tsp
Flour – 2 ½ cup ( I took a mixture of oats flour + brown rice flour + whole wheat flour, and All-purpose little flour )
Baking powder – ½ tsp
Salt – 1 tsp
Lemon cream cheese filling:
cream cheese or paneer – 1/3 cup
sugar – 2 tbl spoons
hung curd – 2 tbl spoons
fresh lemon juice – 1tsp
all-purpose flour /fine semolina – 2 tbl spoons
homemade lemon curd – 1/4 cup
Method:
First: Bloom the yeast: In a large glass bowl, add warm milk, sugar, melted butter, and mix. Sprinkle yeast, stir well, close the lid, set aside for 10 minutes or until yeast starts to bloom. (Milk should barely be warm while touching. Otherwise, the yeast would not bloom; instead, it will die)

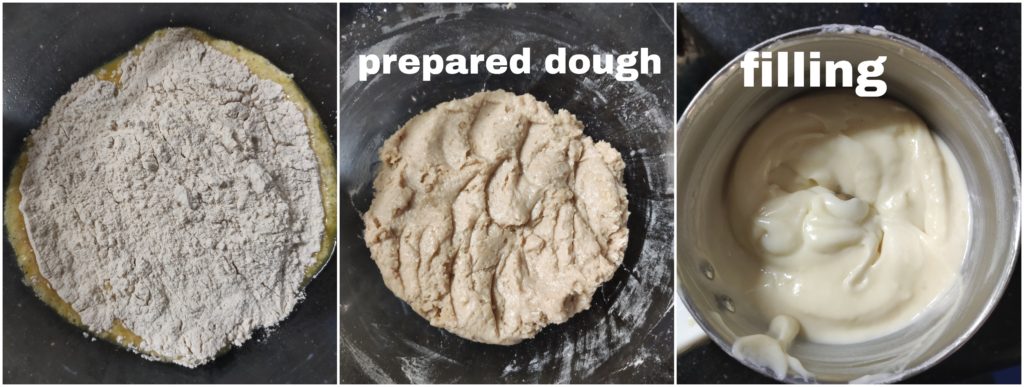
Second: Prepare a dough: Take whatever flour you are using, combine everything, add to the bloomed yeast and milk mixture. Fold everything together, keep it covered, let it rise in a warm place for another one hr or more until it nearly doubled in size.

Third: Prepare the filling: In a small mixer jar, at first, churn paneer pieces, sugar, hung curd, then add the remaining ingredients and, whip once or twice and keep it ready.
Line your baking tray or grease your muffin tray and keep it ready.
Fourth: Kneading the dough for good 10 minutes: Dust the clean kitchen counter with the flour, Remove the dough from the bowl, start kneading. If needed, add little flour, and adjust the consistency. Until dough does not stick to your hand or surface. Now start kneading the dough by hand until it reaches a silky smooth texture and springs back when poked.

Fifth: Now it is ready to Roll: Roll the dough into a large rectangle using the hand and the roller. It should be around ½ inch in thickness, roughly 12” by 16” long. Fix the shape of all the corners.
Sixth: Spreading: Drop the filling here and there over the rectangle, spread evenly using a spatula or spoon.
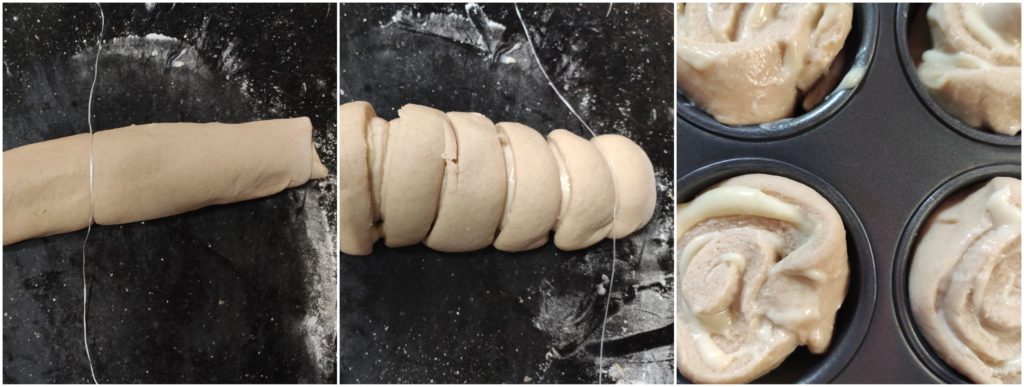
Seventh: Make a log: Start rolling from one end ( longest side); roll up the dough slowly by sealing correctly and tightly. At the other end, seal the edge correctly, place seam side down.

Eighth: Cutting: Cut the log into even pieces using dental floss, twine, or knife. Take a long enough string, keep it at the bottom of the rolled log and pull upwards to get uniform pieces. Place all these pieces in a baking tray. Close the tray with the kitchen towel and leave it to rise. ( mine took hardly 5 minutes)
Ninth: Baking: Preheat the oven to 180°C; if it has risen/ second proof, apply the milk wash and keep it in the pre-heated range. ( I have baked in a mid rack of my oven ) It took me around 35 minutes. Keep an eye after 30 minutes, and when its upper surface turns brown, remove it from the oven.

After taking it out, apply butter over hot rolls to retain moisture. After it cools down, break one by one and serve. I have not used any glaze or cream cheese. It was delicious as it is.
