Greater Yam curry /Kachil curry :

In my last blog post, I have shared Greater yam Melara, and today I am going to share Kerala style kachil curry, which I prepare at home.

I have shared the details regarding Greater yam / Dioscorea alata in this post, and our traditional recipe, Melara, is here.

Kachil curry is Cumin flavoured, coconut-based curry. It is seasoned with coconut oil and shallots.

Ingredients:

Kachil cubes – 1 bowl

Turmeric – ½ tsp

Salt and jaggery – to taste

Tamarind – ½ tsp

Green chilli – 1

Red chilli powder – ½ tsp

Curry leaves – 1string

Shallots – 3

For masala paste: Coconut – 1 cup, Cumin – 1 tsp, Garlic – 1 clove

Seasoning: Coconut oil – 1 tbl spoon, mustard – 1 tsp, shallot – 3, green chilli – 1, curry leaves – string

Method:

-Pressure Cook kachil cubes for two whistles by adding salt, jaggery, little tamarind, one slit green chilli, red chilli powder, one spring of curry leaves, 2 or 3 sliced shallots with sufficient water.

-Make a smooth masala paste by adding coconut, Cumin, Garlic with little water.

-Mix in the ground paste to cooked veggie, adjust the consistency, boil.

-Add seasoning, heat oil, splutter mustard, sliced shallots, slit green chilli and curry leaves, fry until shallots turn brown and pour it on the curry.


Gujje Huli menasu / Tender jackfruit curry:

In our region, Raw jackfruit curry relished in every possible way and every possible stage of its growth. Huli Menasu is nothing but tamarind and dried chillies. The speciality of this sambar is no frying or roasting the masala. It is no fuss masala but, the flavour is unthinkable. It is an experience by itself. It is one of our family favourites, and today, sharing it with you all.

I have many raw jackfruit recipes in my blog, including “how to chop” the young jackfruit for beginners.

To get an authentic taste, one should use coconut oil and fresh grated coconut for this curry.

Now we will see the recipe part.

Ingredients:

Raw jackfruit cubes – 1 bowl

Salt

Red chilli powder – 1 teaspoon

Fresh coconut – 1 bowl

Red Byadagi chillies – 3 to 5

Tamarind – gooseberry size

Turmeric powder – ½ teaspoon

For seasoning:

Coconut oil – 1 tablespoon

Mustard – 1 teaspoon

Red chilli – 1

Curry leaves – 2 springs

Garlic – 10 cloves (crushed)

Method:

-Cook Raw jackfruit pieces in a sufficient amount of water. Add salt and red chilli powder, turmeric as well.

-In the meantime, grind smooth masala by putting coconut, tamarind, red chillies.

-When jack pieces are soft/ cooked, add ground masala, adjust the consistency and boil.

-When the mixture boils nicely, switch off the gas.

-Prepare seasoning, heat oil, splutter mustard, add garlic, red chilli, curry leaves.

-When garlic becomes deep brown, add the seasoning over boiled gravy.

-Keep this closed for a while before serving to absorb all the flavours.

-Serve with hot rice.

Mango ginger Tambli:

Mango Ginger or Curcuma amada is a plant of the ginger family Zingiberaceae and is closely related to turmeric. It is locally known as kukku shunti/ Mangannari or Ambe kombu. Mavinakai shunti in Kannada and Aam Haldi in Hindi. Mango ginger is antioxidant,anti-fungal, antibacterial as well as anti-inflammatory in nature.

Our traditional cooking includes mango ginger in many forms. One such recipe is Tambli. Come summer, tambli is an integral part of our lunch platter. Tambli is a coconut-based, uncooked gravy enriched with any one of the herbs, with minimal spices and buttermilk to soothe our system.

It is a quick, instant,  no involvement recipe. It can be had as an appetizer or mixed with rice like any other curry. 

Ingredients:

Mango ginger – 1” piece

Sesame seeds – ½ tsp

Dried red  chilli – 1

Coconut – ½ cup

Salt

Jaggery – ½ tsp

Buttermilk – ½ cup

For the Seasoning: ghee – ½ Tsp, cumin – ½ tsp, curry leaves – 1 spring.

Method:

-Peel the outer skin of mango ginger, slice.

-Dry roast sesame seeds, then fry red chilli in a drop of oil.

-Take a Mixie jar, grind coconut, red chilli, sliced mango ginger, salt, jaggery and grind into smooth paste by adding water.

-remove this into a vessel, add buttermilk, and adjust the consistency by adding little water if needed.

-Consistency should be like regular milk.

– Add Seasoning by heating ghee, cumin and curry leaves.

– Enjoy this coolant with hot rice.

NOTE: If you want to prepare a vegan version, omit buttermilk and add little tamarind while grinding, or after preparing, add lemon juice and enjoy.

For the Seasoning: You can Opt for cold-pressed coconut oil.

Mango pickle (Midi Uppinakai Masala)

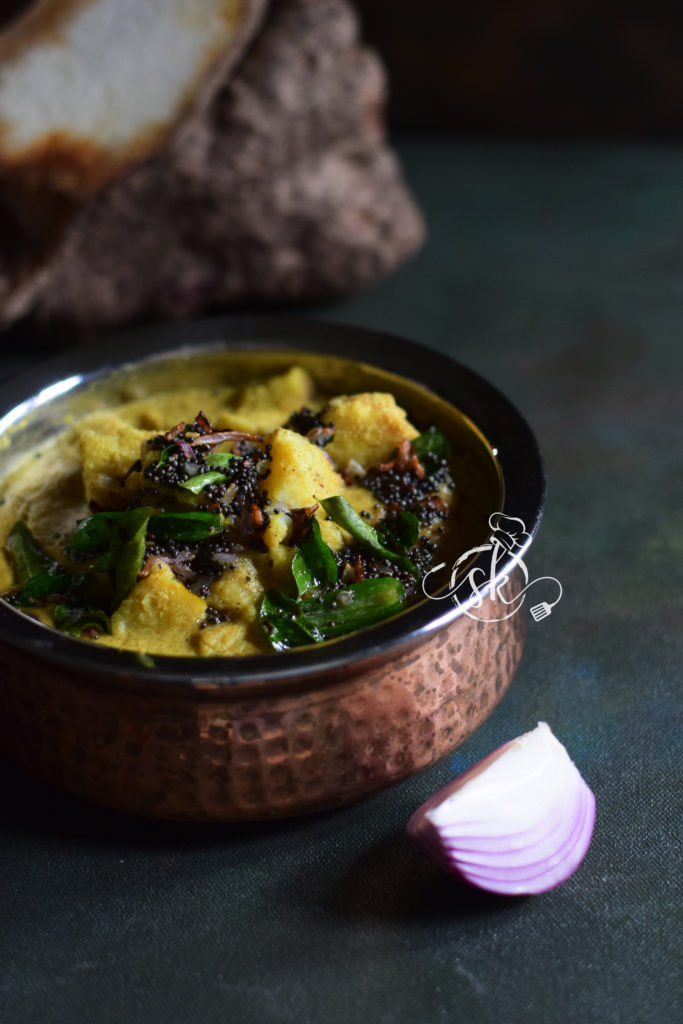
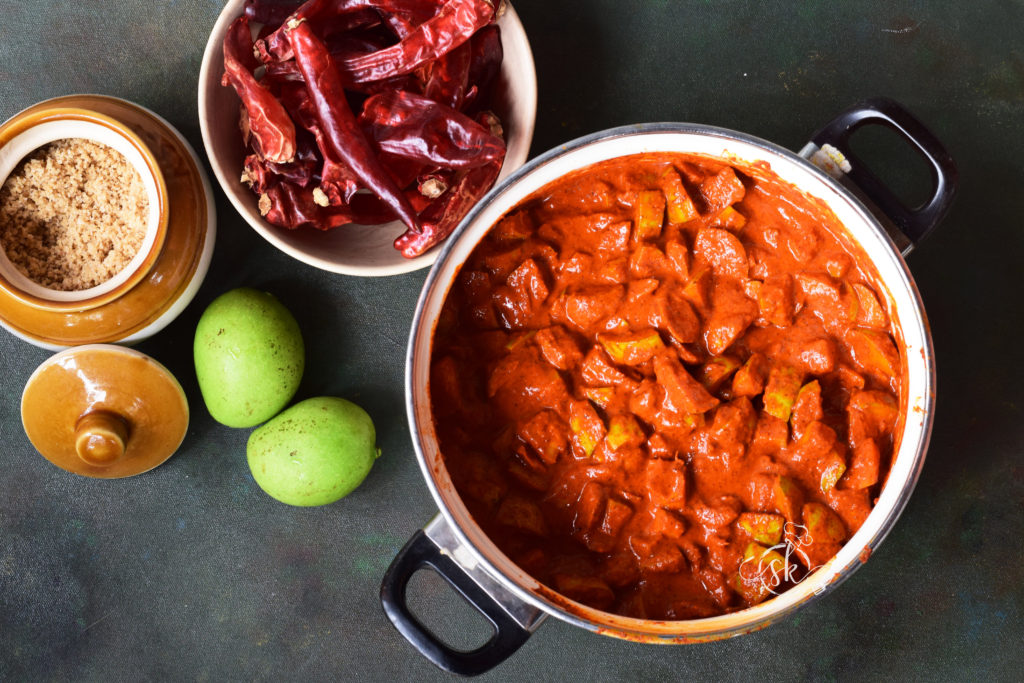
Mangalore is known for tender mango pickle, locally known as “Midi uppinakai.” Unlike other pickles, it is made up of hardly any ingredient. It needs Dried chillies, mustard, turmeric and hing as an optional. The proportion of the chillies and mustard varies from family to family, hence the pickle’s taste.

The procedure is straightforward. First, after selecting a fresh, tender mango, the cleaning process happens, wiping, drying.

Then comes the pickling part; take a fist full of tender mango spread it at the bottom of the container, usually ceramic Bharani or glass jar. Then, a fist full of crystal salt. Repeat the process until mango reaches the brim of the bottle.

Mango shrinks within a couple of days, and the colour turns green to pale green. Now, it is time to make a pickle masala and finish the process. Isn’t it simple and straight forward 😀 It is one of the must condiments in our family. The recipe which I follow is handed down to me by my mother in law and stamped by my dear husband 😀 

My father in law was very particular about the chilli usage, which he used to source after checking the freshness.  The variety of chilli he used to prefer is called Harekala Menasu, a native variety of Mangalruru and cultivated in Harekala and nearby villages along the river Netravati. Chillies are spicy, fiery red when it is grounded, and smooth in texture.

As a city dweller, sourcing a tender mango within a short seasonal period becomes very difficult for me. Hence, I use the same masala and prepare cut mango pickle using freshly bought wild mangoes from my native. Instead of Harekala chillies, I opted for half Kashmiri chillies and half Byadagi variety. Hence, it worked out best for me.


Ingredients:

Wild Mangoes – 15 (medium size)

Red chillies – 100 grams ( I have used 50 grams of Kashmiri chillies and 50 grams of Byadagi)

Mustard – 50 grams

Hing – small peanut size.

Turmeric – 1 to 2 tsp

Sea Salt – 1 cup(crystal)

Method:

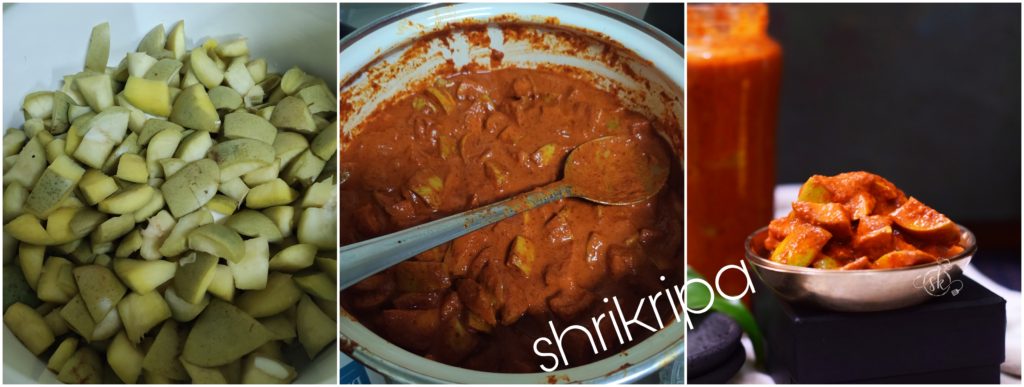
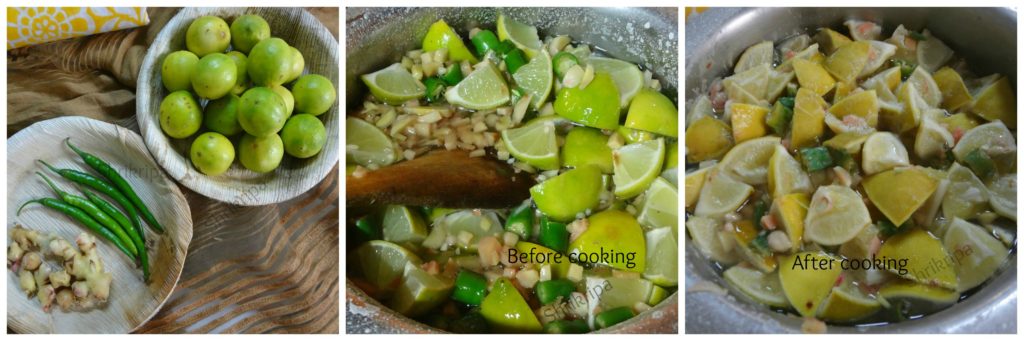
-Wash mangoes, wipe them, cut them into pieces.

-Take a porcelain jar or glass bottle, put a fistful of mango pieces at the base, sprinkle one tablespoon of salt.

-Again, put a layer of mango, then salt. Continue until mango pieces are over.  Close the lid and keep it aside.

-Next day, mix everything and press a little and keep it until the skin becomes a little pale and wilted.

-When skin becomes pale, strain all the salted water, drain the content and collect the water.

-Now, it is time to prepare salted water. This flavourful drained water adds a little more salt and extra water to make boiled salted water. Boil nicely, remove skum, which appears at the top, strain the salty water, and cool it.

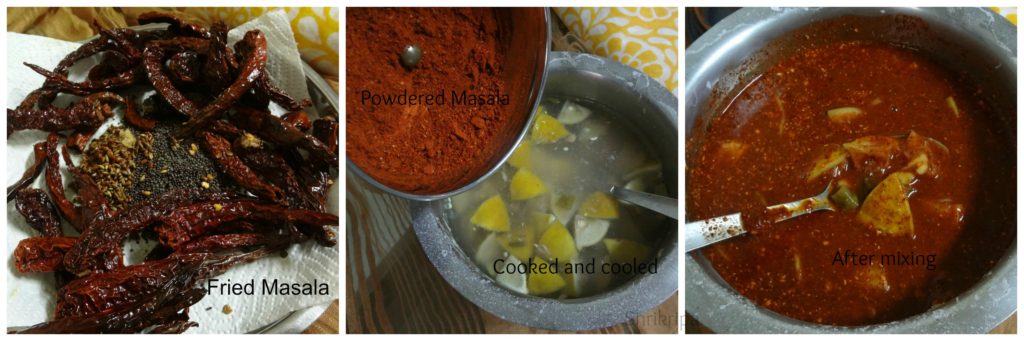
-Next comes the Pickle masala part: I usually prefer my wet grinder to make masala.

At first, Put mustard, red chillies and give a pulse in the mixer jar. When chillies and mustard become chunks, it is effortless to proceed in a wet grinder.

Put churned chillies, mustard, turmeric, hing and salted (cooled) water little by little and make a thick masala paste. When it is smooth and finely ground, remove the masala.

Add the required quantity of masala to wilted mango, adjust the consistency by adding salted water. Store it in a dry porcelain jar or bottle.

-If any extra masala or salted water is remaining, store it in a glass bottle. It can be handy to adjust the pickle after 2 or 3 days if needed. Or you can use the masala to make any instant pickle.

-After one week, you can start to use it, and this pickle stays good for a year or more. If the procedure handled well, you could keep it under room temperature, or you can keep it under refrigeration as well.


Brown rice – Horse gram Laddu :

This Laddu happened by chance. I have heard “Keddasa” unique festival from our region. But, I never knew the details, how to celebrate and its significance until recently. My interest in digging and reading about it started after seeing my Instagram friend, Akshatha’s post regarding Keddasa – a unique practice of our Tulu Nadu.

Farmers of our region observe Keddasa or Keddaso to honour mother earth and obtain her blessings in the next harvest. They believed that the earth goddess would grant crops in abundance by following the tradition.

Keddasa is observed typically in February, the end of the winter and believed that the earth goddess becomes fertile for farming. Rituals spread in 3 days; those three days are considered a rest for any farming activity to provide rest to mother earth. In this duration, a different offering is also a part of the custom.

A unique dish, known as Kudu -Ari, is made other than the offering. The literal transition of kudu is horse gram, and Ari is Rice. Roasted, powdered horse gram – rice is seasoned with other roasted items; it varies from family to family, such as roasted coconut, peanuts, sesame, Jaggery. Sometimes, the whole moong as well. The perfect way to look after our bone health during the winter months n the name of tradition. How beautiful. To make this Brown rice – Horse gram laddu, I took the inspiration from another traditional unde, known as Thambittu unde, which I shared in my blog, and the recipe is HERE. It is indeed a perfect energy ball or mid-day snack in the winter months, and I loved it.

How I did – Took one small tumbler as a measurement cup.

Here Ready laddu mixture was around 277 grams, and I took 250 grams of Jaggery, and it turned out perfect for our preferred sweet level. You can take equal or a little less.

Ingredients:

Red boiled rice/ matta rice – 1 cup

Peanuts – ½ cup

Horse gram – ¼ cup

Coconut – 1 cup

Sesame seeds – 2 tablespoons

Cardamom powder – 1tsp

Powdered Jaggery – Equal quantity as laddu mixture or little less.

Ghee – 2 to 4 tablespoons

Method:

-Wash rice once or twice, drain the water, let it air dry until it is dry.

-Wash horse gram and let it air dry until it is dry.

-Heat one thick bottomed wok/vessel, add dried rice little by little and roast; it will pop a little and texture will become brittle and a little puffy. Do this procedure in 3 to 4 batches and cool it.

-Dry roast Horse gram as well. When it cools down, make powder in a mixer jar; Sieve this powder and keep it aside.


-Now dry roast, sesame seeds, peanuts,  grated coconut until it emits fragrance. Keep aside.

-I did crush the peanuts by using whip mode by using a mixer jar.

-Mix everything, measure the content. If it is 2 cups, take 2 cups of grated Jaggery or a little less than that. If you have a measuring scale, you can measure as well.

-Boil Jaggery put in one cup of water when it melts; sieve this solution to remove any impurities. (Pictorial guide is here)

-Take this liquid and boil further till it reaches one thread consistency. At this stage, you will hear “Tup” “Tup” bubbling sound, too (this is the clue which I have received from the elders)

-When it reaches one thread consistency, mix in the prepared content, ghee, and cardamom powder.

-Mix nicely. At this stage, the mixture will be too wet to handle. So, keep aside for 10 o 15 minutes till the mixture becomes a little dry and ready to handle. When you feel it is ready, take a small amount in hand, make Laddu, and keep it aside.

-When all the mixture gets over, and you have finished the process, store these laddus in an airtight container. This Laddu stays good for long, even at room temperature.


Plantain flower Proso millet dosa :

I have discussed plantain flower, traditionally, how to chop, how to use etc., in my earlier blog post, which included my mom’s best chutney recipe. We all know the banana flower is rich in fibre, antioxidants, iron, potassium, calcium, vitamins, and other minerals. It is used mainly to treat constipation and anaemia in villages of our native in and around Mangalore and is part of our day to day cooking.

 I Tried the recipe long ago, liked and finalised it with the recipe for my millet calendar project, which was published in 2019 and filing the recipe under Diabetic friendly recipe in my blog.

Ingredients:

Proso millet – 1 cup

Dosa Rice – 1 cup

Urad dal -1/4 cup

Chana dal – ¼ cup

Methi – 1 tsp

Poha – ½ cup

Jaggery – 1 tsp

Salt

Tamarind – 1tsp

Red chillies – 4

Coconut – ½ cup

Plantain flower – 1

Method:

-Wash, soak millet, rice, chana and urad dal, methi and poha for 3 hrs.

-Take one bowl of water with added one serving spoon of buttermilk.

-Chop whole plantain flower, soak in buttermilk water, drain. You can check the process here as well.

– cook the drained banana flower by adding tamarind water, salt, red chillies, jaggery.

-Cool the cooked mixture, grind with soaked items by adding coconut into a smooth paste.

-Ferment and make dosas like any regular dosas and serve with chutney.

NOTE: It can be made as a vegan, instead of buttermilk, use tamarind water and instead of ghee, you can use any vegetable oil. 


Millet –banana stem dosa:

Every part of the banana plant has its benefits to our health. Banana stem is one such thing, which is high in fibre and filled with nutritious water. It is perfect for Human gut as well as the kidney.

The juice of the banana stem helps in flushing out toxins as well as to prevent kidney stone formation as well. Overall it acts as a healing food for the human body. In coastal Karnataka, we do use plantain stem or flower in various recipes. I have already shared our traditional Dosa recipe, and it is here, and previously I have shared Raw salad, curd salad and Rasam recipe.

When Plantain stem and millet combine, it is a perfect balance and can be a diet food or whoever is cutting down their rice intake due to their health issues. This dosa turns crispy and goes very well with any side dish of your choice. Tried and did this for my millet calendar project, published in 2017 and filing the recipe under Diabetic friendly recipe in my blog.

Ingredients:

Foxtail Millet – 2 cups

Rice – ¾ cup

Urad dal – ¼ cup

Banana stem – from 6” piece

Methi – ¼ tsp

Poha – ½ cup

Buttermilk – 1 cup

Method:

-Wash millet, rice and urad dal together. Add poha.

-Soak in buttermilk for 2 to 3 hours.

– To chop banana stem, remove the outer cover and make slices of inner pith.

-While slicing, you will find little thread-like fibre, discard that by drawing by hand.

-After slicing into round pieces of dice and use this for grinding.

-Grind soaked items with banana stem and salt.

– Ferment overnight and next day morning you can prepare Dosas.

Note: You can use any millet instead of foxtail. Taste doesn’t change.

Instant Ragi Rava Dosa:

Instant preparations are always handy when you are in a hurry or in a “no mood to cook” situation. I usually prefer Ragi Rava dosa to make, because it has the goodness of Ragi/ finger millet and everyone likes it in this form. Dosa turns out very crispy and tasty. One can have it with coconut chutney or any leftover sambar or with pickle or as it is. It has a nice natural flavour as well.

If you plan to make Rava dosa, you can mix the batter and keep it at night itself. Otherwise, no worries, mix and proceed to make dosas. Even some ingredients are optional; if you add coconut, greens, it would surely enhance the taste. 

Ingredients:

Ragi flour – ½ cup

Fine Rava – ½ cup

Rice flour – ¼ cup

Salt

Hing – a pinch

Black pepper – ½ tsp

Cumin – ¼ tsp

Grated coconut – ¼ cup (optional)

Coriander leaves – 2 tablespoons (optional)

Methi leaves – 2 tablespoons (optional)

Method:

-Crush black pepper and cumin in a mortar and pestle.

-For dosa mix: Mix in Rava, rice flour and Ragi flour, salt, hing, crushed cumin -pepper and a little water and keep aside at night (optional) otherwise mix in the morning and proceed.

– If you have mixed and kept it at night, add in grated coconut, chopped coriander leaves or methi leaves in the morning.

-Make batter into pourable consistency like Rava dosa or neer dosa batter and check for the salt.

-Now keep Iron griddle for heat.

-When it is ready, grease with oil, pour one serving spoon of batter-like how we make Rawa Dosa, you can see it in the picture below.

-Now close the lid by keeping the gas on full flame.

-After two minutes, remove the lid and keep the gas in simmer. The edges of the Dosa rise a little.

-Now flip this Dosa on the plate, leave for 2 minutes, then fold like this.

– Now keep repeating this with the remaining batter and stack one over the other or take one big plate and stalk one opposite another alternately.   

-Serve these Dosa with coconut chutney or with any other gravy of your choice or have it as it is.


Khara Neer Dosey / Savoury Neer dosa :

Neer dosey is an integral part of coastal breakfast. I usually prepare Neer dosey or my own version of Healthy neer dosey. Leftover neer dosey would turn into another dish, with sweet seasoning for an evening with a cup of tea. Khara neer dosey is one more variety of dosa from our region. 

Khara neer dosey is also known as Khara Thellavu /savoury neer dosey which is nothing but a spicy version of normal white neer dosey. It is quick, no fermentation is required. Soak the rice, grind, maintain the right consistency, use a well-seasoned cast-iron tawa to get the super-soft, authentic taste.

Ingredients needed:

Dosa rice -2 cups

Red chillies – 4 to 5

Onion – 1 big  Or Coconut – 1 bowl

Coriander seeds – 1 tablespoon (optional)

Cumin – 1 tsp (optional)

Hing – generous pinch

Salt

Iron griddle /tawa.

Method:

-Wash and soak Dosa rice at night or 2 to 3-hour soaking is needed.

-In the morning grind this soaked rice into fine paste by adding chillies, chopped onion OR Coconut, coriander, cumin, salt with water (I use soaking water while grinding, it gives pleasant aroma for the Dosa) and salt as per requirement.

– Make batter into pourable consistency like this and check for the salt.

-Now keep Iron griddle for heat, smear oil and keep it ready. 

-Pour one serving spoon of batter-like how we make Rawa Dosa, you can see it in the picture below.

-Now close the lid by keeping the gas on full flame.

-After two minutes, remove the lid and keep the gas in simmer, the edges of the Dosa rise a little, like this.

-Now flip this Dosa on the plate, leave for 2 minutes, then fold like this.

-Now keep repeating this with the remaining batter and stack one over the other or take one big plate and stalk one opposite another alternately.

-Serve this Dosa with Coconut and grated jaggery mixture or coconut chutney or as you wish.


Lemon pickle:

Pickle is an essential part of our Indian meal and we South Indians enjoy our pickle with curd rice as the last leg of our meal, which will tickle and will remain for some time in our taste bud with its right amount of salt, spice, sour, tangy and tartness.

This particular pickle is the non-oily, south Indian style, which I learnt from my mom. This pickle has lemon, green chillies and ginger and goes very well with curd rice.

Ingredients:

Lemons – 15

Ginger – 50 Gms

Green chillies – 5

Salt – ¾ cup

Water – 1 ½ to 2 cups.

Masala:

Dried red chillies – 28 -30

Mustard – 2 Table spoons

Hing – peanut size

Fenugreek – 1 tsp

Cumin – 1 tsp

Turmeric powder – 1 tsp

Oil- 1 to 1 ½ tsp

Method:

-Wash lemon, ginger and green chillies. Pat dry and chop however you like it.

-Boil water and salt together.

-When it is ready, you could see the glossy, shiny layer at the top.

-Drop all the chopped items to this. Boil till lemon rind becomes pale. Switch off and keep this for cooling.

-Gradually while cooling, the lemon rind will wilts and rind will fold backwards, don’t worry. It would become normal once it sets/marinates properly.

-Next, we will prepare the pickle masala.

-Dry roast mustard until it pops, remove and keep aside.

-Take one teaspoon of oil, roast fenugreek, cumin, hing one by one and keep it aside.

-Lastly, fry red chillies until it forms crisp with very little oil.

-Cool everything, make powder all these by adding turmeric.

-When salted lemon cools down, add this masala, mix and store this in an airtight bottle.

-After ten days, you can use this.

-I suggest storing this in a fridge so that its shelf life will be one year or more.

NOTE:

– If you want a little thicker consistency to take one and a half cup of water. If you wish to get, a thin consistency takes 2 cups of water.

  -Here I have taken 2 cups of water.