Balehannina Berati Payasa / Payasam by plantain preserve:

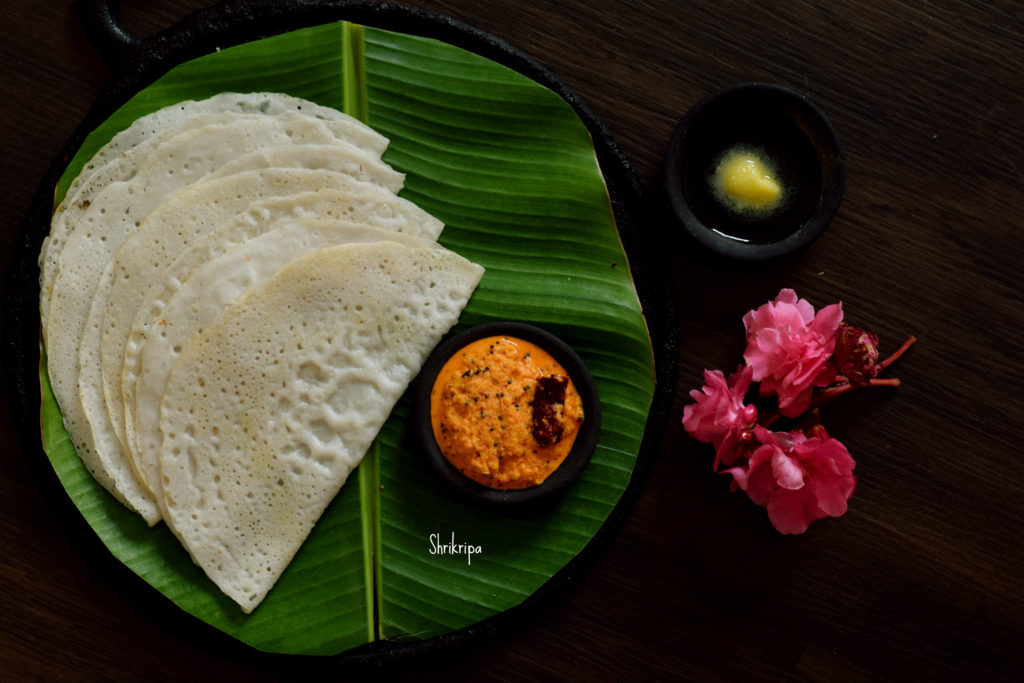
First, I want to wish a very very happy “Ugadi” to all my readers.  Ugadi marks the beginning of the new Hindu lunar Calendar, which is based on the change in the moon’s orbit. Ugadi is a Lunar New year for us.

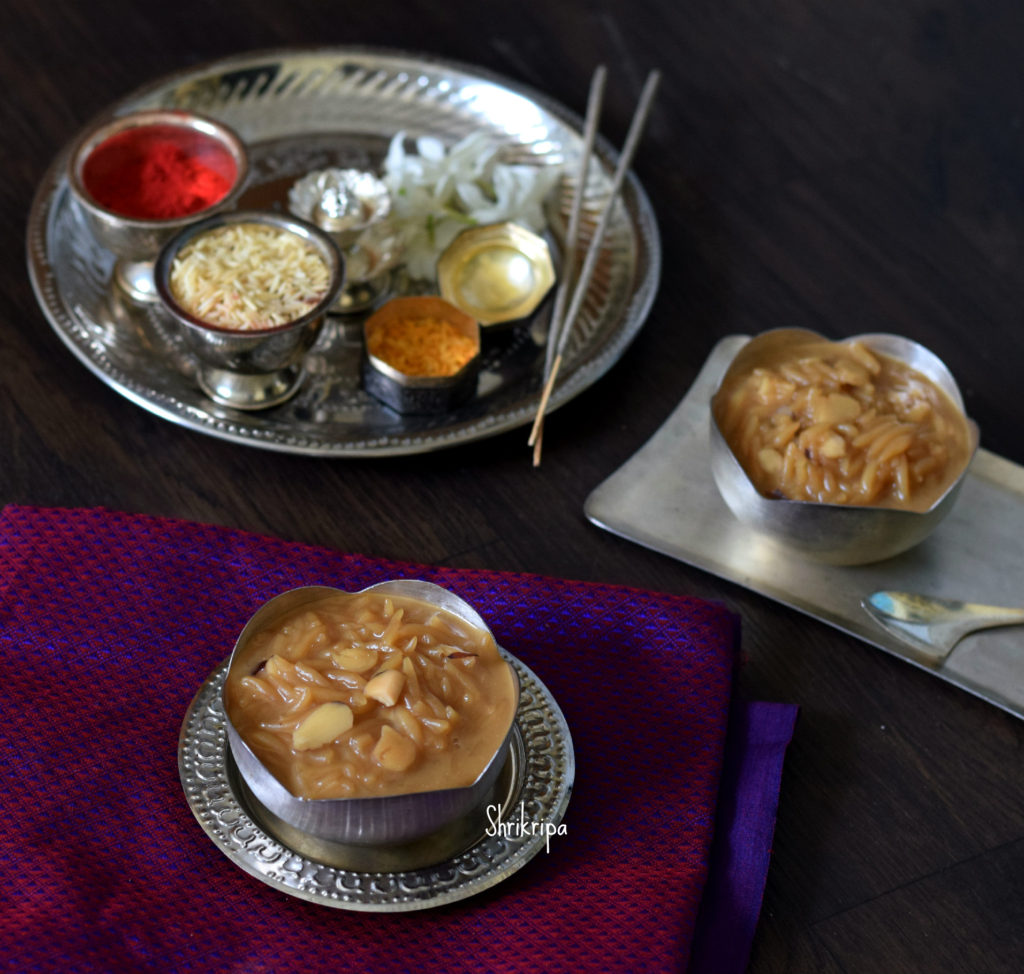
On the eve of this festival I made our traditional payasam and enjoyed with my family.

“Berati” is nothing but preserved fruit pulp, which is cooked until it forms into thick mass and usually made when it is in abundance and stored for future use.

How to preserve jackfruit and Banana / Berati is already shared in my blog. 

In Coastal region we love jack and Banana in many forms. Berati Payasa (preserved Banana or Jack)  is one of them.

Now we will see traditionally how it is made:

Ingredients:

Berati / Banana preserve – 1 bowl

Coconut – 1 (To extract milk)

-OR-

Thin coconut milk – 2cups

Thick coconut milk – ½ cup

Salt – ½ tsp

Cardamom powder – ½ tsp

For Seasoning:

Ghee – 1 tbl sp

Thin Coconut slices – 2 tbl sp

Cashew pieces – 2 tbl sp

OR

Toasted black sesame – 1 table spoon

Fresh coconut slices – 1 to 2 table spoons

Method:

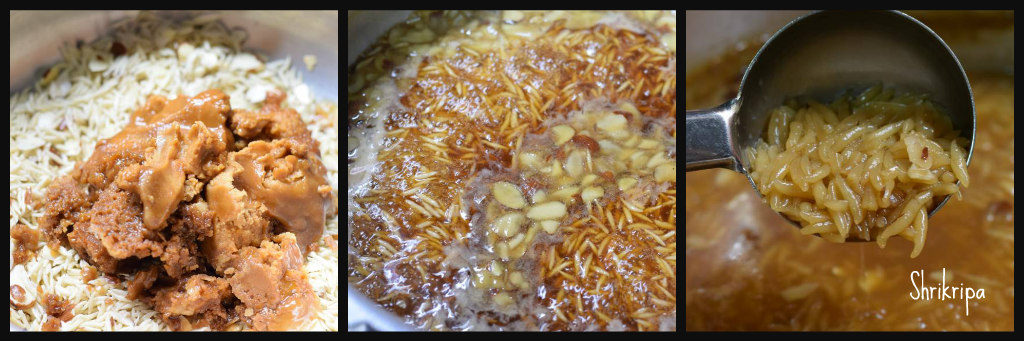
  • Take out Berati from your freezer and keep aside for some time to attain room temperature.

  • Slice coconut by using small knife, chop these sliced pieces into small bits.
  • Toast black sesame and keep aside.
  • Take little ghee and fry coconut bits and keep aside.
  • If you want to, you can add ghee roasted cashew bits as well.
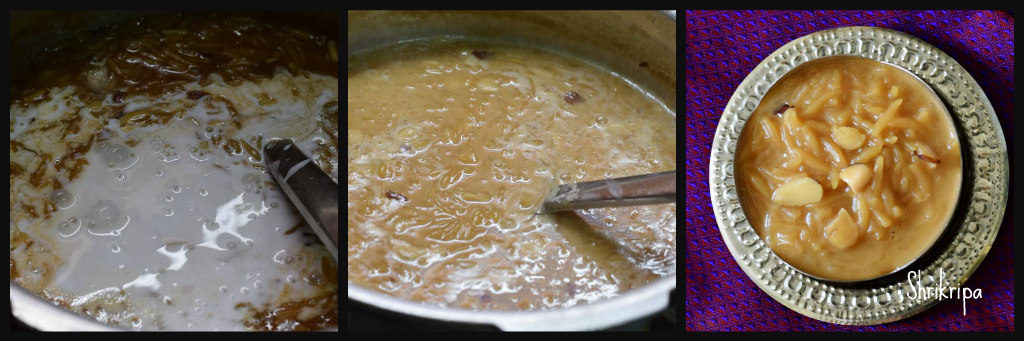
  • Grate coconut (coconut should be fresh), put one cup of water and grind this in a mixer jar and extract milk by sieving this ground mixture. This is thick coconut milk and you should keep this separately. We use this at the end stage of Payasa making.
  • Do this procedure a couple of times to get a thin extract and lastly discard coconut fibre.
  • If you are using readymade coconut milk, please skip this step.
  • Now take one thick bottomed vessel, put Berati, thin coconut milk and dissolve Berati and keep this on a gas stove to boil.
  • Usually while making Berati, we put Sugar, so no need of additional sugar.

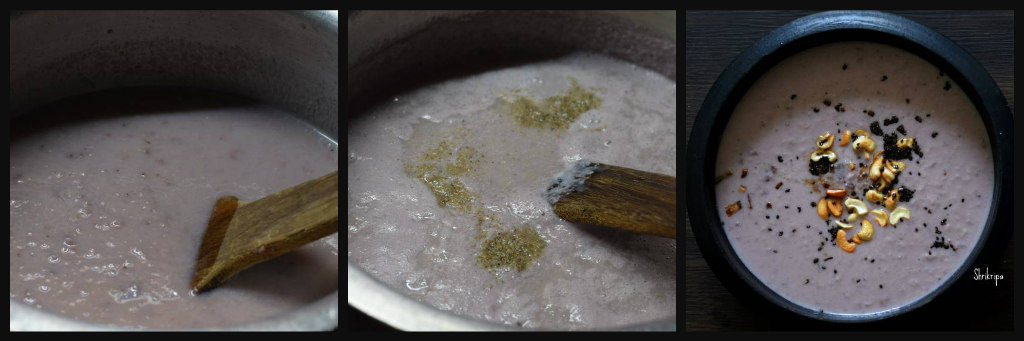
  • Lastly add thick extract of coconut milk and give one boil. Don’t boil it much. Add Cardamom powder and mix.       
  • Remove from fire and add fried coconut pieces, toasted black sesame or cashew brittles to prepared Payasa.
  • Serve with lunch thali or as a dessert.

NOTE:

  • Traditionally only toasted sesame and coconut bits are added.
  • Vegans can omit ghee and roast all the items, instead of frying.


Sabudana/Sago idli:

Sago/ Sabudana is also known as Sabbakki, Javasiri in Southern part of India. Yes! It has many names and is one of the favourite staple foods during the festivals or fasting time. Sabudana is rich in complex carbohydrates due to which, it is easy to digest as well as takes longer to breakdown. Hence, you don’t feel hungry for long.

In our tradition, it has been used from ages during the summer time to maintain body heat, during the time of illness or as baby food. During all these situations, people need to take low calorie, high in energy, easily digestible meal option. Traditionally it is combined with rice while making gruel.

In India we normally make sweets as well as savouries from these edible pearls. Sago is usually confused with Tapioca pearls. Sago is extracted from the inner pith of the tropical palm trees. On the other hand, Tapioca pearls are made by using Cassava, it is a tuber.

In Summer, it is a good idea to include Sago, rice as well as curds in your diet to maintain body heat. I have included fresh homemade turmeric powder, fresh coconut, cumin as well as chopped coriander to enhance the taste as well as nutrients.

Ingredients:

Rice Rava / Idli Rava – 2 cups

Sabudana – 1 cup

Curds – 2 cups

Water – 1 cup

Cumin – 1 table spoon

Turmeric – 1 tsp

Salt

Grated coconut – 1 fist full

Chopped coriander leaves – 3 table spoons

Eno fruit salt or cooking soda – 1 tsp

Method:

-Mix Rice Rava and Sabudana, wash twice and drain. Add curd, water, cumin, turmeric powder, salt and keep it covered overnight.

-Next morning, add coconut, Eno fruit salt, coriander. If needed, adjust the consistency of the batter by adding little extra water.

Mix well and make idlies like regular idlies in an idli steamer for about 10 minutes and serve with chutney.

NOTE: Vegans can substitute with any plant based curds to make this batter.


Nolen Gur Payesh / Rice kheer with date palm jaggery:

Rice kheer or Paramanna is an integral part of any festivities in many parts of India. Every region has its own method or style. Usage of ingredients would differ according to the region. Such as the addition of plain milk or coconut milk. Usage of Jaggery or sugar. So, in west Bengal, they use date palm jaggery, which is known as Nolen Gur, which is available only during the wintertime; they make a lot of delicacies by using this special jaggery. It ranges from Nolen Gur Payesh, Nolen Gur Rasgulla, Nolen Gur Sandesh are the few.  I wanted to try this out in my cooking and bought it online.

They usually use plain tiny grain rice or dried rice-shaped vermicelli, which is known as Chushi pithe. Chushi pithe is nothing but handmade Rice vermicelli. In Mangalore, we make rice noodles known as Halittu or Paradi and use them in a Payasa/ kheer, and we usually use coconut milk. So, I tried my regional method and proceeded. It tasted divine!! Usage of coconut milk and taste of the palm jaggery was the best decision, and it was very rustic and flavourful in taste.

Ingredients:

Chushi Pithe/handmade rice vermicelli – 200 grams (you can use small grain rice as well)

Almond or Cashew – ½ cup (slivered)

Nolen gur – 300 grams (used Patali gur)

Coconut milk – 200 grams

Cardamom powder – 1 tsp

Ghee – 1 tsp (vegans can skip this)

Method:

-Take one thick bottomed vessel, add ghee and fry almond and rice vermicelli (Chushi pithe) or if you are using plain rice.

-Add around one litre of water and cook until rice cooks perfectly. Whenever it’s needed, add extra water little by little and cook.

-Now, add jaggery of your choice, boil until it smells divine and the aroma spreads. Here, the raw smell of the jaggery should vanish.

-Lastly, add one tetra pack of coconut milk, give one boil. Garnish with cardamom powder and mix.

NOTE:

-If you are using fresh homemade coconut milk, extract three times, preserve thick (1st extract) and add at the end.

-thin coconut milk of 2nd and 3rd extracts can be added while boiling or cooking rice vermicelli.


Lemongrass Tambli:

Lemongrass is used as a culinary as well as medicinal herb in the Asian continent. It has a mild citrus flavour with sweetish taste. It can be used in a dried, powdered or fresh form in various things like teas, soups and curries. This particular curry is called “Tambli” and it is prepared by grinding fresh leaves with coconut and mixing in buttermilk and it doesn’t need boiling. You can savour this like an appetiser or mixing with piping hot rice in this really hot summer. It has healing properties and is very good for the digestive system.

How to prepare this:

Ingredients:

Lemongrass sticks – 5-6

Fresh grated Coconut – ½ cup

Green chilli -1

Salt –to taste

Lemon – ½

Buttermilk – ½ cup

Method:

  • Chop lemongrass into bite size.
  • Take your mixer jar, grind lemongrass pieces, coconut gratings, green chilli and salt by adding ½ cup of water into smooth paste. Sieve this mixture to get smooth liquid. (Sieving is very important over here, otherwise lemongrass will irritate your throat)

  • Once again add half cup of water, do exactly like earlier and repeat this process for two or three times, so that we will remove all the traces of liquid and discard the remaining fibre.
  • Now mix in buttermilk, adjust the consistency by adding water. Check the salt and add lemon juice.
  • Now your Tambli is ready to savour.
  • If you want to add the seasoning, heat one tsp of ghee, fry little cumin and curry leaves and add to Tambli.
  • Beat the heat by having this either as an appetiser or with hot rice.

NOTE:

  • To make vegan version, please omit the buttermilk and rest you can proceed as it is.


Malabar spinach and Raw papaya curry:

Malabar spinach is commonly known as Basale in our coastal area. It is a common creeping vein in the backyard of every household.

Its leaf is very rich in iron, fibre, antioxidants and vitamins and low in calorie. Malabar spinach is a go getter veggie at any given point of time. You can harvest, as soon as the main stem is growing and spreads all over. Snip the leaves and use the stems as well.

On the other hand, raw papaya is also a power house of nutrients and it is a natural cleanser of intestine and colon.

Like Malabar spinach, Papaya tree also plays an integral part in our garden. May be because of the easy availability, we have a couple of traditional dishes with Raw papaya and one curry is this. Our elders had so much knowledge to include all the goodness in their cooking. One such recipe is Raw papaya and Malabar spinach with a freshly ground coconut masala. It can be relished with Boiled rice or white rice. It is an overall package of health benefits from both the veggies.

Ingredients:

Malabar spinach – one small bundle

Raw papaya – 1 small

Onion – 1

Salt

Jaggery (optional)

Red chilli powder – 1 tsp

Toor dal – ½ cup

For Masala paste:

Coriander – 1-2 tablespoon

Cumin – 1 tsp

Methi – ½ tsp

Dried red chillies – 5 to 6

Tamarind – 1 tsp

Coconut – 1 to 1 ½ cup

Seasoning:

Coconut oil – 1 tablespoon

Mustard – 1 tsp

Red chilli – 1

Small onion – 1

Curry leaves – 1 spring

Method:

-Wash Malabar spinach leaves, chop them and keep them aside. Cut it into 2 to 3-inch pieces if you are using its stem.

-Chop Raw papaya by removing the outer skin and the inner seeds. Dump in a water bowl to remove all the oozed latex and drain.

-Wash Toor dal; if you have chopped Malabar spinach stem, combine it and cook with dal by adding turmeric and salt.

-When toor dal is ready, remove the lid, add a little water, salt, jaggery, red chilli powder, Papaya pieces, and chopped leaves. Cook for one whistle.

-Now prepare masala by roasting methi, coriander, cumin and red chillies in a little oil. Grind into a paste by adding coconut, tamarind and water.

-Add the ground paste to cooked veggies, adjust everything, boil and add seasoning.

-To season, heat oil, splutter mustard, red chilli, curry leaves and chopped onion. When the onion becomes brown, add it to the curry.

-Serve with Hot rice.

Bannangayi Dosey /tender (young) coconut Dosa:

When I was a little girl, my mom used to work, and I used to spend the summer vacation at my grandparents’ house. I used to enjoy at the farm house by having an unlimited supply of Mangoes, tender coconut, pineapples etc.

There used to be abundant supply of fallen young coconuts, also called ‘bannangayi’ which have much harder flesh than what we get in the normal tender coconut carts over.

My aunt used to make a very tasty Dosa out of this and we used to relish this along with chutney and Jaggery syrup topped with homemade ghee.

Yesterday, when we had tender coconuts here in Bangalore, inner pulp was very thick and couldn’t eat. So, I thought about Dosa and prepared this after ages. It was such a nostalgic moment for me. Let us see how to make this tasty Dosa.

Ingredients:

Tender coconut – 1

Dosa rice – 2 cups

Salt

Method:

-wash and soak Dosa rice for 3 to 4 hours.

-Grate or chop tender /young coconut and keep aside.        


-Grind soaked rice with grated young coconut by adding little water and salt and make smooth paste. This batter must be like our regular Dosa batter and there is no need of fermentation.                           

-You can make use of this batter straight away. Usually we prepare this batter in the morning itself.

-If you want to prepare this batter in the evening, to make the Dosa in the morning, you can store the batter in the refrigerator.

-To prepare Dosa, heat iron Dosa tawa. When it is hot, don’t apply any oil. You can pour one serving spoon of batter and make Dosa like our regular Dosa. Pour ½ tsp of ghee and Close the lid.     


When it shows little brownish spots here and there, flip the side, cook upper side and serve with Coconut and onion chutney , jaggery syrup which is topped with ghee or honey.


Homemade Vegetarian Thai Green curry paste /Curry:

Being a coconut eater, born and brought up in Coastal Karnataka, we like Thai food over any other cuisine. Thai green curry is our favourite and when it is with homemade fresh paste, nothing like it.

Homemade curry paste is very simple to make and loaded with rich flavour as well as delicious. It is the perfect menu for weekend family lunch.

      Pic credit: My daughter

Three main ingredients which are very important is lemon grass, galangal (Thai ginger), Thai sweet basil and tender lemon leaves.

Instead of lemon leaves one should be able to use grated lemon rind (only outer layer) as well.

First, we will see the procedure for Fresh Green curry paste:

Ingredients:

Coriander seeds – 1 table spoon

Cumin seeds – 1 tea spoon

Turmeric – ½ tea spoon

Ginger – ½ inch

Garlic – 6 cloves

Galangal – ¾ to 1 inch (Thai Ginger)

Coriander leaves – 4 sticks

Onion – 1 small size

Green chillies – 8-10

Lemon grass bulb – 2

Pink salt – 1sp

Tender Lemon leaves – 3

Method:

-Slice ginger, galangal, onion, green chillies. Mine was home grown heirloom variety, which is less spicy. If your chilli is spicier, please remove inner seeds.

-Remove outer stiff cover from the lemon grass bulb. Then slice it and keep it ready.

-Put everything in the mixer jar and make a paste by adding very minimal water. Store this paste in an air tight bottle. This portion suffice for twice.

How to make Curry:

Ingredient:

Vegetables – Choice of yours

I have used Broccoli, baby corn, capsicum, carrot, beans and baby spinach.

Green curry paste – 2 table spoons

Salt

Sugar – 1 tsp

Corn flour – 1 tsp

Coconut milk – 1 tetra pack

Oil – 2 table spoons

Onion – 1

Basil leaves – 8

Red bird eye chillies – 2 (optional)

Method:

-Chop veggies, dice onions and separate each layer and keep aside.

-Heat oil, add onion and fry for 2 min. Add chopped veggies and fry for a while.

-Add green curry paste, salt, sugar and fry until raw smell vanishes.

-Add water,corn flour and boil, until veggies are half cooked. Add Coconut milk and give only one boil.

-Garnish with basil and red tiny chillies and serve with small grain rice.


Surnoli: (Bread dosa/ Buttermilk dosa)

Surnoli is a traditional breakfast recipe of south canara; it is also called as bread dosa or buttermilk dosa. This is usually prepared if you have left over buttermilk or curds in excess. Usually we make this by adding jaggery.

Here I am giving both sweet and normal dosa version.

Ingredients:

Dosa rice – 3 cups

Fenugreek seeds – 2 tsp.

Beaten rice /poha – 1 ½ cup

Salt – to taste

Buttermilk /curd – 2 cups

Grated coconut – from half coconut or 2 fists full.

Eno fruit salt – 1 tsp. each (for sweet/normal version)

Grated jaggery – according to taste (2 to 3tbl sp) (For sweeter version)

Turmeric powder – 1 tsp. (for sweeter version)

Method:

  • Wash dosa rice, fenugreek and beaten rice twice; discard water. Pour curds and soak this for 3 to 4 hours.
  • Grind this in to a smooth paste by adding coconut and salt to an idly batter consistency (little thicker than normal dosa)
  • If butter milk is very sour add milk while grinding or else you can add water too (if batter is too thick)
  • Now divide this batter into two, take out one portion of batter into a steel vessel in which you keep it for fermenting. This is our normal dosa batter.
  • For sweeter version, add turmeric and jaggery to the mixer jar and grind until it is homogenous.
  • Remove this batter to another vessel and keep it for fermentation.
  • Next day morning add 1 tsp. Eno fruit salt to both the batter and leave it aside for 10 min.

  • Make a dosa by pouring one serving spoon of the batter on hot iron griddle, don’t spread.
  • You will see thousands of holes on upper surface, smear with butter(Vegan’s can avoid) and cook this in a low flame by closing it with a lid.
  • Cook this dosa only on one side and don’t flip.

    -Spongy bread dosa is ready to serve and indulge in it with homemade butter or any chutney. Here I have served this with Onion-coconut chutney.

Gujiya / Dry fruits Karanji/ Karjikai:

Deepavali aka Diwali is an important festival of India and is spread between three days. Indian festivals are incomplete without sweets and savouries. In India, each festival has its own significance in celebration as well as its menu. Gujiya is one of them and has a very important role during Diwali.

Gujiya is a deep-fried flour-based delicacy, with different fillings in different regions. It is known by a different name in each region. Outer cover will be the same and inner stuffing varies from Rava – sugar, coconut – jaggery, coconut – sugar, mawa (milk solids) with dry fruits or with only dry fruits are traditionally seen. Nowadays you get to see so many variations from chocolate to cheese filling as well as baked version.

In North India, after frying the Gujiya, they usually dip it in a sugar syrup and outer cover would be wet and shiny. In south India, we normally deep fry and serve as it is and it’s known as Karanji / Karjikai.

I used to follow Chef Sanjeev Kapoor and learnt so many recipes from him and this is one such recipe. Over the years, I tweaked it a little and adjusted it according to our taste and it has one added advantage of longer shelf life, due to the usage of milkmaid instead of khoya.

Ingredients:

For the outer cover / shell:

All-purpose flour – 2 ½ cups

Salt – ¼ tsp

Ghee – 6 table spoons

Water – As needed (normal water)

Oil – for Deep frying

For the stuffing /filling:

Desiccated coconut – 200 grams

Semolina – 2 table spoons

Almonds – ¼ cup

Cashew – ¼ cup

Raisin – ¼ cup

Cardamom – 1 tsp

Condensed milk – 1 tin (400 grams)

Method:

For the outer cover-

-In a bowl, add flour and pour ghee. Rub the ghee and flour by using your hand for 5 to 10 minutes. 

-After a while, flour would resemble like a semi wet crumb.

-Now add required amount of water to make a firm dough.

-Cover the dough with wet cloth and keep aside for half an hour.

Note: Dough approximately holds ½ cup of water.

In the meantime, prepare the stuffing –

-Roast semolina in a low flame, switch off the gas. Mix in all the other ingredients from almond to condensed milk.

-Keep it until mixture is non-sticky while touching. 

-Now comes the actual procedure. You can use three methods.

  1. Use Gujiya mould.

     2.Take a dough, roll into big thin circle, use cookie cutter to make small, uniform circle.

  1. Take little dough, make small poori like discs.

Here I have followed the third method.

This quantity has yielded 28 Gujiya.

-Divide the dough, make roundels, fill the stuffing, close into half.

-Dip your hand in water, now, start folding the edges from one corner and go on folding like a half diamond shape at regular intervals until you reach the other end.

-Keep this ready, stuffed, yet to fry Gujiya to air dry.

-Repeat the procedure and finish off the filling work.

-Heat the oil for deep frying in low temperature.

-When oil is hot, drop one by one Gujiya, fry in a low flame to get good results.

-When everything is fried and cooled, store it in an air tight container.

NOTE:

To get a perfect Gujiya – these points are very important. 

1- Rubbing the ghee + flour. 

2-Frying in a low fire 


Homemade Corn flakes Mixture / Corn flakes Chiwda:

Corn flakes is nothing but maize flakes, which is flattened maize. Indian savouries are an integral part of any festivities. When Diwali festival is around the corner each one would think about what to make. When it is an easy and super fast savoury you need, nothing like it than this recipe. It is very handy, when you have time constraints but still want to make homemade stuff and enjoy.

Maize flakes or Corn flakes or flattened maize is available in almost all departmental stores.

Ingredients:

Maize / Corn flakes – 500 Grams

Oil – to deep fry

Tamarind powder or Amchur powder – 2 tsp.

Salt – to taste

Sugar powder – to sprinkle.

Seasoning:

Oil – 4 tbl sp

Peanuts – 4 tbl sp

Mustard- 2 tbl sp

Cumin- 1 tbl sp

Hing – 1 tsp

Curry leaves – 7 -8 springs

White sesame seeds – 2 tbl sp

Turmeric powder – 2 tsp

Green chillies – 3 -4 Chopped

Dry Coconut bits – 3 tbl sp

Coriander leaves – 3 tbl sp

Method:

-Deep fry maize flakes by putting little by little at hot oil and drain the excess oil and keep it ready.

– When it is ready, keep everything ready for seasoning.

– Chop green chillies, curry leaves, coriander leaves.

– Slice coconut and make bite size pieces.

-Make sugar powder and keep aside.

-Now take one big kadai, put oil. When it is hot add peanuts.

-When it is half done, add mustard. After it splutters go on adding Cumin, hing, curry leaves and green chillies one by one.

-When curry leaves become crisp add coconut bits and fry a little.

-Lastly add chopped coriander leaves and fry nicely until coconut bits becomes brown.

-Now add all the powders- turmeric, salt, tamarind and sugar.

-Switch off the gas, add deep fried corn flakes and mix thoroughly until it holds all the masalas.

– Don’t put lot of pressure while mixing, if you do so, crunchy flakes will break and will not hold the shape.

-After mixing, cool and store this in an airtight container. This stays good for one month or more.

Enjoy homemade crunchy munch with evening tea.