Gujje Huli menasu / Tender jackfruit curry:

In our region, Raw jackfruit curry relished in every possible way and every possible stage of its growth. Huli Menasu is nothing but tamarind and dried chillies. The speciality of this sambar is no frying or roasting the masala. It is no fuss masala but, the flavour is unthinkable. It is an experience by itself. It is one of our family favourites, and today, sharing it with you all.

I have many raw jackfruit recipes in my blog, including “how to chop” the young jackfruit for beginners.

To get an authentic taste, one should use coconut oil and fresh grated coconut for this curry.

Now we will see the recipe part.

Ingredients:

Raw jackfruit cubes – 1 bowl

Salt

Red chilli powder – 1 teaspoon

Fresh coconut – 1 bowl

Red Byadagi chillies – 3 to 5

Tamarind – gooseberry size

Turmeric powder – ½ teaspoon

For seasoning:

Coconut oil – 1 tablespoon

Mustard – 1 teaspoon

Red chilli – 1

Curry leaves – 2 springs

Garlic – 10 cloves (crushed)

Method:

-Cook Raw jackfruit pieces in a sufficient amount of water. Add salt and red chilli powder, turmeric as well.

-In the meantime, grind smooth masala by putting coconut, tamarind, red chillies.

-When jack pieces are soft/ cooked, add ground masala, adjust the consistency and boil.

-When the mixture boils nicely, switch off the gas.

-Prepare seasoning, heat oil, splutter mustard, add garlic, red chilli, curry leaves.

-When garlic becomes deep brown, add the seasoning over boiled gravy.

-Keep this closed for a while before serving to absorb all the flavours.

-Serve with hot rice.

Plantain flower Proso millet dosa :

I have discussed plantain flower, traditionally, how to chop, how to use etc., in my earlier blog post, which included my mom’s best chutney recipe. We all know the banana flower is rich in fibre, antioxidants, iron, potassium, calcium, vitamins, and other minerals. It is used mainly to treat constipation and anaemia in villages of our native in and around Mangalore and is part of our day to day cooking.

 I Tried the recipe long ago, liked and finalised it with the recipe for my millet calendar project, which was published in 2019 and filing the recipe under Diabetic friendly recipe in my blog.

Ingredients:

Proso millet – 1 cup

Dosa Rice – 1 cup

Urad dal -1/4 cup

Chana dal – ¼ cup

Methi – 1 tsp

Poha – ½ cup

Jaggery – 1 tsp

Salt

Tamarind – 1tsp

Red chillies – 4

Coconut – ½ cup

Plantain flower – 1

Method:

-Wash, soak millet, rice, chana and urad dal, methi and poha for 3 hrs.

-Take one bowl of water with added one serving spoon of buttermilk.

-Chop whole plantain flower, soak in buttermilk water, drain. You can check the process here as well.

– cook the drained banana flower by adding tamarind water, salt, red chillies, jaggery.

-Cool the cooked mixture, grind with soaked items by adding coconut into a smooth paste.

-Ferment and make dosas like any regular dosas and serve with chutney.

NOTE: It can be made as a vegan, instead of buttermilk, use tamarind water and instead of ghee, you can use any vegetable oil. 


Millet roti/ pulka :

Millets are “no glutenous” flours. To attain soft-edged, easy to roll roti’s, we need to prepare the proper, pliable dough. When you want to prepare roti dough, you can either add little rice flour or whole wheat flour to millet flour. Even though it is not a traditional method, it works out just fine to my family needs. It remains soft even after cooling, easy to make and works out just perfect for any rolls or wraps.

How: First, make a porridge of millet flour or a mixture of two to three millet flours by boiling water, salt,0ne a spoon of any cooking oil. When it starts boiling, add millet flour and cook until it is glossy.

When it is cool, add rice or whole wheat flour and make a dough. In this way, you would get very soft pulkas.

How I usually do is –

Ingredients:

Ragi flour – ½ cup

Bajra flour – ½ cup

Jowar flour – ½ cup

Whole wheat flour- as needed

Water- 2 cup

Salt

 Oil -1 tsp.

Method:

-Take two cups of water, add oil, salt and boil. Now add millet flours and keep this for 2 to 3 minutes or until it cooks. Now remove from the flame and keep aside.

-When it is ready to handle, add whole wheat flour, make a firm ball like Chapati dough. Cover and keep this aside for 10 minutes for resting.

-Then start making a little thicker Chapati than the regular Chapati/ pulka’s and cook both the sides and place it on fire to fluff and serve either as it is or by applying ghee or oil.

NOTE:

-To make Glutenfree roti, add rice flour instead of whole wheat flour. 

-To make an initial porridge, you can use the microwave as well. 


Khara Neer Dosey / Savoury Neer dosa :

Neer dosey is an integral part of coastal breakfast. I usually prepare Neer dosey or my own version of Healthy neer dosey. Leftover neer dosey would turn into another dish, with sweet seasoning for an evening with a cup of tea. Khara neer dosey is one more variety of dosa from our region. 

Khara neer dosey is also known as Khara Thellavu /savoury neer dosey which is nothing but a spicy version of normal white neer dosey. It is quick, no fermentation is required. Soak the rice, grind, maintain the right consistency, use a well-seasoned cast-iron tawa to get the super-soft, authentic taste.

Ingredients needed:

Dosa rice -2 cups

Red chillies – 4 to 5

Onion – 1 big  Or Coconut – 1 bowl

Coriander seeds – 1 tablespoon (optional)

Cumin – 1 tsp (optional)

Hing – generous pinch

Salt

Iron griddle /tawa.

Method:

-Wash and soak Dosa rice at night or 2 to 3-hour soaking is needed.

-In the morning grind this soaked rice into fine paste by adding chillies, chopped onion OR Coconut, coriander, cumin, salt with water (I use soaking water while grinding, it gives pleasant aroma for the Dosa) and salt as per requirement.

– Make batter into pourable consistency like this and check for the salt.

-Now keep Iron griddle for heat, smear oil and keep it ready. 

-Pour one serving spoon of batter-like how we make Rawa Dosa, you can see it in the picture below.

-Now close the lid by keeping the gas on full flame.

-After two minutes, remove the lid and keep the gas in simmer, the edges of the Dosa rise a little, like this.

-Now flip this Dosa on the plate, leave for 2 minutes, then fold like this.

-Now keep repeating this with the remaining batter and stack one over the other or take one big plate and stalk one opposite another alternately.

-Serve this Dosa with Coconut and grated jaggery mixture or coconut chutney or as you wish.


Instant Masala Rolled Oats in Kettle :

If you are living in a hostel, PG or with limited access to the main kitchen, it is an awesome idea to keep some ready mixes with one small kettle, as an alternate choice to mess food.

Here, I have used Rolled oats with south Indian masala to give homely Sambar taste, as well as Rolled oats to give chewy texture, alternate to rice. Rice needs little longer time to cook, when compared to Rolled oats. when you have an instant mix ready, it is really quick, easy, filling, fibre rich and delicious choice of meal. 

Ready mix can be stored at room temperature up to a month.

Cooking time – 5 minutes and standing time :5 minutes.

How I made:

Rolled oats – 1 cup

Ghee/ oil – 1 tablespoon

Mustard – 1tsp

Urad dal – 1 tsp

Chana dal -1 tsp

Cashew pieces – 1 tablespoon

Curry leaves – 1 spring (chopped)

Turmeric – ½ tsp

Sambar powder – 1 tsp (as needed)

Tamarind powder – ½ tsp (as needed)

Salt

Jaggery – 1 tsp (as needed)

Method:

-Take one tawa, heat ghee or oil, splutter mustard, fry urad dal, chana dal, fry until it starts to change colour.

-Add cashew pieces, fry for a while. Next, add chopped curry leaves toss until crispy.

-Now add Rolled oats fry for 2 to 3 minutes in low fire. Add turmeric, sambar powder, tamarind powder, salt, jaggery and mix everything until oats absorbs all the masalas.

-Switch off the gas, cool the mixture and keep it in an airtight container. Stays good for more than one month.

How to Cook:

-Take required amount of oats.

If Masala oats – 1 cup

Water – 1 ¼ cup

Boil water in  a kettle, add oats, cook without the lid, until water absorbs, now close the lid, and leave it for 5 minutes. It is such a simple and delicious choice.


Hasaru Unde/Green gram Laddu/ Whole moong flour Laddu:

Wishing all my readers a happy Navarathri!

Green gram / whole moong is very nutritious and loved by everyone at our home. When I found the whole moong flour at my regular organic stores, I was excited to try my hand at using it in my regular cooking. While thinking of utilising it, idea of preparing laddu came to my mind and I immediately tried my best by using my Besan laddu recipe as a base and it did turn out super delicious with its earthy flavour. Everyone gave a thumbs up at home and  liked it .

So, I am sharing the recipe with you all.

Ingredients:

Green gram flour/ whole Moong flour  – 3 cups

Sugar – 2 ¼ cups

Ghee – 1 ¼  cup

Dry fruits – 1 cup

Cardamom powder – 1 teaspoon

Method:

-Chop dry fruits. I normally use half cup of cashew bits and half cup of slivered Almond bits.

-Dry roast almond and cashew bits and keep aside.

-Powder sugar and keep aside.

-Take one thick bottomed wok, roast green gram flour in very low temperature.

-When it is a little hot, start adding ghee little by little during the roasting process.

-Do not add or pour all the ghee at one go. It will not help to roast evenly, and it will form a muddy consistency, and will affect it in even roasting.

– I took exactly 20 minutes over a small flame.

-After it roasts and you’ve added all the ghee, mixture becomes very runny and colour will turn greenish brown.

-At this time, your house will filled with roasted flour’s aroma. This is the time you should switch off the gas and leave this mixture to cool completely.

-It will take anywhere between 30 to 40 minutes.

-Now add powdered sugar, cardamom powder and roasted dry fruits and mix everything properly.

-Now start using your hand and mix it once and start making small roundels by taking little mixture at a time.

-At this time, you will feel that the laddus are a little wet and glossy and shining.

-Arrange these over a clean, dry platter. After some time (one hour) laddu’s will be dry and glossy texture will vanish.

-Store it in a dry container and enjoy with your family.

Nugge soppu/Moringa leaves Pathrode:

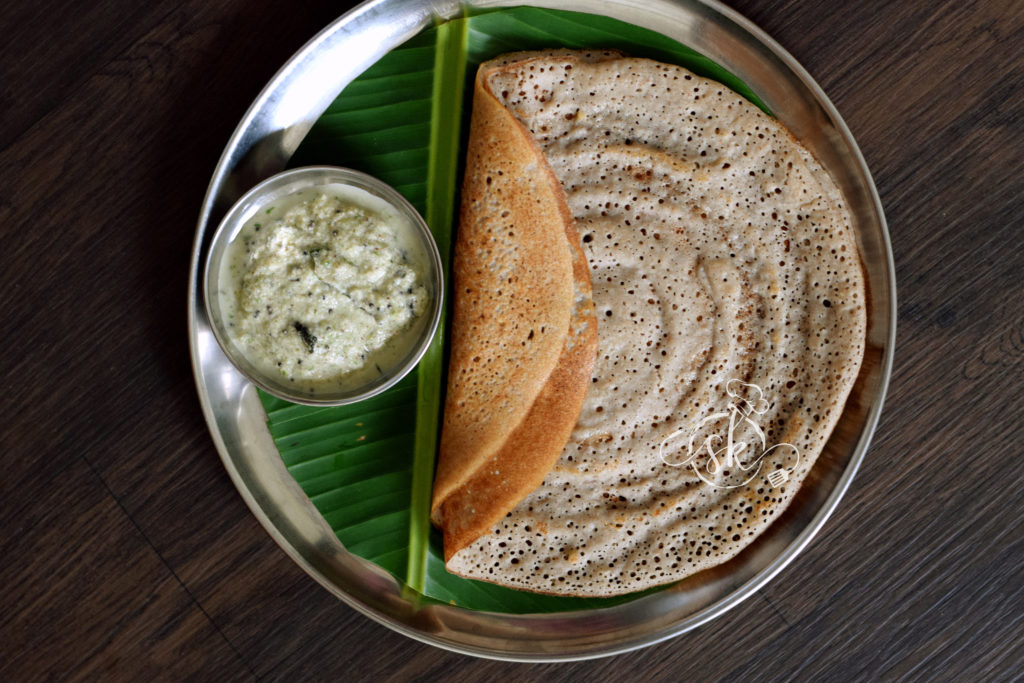
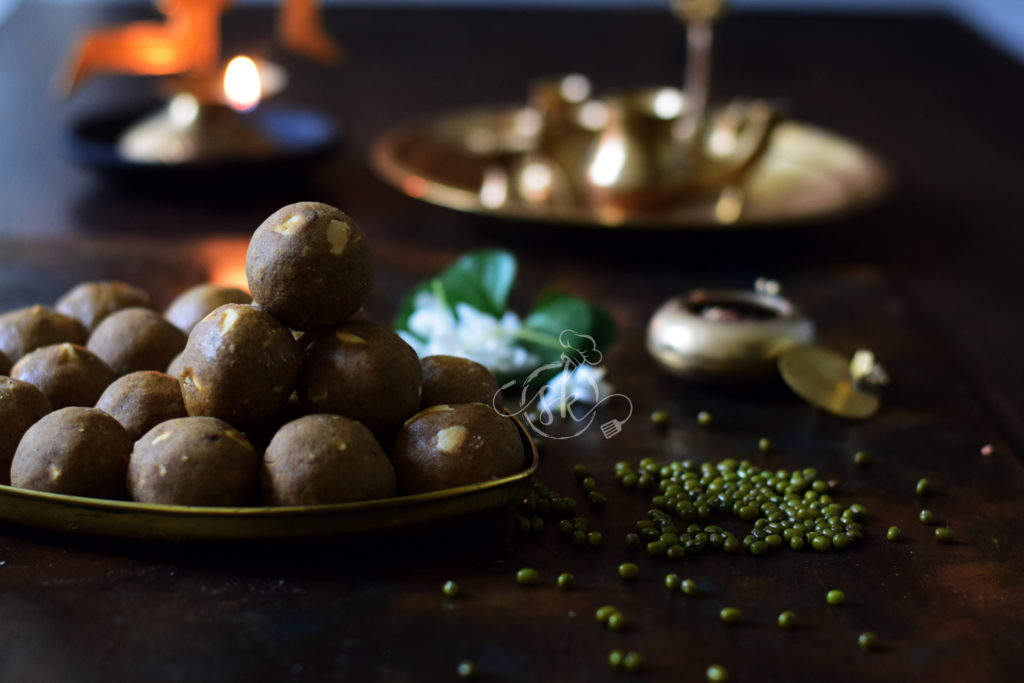
Pathrode is a much-loved Mangalorean delicacy made with colocasia leaves and spice batter. We also make two versions of Pathrode, one is masala batter smeared, rolled, and steamed. Other one is by chopping the greens, mixed with masala laced batter, wrapped in wilted banana leaves , and steam cooked. This version can be prepared by using many other greens as well as banana blossom or flower as well.

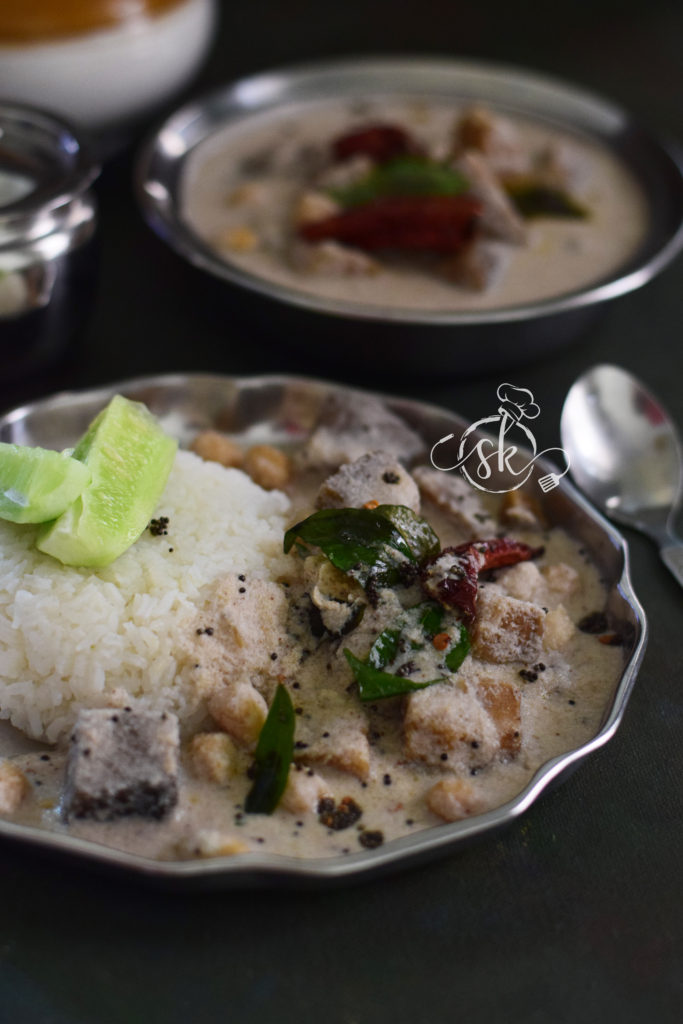
After steaming these flat steamed dumplings/ pathrode’s, they can be enjoyed in many ways. We usually steam cook this, the previous evening and relish hot Pathrode paired with fresh coconut oil when it is hot. Next day, we normally, break those dumplings by using hand, prepare 2 types of seasoning. One is Sweet- with coconut and jaggery. Other one is – without jaggery, by adding onion. This version is my childhood favourite and even now, I cherish it to the core.

In the evening, if Pathrode is left, we even make Pathrode bendi. It is nothing but big chunks of Pathrode, dropped in masala gravy , simmered, and cooked. It is the most loved version in my husband’s family.

I would share all the possible relishing methods in this post. First, we should look into the main preparation,

Ingredients:

Moringa leaves – 1 big bowl

Rice – 2 cups (1 cup red boiled rice or Kerala matta rice +1 cup dosa rice) OR only dosa rice

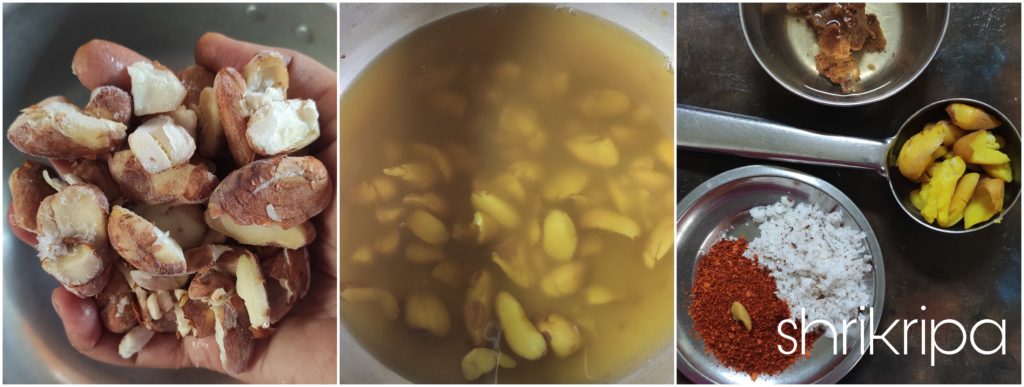
Coconut – from half coconut

Red chillies – 10 -12 ( Byadagi variety)

Coriander – 2 tablespoons

Cumin – 1 tsp

Tamarind – 1 big lemon size

Hing – 1 peanut size (optional)

Salt

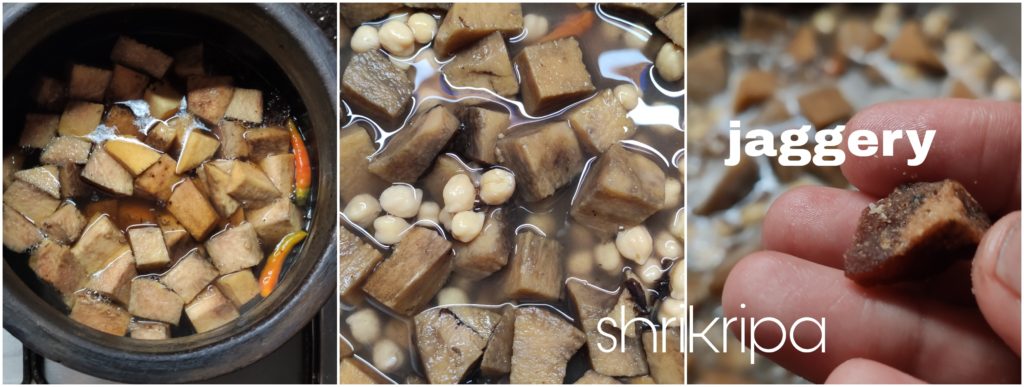
Jaggery – 2 teaspoons

Coconut oil – 2 teaspoons

Method:

-Soak rice for 3 to 4 hours after washing it. 

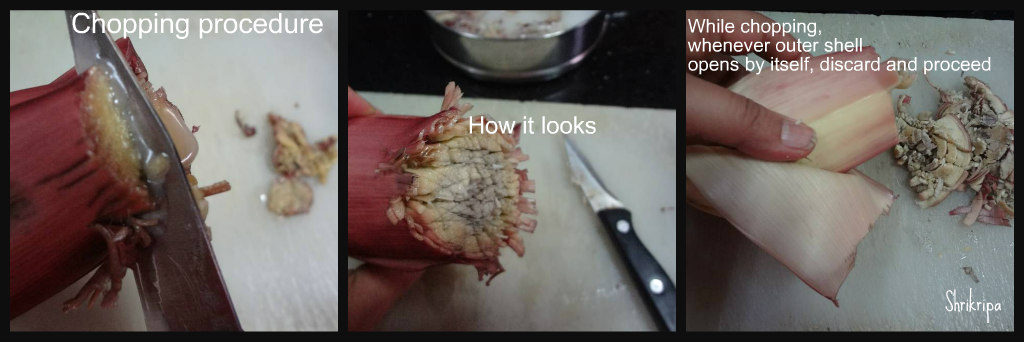
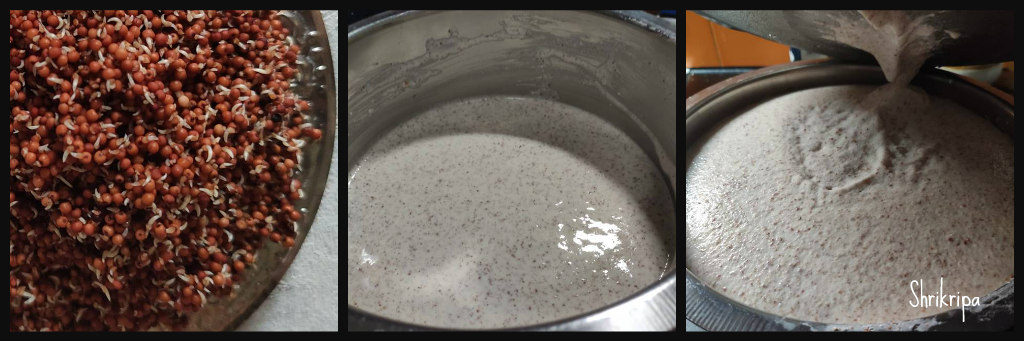
-separate moringa leaves from the twig, wash, drain, chop and keep aside.

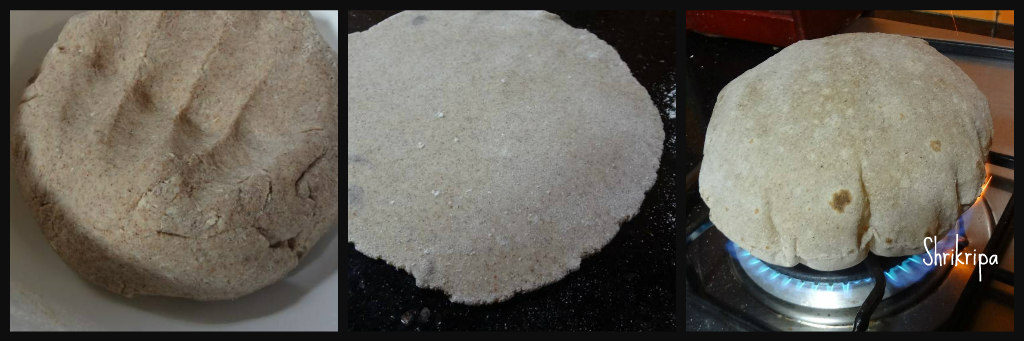
-In the meantime, wilt banana leaves over a gas flame, wipe in a wet cloth and keep them ready.

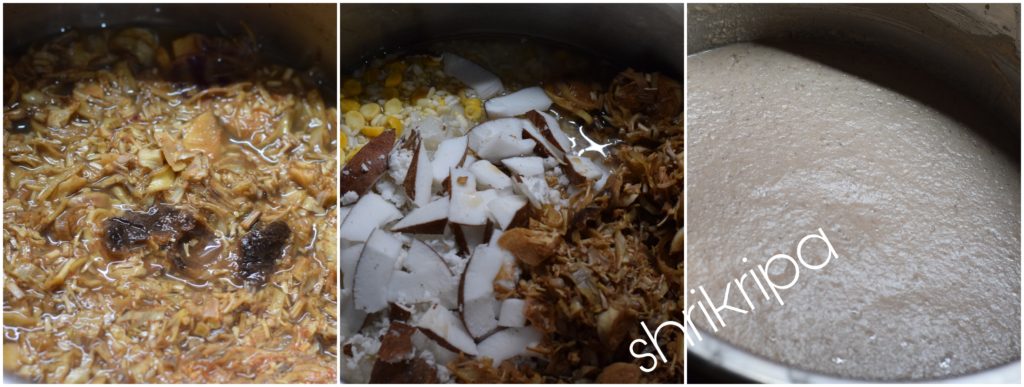
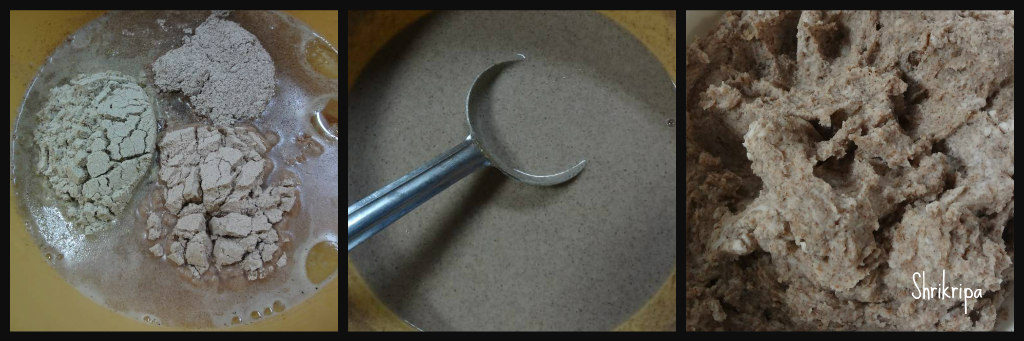
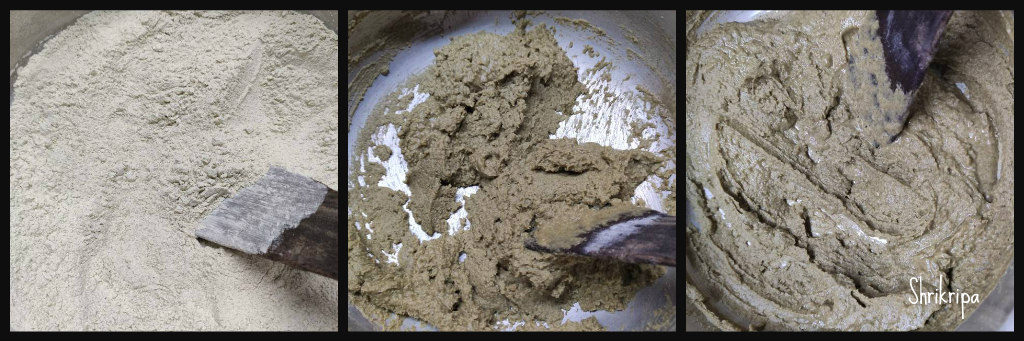
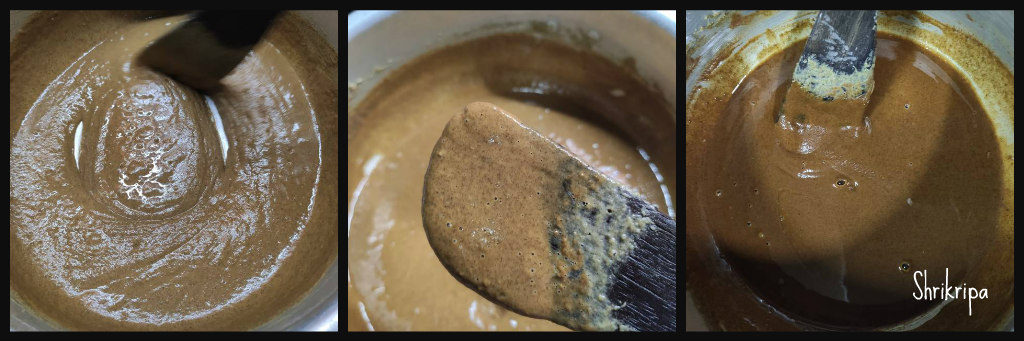
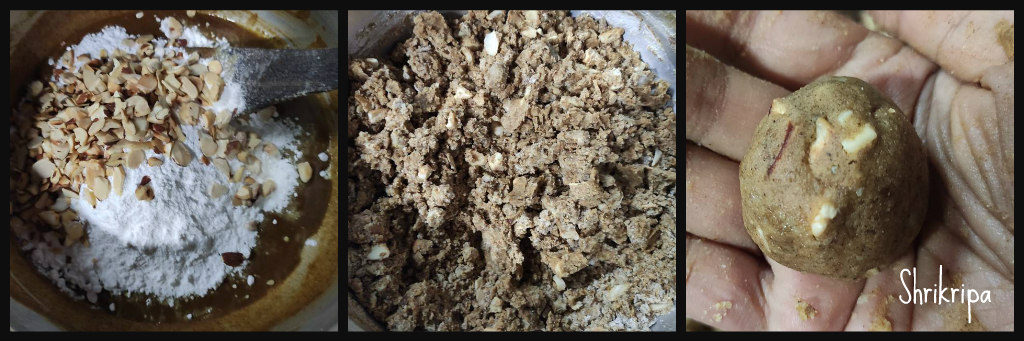
-Make masala by adding coconut, coriander, cumin, hing, salt, jaggery, and red chillies. Add soaked, drained rice, and grind into a batter. A batter needs to be thick in consistency. Add very minimal water, and grind.

-Mix chopped moringa leaves with the batter, add coconut oil, and adjust the consistency, it should be semi-solid but pourable. 

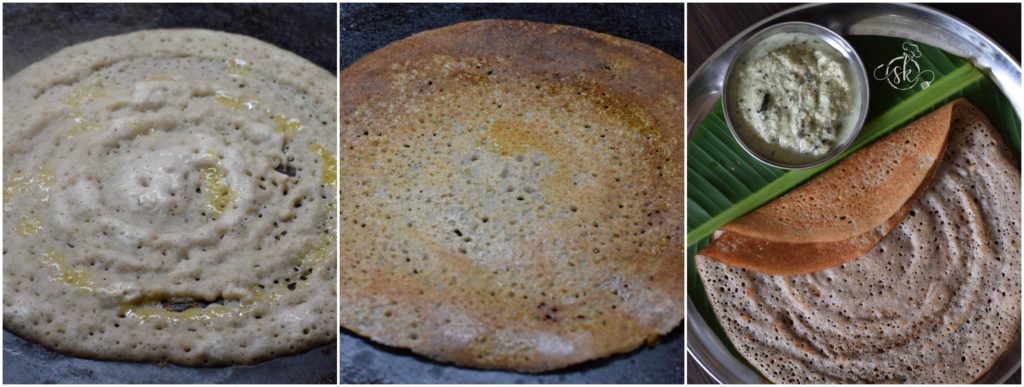
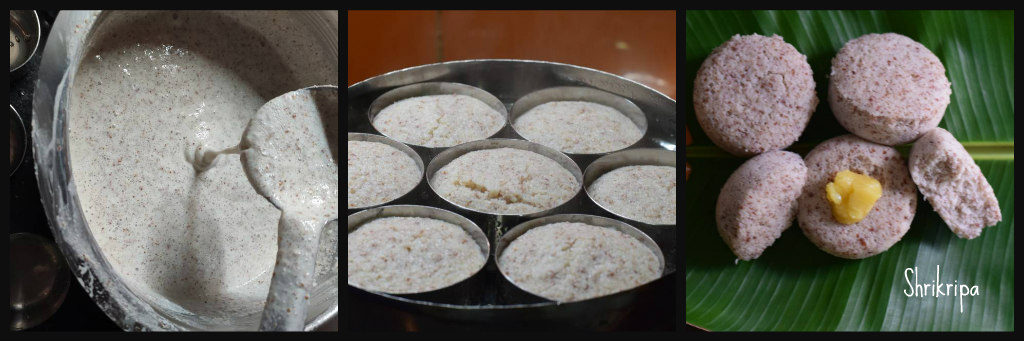
-Pour the mixture, fold it, and steam cook in an idli steamer for one hr on a low flame. You can leave these overnight in an idli steamer itself.

-At night, you can remove a couple of pathrode, and relish hot Pathrode paired with fresh coconut oil when it is hot. This is an experience in itself 😀 

Next day morning, 

For Sweet Oggarane/ seasoning:

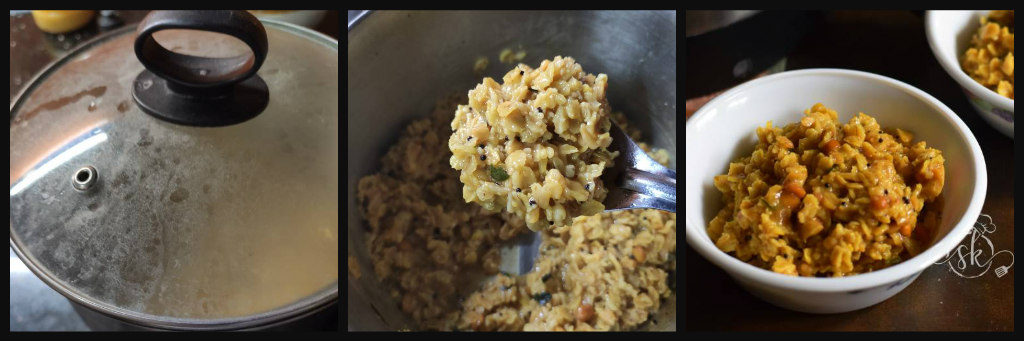
Take 2 pathrode’s, break them into pieces and keep them aside.

To make coconut jaggery mixture,  take a fistful of grated coconut, 2 to 3 tablespoons of grated jaggery and mix by hand.

For seasoning, take  2 tsp of coconut oil, splutter mustard, urad dal, one broken red chilli, fry until it turns red, and add a spring of curry leaves.

Mix in crushed Pathrode, coconut jaggery mixture and mix everything and allow it to heat and jaggery to melt and hold the flavour.

For Khara Oggarane/ Seasoning:

Take 2 pathrode’s, break them and keep them aside.

Chop one small onion little fresh coconut gratings.

For seasoning, take  2 tsp of coconut oil, splutter mustard, urad dal, 1 broken red chilli, fry until it turns red, and add a spring of curry leaves.

-Add chopped onion, fry until it turns transparent, mix in crushed Pathrode, coconut gratings and, mix everything and allow it to heat as well as to hold the flavour.

Now comes the,

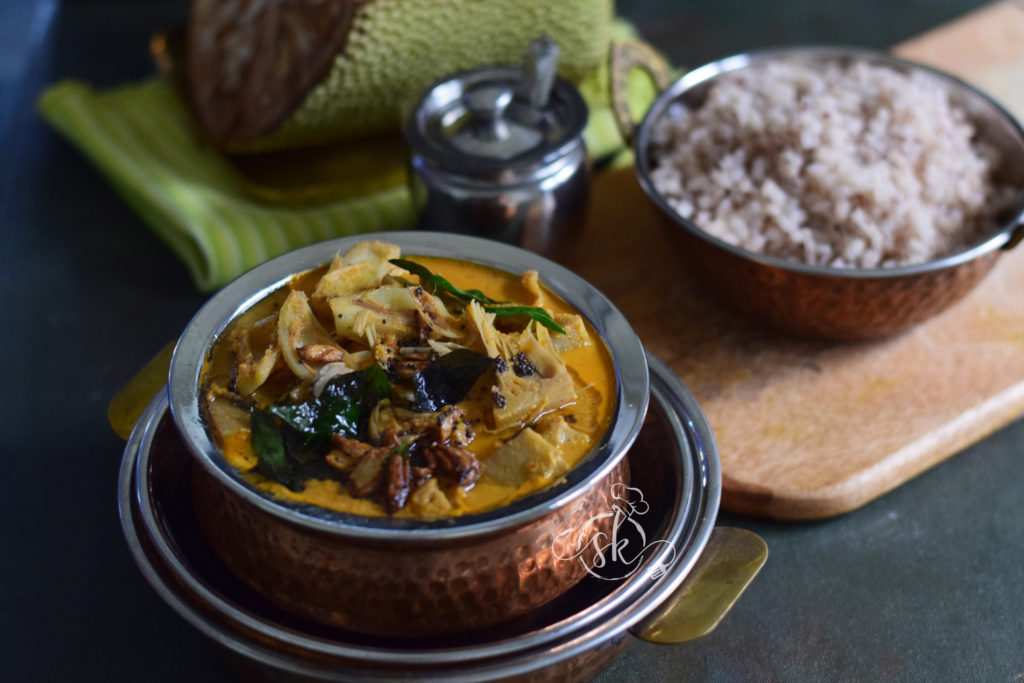
 Pathrode Bendi/ dumpling in masala gravy:

Here, we must break Pathrode into big chunks and keep it ready.

For Masala: Take one bowl of grated coconut, roasted red chillies – 3 to 4 , 1 tsp of coriander, ¼ tsp of cumin, and two cloves of garlic and grind into a smooth paste.

Heat 2 tsp of coconut oil in a wok, splutter mustard, and one broken red chilli, and add curry leaves. Add half the finely chopped onion and fry until it turns brown.

Now, add ground masala paste into the seasoning and adjust the consistency; add salt and a pinch of jaggery and boil.

When it starts to boil, add Pathrode chunks, and boil for five more minutes or until it reaches a thick consistency.

Serve hot, and enjoy.

Sprouted Ragi Idli:

We all know, Ragi is extremely healthy plant-based grain, which is fibre rich, calcium rich and what not? It is a new age “Super food” which was earlier considered as a staple, poor man’s food, or farmer’s diet.

Ragi also known as finger millet or Nachni. Interesting part is, when we sprout the ragi, its nutritional benefits increases 10 folds.

Soaking and sprouting ragi is easy to digest, high in calcium, protein, low in glycaemic index as well as high in vitamin B12, which is a boon to vegetarians. Ragi has the natural property to balance sugar levels in our body, hence it is an extremely  good option for all the age groups, including diabetics.

 Some people do not like ragi for varied reasons, it may be due to its bland taste or something else. If that is the case, one can try to sneak in Ragi in various forms, combining with the other grains in cooking or while baking.

Here, I have tried to make sprouted Ragi idli with mixing rice. When it is combined with sambar or chutney it tastes delicious and my family likes it a lot.

Preparation goes like this-

Ingredients:

Whole Ragi -1 cup

Idli rice – 2 cups ( you can use normal rice as well)

Urad dal – 1 cup

Poha – 1 cup (loosely packed)

Salt

Method:

-Wash Ragi, soak overnight, drain and keep aside to sprout, In Bangalore weather it takes almost a day or day and a half. After sprouting it swells and becomes 1 ½ cup.

-Next day, wash , soak  Idli rice in one vessel. In another vessel, Urad dal and poha. Soak for 3 to 4 hrs.

-According to your weather, opt the timing to grind. Ragi batter ferments little quick, compared to normal idli batter. SO, keep that in mind as well.

-I normally opt for a wet grinder to make idli or dosa batter.

-While grinding, first grind urad dal into fine batter, then add sprouted ragi, it takes little longer to grind. While halfway through add soaked idli rice, salt and grind the batter into small rava consistency.

-Remove from the wet grinder, adjust the consistency of the batter, mix nicely, and keep aside to ferment.

-Next day morning, steam idlies like a Regular idli and enjoy with little hot coconut chutney or any vegetable sambar.

Thondekai melara / Ivy gourd Kayi huli:

Melara is one of our  specialities, only found in our community and must in our functions or any festivity.  Melara has different names according to the region from which we belong to such as Kayi Huli / Majjige Huli. This post was long due and glad to be able to post at least now.

Kayi is nothing but Coconut. Here, fresh coconut ( which is known as Hasi kayi/ not dried/should be filled with coconut water, not dehydrated one)  is ground without any masala and added to cooked veggie , lastly one serving spoon of slightly sour buttermilk or beaten curd has been added and seasoned.

Melara can be done with extremely limited choices of vegetables. Well known  suitable vegetables which can be used in this curry are, Ivy gourd, Tender Mangalore coloured cucumber( which should be green and white) , Ivy gourd and Mangalore cucumber mixed together, Yam alone or with White Kabuli Chana , Bread fruit ,Giant Taro alone or with White Kabuli chana, White Bitter gourd , Red  Amaranth greens, yard long beans, brined raw jackfruit etc are some of our traditional “qualified” vegetables  to cook melara.

As time passes by, even this list has some additional English vegetables 😉 (Yes! Other than our native veggies are known by this name)  like Raw green tomato, Capsicum, potato, and beans)

Now we would move towards the recipe –

Ingredients:

Ivy gourd – 500 grams ( Or Vegetable of your choice)

Green chillies – 2

Salt

Grated fresh coconut – from ½ to ¾ coconut 

Thick buttermilk – 1 serving spoon

Coconut oil – 2 tsp

Mustard – 1 tsp

Red chilli -1

Curry leaves – 1 string

Method:

-Wash ivy gourd ,chop into 4 pieces lengthwise. Cook with just enough water to immerse, by adding salt, slit green chillies.

-Make a really fine paste of fresh grated coconut. When veggie cooks, add this ground masala, adjust the consistency and boil for 2 minutes.

-Add buttermilk or beaten curd and when it starts to boil, switch off.

-Prepare seasoning, heat oil, splutter mustard, add red chilli and curry leaves fry and pour over melara.


Apple Halwa

Yesterday, while preparing Apple jam, my Research oriented husband came in and asked me what I was doing, I said – Apple jam , planning to finish the stock which we bought couple of weeks back

He said, “why not halwa?” I was like 🙄🤔

Then, I changed my mind and took my share of  jam when it was done. Proceeded to make Halwa with the remaining quantity, by adding little ghee in-between at a regular interval.

Surprisingly, it turned out super delicious and here I am presenting my end result which was experimental.

Here I have used fruit as a whole /with skin. Normally Apple turns out sour when you cook /boil . To avoid the sour taste, normally I bake it until it is done, then grind into a puree, sieved, and proceed to make jam then halwa with the added mild cinnamon flavour. One can add cardamom as well. Sugar can be replaced with an organic jaggery as well. Even though I have not tried with the jaggery, my friend Aruna has tried with the jaggery and result was just amazing, which was deep brown in colour.

Ingredients:

Golden yellow Apple – 1 kg (Any variety would do)

 Sugar – ¾ kg

Ghee – ½ to ¾ cup

Cinnamon or Cardamom – 1 or 2 pinches

Method:

-Wash Apples, dice ,remove seed part and arrange in a baking dish. For Initial preparation, please refer here

-Bake this in a 170°C pre-heated oven for 15 minutes at first.

-Remove, flip those apple pieces, and continue further 15 minutes.

-After 30 minutes, check the doneness. If it is soft, well cooked ,remove it.

-If it is not done, bake for further 5 or 10 minutes.

-When it is cool, add a little water and churn in a juicer by adding 1 or 2 cups of water.

-Sieve ,discard the roughage ( fibre as well as outer skin remains)

-Put this pulp in a thick bottomed kadai, add sugar,  cook until it turns into little thick and turns into mass.

-Add ghee 2 tablespoons at a time in-between while stirring. If you feel that the Apple puree  needs a little more ghee, add up to ¾ cup, some varieties of Apple need very less ghee and some need more.

-Now we will see, how we decide the quantity of ghee. While stirring if you feel that the mixture is a little dry and the bottom part becomes a little brown, keep adding it. If the ghee starts oozing at the sides, it is an indication to stop the addition of ghee.        


-Now we will see how you know the doneness. It is quite simple, keep on stirring until mixture leaves the sides of the kadai and ghee oozes out from the mixture. You can add cashew pieces at this stage or spread those pieces in a greased plate like me.

-After you are done with this, it is almost ready to shift to the plate. Before shifting I prefer to check, by taking one small peanut sized portion of the mixture and rolling it in-between my thumb and forefinger to make a small ball like structure. If it holds a ball like structure and does not stick to your finger, it is ready.

-Now remove from the flame, shift to a greased plate, and pat this mixture evenly by using a flat, greased (apply some ghee) back of the spoon.       


-Keep this aside for two or three hours to cool. Then cut this into the desired shape and store it in an airtight container.

-You can store this Halwa for a really long time (up to a month or two).