Karkali / Arbi leaves Chutney:

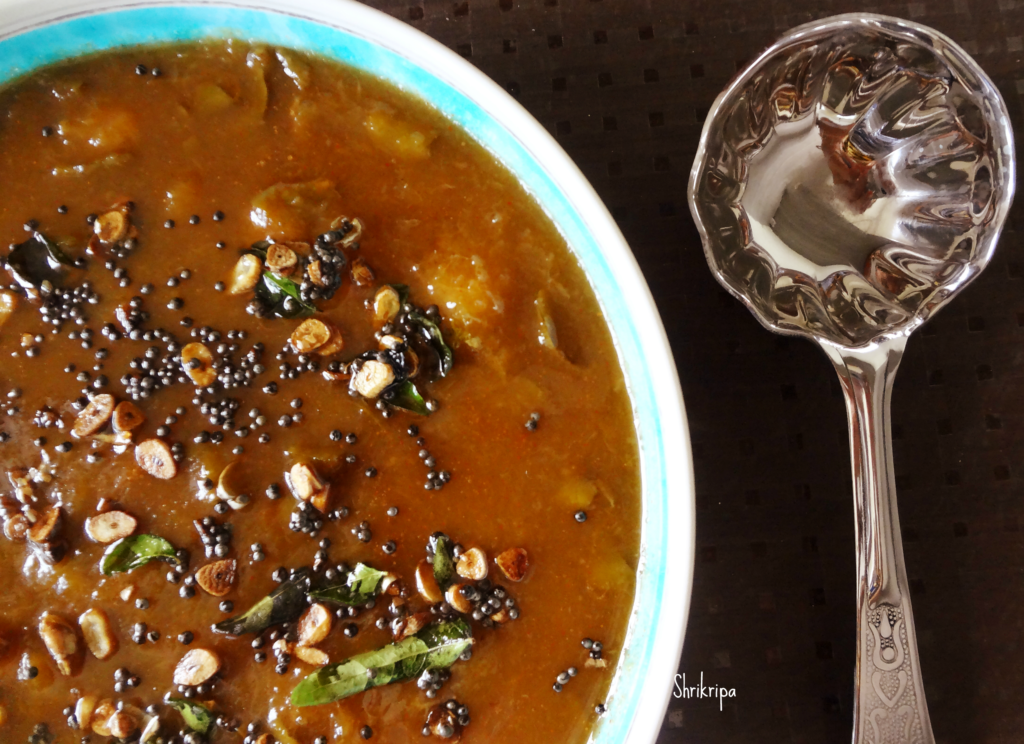
Monsoon is the time, we relish our dose of colocasia leaves, which is known as “Kesavu” in Kannada. Coastal people relish Pathrode, which is a rice batter smeared steam cooked rolls. Apart from this we usually relish its chutney and with mix veg curry as well. It goes very well with hot rice with a dollop of ghee or coconut oil.

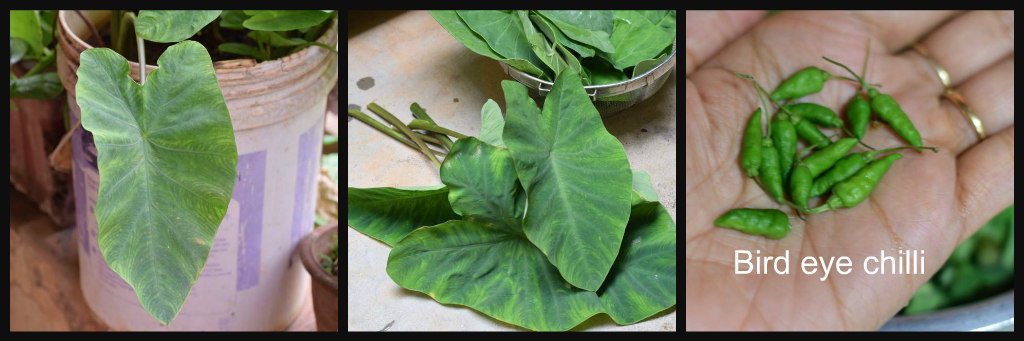
Colocasia leaves has many names in India. It is known as Taro leaves, Arbi leaves, pathra leaves, Alu chi bhaji, kesavina ele and so on. Every state has its own speciality with this iron rich leaves. Because it tends to get itchy, we need to add sufficient amount of tamarind and it should get balanced with the taste.

If you learn the trick of this, half the battle is won, and you can master the art of cooking this leaf for sure. In our traditional preparation, we do use bird eye chilli for this chutney and if you don’t have access, you can use normal green chilli as well.

How to make this flavourful chutney:

Ingredients:

Arbi leaves – 12 to 14

Bird eye chillies – 8 -10 (if green chilli use 4 to 6)

Salt

Tamarind powder or tamarind – 1 ½ tea spoon

Garlic – 8- 10 cloves

Seasoning:

Coconut oil – 3 table spoons

Mustard – 1 tea spoon

Curry leaves – 1 spring

Chopped garlic – 4 to 5

Dried Red chilli – 1 (optional)
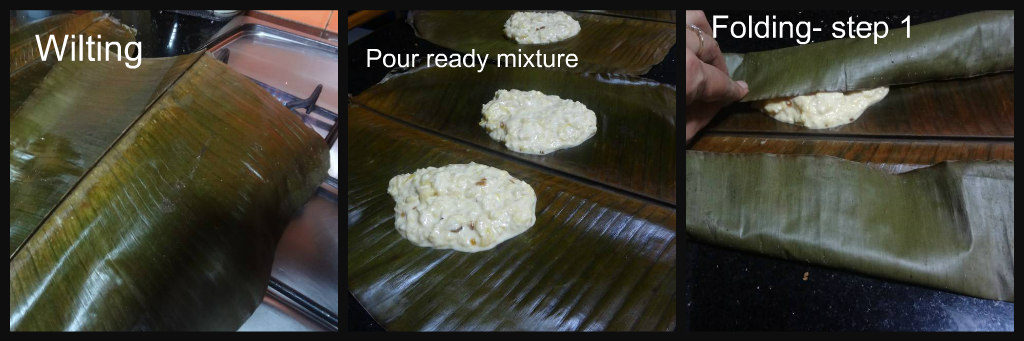
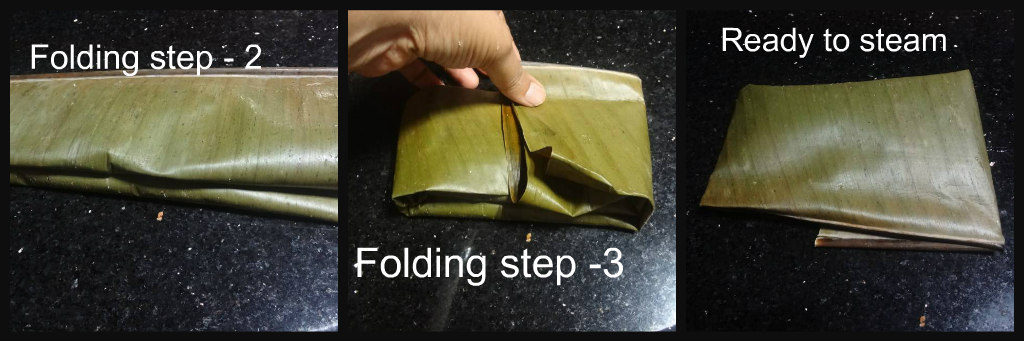
Method:

-Wash Arbi leaves as well as its stem and bird eye chillies.

-Chop leaves and stem.

-Take one cooker, add chopped leaves, stem, chillies, garlic, tamarind, salt and cup of water.

-Cook for 2 whistles, when it is cool, grind the content into smooth paste.

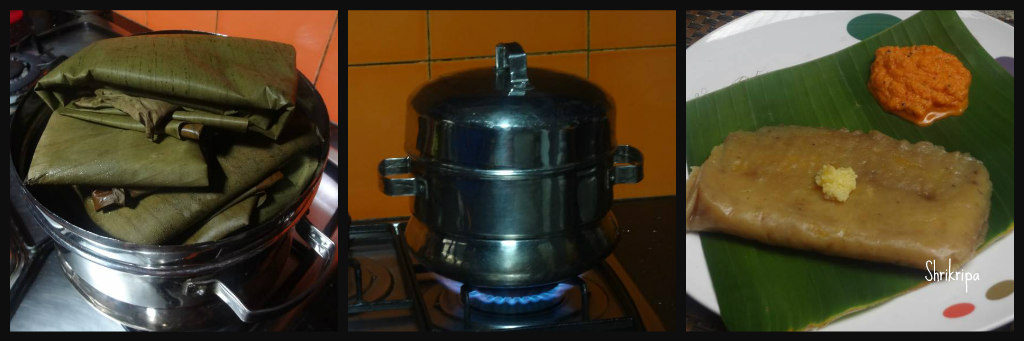
-Prepare seasoning, heat oil, splutter mustard, add curry leaves and chopped garlic and fry.

-To this seasoning, pour the ground mixture and boil it nicely.

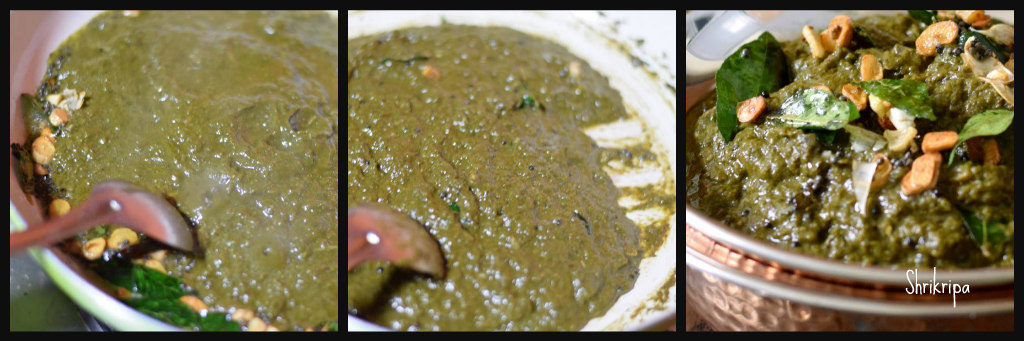
-Serve this with hot rice and ghee or coconut oil.


Halasina Hannina Berati / Jackfruit Preserve:

When summer ends, a whole lot of your favourite fruits also vanish from your eye sight and you will surely miss the season!! The best thing one can do is, prepare some jams or preserves and try to store this for future use.  This jackfruit preserve stays good for almost a year or more in the freezer. It is very handy when you want to make payasam for any festivals or any special occasions. Here is my recipe for homemade jackfruit preserve, which we make every year and use it for Prathamam, which is nothing but kheer or payasam from the preserve!!!

Ingredients:

Jack fruit – 1 big bowl (cleaned)

Jaggery – 2 blocks (I have used organic one)

Method:

  • Put little by little jack bulbs and make a smooth paste in a mixer grinder.
  • Take one thick bottomed kadai, put this paste and keep gas flame in a very low flame and cook for a while.

  • When it changes its colour from bright yellow to a pale colour and when you smell the cooked jackfruit flavour in the air, add jaggery and mix this in a regular interval.
  • After some time, it will turn into a light brown then to darkish colour and it will start to leave the sides of the kadai. Now it is the time to remove it from the fire.
  • Keep as it is and when it reaches room temperature; store it in an airtight container or a zip lock.
  • Keep it under refrigeration/ freezer.

  • You can do this in a microwave as well. Only thing, you should remove the glass bowl at regular intervals and give a stir and proceed as given above.

Note:

-You can use sugar or regular jaggery as well.

-Traditionally we use jaggery in our region.

Mysorepak /Mysorepaka:

There are a lot of sweets which have originated from south Indian kitchens, even then Mysore Pak has a very special place in people’s hearts. Some like it very soft, ghee dripping melt in the mouth kind and some like little harder, porous and little grainy in texture.

Usually in the Mysore – Bangalore side, you will find softer version and In Mangalore we usually get latter one, with grainy texture.

I have received a couple of requests to update my version of Mysorepak recipe, which I prepare almost from past 25 years and it is our family and extended family member’s favourite sweet. My little niece who relishes it, and thinks it is the ultimate sweet, ends up having couple of pieces at one go. I usually wait to see her priceless expression while relishing her share of Mysorepak. This recipe yields firm, porous and grainy in texture with darkish inner and light colour on both the outer sides. Last week I prepared this sweet on my husband’s birthday and now sharing the recipe with you all.

Recipe goes like this-

Ingredients:

Besan /Bengal gram flour – 2 cups

Ghee – 3 cups

Sugar – 3 ¾ cups

Water – 1 cup

Cardamom powder – 1 to 2 tea spoons

Method:

-Take one baking tray or any deep wide vessel, apply ghee and keep aside.

-Take one vessel, pour ghee and keep it on the flame. When it becomes hot (before boiling), switch off the gas, add Besan to hot ghee, stir well and keep aside.

-Mixture should be uniform and without any lumps. I prefer to use wire whisk to do this.

-Next comes the main part.

-Take one thick bottomed kadai, add sugar, pour water and keep it on the flame, boil until it is frothy and reaches single thread consistency.

-During boiling, fire should be kept at low and you should stir in-between.

-When the consistency of the sugar is ready, add ghee mixed Besan and start stirring.

-Fire should be kept at low flame and you should continue stirring without removing your hand.

-After 10 to 15 minutes you will see the changes and mixture will become bubbly and shiny.

-Now it is the time to add cardamom powder and be vigilant. It would be ready in any moment from now.

-When it is done, mixture will leave the sides, base and sides of the vessel will become light brown or sometimes we see the ghee separating and oozing out from the bubbles. (these are the indications to remove)

-Now pour this mixture to a greased vessel, don’t touch or press after pouring, leave as it is.

-Cool it for about 5 min and mark the lines by using a sharp knife.

-Once it is completely cooled (it takes anywhere between 2 to 3 hours)

-Invert the plate on another plate or by keeping butter paper. It needs some knocking at the base because air bubbles would restrict the easy exit.

-Remove gently, break all the pieces and store it in an air tight container.

Your Mysorepak is ready to serve!

Note:

-Besan should be as fresh as possible. (do check the manufacturing date)

-When ghee is hot, you will hear couple of “tup” “tup” sound. That is the time you should mix in the Besan.

-Ghee shouldn’t boil.

-When sugar reaches single thread consistency, solution will start bubbling and rise upwards.

-Take a deep pan or baking tin or deep flat vessel to get long pieces and two tone colours.


Red cabbage and Sweet corn Pulav: One pot meal

I have promised to post my trial on rice dish by adding red cabbage and sweet corn in my earlier post. Here I am with the detailed account on this beautiful pink hued rice.

Red cabbage is smaller and dense in structure, when we compare it to the green one. Leaf is thicker as well. Because of this, it doesn’t loose its texture, even after cooking. So, pressure cooking does not ruin its shape or texture in this trial of one pot meal.

When we want to cook Purple or red cabbage, we make sure to add some souring agent to it. It can be anything like lemon, vinegar or yogurt. Here I have added curd while cooking. If souring agent is not there, red cabbage will surely turn pale blue and loose its crunchiness.

Now we will see how I have worked in this recipe –

Ingredients:

Basmati Rice – 3 cups

Shredded cabbage – 1 ½ cup

Sweet corn – 1 cup

Oil – 3 table spoons

Cinnamon – 1 “

Cumin – 1 tea spoon

Bay leaf – 1

Star anise – 1

Clove – 2

Cardamom – 1

Green chillies – 3(slit)

Onion – 2 (sliced)

Ginger garlic paste – 1 ½ table spoon

Curd – ½ cup

Salt

Method:

-Wash rice, drain and keep aside.

-Take one cooker, add oil, cinnamon, cumin, bay leaf, star anise, cloves and cardamom.

-After frying for a couple of minutes, add green chillies and onion and fry.

-When onion turns light brown, add ginger garlic paste and continue frying.

-Next add shredded cabbage and corn and mix once.

-Immediately add curds, salt, drained rice  and coat evenly.

-Add 6 cups of water, when it starts to boil, close the lid and cook until one whistle and keep it in a simmer for 2 minutes and switch off.

-When pressure releases, open the lid and mix gently and serve with any raita. I have served this rice with slightly sweet Boondi raita.


Palak paneer Parata:

Palak aka spinach and paneer is a classic combination from North Indian cuisine. It is usually in the form of Palak gravy with paneer chunks. If we convert this into Palak in a roti form and grated paneer as a filling it is a mind-blowing combination in a very healthy form. Here I have used Palak in the raw form as well as paneer.

It is a healthy option for breakfast, brunch, dinner or even in an office or school lunch box.

Palak or spinach is a healthy green which is a power house of nutrition. It contains Iron, anti-oxidants, vitamins and calcium.

On the other hand, paneer is also a very good source of calcium and if it is made from low fat cow’s milk, it is less in fat as well.

It is one more favourite from our lunch box item –

Ingredients:

For the dough:

Palak/ spinach – 1 bunch (only leaves)

Salt

Sugar – 1 tea spoon

Garlic – 2 cloves

Curd – 2 table spoons

Water – as required

Oi – 1 table spoon

Whole wheat flour – as needed

For the Filling:

Paneer – 200 grams (grated)

Coriander powder – ¾ tea spoon

Cumin powder – ¾ tea spoon

Red chilli powder – 1 ½ tea spoon

Garam masala – ¾ tea spoon

Salt

Turmeric – ½ tea spoon

Coriander leaves – ¼ cup (chopped)

Method:

-Make chapati dough at first and keep aside.

-For the dough, make a paste of chopped Palak, salt, sugar, garlic, curd and little water in a mixer grinder.

– Take out the liquid and pour oil and whole wheat flour. Knead it into a soft pliable dough, cover and keep.

-For filling, take one bowl, mix in grated paneer, coriander powder, cumin powder, red chilli powder, garam masala, salt, turmeric and mix it.

-Add chopped coriander leaves and mix once again. Now, Stuffing is ready.

-Now comes the rolling part.

-Now take lemon sized chapati dough in hand, spread as a small disc by using fingers, by applying little flour.

-Keep this in your left palm, in a cup shape, put filling (smaller in size) and cover it.

-Now take extra flour for dusting and spread or roll this ball with light pressure by using a roller.

-Cook both the sides by using either oil, ghee or butter.

-Enjoy this either with sweetened curd, boondi raita or pickle.


Potato Sagu:

Potato Sagu is an ultimate combo for Rava idli, here in Bangalore. I came to know about Rava idli or Sagu only after coming to Bangalore, after my marriage. Earlier, we never found this combo in Mangalore. I like potato Sagu which is served with Rava idli in MTR hotel, Bangalore. It is here, that the invention of Rava idli happened, during the world war II. At that time, making of idli was so difficult, due to short supply of the rice, this is how they experimented with semolina to prepare idli and it is now history and Rava idli has become a staple diet of south Indians throughout the world.

Earlier I used to use MTR or Mayya’s Potato Sagu masala to this side dish to get a taste as close as their Sagu. But, now they have stopped the product. To replace it, I started using my own masala. 

My preparation goes like this-

Ingredients:

Potato – ½ kg

Onion – 2

Ginger – ½ “

Green chillies – 2

Tomato – 2

Coriander leaves – 2 table spoons

Salt

Sugar/ jaggery

Turmeric – ½ tea spoon

Sagu masala powder – 1 ½ to 2 tea spoons (Mixture of Puffed chana/ Putani powder, coriander powder, jeera powder, little garam masala and tamarind powder) 

Seasoning:

Cooking oil – 2 table spoons

Mustard – 1 tea spoon

Urad dal – 1 tea spoon

Chana dal – 1 tea spoon

Cumin – ½ tea spoon

Hing – one pinch

Curry leaves – 2 springs

Method:

-Wash potato, cut it into half and cook in sufficient water for 2 whistles in a pressure cooker.

-When it is cool, remove skin, mash and keep aside.

-Chop onion, ginger, green chillies, tomatoes and coriander leaves.

-Take one deep pan, add oil for the seasoning, when it is hot, splutter mustard, fry urad dal and chana dal. Next add hing, cumin, curry leaves.

-Next- fry onion, green chillies, ginger. While frying add turmeric powder as well.

-When onion is light brown, add tomatoes, salt, sugar or jaggery, Sagu masala and fry until tomato is mushy.

-Add 2 to 3 cups of water and when it starts boiling, add mashed potato, coriander leaves and cook for 5 to 10 minutes or until it becomes a homogeneous mix in a low fire.

-Serve with Rava Idli Or Rava and Oats idli  as a dip.


Alasande Palya / Yard long beans dry curry:

Alasande aka yard long bean is very popular and one of the age old cultivated crops of Mangalore coast. It is tender, immature pods of black eye pea. In rainy season, most of the vegetable kitchen gardeners grow this super tasty veggie for day to day use.

Immature pods are one of the favourite food for little birds as well. It is a low calorie, high in fibre vegetable and tastes little sweetish and texture is little chewy and watery.

Alasande side dish is one of the very popular dishes during the festivities- either in weddings, festival cooking or day to day cooking. For day to day cooking, we normally toss this veggie with mild seasoning and for festivity cooking, we use coconut masala. Today I am going to share the recipe of my house hold which my family relishes whenever I prepare.

Ingredients:

Alasande / Yard long beans – 500 grams

Red chilli powder – ½ tea spoon

Turmeric – ½ tea spoon

Salt

Jaggery – 1 tea spoon

For seasoning:

Coconut oil – 1 table spoon

Mustard – 1 tea spoon

Urad dal – 1 tea spoon

Red chilli – 1 (optional)

Curry leaves – 1 spring

For Masala:

Coconut – ¼ cup

Roasted Byadagi Red chillies – 2 to 3

Cumin – 1 tea spoon

Tamarind – ½ tea spoon

Method:

-Wash, remove two ends of yard long beans and chop as required.

-Dry grind coconut with roasted chillies, cumin and tamarind for masala and keep aside.

-Now take one kadai, heat oil for seasoning, splutter mustard, add urad dal. If you are adding red chilli add that as well.

-When urad dal becomes red, add curry leaves, chopped beans, turmeric, salt, jaggery, red chilli powder and toss for two minutes.

-Add one small cup of water and cook until it is soft and firm.

-Add dry ground masala and mix everything. Keep it covered for two to three minutes and switch off the gas.

-Serve with hot rice or with thali as a side dish.


Hog Plum/Ambatekayi Gojju:

We call hog plum as “Amtekai” in Kannada and as “ambate” in our local language. In our region you will find 2 varieties of hog plums. One is Wild variety which is also known as Indian sour hog plum and the other one is known as grafted or Kashi Amtekai/ hog plum.  Grafted variety is nothing but Hog plums which we normally find in South America or South East Asia. Also known as Ambarella or Golden apple which belongs to the specie – spondias dulcis.

Wild variety is normally used in pickle making or as a souring agent in some of the traditional curries because of its sour taste. When it matures, seed becomes hard and skin becomes thin. Here I have used normal hog plum, which has a fibrous core and when it matures, skin will turn green to yellow and sweetish in taste. People use this as a fruit as well.

Gojju/ Gojji is an essential side dish of our community. Which is a semi solid, tamarind based, sweet and sour curry, which can be relished as it is with hot rice, or as an accompaniment with curd rice as well. Some of the gojjus taste good with Dosa or Idli as well.

Ingredients:

Hog plums – 7 to 8

Jaggery – 2 to 4 table spoons

Salt

Red chilli powder – 1 tea spoon

Seasoning:

Coconut Oil – 1 table spoon

Mustard – 1 tea spoon

Garlic cloves – 8 to 10 (sliced)

Curry leaves – 1 spring

Method:

-Wash and cook hog plums in sufficient water by adding salt, jaggery, red chilli powder in a pressure cooker.

-One whistle is more than enough for this veggie to cook.

-When it is cooked, outer skin layer will separate, inner flesh will become soft.

-Mash a little by using back of the serving spoon, to give a texture to the curry.

-Mix everything and check for salt, hot and sweet. Add whatever is needed.

-Curry should taste tangy, hot and sweet.

-Boil this and add seasoning.

-Heat oil, splutter mustard, add sliced garlic. When garlic becomes brown, add curry leaves and pour this over curry.

-Serve as a side dish with rice or curd rice.

Note:

-Usage of garlic is purely optional.


Jackfruit kottige:

Halasina hannu is Jack fruit and Kottige is nothing but idly or kadubu,also known as Halasina Hannina kottige Or Gatti in local language. In which mixture is wrapped in pre-wilted banana leaves like pockets and steam cooked. Like bottle gourd kottige, which I have posted earlier, it is not a savoury kind, it is sweetish and bustling with jackfruit flavour which is enhanced even more with the usage of banana leaves wrap.

Jackfruit season is considered as a feast time in our region. Usage starts from tiny raw fruit form to ripened stage. You will find couple of curry recipes in my blog which I have posted earlier as well as Ripe jack fruit Dosa.

Now we will see how to make kottige, in our traditional method.

Ingredients:

Dosa rice – 2 cups

Jackfruit – 2 cups (cleaned)

Fresh coconut gratings – 1 cup

Grated jaggery – ¼ to ½ cup (according to your taste)

Ghee – 1 table spoon

Salt

Method:

-Wash Dosa rice (white raw rice) and soak for 2 to 3 hours.

-If you are using banana leaves, wilt the leaves on gas flame, wipe with a wet cloth and keep it ready.

-If you are using idli mould, grease the moulds with little ghee and keep aside.

-Chop jack fruit, separate fruit pods, remove outer thin white fibres as well as inner seed and take only yellow fruit part.

-Mix grated coconut and jaggery as well as ghee and keep aside.

-Grind rice into fine paste by adding very little water and salt.

-Now take jack fruit little by little and whip a little to chop roughly by using same mixer jar in which rice batter is ground.

-Take one wide bowl, mix in ground batter, roughly whipped fruit pulp, coconut-jaggery mixture.

-Mix nicely, spread the wilted banana leaves and pour one spoon and fold it like a sealed pocket. (refer the below pictures)

-Assemble all these packets in a water filled idli steamer or Momo steamer and cook this for half an hour to 40 minutes in medium to slow heat.

-If you are using idli mould, pour required amount of batter and steam cook like an idli.

-Relish this jackfruit idli or kottige with ghee or coconut and ginger chutney.

-We usually steam cook this on the previous night and keep it ready for the next day’s breakfast. In this way, It will be easy in the morning as now you just have to prepare chutney and serve.


Barley Pongal:

Come Summer, our ancestors used to drink Barley water to keep their body cool. Otherwise Barley gruel or water is used mainly during illness- diarrhoea, urinary tract infection. As it is a natural diuretic, it increases urination and helps to flush out any toxins or infection causing bacteria from the body. Here I have used this super cool grain in making Pongal, south Indian breakfast dish.

Barley has two varieties, one is with outer cover which is called hulled barley and other one is more processed, without outer cover and is called De hulled or pearl barley. Compared to hulled, pearl is little less in fibre but cooks faster and is ideal for our day to day cooking.

Barley is known for its low glycaemic index, which makes it an excellent option for diabetics. Over all it is good for all and we can include it in our day to day cooking in one form or the other and take a benefit from this age-old grain for sure.

Although Barley is very good for health, it contains gluten and people who have sensitive digestive system or are allergic to gluten should avoid this grain.

Recipe is like this-

Ingredients:

Barley Rawa/ grits – 2 cups

Green gram/moong dal – 1 cup

Green chillies – 2

Ginger – ½ inch

Grated coconut – 3 table spoons

Ghee – (to serve)

Seasoning:

Ghee – 1 table spoon

Mustard – 1 tea spoon

Cumin – ½ tea spoon

Hing – ¼ tea spoon

Curry leaves – 1 spring

Method:

-Dry roast moong dal for 2 to 3 minutes.

-Wash moong and barley grits together and keep aside for a while.

-In the meantime, prepare for the seasoning.

-Take one cooker vessel, do seasoning, heat ghee, splutter mustard, add cumin, hing, curry leaves, chopped green chillies, chopped ginger (slivered) and fry for two min.

-Add water (around 8 to 9 cups) and boil. Add salt, coconut gratings and keep it for boiling.

-Add soaked dal and barley mixture and close the cooker lid.

-Cook for 3 whistles and switch off the gas.

-When pressure releases, open the cooker lid, give a stir and adjust the consistency.

-Pour a couple of spoons of ghee to enhance the taste or you can completely skip the ghee if you are into low calorie diet.

-Serve with coconut-ginger flavoured chutney.