Indian broad beans with ground nut:

It is a very tasty vegetable and is known as Chikdikayi, chapparadavare or Indian broad beans. This subzi/dry curry is one of our favourite and whoever tastes this subzi, usually asks for the recipe. So, I thought of sharing this recipe in my blog as well. I learnt this from our family friend who hails from Gulbarga, Northern part of Karnataka.

How it is made –

Ingredients:

Indian broad beans – 500 Gms

Garlic – 10 -12 cloves

Red chilli powder – 1 to 2 tsp.

Salt

Crushed roasted groundnut – ½ cup

Oil- 2 tbl sp.

Method:

-Remove both side’s fibre and slit open, to see. Slit at the centre and keep aside.

-Now keep one pot of water for boiling, add little salt to it. When it starts boiling, add broad beans including bean as well.

-When it changes colour, drain the water and keep aside.

– Keep one thick bottomed kadai, put oil. When oil becomes hot, add crushed garlic and fry a little. Now add cooked and drained beans.

-Add sufficient amount of salt and red chilli powder and mix nicely. Cook until oil leaves from the sides.

-Now add crushed or roughly powdered ground nut and mix for a while.

-Serve with Chapati/phulka’s or rice.

Note: I usually add ready ground nut chutney powder (which has red chilli powder, salt and garlic)

If you are using chutney powder like me, decrease the amount of salt and red chilli powder while adding at the beginning.


Steel cut Oats and lentil Dosa:

It is a no rice urad dal Dosa. I have used Steel cut oats  or broken Oats instead of rice and avoided rice fully in this batter. These oats are considered as cut pieces of original grain. It is healthy compared to quick cooking oats. It takes much longer time to cook but when it is soaked and ground, almost tastes like rice and you can’t figure out the difference. This is Gluten free, high in fibre, protein and iron. It is low in glycaemic index.

I have bought Kosh broken oats to try out my experiment and it is whole oat grains cut into smaller pieces. It looks like broken wheat. When it is cooked, tastes like our broken wheat with outer thick skin with nutty taste. Loaded with insoluble fibre which helps in our gut health as well. Because of its low glycaemic property, it is a very good option for diabetic people and its fibre level will help to keep them full for longer hours.

I have used my regular plain Dosa batter recipe. I simply avoided rice and added broken oats.

Ingredients:

Steel cut Oats – 2 cups

Urad dal – ½ cup

Methi – 1 tea spoon

Chana dal – 2 table spoons

Poha – 1 fist full (optional)

Salt

Method:

-Wash oats, urad dal, methi, chana dal twice and soak this with poha (if you are using) for 3 to 4 hours.

-Grind this soaked ingredient by adding soaked water little by little with added salt.

-Ferment this batter over night or 8 to 10 hours according to the climatic condition.

-When it is ready, mix nicely, adjust the consistency of the batter and start making dosas by heating iron griddle.

-Take one ladle spoon of batter, spread into thin Dosa, pour oil or ghee and roast on one side, then flip and cook the other side, remove and serve with chutney or sambar.

Gujiya / Dry fruits Karanji/ Karjikai:

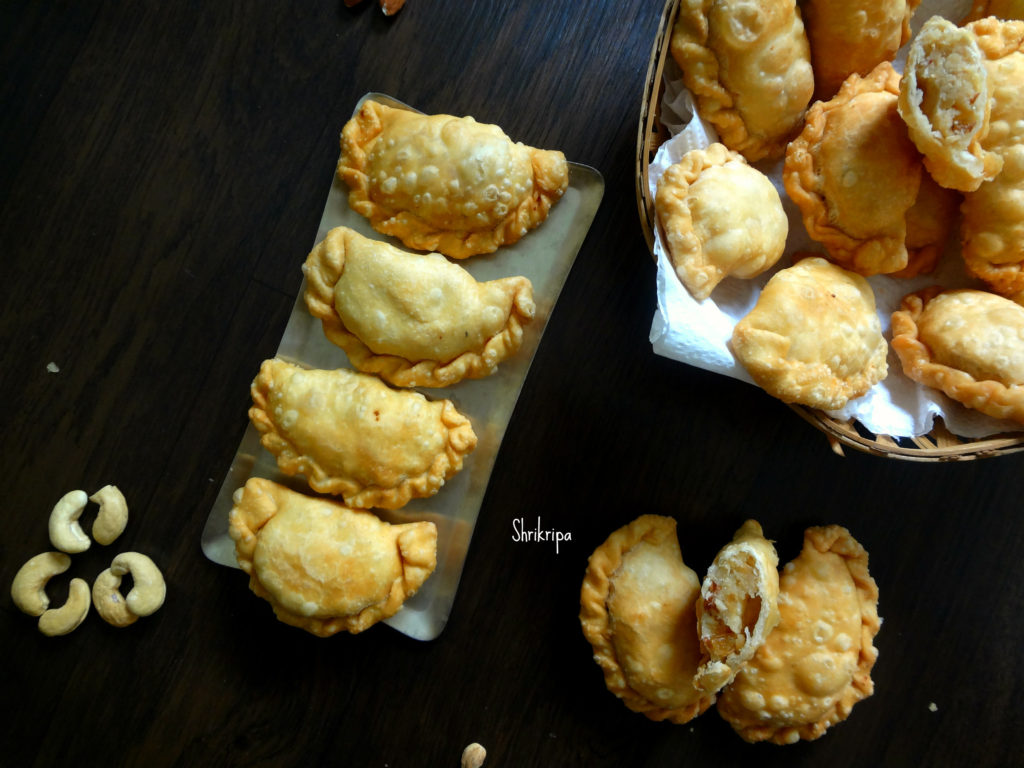
Deepavali aka Diwali is an important festival of India and is spread between three days. Indian festivals are incomplete without sweets and savouries. In India, each festival has its own significance in celebration as well as its menu. Gujiya is one of them and has a very important role during Diwali.

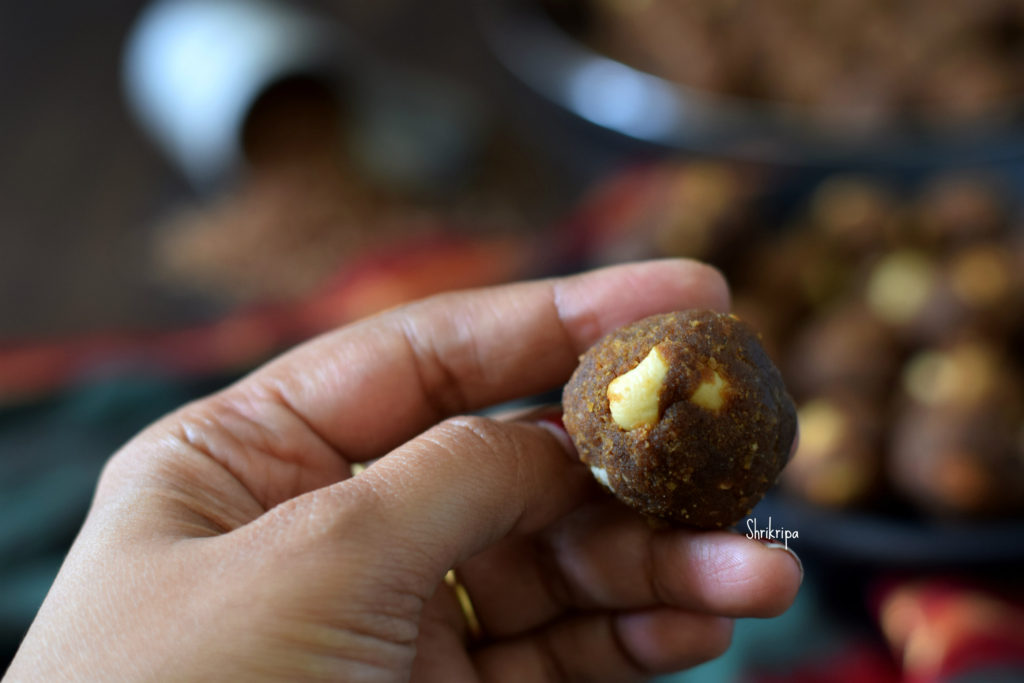
Gujiya is a deep-fried flour-based delicacy, with different fillings in different regions. It is known by a different name in each region. Outer cover will be the same and inner stuffing varies from Rava – sugar, coconut – jaggery, coconut – sugar, mawa (milk solids) with dry fruits or with only dry fruits are traditionally seen. Nowadays you get to see so many variations from chocolate to cheese filling as well as baked version.

In North India, after frying the Gujiya, they usually dip it in a sugar syrup and outer cover would be wet and shiny. In south India, we normally deep fry and serve as it is and it’s known as Karanji / Karjikai.

I used to follow Chef Sanjeev Kapoor and learnt so many recipes from him and this is one such recipe. Over the years, I tweaked it a little and adjusted it according to our taste and it has one added advantage of longer shelf life, due to the usage of milkmaid instead of khoya.

Ingredients:

For the outer cover / shell:

All-purpose flour – 2 ½ cups

Salt – ¼ tsp

Ghee – 6 table spoons

Water – As needed (normal water)

Oil – for Deep frying

For the stuffing /filling:

Desiccated coconut – 200 grams

Semolina – 2 table spoons

Almonds – ¼ cup

Cashew – ¼ cup

Raisin – ¼ cup

Cardamom – 1 tsp

Condensed milk – 1 tin (400 grams)

Method:

For the outer cover-

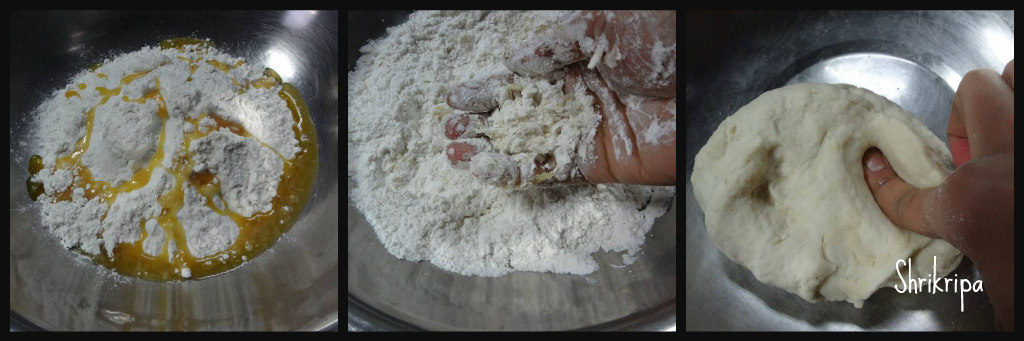
-In a bowl, add flour and pour ghee. Rub the ghee and flour by using your hand for 5 to 10 minutes. 

-After a while, flour would resemble like a semi wet crumb.

-Now add required amount of water to make a firm dough.

-Cover the dough with wet cloth and keep aside for half an hour.

Note: Dough approximately holds ½ cup of water.

In the meantime, prepare the stuffing –

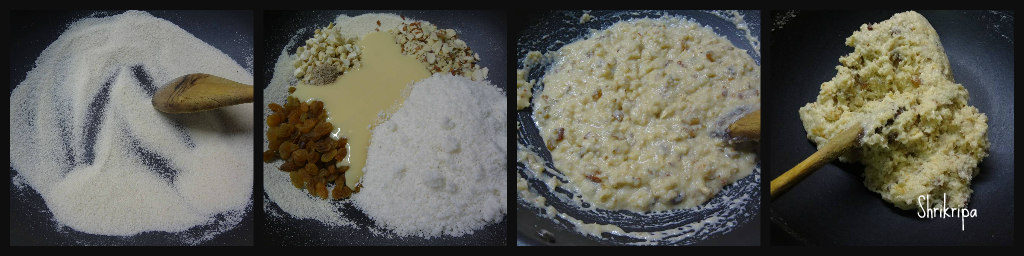
-Roast semolina in a low flame, switch off the gas. Mix in all the other ingredients from almond to condensed milk.

-Keep it until mixture is non-sticky while touching. 

-Now comes the actual procedure. You can use three methods.

  1. Use Gujiya mould.

     2.Take a dough, roll into big thin circle, use cookie cutter to make small, uniform circle.

  1. Take little dough, make small poori like discs.

Here I have followed the third method.

This quantity has yielded 28 Gujiya.

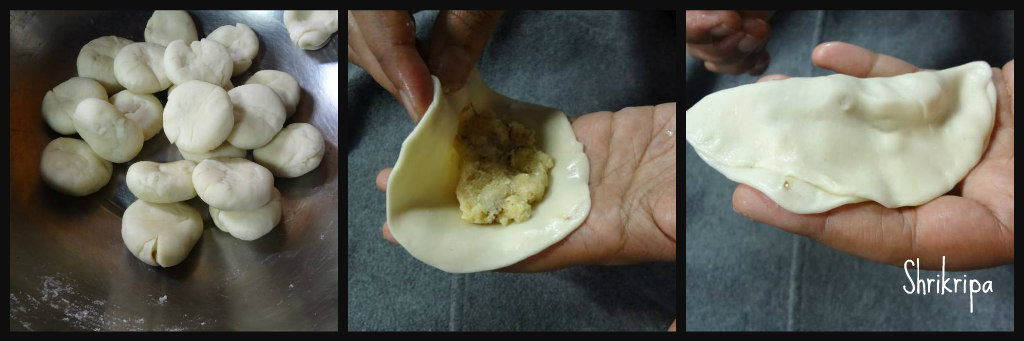
-Divide the dough, make roundels, fill the stuffing, close into half.

-Dip your hand in water, now, start folding the edges from one corner and go on folding like a half diamond shape at regular intervals until you reach the other end.

-Keep this ready, stuffed, yet to fry Gujiya to air dry.

-Repeat the procedure and finish off the filling work.

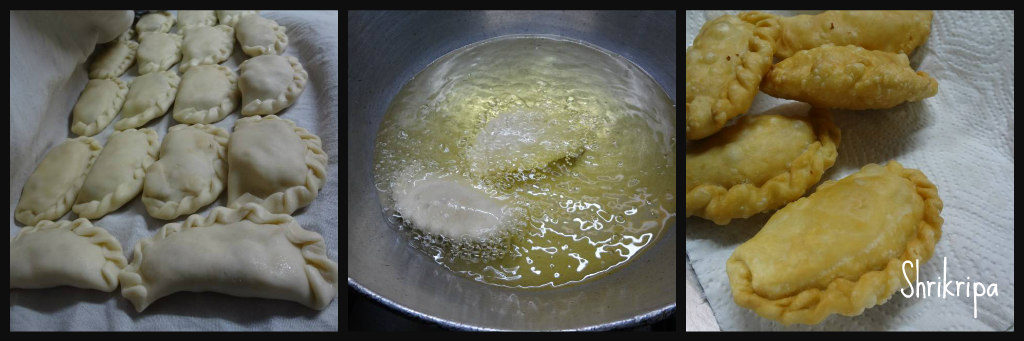
-Heat the oil for deep frying in low temperature.

-When oil is hot, drop one by one Gujiya, fry in a low flame to get good results.

-When everything is fried and cooled, store it in an air tight container.

NOTE:

To get a perfect Gujiya – these points are very important. 

1- Rubbing the ghee + flour. 

2-Frying in a low fire 


Banana Halwa:

Banana or Plantain Halwa was an integral part of my childhood. Usually this Halwa is made by using Kerala big banana which is called as” Nendra variety” but in our home, we used to have lots of overripe bananas from our family farm. To finish off all those overripe small bananas (Kadali variety of Mangalore), amma used to make Halwa or Banana Preserve/ Berati all the time. It was a very regular sweet at our house hold. Today I will share this recipe to all our readers-      

Ingredients:

Over ripe banana – 22

Sugar – 1 bowl

Ghee – ½ to ¾ cup

Cashew nuts – 2 tbl sp.

Method:

-Put all the peeled bananas to mixer grinder and make a smooth paste. Measure this by using any bowl of your choice.

-If this paste is 3 cups in quantity take one cup of sugar in that same measurement cup. So, your ratio of banana paste and sugar will be 3:1.

-Fry cashew bits in a teaspoon of ghee and keep aside. Grease one plate with ghee and keep it ready.

-Take one thick bottomed kadai, put this paste and keep gas flame in a very low flame and cook for a while.

-When it changes its colour to milky white and then to a pale colour and when you smell the banana flavour in the air, add sugar and mix this in at a regular interval.

-Add ghee 2 table spoons at a time in-between while stirring. If you feel that the banana paste needs a little more ghee, add up to ¾ cup, some varieties of bananas need very less ghee and some need more.

-Now we will see, how we decide the quantity of ghee. While stirring if you feel that the mixture is a little dry and the bottom part becomes a little brown, keep adding it.

-If the ghee starts oozing at the sides, it is an indication to stop the addition of ghee.

-Now we will see how you know the doneness. It is very simple, keep on stirring until mixture leaves the sides of the kadai and ghee oozes out from the mixture.

-You can add cashew pieces at this stage or spread those pieces in a greased plate like me. After you are done with this, it is almost ready to shift to the plate.

-Before shifting I prefer to check, by taking one small peanut sized portion of the mixture and rolling it in-between your thumb and forefinger to make a small ball like structure. If it holds a ball like structure and does not stick to your finger, it is ready.

-Now remove from the flame, shift to a greased plate and pat this mixture evenly by using a flat, greased (apply some ghee) back of the spoon.

-Keep this aside for two or three hours to cool. Then cut this into the desired shape and store it in an airtight container.

-You can store this Halwa for a really long time (up to a month or two).


Homemade Corn flakes Mixture / Corn flakes Chiwda:

Corn flakes is nothing but maize flakes, which is flattened maize. Indian savouries are an integral part of any festivities. When Diwali festival is around the corner each one would think about what to make. When it is an easy and super fast savoury you need, nothing like it than this recipe. It is very handy, when you have time constraints but still want to make homemade stuff and enjoy.

Maize flakes or Corn flakes or flattened maize is available in almost all departmental stores.

Ingredients:

Maize / Corn flakes – 500 Grams

Oil – to deep fry

Tamarind powder or Amchur powder – 2 tsp.

Salt – to taste

Sugar powder – to sprinkle.

Seasoning:

Oil – 4 tbl sp

Peanuts – 4 tbl sp

Mustard- 2 tbl sp

Cumin- 1 tbl sp

Hing – 1 tsp

Curry leaves – 7 -8 springs

White sesame seeds – 2 tbl sp

Turmeric powder – 2 tsp

Green chillies – 3 -4 Chopped

Dry Coconut bits – 3 tbl sp

Coriander leaves – 3 tbl sp

Method:

-Deep fry maize flakes by putting little by little at hot oil and drain the excess oil and keep it ready.

– When it is ready, keep everything ready for seasoning.

– Chop green chillies, curry leaves, coriander leaves.

– Slice coconut and make bite size pieces.

-Make sugar powder and keep aside.

-Now take one big kadai, put oil. When it is hot add peanuts.

-When it is half done, add mustard. After it splutters go on adding Cumin, hing, curry leaves and green chillies one by one.

-When curry leaves become crisp add coconut bits and fry a little.

-Lastly add chopped coriander leaves and fry nicely until coconut bits becomes brown.

-Now add all the powders- turmeric, salt, tamarind and sugar.

-Switch off the gas, add deep fried corn flakes and mix thoroughly until it holds all the masalas.

– Don’t put lot of pressure while mixing, if you do so, crunchy flakes will break and will not hold the shape.

-After mixing, cool and store this in an airtight container. This stays good for one month or more.

Enjoy homemade crunchy munch with evening tea.


Pumpkin/Cheenikayi Kalasu:

Pumpkin Kalasu is a traditional recipe of our community. It is a semi solid, sweetish coconut based curry, which goes very well with hot rice or Chapati.

Usually we use tender, greenish sweet pumpkin for this curry, paired with white Kabuli chana.

Ingredients:

Green sweet pumpkin – ½

White chana – 1 cup

Coconut – 1 bowl

Cumin – 1 tsp

Red chilli – 1 to 2

Salt

Jaggery

Red chilli powder – ½ tsp

Seasoning:

Coconut oil – 1 tsp

Mustard – 1 tsp

Red chilli – 1

Curry leaves – 1 string

Method:

  • Soak white chana for 7 to 8 hours or overnight.
  • Cut pumpkin into half; remove inner soft pith and seed. Chop this into small pieces with skin intact.
  • Wash soaked chana, put fresh water and cook in a pressure cooker for 3 whistles.

  • When pressure relieves, open the lid and add chopped pumpkin, salt, red chilli powder and jaggery. If needed add little more water and cook until pumpkin is done.
  • Now grind coconut, cumin and red chilli into fine paste by adding required amount of water.
  • Add this masala to cooked veggie. Adjust the consistency by adding water. Consistency should be semi solid. Boil this and add seasoning.
  • For seasoning heat coconut oil, mustard, red chilli and curry leaves.
  • Enjoy this curry with hot rice or Chapati.


Massoppu by using Anne Soppu / Water spinach:

Massoppu is nothing but mashed greens with cooked lentils, which is the staple food of Bangalore- Mysore region and is an excellent accompaniment with either Ragi balls or rice. Usually Massoppu is prepared with mixed greens, which is available throughout the year.

We all know the fact that leafy greens are source of iron, calcium, vitamins, antioxidants and fibre and it is the best gift of nature.  Apart from the regular greens we sometimes find unique, seasonal, never seen greens with local soppu/ green vendors in the early morning hours, when they visit our locality. Only few people know the usage of local, seasonal edible greens which was consumed in rural India for centuries. These super foods are sold only in the hand pushed carts in our cities and sadly not at all available in modern super stores.

 Anne soppu comes under such category. After staying in Bangalore for 20 long years I had never seen this green and when I came across it this last week, asked my soppu vendor. He said, it is Anne soppu and is very tasty. Then comes my right hand, house help who grew up in rural Bangalore and knows every green which grows locally. She said, not only is it tasty, but also very nutritious.

According to her, Anne soppu grows wild, like a weed in between paddy or Finger millet/ Ragi fields during monsoon. It has long, arrow shaped leaves and crunchy, hollow stem which breaks very easily, while bending. It is known as Water spinach in English and Kalmi saag in West Bengal. Here is her recipe, which I made and relished and dedicating this post of mine to her.

How I proceeded with is –

Ingredients:

Toor dal – 1 cup

Anne soppu – 4 small bundles

Onion – 1

Garlic- 1 whole

Green chillies – 5 to 6

Tomatoes – 4

salt

For Seasoning –

Oil / ghee – 1 table spoon

Mustard – 1 tsp

Cumin – 1 tsp

Hing – ¼ tsp

Red chilli – 2

Curry leaves – 1 string

Method:

-Greens are like this-

-Clean the greens by discarding thick stem portions by hand.

-Wash and keep aside.

-Wash toor dal, chop onions, tomatoes.

-Take one pressure cooker, shift washed dal and pour water till just above the dal.

-Now place tomatoes, green chillies, onion, garlic, washed greens, salt and cook for 2 to 3 whistles.

-When pressure relieves, churn roughly in a hand blender or hand-held churner.

-Adjust the consistency of dal by adding water and adjust the salt and boil once.


-Now do seasoning by heating oil or ghee, splutter mustard, cumin, hing, red chilli and curry leaves and pour over boiled dal.

-Enjoy with hot rice and raw onions or with any sort of papads or tawa fries like me 😊


Thambittu Unde / Brown Rice Laddu:

Brown rice laddu is also known as “Thambittu unde” in our coastal region of Karnataka. It is an age-old recipe of my aunt’s family. This tasty laddu is very dear to my heart, which I used to relish whenever I visited my maternal uncles place.

Brown rice, also known as boiled rice/matta rice/Kerala rice is very healthy and packed with many nutrients, at the same time it is gluten free and you can have it without any hesitation. It requires very minimum ingredients but tastes heavenly.

Now we will see the procedure –

Ingredients:

Brown rice /matta rice – 500 grams.

Fresh Coconut – 1 (grated)

Jaggery – 500 grams (used organic, hence the colour is dark)

Ghee – 50 -100 ml

Cardamom powder – 1 tsp.

Cashew bits – ½ to 1 cup

Method:

-Wash rice once or twice, drain completely and Spread this on a clean cloth and let it air dry. It takes one to two hours. After one to two hours, check the moisture.

-If it is completely dry while handling, it is ready to use.

-Heat one thick bottomed wok/vessel, add dried rice little by little and roast, it will pop a little and texture will become brittle and little puffy.

-Do this procedure in 3 to 4 batches and cool.

-When it cools down, make powder either in a mixer jar or nearby flour mill. Sieve this powder and keep aside.

-Now dry roast grated coconut until it emits fragrance. Keep aside. (you can use mixer jar and pulse once or twice to get uniform tiny gratings. This would help in uniform roasting)

-Boil jaggery by putting one cup of water. When it melts sieve this solution to remove any impurities.

-Take this liquid and boil further till it reaches one thread consistency. At this stage you will hear “Tup” “Tup” bubbling sound too (this is the clue which I have received from the elders)

-When it reaches one thread consistency, mix in roasted coconut gratings, ghee, roasted cashew bits, rice powder and cardamom powder.

-Mix nicely. At this stage mixture will be too wet to handle. So, keep aside for half to one hour, till mixture becomes little dry and ready to handle.

-When you feel it is ready, take a small amount in a hand and make laddu and keep aside.

-When all the mixture gets over and you have finished the process, store these laddu’s in an airtight container. This laddu stays good for long even in room temperature.


Vegetable Pulav (Bangalore Style):

Vegetable Pulav is very versatile and made in many ways. Each house or family has their own favourite recipes. But this one is found in any small darshini or small eateries in Bangalore. It is a native Bangalore style Pulav which is green in colour due to the usage of Pudina and coriander leaves. It is fried with onion and other masalas and ground to paste. Selection of the vegetable is also unique. With other vegetables, Knol khol, double beans as an added attraction, when compared to normal Pulav. Added to all this, we find deep fried bread croutons.  

Ingredients:

Basmati rice – 3 cups (small steel tumbler)

Beans – 10

Carrot – 1

Knol khol – 2

Green peas – ¾ cup

Double beans – ¾ cup

Lemon – 1

Bread slices – 3

For Masala: (please refer the picture)

Oil – 2 table spoons

Cinnamon – 4 to 5 small pieces

Clove – 4

Cardamom – 2

Black pepper – 10 to 15

Cumin – 1 table spoon

Onion – 2 (medium)

Green chillies – 5 to 8

Ginger – 2-inch piece

Garlic – 12 to 14

Mint / Pudina leaves – 1 fist full

Coriander leaves – 1 fist full

Fresh Coconut – 1 small cup

Seasoning:

Oil – 8 to 10 table spoons

Cumin – 1 tea spoon

Bay leaves – 3 half pieces

Marathi moggu – 2

Star anise – 2

Method:

-Wash rice a couple of times, soak and keep aside.

-Wash pudina, coriander leaves, Chop veggies, onions etc. If you are adding double beans and green Peas keep it ready.

-Now prepare ground masala: Take everything under masala and keep it ready by washing or chopping.

-Take one wok, heat oil, drop all the dry spices from cinnamon to cumin.

-Fry onions, garlic, ginger, green chillies when onion becomes transparent add pudina and coriander.

-Fry until it wilts. Add coconut and fry for 2 minutes and switch off the gas.

-Cool, grind into paste by adding very minimum water. Keep aside.

-Now we would move towards the main preparation. It is the time to drain the soaking rice.

-Take one pressure cooker, pour oil for the seasoning, drop all the dry spices from cumin to star anise, fry for 2 minutes.

-Now put all the veggies, green peas, double beans and fry nicely until raw smell vanishes and all the pieces coats with the oil.

-Next comes the turn of adding ground green masala and salt. Fry nicely and lastly add drained rice and fry for couple of minutes.

-Add water (I normally add 1: 2 for Basmati rice or Sona masuri rice) If you are using small grain (Jeera rice) Use 1: 1 ½ ratio for water. Here 1 is rice and 2 or 1 ½ is water.

-Use rice measured cup for water measurement.

-Check for salt and squeeze lemon and close the lid. Cook for 1 whistle and keep it in a simmer for 2 to 3 minutes.

-During this time, we can prepare bread croutons. Usually bread pieces will be deep fried, drained and added.

But, I normally avoid deep frying and make it like this.

-Take one tawa, drop couple of spoons of ghee or oil, when it is hot, drop the bread pieces and fry for 2 to 4 minutes, until all the bread pieces coats partially and half roasted.

-Now switch off the gas, spread those bread pieces in a baking dish, bake for 20 minutes or until it is crisp in a pre-heated oven or convection microwave at 170-degree C.

-When Pressure relieves, open the cooker lid and mix in bread croutons and mix well. Close the lid and leave for some time to soak all these bread pieces to absorb the aroma.

-Then serve with Onion raita at the side.


Ganike hannu Gojju, side dish for Pongal / Black nightshade fruit curry:

Have you ever tasted this wonder fruit? If no, you should pluck next time when you see in your vicinity and should enjoy it and feed all the goodness to your body. When we were young, it was our pass time, while walking towards school. We would pluck all these edible different berries though we never knew the goodness that we were getting form these.

Traditionally, in our region, these berries are not at all used in cooking. As I know, it is used only in Tamilnadu in a dry form, after soaking it in buttermilk and sun drying. Normally these dried berries are made into sweet and tangy curry called Vathal Kuzhambu and I tried the fresh berries to include in my regular Pongal Gojju, as a side dish.

As I said in the earlier post, black night shade has many names and these berries are also known as Ganike Hannu, Kakke Hannu, Chavi Hannu in Karnataka. Manathakkali, Sukkuti in Tamil. Nakoi in Hindi.

Black Nightshade (solanum nigrum) is sometimes confused with Deadly Nightshade (Atropa belladonna) of which berries grow individually and in this, we see a bunch formation of berries.

It has a whole lot of health benefits. It is a major source of anti-oxidants and moreover anything else, it is pesticide-free and free of cost 😀

For me, it is a gift of mother nature. I have not potted the plant and it is growing wildly in my garden and feeding me with greens and berries. This time, I have added these berries in my usual side dish, which I prepare for Pongal and liked as well.

Now we will move towards the details –

Ingredients:

 Ganike Hannu – 1 cup (I have used black as well as green unripe one)

Tamarind – One gooseberry size

Jaggery

Salt

Sambar powder – 1 to 2 teaspoons

Rice flour – 1 to 1 ½ teaspoon

Sesame Oil / any cooking oil– 1 tablespoon

Fenugreek seeds – ½ teaspoon

Hing – ¼ teaspoon

Mustard – 1 teaspoon

Cumin – ½ teaspoon

Dried Red chilli – 1

Curry leaves – 1 spring

Method:

-Soak tamarind in a cup of water.

-Wash berries and keep them ready.

-Keep the vessel for seasoning, heat oil, first fry fenugreek seeds.

-Splutter mustard, cumin, hing, chilli and curry leaves and drop berries and fry until it wilts.

-Add tamarind water, salt, jaggery (jaggery should be a little more)

-Boil until berries are cooked and soft. Time to add Sambar powder.

-Mix rice flour in ¼ cup of water, mix and pour it into the curry.

-Boil this nicely, until the top of the curry looks glossy. In the meantime, adjust and add salt, jaggery or sambar powder if needed.

-Serve this Gojju with Pongal as a side dish or you can have it with white rice as well.

-It is sweet, sour and Hot in taste and pairs very well with Pongal.