Cucumber Chutney:

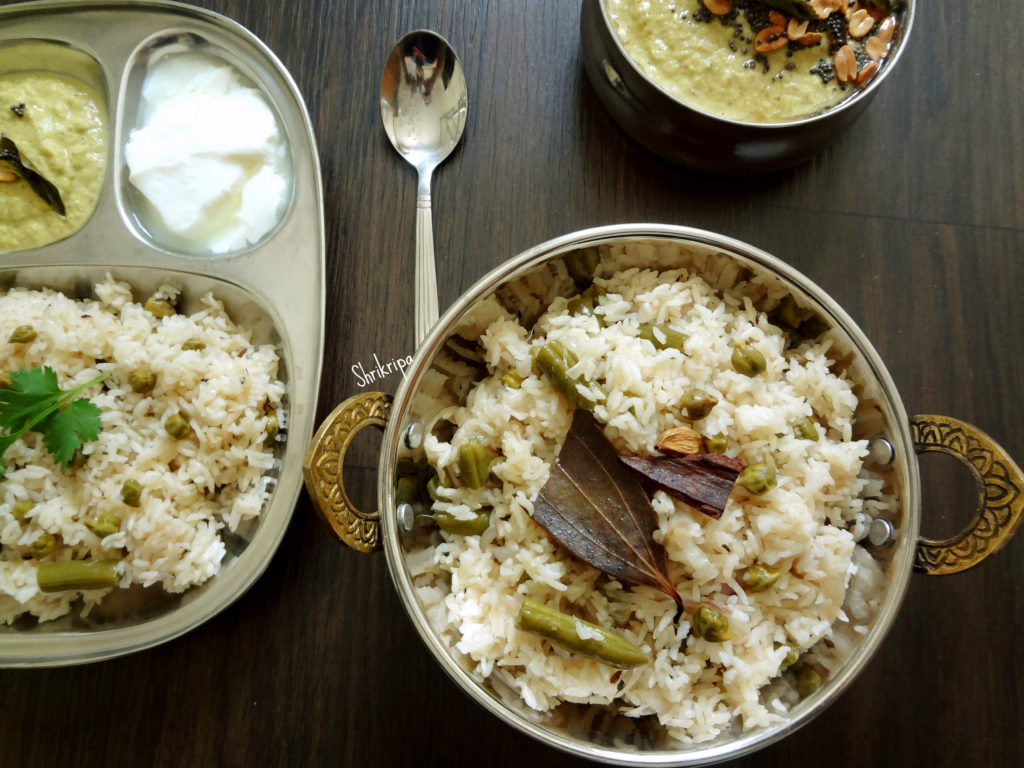
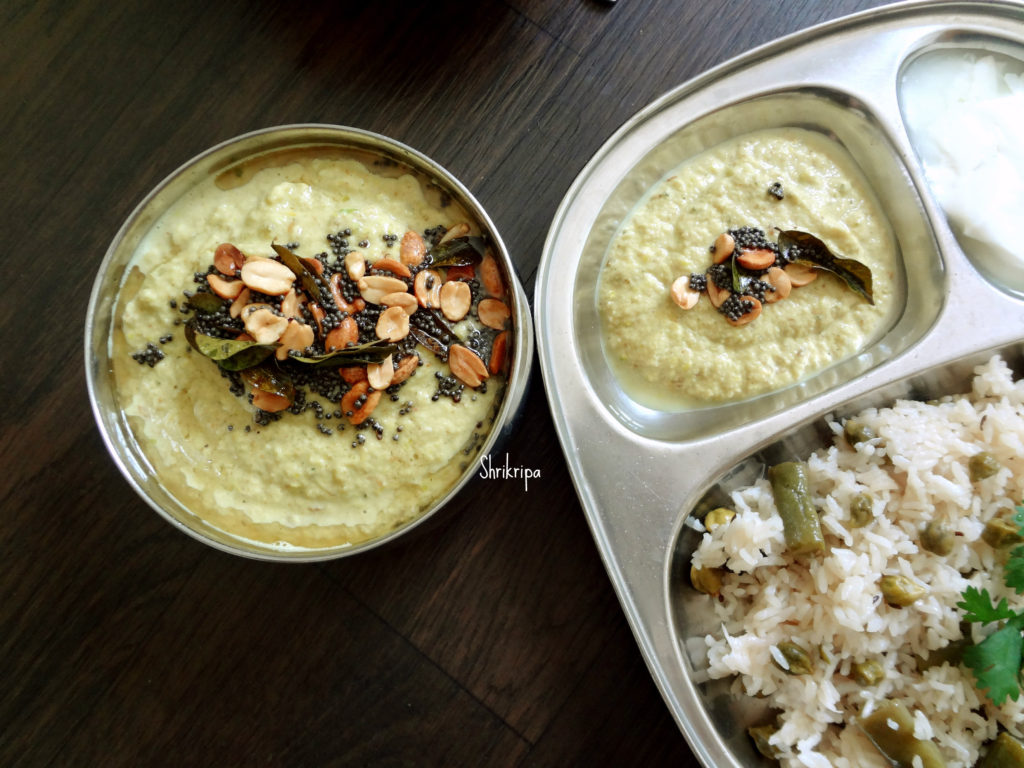
When I saw this chutney recipe in our Facebook Foodie group, I was attracted mainly because of the veggie. One of my daughters loves cucumber and I tried this recipe by pairing it with very mild flavoured Fresh chick peas Pulav. It was a pair made in heaven, and everyone liked this chutney, not only with the Pulav, but also with rice, Dosa or chapati. 

This recipe is by Jayanth Desai one of our Foodie member and all thanks to him for sharing this flavourful chutney of North Karnataka region.

DSC05898_Fotor

Ingredients:

Cucumber – 2 (grated)

Green chillies – 3 to 4

Curry leaves – 2 strings

Turmeric – ½ tea spoon

Oil – 1 table spoon

Hing – ¼ tea spoon

Cumin – 1 tea spoon

Peanuts – 5 tea spoons

Sesame seeds – 2 tea spoons

Tamarind – gooseberry size

Jaggery – small piece

Salt

Seasoning:

Oil – 1 tea spoon

Mustard – ½ tea spoon

Peanut – 1 tea spoon
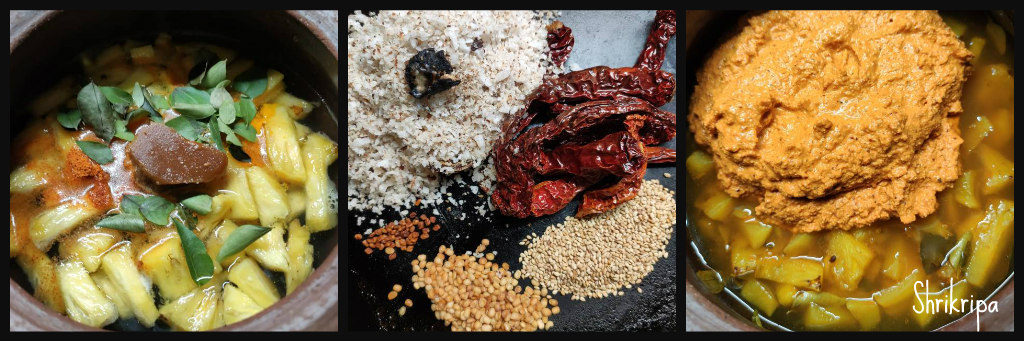
Method:

-Dry roast sesame seeds until it splutters.

-Dry roast peanuts. Keep aside.

Ribbet collage 1

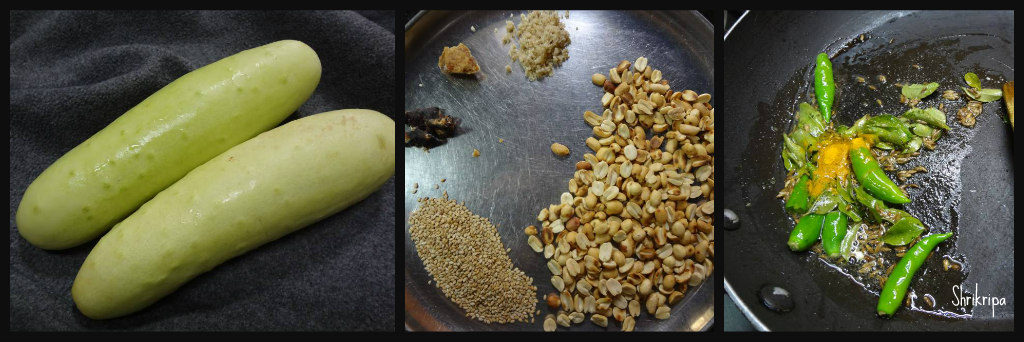
-In the same pan, heat oil, add hing, cumin, curry leaves, green chillies and fry for a minute.

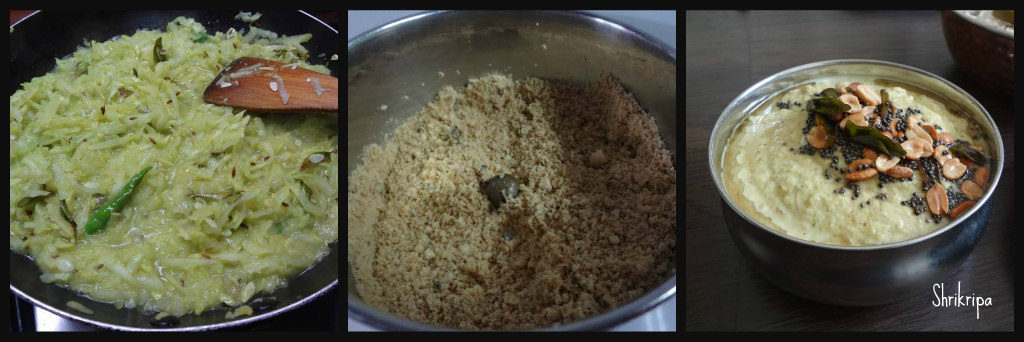
-Add grated cucumber, turmeric and fry until cucumber changes in colour and cooks.

Ribbet collage 2

-Cool the mixture.

– Take one mixer jar, add roasted sesame, peanuts and make powder.

-To this, add cooled cucumber mixture, jaggery, tamarind and salt.

– If necessary, add very little water and blend into smooth paste.

-Do seasoning by heating little oil, mustard and peanuts.

-Serve as you wish.


Fresh Chick Peas Pulav:

Fresh chick peas are green in colour and known as Cholia / Hara Chana. They are fresh young Garbanzo beans which are usually sold as a small bundle of plants with roots intact. These are found only in winter months here in Bangalore. People usually enjoy eating this as a fresh bean by shelling its outer green pod. Chickpeas are high in dietary fibre, mineral, vitamins, proteins.

Ribbet collage 1

These pods are tiny compared to green peas pods. Usually one pod will contain only one garbanzo bean, rarely we find two beans as well. Not more than that.

DSC05879_Fotor

One pot meal is a super cool idea to consume these fresh beans, which I have paired with a cucumber chutney, which I will post next.

Here we will see how I made this Pulav –

DSC05895_Fotor

Ingredients:

Small grain rice – 3 cups (we call this as Jeera samba rice)

Onions – 2

Green chillies – 3 to 4

Ginger garlic paste – 1 table spoon

Fresh chick peas /green Chana – 1 small cup

French beans – 8 to 10 (chopped)

Pudina leaves – 2 tblsp (chopped)

Coriander leaves – 2 tblsp ( chopped)

Salt

Lemon – ½

Ghee – 1 table spoon

Oil – 2 table spoons

Shahi jeera – 1 tea spoon

Bay leaves – 2 small

Cloves – 4

Cinnamon – 1” piece

Mace – 1

Cardamom – 2

Method:

-Wash rice, drain and keep aside.

-Slice onion, green chillies.

-Take one cooker, heat oil, put all the masalas from Shahi jeera to cardamom.

Ribbet collage 2

-Fry onion, green chillies till it is light brown.

-Add ginger garlic paste and toss. Add chopped beans, fresh chick peas and fry for a while.

-Add salt, drained rice, chopped coriander, pudina and fry for 2 minutes. Add 5 ½ cups of water (rice 1: 1 ½ cups of water + 1cup for veggie)

Ribbet collage 3

-When water starts to boil, check for salt, add lemon juice and I table spoon of ghee. Close the cooker lid.

– Cook until one whistle, then simmer for 2 minutes. Switch off the gas.

DSC05907_Fotor

-When steam relieves mix the rice and serve with Hot cucumber chutney

Note:

-I usually use 1 ½ cups of water for 1 cup of small grain rice.

-Here additional 1 cup of water is to cook fresh bean.

-Instead of Chana one can use fresh green peas as well.

Winter Veggie Pickle/Gajar, Gobhi aur shalgam ka achar:

Winter vegetables are very juicy, which can be preserved and enjoyed during the off season as well. In Northern India mainly in Punjab, they preserve these veggies by making pickle. I am very much fond of all kinds of pickles right from our traditional non-oily baby mango pickle to Andhra Avakaya and Punjabi mustard oil soaked root vegetables. No meal is complete without pickle. I usually prefer homemade pickles over store bought one and usually stocks lots of varieties for our regular usage. People who know me will surely agree with this. 😀

DSC05599_Fotor

In this Pickle we use seasonal Red carrots, radish, cauliflower and Turnip chunks. Which is mixed with assorted spices, salt, jaggery and mustard oil. It is a classic combination with any kind of Indian flat breads.

How I make-

Ingredients:

Carrot – 250 grams (Red or Baby carrots)

Radish – 250 grams

Turnip – 250 grams

Cauliflower – 250 grams

Salt – ½ cup+ 1 table spoon (as needed)

Mustard oil – 50 ml

Refined cooking oil – 50 ml

Garlic cloves – 10

Yellow mustard – 50 grams

Turmeric – 1 + 1 tea spoon

Kashmiri chilli powder – 20 grams

Normal chilli powder – 20 grams

Vinegar – 50 ml

Jaggery – 75 grams

Method:

  • Wash, cut carrots, Radish, Turnip into long pieces.

DSC05546_Fotor

  • Remove small florets from cauliflower. Wash and drain.
  • Boil 4 to 6 cups of water in a big vessel. Add 1 table spoon of salt and 1 tea spoon of turmeric.

Ribbet collage 1

  • Blanch cauliflower, radish, Turnip, carrot pieces separately and drain and cool.
  • Spread these on a clean towel and keep it under the sun for 1 to 2 hours to remove all the water content.

Ribbet collage 2

  • If you are keeping and drying it inside the house, please switch on the fan or keep it for long hours, until it is dry.
  • Now keep everything ready for pickle masala and seasoning.
  • Take one thick kadai, pour oil, when it is hot, add garlic and fry for 2 to 3 minutes.

Ribbet collage 3

  • Add crushed yellow mustard, fry for one to two minutes.
  • Immediately add turmeric and dry veggies. Mix nicely.
  • Add both the chilli powders, salt and mix nicely.
  • Then add grated jaggery (I have kept the jaggery piece to show) and vinegar.

Ribbet collage 4

  • Cook until all the masalas and liquid absorb and becomes like a mass.
  • Cool the mixture, store this in a clean, dry glass bottle.
  • It will set in a weeks’ time and one can relish after that period.
  • After it sets, I usually prefer storing it in the fridge to prolong its shelf life.

Radish Thepla/Paratha:

Thepla is a Guajarati word. It is an easy form of paratha. Enjoyment without much work 😉 Yes!!! There is no need to prepare stuffing separately. Put everything together, knead and make.

Radish is not liked by many, let alone be in their list of favourite vegetables. But it ranks very high in nutrition and health benefits. You can make raw salads, sambar or add them in any veggie recipes. If you don’t like the pungent taste, add couple of carrots, tone down the taste and enjoy.

Winter is the time when we get fresh juicy radishes in India. When It is home grown, the joy doubles. I wish to use every edible part without any wastage and without any usage of pesticide. Thus, it is healthy as well.

DSC09149_Fotor

Ingredients:

Radish and its greens – one small bunch

Coriander – 1 tea spoon

Cumin – ½ tea spoon

Carom seeds – ½ tea spoon

Garlic – 3-4 cloves

Green chilli – 1

Coriander leaves – 1 table spoon (chopped)

Curd – 2 table spoons

Salt- to taste

Whole wheat powder – as required

Oil – to cook

Method:

-Wash radish as well as green leaves.

-Grate the radish and chop the greens. Sprinkle salt.

Ribbet collage 1

-Crush coriander and cumin, add.

-Dry grind green chilli and garlic, add.

-Add carom seeds, chopped coriander and curd as well.

-Mix everything, make a firm dough by using required amount of whole wheat flour.

Ribbet collage 2

-Now take lemon sized chapati dough in hand, roll this ball by using a roller, like regular chapati.

-Cook both the sides by using either oil, ghee or butter.

-Serve with sweetened curd or pickle.

Fresh Pigeon pea and Methi Pulav:

Winter is that time of the year, where you can relish all the fresh produce from the bean family. One such bean is Thogari kayi/Fresh Tuvar/Pigeon peas. These are beautiful green pearls with maroon spots all over them and we can make so many varieties of dishes from them. This rice dish is a very easy, one pot meal which has the goodness of Tuvar dal, methi leaves with coconut flavour which will enhance the flavour of the dish to another level.

DSC05585_Fotor

Recipe goes like this-

Ingredients:

Rice – 3 cups

Onion – 2

Fresh Pigeon peas – 1 cup

Fresh methi leaves – 1 small bundle

Veggies of your choice – 1 cup (French beans, carrot)

Ghee /oil – 2 to 3 table spoons

Bay leaves -2

Cumin – 1 tea spoon

Mace – 1

Marathi moggu – 2

To grind: Little coriander leaves, Cinnamon one stick,3 to 4 green chillies and 1-inch ginger.

Coconut milk – 1 cup

Lemon –  ½

Salt

Method:

-At first take a fresh Tuvar bean pod, remove outer thick green skin and separate the green bean with the beautiful red spots. Collect all the shelled beans.

Ribbet collage 1

-Wash rice and soak for 10 minutes, drain and keep aside.

-Chop onions, methi leaves and vegetables of your choice.

-Grind a paste of coriander leaves, cinnamon, green chillies and ginger by adding little water and keep.

-Take one cooker, add oil and ghee or only ghee. Drop whole masalas like bay leaves, cumin and mace.

Ribbet collage 2

-Fry onions until brown and add methi leaves, fresh tuvar, chopped veggies and fry until it wilts.

-Add salt, ground masala and fry for 2 minutes and add drained rice and fry for a minute.

Ribbet collage 3

-Add coconut milk and 5 cups of water, juice of half lemon, boil, close the lid and cook until one whistle and 2 minutes into simmer.

DSC05591_Fotor

-Serve with any kind of raita.


Energy cake:

This energy filled cake has millets, oats, coconut flour. Usually after extracting coconut milk from the fresh coconut, the residue that remains will go into the trash. Coconut residue is very high in fibre. It is much healthier than wheat bran or oats bran. I usually collect this residue, after extracting the milk for any south Indian kheer, and use it in my baking as it is, by storing it under refrigeration for a couple of days.

This energy bar is a little softer than a normal crunchy bar. So, I named it as Energy cake. Shelf life is any where between 2 to 3 days at room temperature, Up to 10 days under refrigeration. If it was under refrigeration, please re-heat to get soft texture.

DSC05271_Fotor

Ingredients:

Oats – 1 cup

Mix millet flour – 1 cup

Coconut residue – ¾ to 1 cup (You can use coconut flour or desiccated coconut as well)

Brown Sugar – ¾ cup

Butter – 100 grams

Honey – 2 table spoons

Milk – ¼ cup

Cooking soda – ½ tea spoon

Vanilla essence – 1 tea spoon

Choco chip and almond flakes – to garnish

Method:

-Pre-heat oven, line a baking tray.

-In one bowl, combine oats, 2 flours and mix thoroughly.

Ribbet collage 1

-Take one sauce pan, heat butter and sugar. When sugar melts, switch off.

-Add in honey, milk,vanilla and cooking soda and mix.

-Pour the frothy wet mixture over oat and flour mixture and fold the batter.

Ribbet collage 2

-Batter will be a little thick and heavy. Pour the mixture and spread evenly on a lined baking tray.

-Garnish with Choco chips and almond flakes and press a little.

Ribbet collage 3

-Bake this in a pre-heated oven at 180 C for about 25 to 30 minutes or until done.

-Cool, cut into pieces and serve as a snack or a breakfast bar.


Oats cookies with kisses:

Wanted to use Hershey’s “Kisses” in baking from so many days, finally I did try out this and my kids liked it too. These are a real treat for kids and at the same time filled with high fiber and are healthy because of the usage of Whole wheat flour and oats. I like lemon flavor in my cookies, if you don’t want to use lemon you can add vanilla or cardamom too.

main_Fotor

Now we will see how I made this.

Ingredients:

Whole wheat flour -1 cup

Powdered oats – 1 cup

Sugar -1 cup

Baking soda -1 tsp.

Grated lemon zest- ½ to 1 tsp.

Ghee /Clarified butter – ½ cup

Milk – 3  to 4 table spoons (to bind)

Hershey’s Kisses chocolates for decoration.

Method:

-In a mixer jar, powder oats, measure and keep aside.

-powder sugar and keep aside.

-Now take one mixing bowl, take all the dry ingredients like whole wheat flour, oats powder ,sugar powder ,baking soda ,lemon rind and mix it thoroughly by using hand ,so that flavor will spread uniformly.

-Now mix in melted ghee and bind it together. If it is a little dry, add one to two table spoons of milk, if it binds and holds a shape well and good. Otherwise add one more table spoon of milk and make a ball like Chapati dough.

-Now pre-heat your oven in 180C.

-Line your cookie tray with butter paper or aluminum foil and keep it ready.

-Take one small cookie scoop or a Table spoon to shape the dough into semi-circle balls, and place them on a parchment covered baking/cookie tray.

Ribbet collage 1

-Bake 12 to 15 minutes or until base becomes light brown in colour.

-While baking process is going on, keep kisses chocolate ready by removing its cover.

-When it is done, take out the tray and immediately press a chocolate into the center of each cookie.

Ribbet collage 2

-Base of this chocolate will melt a little, so it holds firmly after it cools down. Cookie will crack around the edges.

-Now don’t disturb these beauties and allow them to cool completely. It will take anywhere between one to two hours to cool completely.

-Because of the heat, chocolate will become very soft and after some time it will hold its shape and become firm.

-Then you can store this in an airtight container.


Homemade Lemon curd

Fruit curd is a dessert spread and topping usually made with citrus fruit, such as lemon, lime, orange or tangerine. Other flavor variations include passion fruit, mango, and berries such as raspberries, cranberries or blackberries. Wikipedia

Every year a cousin of mine, gifts me with these home-grown cuties and I love these kinds of lemon’s flavor especially in baking.

Today I will post how to make “Homemade Lemon curd”. Homemade lemon curd is quick and easy and so much more mouthwatering than the shop-bought variety. Made by cooking (by using double boiler method) a mixture of fresh lemon juice, grated outer skin/rind, sugar, butter, and eggs, lemon curd is enjoyed on buttered toast, and is a delicious filling for breads, tarts, cakes and cookies. In the coming posts, I will explain the usage of curds one by one.

Equipment needed: Wire whisk (egg beater) and nice, sharp grater with tiny holes, so that it will help to remove only the lemon’s outermost layer (coloured layer) inner white layer will be bitter, 2 vessels.

DSC05033_Fotor

Ingredients:

Had 4 big lemons and took all those.

zest of 1 lemon and juice of 4 lemons
200g sugar
100g butter (cut into chunks)
3 eggs

-Collect lemon zest, lemon juice and assemble everything.

Ribbet collage 1

-Put lemon zest, juice, sugar and the butter, into a basin kind of a vessel (Step 2) over a pot of boiling water, make sure that the bottom of the basin doesn’t touch the boiling water (step 1).

-Stir with a whisk until the butter melts (step 3)

Ribbet collage 2

-Mix in eggs (beat lightly before adding by using fork), after adding eggs, whisk in between, until it is thick, it should be heavy (should stick to the whisk) (step 4 to 6)

Ribbet collage 3

-It took me around half an hour to complete the process.

-Remove from the heat and stir occasionally till it cools…transfer the content to clean glass jar and store it in a refrigerator.


Tandoori vegetables:

Tandoori items are a real treat in its own way. If we make this at home in a little healthier way, we can relish it as a wholesome salad for dinner as well. I usually use hung curd and sandwich green chutney, which I usually make and keep in handy for a quick sandwich or Bhel preparation in the evenings.

The sandwich chutney I make has coriander leaves, pudina, garlic, cumin, sugar, salt, green chillies, dry mango powder and a little ready sev or boondi as a thickening agent. I will post the recipe in detail as a separate post, in the near future.

For Tandoori vegetables, I normally prefer Gobi florets, Broccoli florets and American corn pieces.

DSC05644_Fotor

Ingredients:

Gobi /Cauliflower – 1 Small

Broccoli – 1 Small

American sweet corn – 2

Salt

Tandoori Masala – 1 table spoon

Hung Curd – 3 table spoons

Green sandwich chutney – 2 to 3 tea spoons

Garlic Mayonnaise – 1 ½ tea spoons

Cumin powder – ½ tea spoon

Butter – 1 table spoon

Method:

  • Break open required number of florets (I took 8 each) from Cauliflower and broccoli.
  • Rinse in water, drain.
  • Make 4 pieces from each corn.
  • Boil water in a big vessel, add salt (around 1 table spoon) and Tandoori masala.

Ribbet collage 1

  • Blanch Cauliflower, broccoli and sweet corn separately, one after the other.
  • Drain and keep aside.
  • Now Take one vessel, make a preparation for Marination. Mix in Hung curd, sandwich chutney, mayonnaise, cumin powder and a little salt.

Ribbet collage 2

  • Put blanched veggies, mix everything nicely and keep it under refrigeration for 3 to 4 hours.
  • When you want to grill, pre-heat the oven at 220°C opting a grill mode.
  • Heat the butter, pour over the marinated veggie, mix thoroughly and place the veggie pieces on a lined baking tray and grill for 20 minutes or till top part becomes a little black and looks charred.

Ribbet collage 3

  • Time to serve this with mint dip.

DSC05646_Fotor

Note:

I usually marinate in the morning hours and grill it in the evenings.

For mint dip: If you have sandwich chutney, take 1 teaspoon of chutney, 1 teaspoon of mayonnaise, 2 table spoons of Hung curd, adjust the salt and add a pinch of sugar.


Pineapple Menaskai/ Gojju:

Menaskai/Menaskayi is one of our coastal specialities, which is a hot, sweet and sour, sesame flavoured coconut-based curry. Normally made with bitter or tangy things like Bitter gourd, raw mango, wild mango or pineapple. We even prepare by mixing Bitter gourd and raw mango as well. It is a common dish in any of our elaborate menus for festivities, usually served on a plantain leaf, like poojas or weddings. This same curry is prepared in a little different way in other parts of Karnataka and known as “Gojju”.

Here, the main trick is-balancing of all the flavours.

If you are preparing with sour vegetable or fruit, there is no need to add additional tamarind. For example, if you are preparing raw mango or mixture of bitter gourd and raw mango Menaskai, there is no need to add tamarind. If you are using pineapple, tamarind should be added.

Here I have used pineapple and the procedure goes like this-

Ingredients:

Pineapple – 1/2 (chopped into bits)

Raw mango – 1/4 (chopped into bits)

Tamarind – gooseberry size (if the mango is not available)

Jaggery – as needed

Salt

Green chillies – 2 (slit)

For masala:

Fresh Coconut gratings – 1 to 1 ½ cups

Methi seeds – 1/4 tsp

Urad dal – 2 teaspoons

Sesame seeds – 2 teaspoons (U can use black or white)

Dried red chillies – 8 – 10 (we use Byadagi variety)

Coconut oil – 2 to 3 teaspoons (1 for roasting + 1 for seasoning + 1 tsp to garnish)

Mustard – 1 tsp

Dried red chilli -1

Curry leaves – 2 springs

Method:

-Clean pineapple by removing the outer skin, chop into bite-size pieces.

Ribbet collage 1

-Cook pineapple pieces and mango pieces or tamarind with little water, turmeric, salt, jaggery, green chillies and curry leaves.

-Dry roast sesame seeds. Now fry all the masalas for grinding. First heat 1 tsp of oil, put methi(fenugreek) seeds. When it is light brown, add all the other ingredients like urad dal,  red chillies and fry until urad dal is light brown. Now it is the time to put coconut and fry further for 2 minutes or until you smell the nice aroma.

-Cool the mixture, grind into a paste by adding sesame seeds and sufficient water as well.

-Add this paste to the cooked pineapple, check for salt and jaggery. Adjust the consistency by adding water and boil nicely in a simmer for 5 to 10 minutes.

-After boiling, add 1 tsp of raw coconut oil as well as the seasoning with coconut oil, mustard, red chilli and curry leaves. Close the lid and leave it to soak all the masalas for half an hour.

-Serve with hot rice.

Note:

-After boiling, the gravy should be a little thicker than normal sambar.

-Taste should be sweet, sour, hot. So adjust the addition of jaggery accordingly.

– We usually relish this dish the next day of preparation, usually with Neer Dosa or chapati/Roti. 😊