Khara Neer Dosey / Savoury Neer dosa :

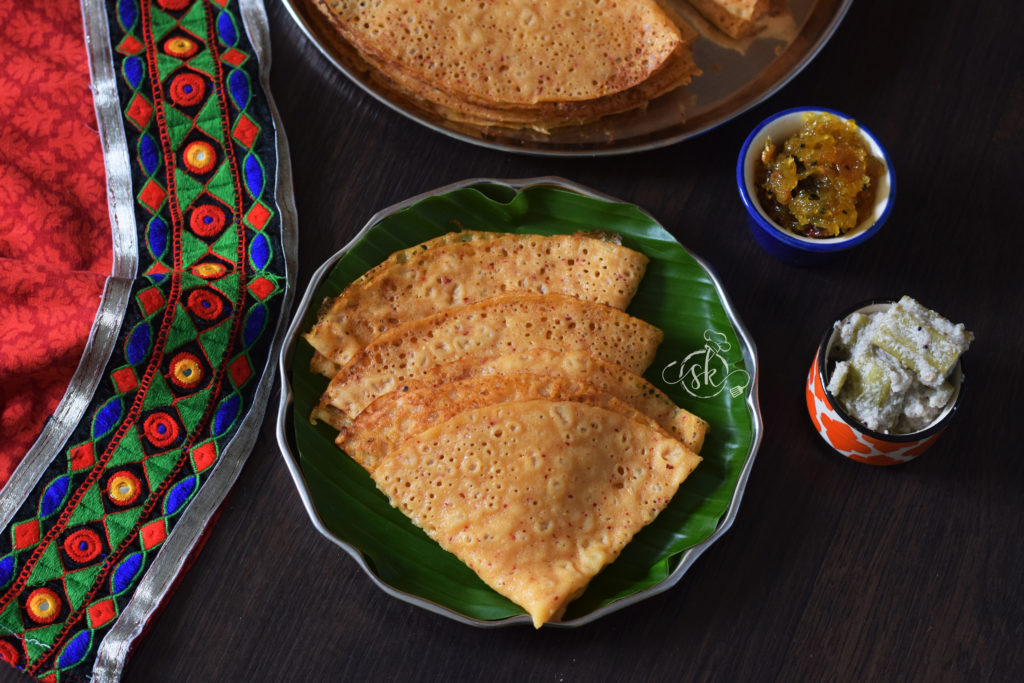
Neer dosey is an integral part of coastal breakfast. I usually prepare Neer dosey or my own version of Healthy neer dosey. Leftover neer dosey would turn into another dish, with sweet seasoning for an evening with a cup of tea. Khara neer dosey is one more variety of dosa from our region. 

Khara neer dosey is also known as Khara Thellavu /savoury neer dosey which is nothing but a spicy version of normal white neer dosey. It is quick, no fermentation is required. Soak the rice, grind, maintain the right consistency, use a well-seasoned cast-iron tawa to get the super-soft, authentic taste.

Ingredients needed:

Dosa rice -2 cups

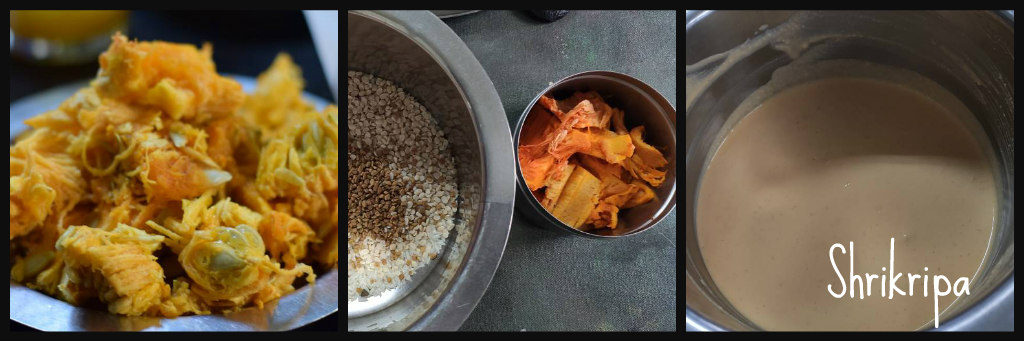
Red chillies – 4 to 5

Onion – 1 big  Or Coconut – 1 bowl

Coriander seeds – 1 tablespoon (optional)

Cumin – 1 tsp (optional)

Hing – generous pinch

Salt

Iron griddle /tawa.

Method:

-Wash and soak Dosa rice at night or 2 to 3-hour soaking is needed.

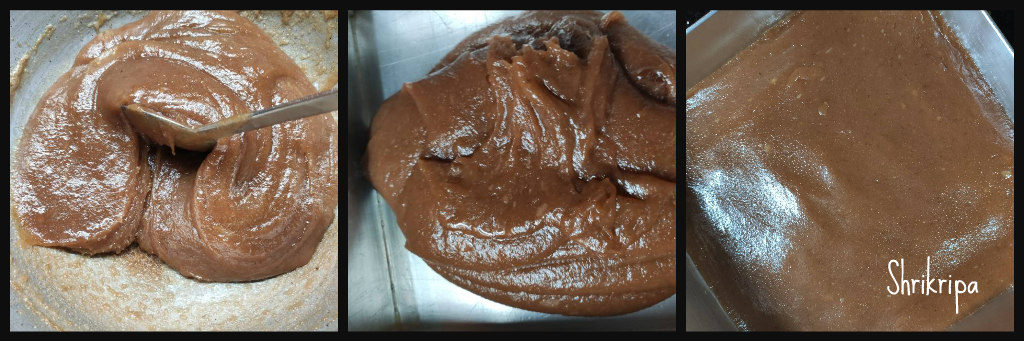
-In the morning grind this soaked rice into fine paste by adding chillies, chopped onion OR Coconut, coriander, cumin, salt with water (I use soaking water while grinding, it gives pleasant aroma for the Dosa) and salt as per requirement.

– Make batter into pourable consistency like this and check for the salt.

-Now keep Iron griddle for heat, smear oil and keep it ready. 

-Pour one serving spoon of batter-like how we make Rawa Dosa, you can see it in the picture below.

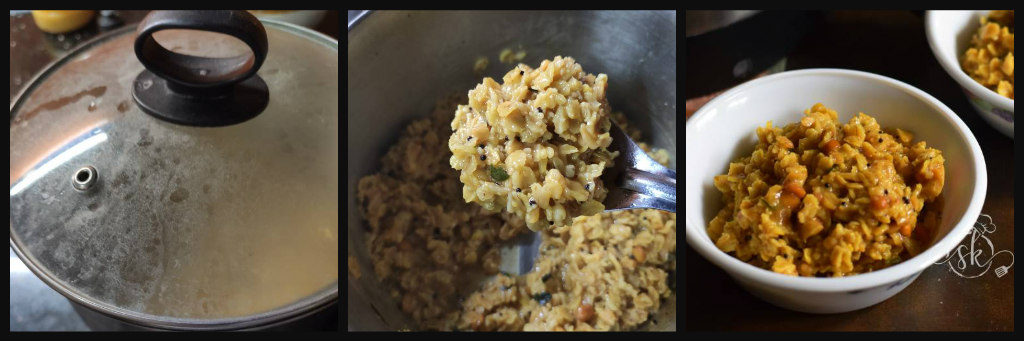
-Now close the lid by keeping the gas on full flame.

-After two minutes, remove the lid and keep the gas in simmer, the edges of the Dosa rise a little, like this.

-Now flip this Dosa on the plate, leave for 2 minutes, then fold like this.

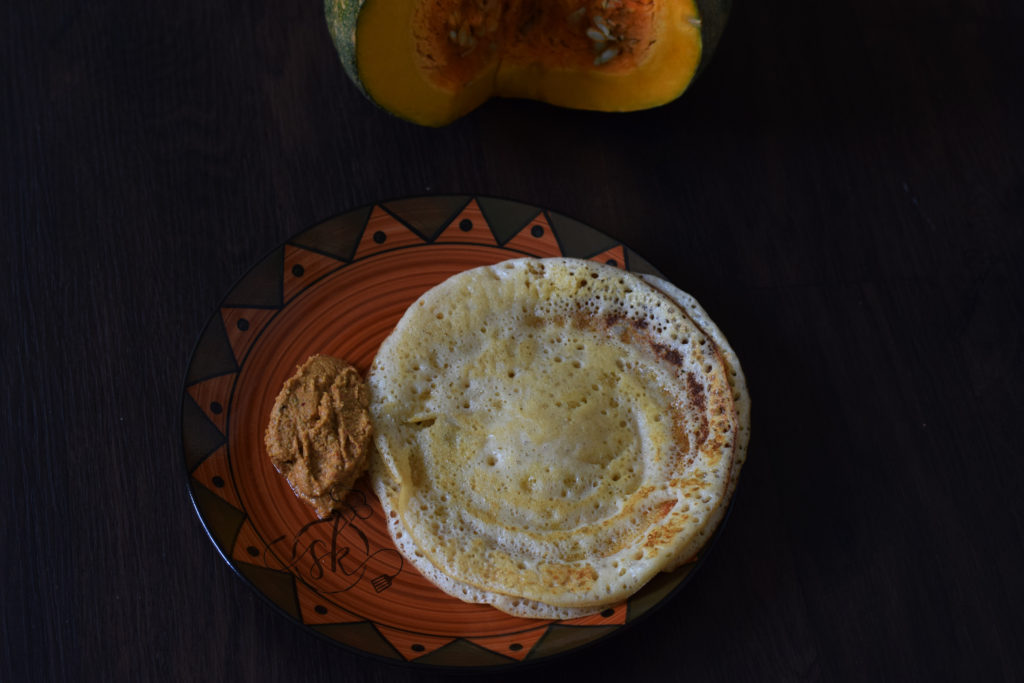
-Now keep repeating this with the remaining batter and stack one over the other or take one big plate and stalk one opposite another alternately.

-Serve this Dosa with Coconut and grated jaggery mixture or coconut chutney or as you wish.


Sankranthi Bhogi Palle/ Multi greens and vegetable palya:

Wish you all Happy Bhogi! While it is not a huge festival in our native. After coming to Bangalore, I learnt Some of my favourite North Karnataka recipes from my previous neighbour aunty, who hails from Solapur near Gulbarga. She used to offer some of her preparations. It starts from simple triangle chapati, obbattu, obbattu Saru, chapparadavarekai palya, chavlikai palya and khara byale Saru, Godhi nucchina Huggi, which she used to offer to God, every Friday evening and she used to distribute as a prasadam to us. Aunty used to prepare Sajje rotti and Bhogi palya, a mixed dry curry, with winter veggies, pulses and greens.

Bhogi Palle or Bhogichi Bhaji is a traditional winter recipe cooked all across Maharashtra and  Uttara Karnataka region on the day of “Bhogi” a day before Makara Sankranti. This dish celebrates the seasonal bounty of winter vegetables and groundnuts and sesame seeds which provide the much-needed warmth and nourishment to the human body during winters. It contains all the nutrients, vitamins, and healthy fat from seasonal fresh harvest with no other added masala other than the ingredients’ flavour.  

Ingredients may differ from family to family. But I like it in this way.

Ingredients:

Mix vegetables – 1 bowl ( Potato, Red carrot, regular carrot, beans, brinjal, broad beans, cluster beans etc.)

Mix greens – 1 bowl ( palak, dill, methi, amaranth etc.)

Mix green pulses and nuts – 1 bowl ( lima beans, toor, choli or chana, double beans, groundnuts etc.)

Spring Onion – 1 small bunch

Tomato – 2 to 3 (Round heirloom variety)

Green chillies – 5 to 6 ( chopped)

Ginger – 1inch ( juveniles)

Garlic – 10 – 12 cloves

Turmeric – 1 tsp

Salt

Jaggery – ¼ tsp to balance the flavour ( an optional)

Seasoning: Oil, mustard, cumin

Coriander leaves – 1 small cup.

Garam masala – ½ tsp (an optional to garnish)

Method:

-Clean everything, keep greens, veggies, pulses separate.

-Chop spring onions, green chillies, crush the garlic. Coriander leaves and keep.

-Take one Kadai, heat oil, splutter mustard, cumin, curry leaves, garlic, ginger, green chillies.

-After frying for a while, add white part of spring onion, then tomato, turmeric, salt, and add jaggery, fry for two minutes. And all the other things from greens to pulses, veggies and give a stir.

Close the lid and cook in a small flame, When it is ready, garnish with chopped coriander leaves. If you wish, add little garam masala and stir well.

Serve with Sajje roti or any other millet roti or regular chapati. I like to have it as it is as well 😀


Guava Cake:

This cake was totally experimental and turned out to be a soft, delicious coffee cake with the mild taste of guava with a sweet tinge. One more thing, I am happy about this cake is the usage of cake seed and 100% whole wheat. Usually, when I attempt a new flavour, I prefer half and half.

Here, cake seed is nothing but Caraway seeds, which has a distinct flavour.

If you need to make eggless, please go ahead with any egg replacer. I usually use flax gel as an egg replacer, and it turns out best and gets an additional nutrition quotient.

For flax gel: -To make flax gel: The necessary ratio is 2 ½ tsp of flaxseed powder and three tablespoons of hot water, and then you whisk in the mixture until it becomes gelatinous to replace one egg.

Ingredients:

Whole wheat flour – 1 ½ cup

Baking powder – ¾ tsp

Baking soda – ¾ tsp

Salt – a pinch

Caraway/Cake seed – 1 tsp

Eggs – 2

Butter – 100 grams

Vanilla – 1 tsp

Sugar – 1 cup (used brown sugar)

Guava puree – ½ cup ( recipe is here)

Milk – 2 to 4 tablespoons (to adjust the consistency)

Method:

-Dry mix all the dry ingredients-whole wheat flour, salt, caraway seed, baking powder and soda, by sieving 2 to 3 times or with a wire whisk.

-In another bowl, beat guava puree, butter, eggs by adding one by one. Add sugar, vanilla essence and beat until sugar almost dissolves.

-Fold in dry ingredients, adjust the consistency by adding milk. The batter should be a little stiff.

-Take a loaf pan, line with parchment paper, pour the dough, bake in a preheated oven at 180°C for 40 -50 minutes or until done.

-take out, cool and slice.


Lemon pickle:

Pickle is an essential part of our Indian meal and we South Indians enjoy our pickle with curd rice as the last leg of our meal, which will tickle and will remain for some time in our taste bud with its right amount of salt, spice, sour, tangy and tartness.

This particular pickle is the non-oily, south Indian style, which I learnt from my mom. This pickle has lemon, green chillies and ginger and goes very well with curd rice.

Ingredients:

Lemons – 15

Ginger – 50 Gms

Green chillies – 5

Salt – ¾ cup

Water – 1 ½ to 2 cups.

Masala:

Dried red chillies – 28 -30

Mustard – 2 Table spoons

Hing – peanut size

Fenugreek – 1 tsp

Cumin – 1 tsp

Turmeric powder – 1 tsp

Oil- 1 to 1 ½ tsp

Method:

-Wash lemon, ginger and green chillies. Pat dry and chop however you like it.

-Boil water and salt together.

-When it is ready, you could see the glossy, shiny layer at the top.

-Drop all the chopped items to this. Boil till lemon rind becomes pale. Switch off and keep this for cooling.

-Gradually while cooling, the lemon rind will wilts and rind will fold backwards, don’t worry. It would become normal once it sets/marinates properly.

-Next, we will prepare the pickle masala.

-Dry roast mustard until it pops, remove and keep aside.

-Take one teaspoon of oil, roast fenugreek, cumin, hing one by one and keep it aside.

-Lastly, fry red chillies until it forms crisp with very little oil.

-Cool everything, make powder all these by adding turmeric.

-When salted lemon cools down, add this masala, mix and store this in an airtight bottle.

-After ten days, you can use this.

-I suggest storing this in a fridge so that its shelf life will be one year or more.

NOTE:

– If you want a little thicker consistency to take one and a half cup of water. If you wish to get, a thin consistency takes 2 cups of water.

  -Here I have taken 2 cups of water.

Guava Cheese/ Perad/halwa :

When the neighbour comes and hands me a big bag full of substantial sized overripe guavas, I knew, it is going to be a strenuous task. I need to deal with my mindset of ‘no wastage.’ First thing, came to my mind was my favourite Guava cheese.

When I was reading about the guava cheese, its origin, it traces back to Portuguese settlers in Brazil where it’s known as Goiabada. I am guessing that is how this recipe landed with them in Goa and is known as Perad/Peraad.

In simple terms, guava cheese is nothing but guava halwa. It doesn’t taste like cheese. Its texture is something you can easily bite into, yet is slightly chewy, somewhat like our Banana halwa, with a grainy texture, of course with added guava taste. Colour of the cheese depends on the variety of the Guava. If it is white, the colour turns our light brown, like mine. I usually mix a half red and half white variety of Guava to get beautiful hue.

Ingredients:

Overripe Guava – 2kgs

Sugar – 800 grams to 1 kg (acc to your palette)

Salt – ½ tsp

Butter – 3 tablespoons

Lemon juice -1 tablespoon 

Method:

-Wash, chop the fruit into quarters—Cook with sufficient water for two whistles, cool.

-Pulse it in a mixer jar along with cooked water, sieve the Puree, separate the seed and its roughage.

-Weigh the pulp. For 2 kgs of pulp, I have taken 800 grams of sugar. You can take up to one kg if you prefer sweeter.

-Take one thick bottomed Kadai, add the pulp and boil for 20 minutes or until it starts boiling. Allow 10 minutes more to boil and add sugar and salt, continue to cook in a low flame.

-When the mixture turns pinkish brown add butter and proceeds to cook further. When it starts leaving the sides, add lemon juice, cook ten more minutes.

-Remove the mixture to the greased plate, leave 4 to 6 hours and then cut.

-Stays good for 3 to 5 months without any problem, at room temperature, stored in an airtight container.


Vegetable Pasta in Pumpkin Sauce:

Do you feel strange? While reading “pumpkin”, that too in pasta? No need to feel!! It tastes good at the same time; it is a delicious, nourishing one-pot meal. You can check all my Pasta recipes, which has one thing or the other to make enjoyable of otherwise bland white sauce, which I usually plan for my daughter, who hates bland Bechamel white sauce.

Pumpkin is the most neglected all-round vegetable, even though considered as fall/winter vegetable in other parts of the world. It is low in calories, high in antioxidants, vitamins, minerals as well as high on the natural source of Beta carotene. Hence, whenever I have a fresh homegrown pumpkin is around, I make Pumpkin puree and store it in my freezer. In that way, it is handy whenever it is needed to make pasta or needed for baking.

We would see the procedure –

Ingredients:

Any pasta – 1 cup (of your choice)

Pumpkin Puree – ½ to ¾ the cup (according to your taste)

Veggies – 1 bowl (I have used zucchini, three colour bell peppers)

Butter or olive oil – 2 tablespoons

Whole wheat flour – 2 to 3 tablespoons

Milk – acc to the requirement

Garlic salt

Red chilli flakes

Italian seasoning

Grated cheese  – as you wish (it is purely optional )

Method:

– Drop pasta in boiling water in which,1 tsp of oil and little salt has been added and cooked.

-When it is done, drain the cooked pasta.

-Cool the pasta by pouring cold water and set aside.

– Chop the veggies and keep aside.

– Make white/pumpkin sauce: put some butter, fry wheat flour (3 TBL sp), add milk and mix nicely. Till it smooths out.

-Add pumpkin puree, drained pasta, garlic salt, red chilli flakes, Italian seasonings and give one boil, keep aside.

-I always keep pumpkin puree in the freezer. The recipe is here.

-In another Tawa, add either butter or olive oil, put chopped or sliced veggies, add req amount of red chilli flakes, garlic salt.

-when it wilts, add ready pumpkin sauce(wth pasta), grated cheese. Check for seasoning. Serve. 


Barbeque Oyster Mushrooms:

Oyster mushrooms are Fan-shaped, soft, with a mild Umami in flavour, when compared to button mushrooms. They appear in different colours starting from white, baby pink, cream, light grey etc. Mushroom is known for its low calorie, rich in protein, low in calorie aspects.

According to my daughters, it tastes much better than the button mushrooms and one of my twins who doesn’t love button mushroom started loving mushrooms by eating a pink variety of Oyster by seeing its cute colour :D. My family prefers simple olive oil, garlic salt and pepper tossed Oyster or Barbecue style (My jugaad style 😉 ) / marinated and baked version as a side dish or salad with fried rice or noodles. 

How I made:

Ingredients:

Oyster Mushroom – 2 packs

Sriracha sauce – 1 tablespoon

Tomato ketchup – 1 tablespoon

Vinegar – 1 tsp

Soy sauce – 1 tsp

Brown sugar or Maple syrup – as needed

Black Pepper powder – ¼ tsp

Olive oil – 1 to 2 tablespoons

Method:

-Clean the mushrooms, drain thoroughly.

-Heat the olive oil, drop Mushrooms, roast it, and remove.

-Prepare the sauce by mixing all the sauces from Sriracha to black pepper. Marinate the roasted mushroom in this sauce for 10 to 20 minutes.

-Bake in a pre-heated oven at 180°C for 10 minutes and serve as you wish.

Note: You can use Iron Tawa to roast, instead of the oven. 


Almond Vanilla cake :

Hey, Anushree here! This is my second guest post on my mom’s blog ( My first one was a red velvet cake, if you haven’t checked that out, click right here).

So, it is my parents as well as my mom’s Blog anniversary today, and since my sister and I are home, and the world has come to a pause (pretty much), I thought it would be a good idea to make something for their special day. My mom doesn’t like chocolate much and loves milder flavours. My dad pretty much loves all desserts, so I decided to make a healthy, and yummy almond and vanilla cake, with a glaze instead of frosting as we aren’t too fond of the cream icing. So, while frosting, instead of new age cream cheese, I have opted for an original Ermine icing, which is also known as boiled milk frosting. Here, instead of All-purpose flour, I have used a mixture of  Almond flour, oats flour, and whole wheat flour.

Ingredients:

For the cake:

Almond flour/ meal – ½ cup

Whole wheat flour – ½ cup

Oats flour – ½ cup

Sugar -¾ cup 

Baking powder -1/2 tsp

Baking soda- ½ tsp

Salt – ¼ tsp

Butter – 2 tablespoons

Curd – ½ cup

Egg – 1

Vanilla essence – 1 tsp

For the Glaze:

Milk – 1 cup

Almond flour – 5 tablespoons

Arrowroot powder – 1 tablespoon

Butter – 50 grams

Sugar – ½ cup

Vanilla – 1 tsp

Slivered Almonds – As needed

Method:

To Bake the cake:

-Preheat oven for 180° C . Line the baking tray and keep it ready.

-Measure every ingredient and keep it ready. Melt butter and keep aside.

-Take one glass bowl, beat egg, then sugar, melted butter, curd, vanilla beat everything until it is well mixed and keep aside.

-Now take one more bowl, put all the dry ingredients, all the three flours, salt and baking soda, baking powder. Sieve a couple of times or dry whisk and keep it ready.

–Pour the previously prepared wet mixture to dry ingredients and fold the batter by using any spatula.

-Pour the batter in the lined baking tray and keep this for baking for 40 -50  minutes or until done.

-Before removing, check with a knife by inserting, in the baked cake. It should come out clean.

-Cool the cake completely before doing the frosting part.

Method for Frosting:

-Take milk, Almond flour, and Arrowroot powder in a saucepan. Boil the mixture until it is cooks and becomes creamy.

-Switch off the flame, add in butter, sugar, and vanilla, mix well. Cool the mixture and keep it in the fridge to cool further making it thicker. ( I have not kept it in the fridge)

-Now, slice the cake, make a 2-equal slice, Apply the frosting on the first layer and cover it with the second slice.

-Now pour the frosting on the top, we like the sauce texture and left it like that.

-Decorate the cake with slivered almonds and serve and enjoy with the family <3

Cheenikayi thirulina dosey/ Pumpkin Core dosa:

Delicious dosa by using nutritionally rich , pulpy pumpkin cores which we usually tend to throw away. Whenever we use pumpkin in larger quantities such as pumpkin puree  , Sambar , kalasu etc, the inner core would be more in quantity and it is an awesome way to utilise in dosa batter. In this way, it can be utilised and turned into a healthy breakfast option.

Let us see how I make this super soft, porous dosa.

Ingredients:

Dosa rice – 2 cups

Urad dal – ¼ cup

Methi seeds – 1 tablespoon

Inner soft core – ¼ cup to ½ cup ( quantity may vary according to the availability)

Salt

Method:

-Wash , soak dosa rice, urad dal, methi in water for 2 to 3 hours.

-Clean the pumpkin core, remove seeds, and keep it ready.

-Grind soaked rice and pumpkin core by adding sufficient salt into smooth paste.

-Ferment overnight or 8 – 10 hours. Next day prepare soft Dosas .

-If you like crisp roasted one, spread as thin as possible on heated iron griddle.

-Serve with coconut chutney or any other curry.

Instant Masala Rolled Oats in Kettle :

If you are living in a hostel, PG or with limited access to the main kitchen, it is an awesome idea to keep some ready mixes with one small kettle, as an alternate choice to mess food.

Here, I have used Rolled oats with south Indian masala to give homely Sambar taste, as well as Rolled oats to give chewy texture, alternate to rice. Rice needs little longer time to cook, when compared to Rolled oats. when you have an instant mix ready, it is really quick, easy, filling, fibre rich and delicious choice of meal. 

Ready mix can be stored at room temperature up to a month.

Cooking time – 5 minutes and standing time :5 minutes.

How I made:

Rolled oats – 1 cup

Ghee/ oil – 1 tablespoon

Mustard – 1tsp

Urad dal – 1 tsp

Chana dal -1 tsp

Cashew pieces – 1 tablespoon

Curry leaves – 1 spring (chopped)

Turmeric – ½ tsp

Sambar powder – 1 tsp (as needed)

Tamarind powder – ½ tsp (as needed)

Salt

Jaggery – 1 tsp (as needed)

Method:

-Take one tawa, heat ghee or oil, splutter mustard, fry urad dal, chana dal, fry until it starts to change colour.

-Add cashew pieces, fry for a while. Next, add chopped curry leaves toss until crispy.

-Now add Rolled oats fry for 2 to 3 minutes in low fire. Add turmeric, sambar powder, tamarind powder, salt, jaggery and mix everything until oats absorbs all the masalas.

-Switch off the gas, cool the mixture and keep it in an airtight container. Stays good for more than one month.

How to Cook:

-Take required amount of oats.

If Masala oats – 1 cup

Water – 1 ¼ cup

Boil water in  a kettle, add oats, cook without the lid, until water absorbs, now close the lid, and leave it for 5 minutes. It is such a simple and delicious choice.