Baked Carrot Halwa:

Baked halwa is an experiment to attempt halwa in an easy manner.   This halwa is not a grainy textured one, it is very smooth and flavourful.

I was thinking of trying out carrot halwa by baking and felt like using my regular carrot halwa ratio in this as well to maintain nice colour and flavour by using Delhi Red carrot which is available only during the winter months as well as the regular orange one.

In this recipe, at first, I have cooked the carrot, then pureed and baked. The recipe goes like this –

Ingredients:

Red carrot – 1 kg

Regular carrot – ½ kg

Milk – ½ cup

Sugar – 2 to 3 cups (according to your taste)

Cardamom – 1 tsp

Saffron – 8 – 10 strings (optional)

Salt – one pinch (it really helps in balancing the taste)

Ghee – ½ cup

Slivered almonds – (roasted)

Method:

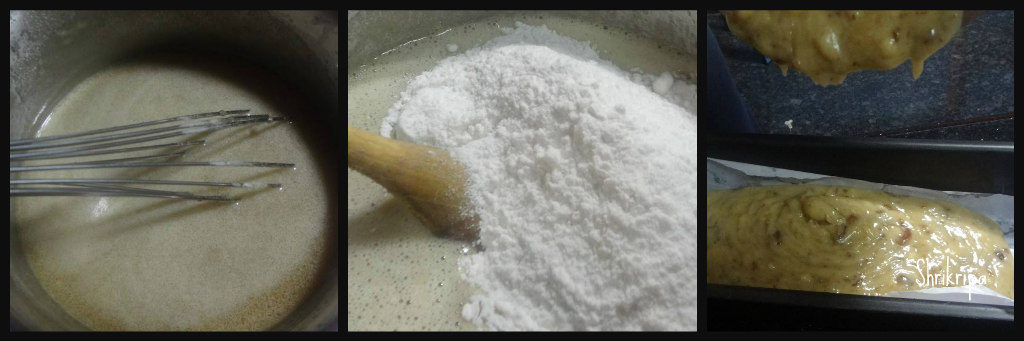
-Wash, slice the carrots. Take one pressure cooker and cook carrot by adding milk and saffron until 2 to 3 whistles.

-When cooked carrot comes to room temperature, churn it into a puree by adding sugar or you can do it like me.

-Now take this puree, mix in sugar, cook until sugar dissolves and add ghee, salt and cardamom. check the sugar and if needed adjust according to your taste.

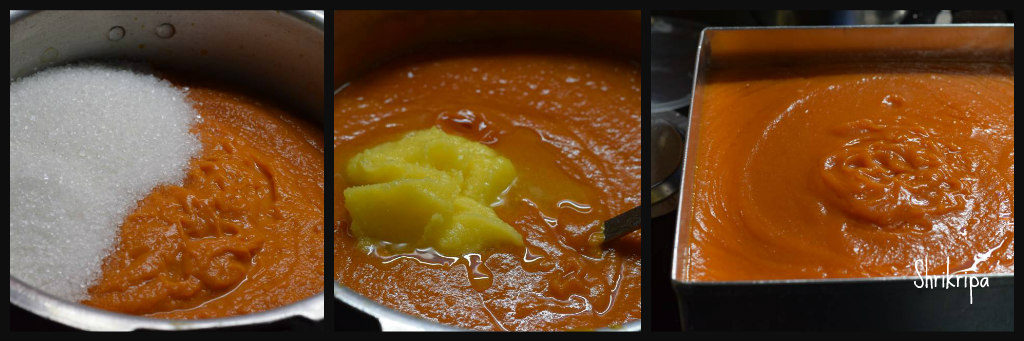
-Transfer this mixture into a baking dish and bake this in a pre-heated oven at 180 °C for 40 to 60 minutes or until top layer becomes dark and bubbly.

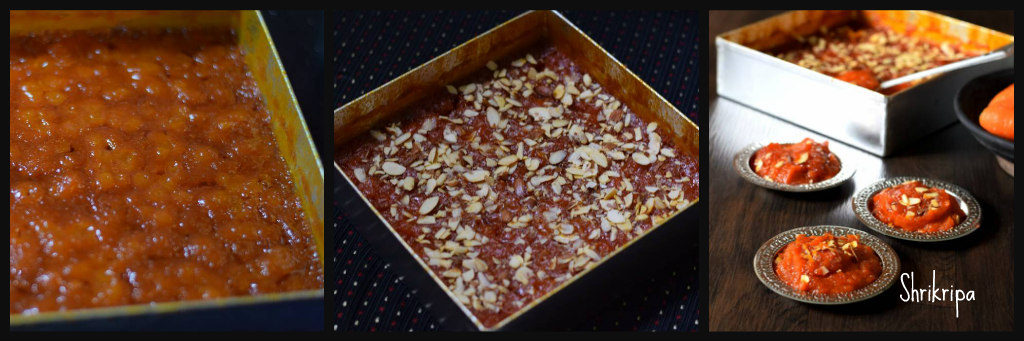
-Remove from the oven and spread the almond slivers at the top and you can proceed to enjoy as it is or with a scoop of ice cream.


DATE CAKE:

I must say, this cake is my Signature dish and very close to my heart. When I was trying my hand in baking, I experienced a lot of failures, but this recipe has uplifted my faith in trying and achieving my goal.

Whenever I made this, everyone liked it for its soft, moist texture. As a little treat to help you relax and settle into Christmas mood, I will share my very easy Date cake recipe with very minimal ingredients. If anyone wants to try their hand at baking, this is just the recipe for you. Just go ahead and try this, you will never regret it.

Now we will see how to make this,

Ingredients:

Dates – 1 cup

Butter /oil – 1 cup

Sugar – 1 cup

All purpose flour – 2 cups (you can mix whole wheat and all purpose too)

Eggs –  2 (beaten)

Water – 1 cup

Cooking soda – 1 tsp or little less.

Method:

– De-seed the dates and chop it either by using food processor or knife, keep aside.

-Grease the baking tray (you can use bread tin as well). Line this with butter paper, keep it ready.

– Take water in a small bowl and boil. When it starts boiling switch off the gas, add chopped dates, butter, sugar, and cooking soda to boiled water and keep aside at least for 20 min.

– After it cools, add beaten eggs and mix nicely.                          

-Now fold in All-purpose flour, mix gently and pour this batter to greased and lined baking vessel.                                              

-Bake this in a pre- heated oven for 35 -40 min or until done at 180 C.

-If you want to check its doneness, use tooth pick or knife. Insert this, if it comes out clean, remove the tin, keep it outside.

-After some time, remove butter paper and cool further.                  

-When it reaches room temperature, you can slice it or cut according to your wish and enjoy with cup of coffee or tea.

Note: For the Eggless Version, use 1/2 cup of flax gel and you can refer my earlier post for the preparation.


Homemade Corn flakes Mixture / Corn flakes Chiwda:

Corn flakes is nothing but maize flakes, which is flattened maize. Indian savouries are an integral part of any festivities. When Diwali festival is around the corner each one would think about what to make. When it is an easy and super fast savoury you need, nothing like it than this recipe. It is very handy, when you have time constraints but still want to make homemade stuff and enjoy.

Maize flakes or Corn flakes or flattened maize is available in almost all departmental stores.

Ingredients:

Maize / Corn flakes – 500 Grams

Oil – to deep fry

Tamarind powder or Amchur powder – 2 tsp.

Salt – to taste

Sugar powder – to sprinkle.

Seasoning:

Oil – 4 tbl sp

Peanuts – 4 tbl sp

Mustard- 2 tbl sp

Cumin- 1 tbl sp

Hing – 1 tsp

Curry leaves – 7 -8 springs

White sesame seeds – 2 tbl sp

Turmeric powder – 2 tsp

Green chillies – 3 -4 Chopped

Dry Coconut bits – 3 tbl sp

Coriander leaves – 3 tbl sp

Method:

-Deep fry maize flakes by putting little by little at hot oil and drain the excess oil and keep it ready.

– When it is ready, keep everything ready for seasoning.

– Chop green chillies, curry leaves, coriander leaves.

– Slice coconut and make bite size pieces.

-Make sugar powder and keep aside.

-Now take one big kadai, put oil. When it is hot add peanuts.

-When it is half done, add mustard. After it splutters go on adding Cumin, hing, curry leaves and green chillies one by one.

-When curry leaves become crisp add coconut bits and fry a little.

-Lastly add chopped coriander leaves and fry nicely until coconut bits becomes brown.

-Now add all the powders- turmeric, salt, tamarind and sugar.

-Switch off the gas, add deep fried corn flakes and mix thoroughly until it holds all the masalas.

– Don’t put lot of pressure while mixing, if you do so, crunchy flakes will break and will not hold the shape.

-After mixing, cool and store this in an airtight container. This stays good for one month or more.

Enjoy homemade crunchy munch with evening tea.


Instant Stuffed Brinjal:

Tiny brinjals are very delicious in dry curries as well as in gravies. When I have plenty of home grown organic brinjals, I normally make this quick dish, which can be handy as well as tasty when you are super lazy to cook. If chutney powder (any chutney powder will do) is around, within no time you will be able to make this delicious dish. It can be relished as a starter, side dish or with curd rice.

Ingredients:

Tiny Brinjals – 12

Garlic Chutney powder – 2 to 3 table spoons

Hucchellu/ gurellu or Nigella seed powder – 1 tea spoon (optional)

Red chilli powder – 1 tea spoon

Amchur powder – ½ tea spoon

Salt

Turmeric – ½ tea spoon

Cooking oil – 2 tea spoons

Method:

-Hucchellu powder is purely optional. If you have roasted Hucchellu powder, use it.

-Take one bowl, mix chutney powder, gurellu powder, salt, turmeric, red chilli powder, amchur powder, salt.

-Wash brinjal, make 2 slits (+ shape) and fill this mixture and keep aside. If any mixture is remaining, keep aside.

-Take one kadai, add oil. When oil becomes hot, add masala filled brinjals and toss for couple of minutes.

-Sprinkle little (1 table spoon) water and close the lid and cook in a low flame.

-Once again sprinkle water in between and cook until brinjal shrinks and cooks properly.

-Lastly, sprinkle remaining masala mixture, give one stir and serve as you wish.


Red cabbage Sandwich:

Red cabbage or purple cabbage? This vegetable has an identity crisis. Red or purple, it is one and the same and this vegetable has numerous health benefits as well. It is a cruciferous vegetable and can be consumed both raw and cooked.

It is a power house of Vitamins, Minerals such as Iron and calcium and dietary fibre . I normally avoid buying cabbages, due to its high pesticide content. Now a day, we do get organic cabbages here in Bangalore. Hence, there is an opportunity to have this beautiful veggie in a raw form as well. When we were shopping, my daughter remembered my Red cabbage sandwich, which I used to prepare for her when she was small and asked me to prepare the same. So, picked up and made this sandwich and tried one rice recipe as well. In coming days, you can expect my new recipe of Red cabbage and sweet corn one pot meal.

Now I will share my sandwich recipe from the scratch-

Ingredients:

Shredded red cabbage – 2 cups

Onion – 1 big

Garlic mayonnaise – 2 table spoons

Honey mayonnaise – 2 table spoons

American mustard – 1 tea spoon

Hung curd – 1 to 2 table spoons (to adjust the consistency)

Oregano – 1 tea spoon

Tomato ketch up – 1 to 2 tea spoons

Red chilli flakes – ½ tea spoon

Grated cheese – 2 table spoons

Bread of your choice – 1 loaf

Butter – to apply while roasting.

Method:

-Take one bowl, put shredded cabbage, chopped onion, garlic mayo, honey mayo, American mustard and hung curd. Mix nicely.

-Now mix in Oregano, chilli flakes, tomato ketchup and grated cheese.

– Mix and make a spreadable mixture. Now your sandwich stuffing is ready.

-Take one slice of bread, spread this mixture and close another bread slice over this.

-Apply butter on both the slices at outer side and keep it in a pre-heated sandwich maker.

-When outer surface becomes light brown, remove and proceed to make remaining sandwiches.

-If you want an extra zing, you can serve this with tomato ketch up or as it is.

Neeru mavinakai Gojju/ Brined mango curd curry:

Neeru Mavinakai” is what we call brined mango, which is basically a firm fully grown, matured but un-ripened mango which is preserved in salt water. We usually relish this in the rainy season or in the off season by preparing some of our traditional dishes. I have shared how to preserve mangoes in my earlier post.  Today I am going to share one of our favourite simple curd curry, which we used to relish even in our childhood days. It is a simple curd curry, seasoned with curd chillies (known as majige menasu), curry leaves and garnished with chopped onions to give the extra zing.

DSC_4350_Fotor

Ingredients:

Preserved raw mangoes – 2

Curd – 1 cup

Coconut milk – 2 table spoons

Green chilli – 1 (chopped)

Onion – 1 (chopped)

For Seasoning;

Coconut oil – 1 table spoon

Mustard – 1 tea spoon

Curd chillies – 1 to 2 (chopped)

Urad dal – 1 tea spoon

Hing – ¼ tea spoon

Curry leaves – 1 spring

Method:

-Remove required number of mangoes from the brine water.

-Immerse these mangoes in fresh water for some time to reduce its salt content.

-Sometimes brined mangoes will be soft or hard. If it is soft, mash it and use.

Ribbet collage

-If it is very hard, cook for a couple of whistles in a cooker by adding little water and try to mash or grate.

-What I had was very hard, and I used it by grating.

-After this is done, mix in curd and coconut milk.

-If you don’t have coconut milk, you can use maggi or some other brand of coconut milk powder as well. (addition of coconut milk will reduce the tartness)

-Mix in chopped onion, green chilli.

-Do seasoning, heat coconut oil, put in mustard. When mustard starts to splutter, add in urad dal, Hing, chopped curd chillies and fry until chillies turns out dark brown.

– Add curry leaves to this hot mixture and add the seasoning over Gojju.

-Traditionally we enjoy this Gojju either with Boiled rice ganji (gruel) or with curd rice as an accompaniment.


Fresh Pigeon pea and Methi Pulav:

Winter is that time of the year, where you can relish all the fresh produce from the bean family. One such bean is Thogari kayi/Fresh Tuvar/Pigeon peas. These are beautiful green pearls with maroon spots all over them and we can make so many varieties of dishes from them. This rice dish is a very easy, one pot meal which has the goodness of Tuvar dal, methi leaves with coconut flavour which will enhance the flavour of the dish to another level.

DSC05585_Fotor

Recipe goes like this-

Ingredients:

Rice – 3 cups

Onion – 2

Fresh Pigeon peas – 1 cup

Fresh methi leaves – 1 small bundle

Veggies of your choice – 1 cup (French beans, carrot)

Ghee /oil – 2 to 3 table spoons

Bay leaves -2

Cumin – 1 tea spoon

Mace – 1

Marathi moggu – 2

To grind: Little coriander leaves, Cinnamon one stick,3 to 4 green chillies and 1-inch ginger.

Coconut milk – 1 cup

Lemon –  ½

Salt

Method:

-At first take a fresh Tuvar bean pod, remove outer thick green skin and separate the green bean with the beautiful red spots. Collect all the shelled beans.

Ribbet collage 1

-Wash rice and soak for 10 minutes, drain and keep aside.

-Chop onions, methi leaves and vegetables of your choice.

-Grind a paste of coriander leaves, cinnamon, green chillies and ginger by adding little water and keep.

-Take one cooker, add oil and ghee or only ghee. Drop whole masalas like bay leaves, cumin and mace.

Ribbet collage 2

-Fry onions until brown and add methi leaves, fresh tuvar, chopped veggies and fry until it wilts.

-Add salt, ground masala and fry for 2 minutes and add drained rice and fry for a minute.

Ribbet collage 3

-Add coconut milk and 5 cups of water, juice of half lemon, boil, close the lid and cook until one whistle and 2 minutes into simmer.

DSC05591_Fotor

-Serve with any kind of raita.


Kumbalakai/Ash gourd Dosa:

When I prepared Kashi halwa, so much quantity of the inner fleshy part was left and I was not in the mood to throw it away. I immediately made a couple of breakfast options from the remaining inner fleshy part, which can be made by adding ash gourd pieces as well. I feel that the inner core has more flavour than real ash gourd: D Ash gourd is considered as super food which has many healing properties and it is very good for the human body. It is low in calories hence it is good for weight watchers as well as diabetics.

Ash gourd main 1

This Dosa batter is like normal urad dal Dosa and one can prepare paper thin roasted Dosa or thick set Dosa as you wish.

Ingredients:

Dosa rice / White normal rice – 3 cups

Urad dal – ¼ cup

Ash gourd inner soft part – 3 cups (you can use ash gourd pieces as well)

Salt

Method:

-Wash Ash gourd, peel outer skin and remove inner core with seeded part. (Core part can be used to make Dosa batter)

Ribbet collage 1

-Remove seeds and take white part and keep it ready.

-Wash rice and dal together. Soak for 2 hours.

Ribbet collage 2

-Grind soaked rice and dal with ash gourd core part or pieces by adding sufficient salt.

-Batter should be smooth and consistency is like normal Dosa batter.

-Ferment this ground batter for 8 hours or overnight.

-Next day prepare Dosa as you wish.

Ribbet collage 3

-If you like crisp roasted one, spread as thin as possible on heated iron griddle.

-If you wish soft, porous kind, spread like a set Dosa and enjoy with coconut chutney.


Avalakkki/Poha Chiwda:

Chiwda or Chivda is an integral part of Diwali festival. It is nothing but savoury rice flakes or Poha. This is not the usual deep fried one. It is a melt in the mouth kind, is very low in calories and is a light snack. My mom used to make this with Nylon Poha or super thin Poha.

Chiwda main

This is how my mom used to make it-

Ingredients:

Nylon Poha /Paper thin poha – 500 Grams

Tamarind powder or Amchur powder – 2 tsp.

Salt – to taste

Sugar powder – to sprinkle.

Seasoning:

Oil – 4 tbl sp

Peanuts – 4 tbl sp

Mustard- 2 tbl sp

Cumin- 1 tbl sp

Hing – 1 tsp

Curry leaves – 7 -8 springs

White sesame seeds – 2 tbl sps

Turmeric powder – 2 tsp

Green chillies – 3 -4 Chopped

Dry Coconut bits –  3 tbl sp

Coriander leaves – 3 tbl sp

Method:

-In the morning keep beaten rice /Poha under the sun by spreading on a thin clean cloth.

chiwda 1

-If you want you can cover this Poha by using another thin cloth to avoid dust accumulation while drying.

-Keep this for two to three hours or until it becomes crunchy.

– When it is ready, remove from outside and keeps everything ready for seasoning.

chiwda 2

– Chop green chillies, curry leaves, coriander leaves.

– Slice coconut and make bite size pieces.

-Make sugar powder and keep aside.

-Now take one big kadai, put oil. When it is hot add peanuts.

chiwda 3

-When it is half done, add mustard. After it splutters go on adding Cumin, hing, curry leaves and green chillies one by one.

-When curry leaves become crisp add coconut bits and fry a little.

-Lastly add chopped coriander leaves and fry nicely until coconut bits becomes brown.

-Now add all the powders- turmeric, salt, tamarind and sugar.

-Switch off the gas, add sun dried Poha and mix thoroughly until it holds all the masalas.

chiwda 4

– Don’t put lot of pressure while mixing, if you do so, crunchy Poha will break and will not hold the shape.

-After mixing, cool and store this in an airtight container. This stays good for one month or more.

Enjoy this with evening tea.

NOTE: If you don’t have access to sunlight, you can roast this in kadai after doing seasoning. Keep it for some time in a low fire and make Poha crispy or use microwave for roasting before seasoning.

Breadfruit Peel Chutney:

Yes!!! You heard it right. In our household we never throw out nutritionally filled outer peel of the veggie or the seeds. I normally make it a point to use as frequently as possible in one form or the other. Normally vegetable stock is an easy option. If only one variety is available, chutney or relish is an alternative tasty option too.

Don’t throw away organically grown or home-grown veggie skins. These are a real treasure of flavour and vitamins. Normally breadfruit is grown without any pesticide. 

This chutney can be relished with hot plain rice with ghee or with any flat breads. 

chutney main

Ingredients: 

Breadfruit peel – From one fruit

Coconut – ½ cup

Urad dal – 1 tea spoon

Cumin – ½ tea spoon

Dried red chilli – 2

Green chilli – 1 or 2

Garlic – 3 to 4 cloves

Tamarind – ½ tea spoon

Coconut oil – 1 table spoon

Salt

Seasoning:

Coconut oil – 1 tea spoon

Mustard – ½ tea spoon

Curry leaves – 1 spring

Method:

-Wash bread fruit peel before peeling. Once again wash and remove white latex, which oozed out while peeling.

-Take one small kadai, pour oil, when it is hot add urad dal fry until it is light brown.

Ribbet collage 1

-Next add cumin, red chilli, and fry until chilli puffs and becomes crisp.

– Now add peels, garlic, green chilli and fry until outer peel changes its colour and wilts a little.

-Next you can add coconut, tamarind and salt, switch off the gas. Toss for one minute and cool this mixture.

-Grind this cooled mixture in a mixer grinder with enough water.

– Do seasoning by heating oil, splutter mustard and add curry leaves and pour it over the chutney.