Protein rich Millet Health Mix:

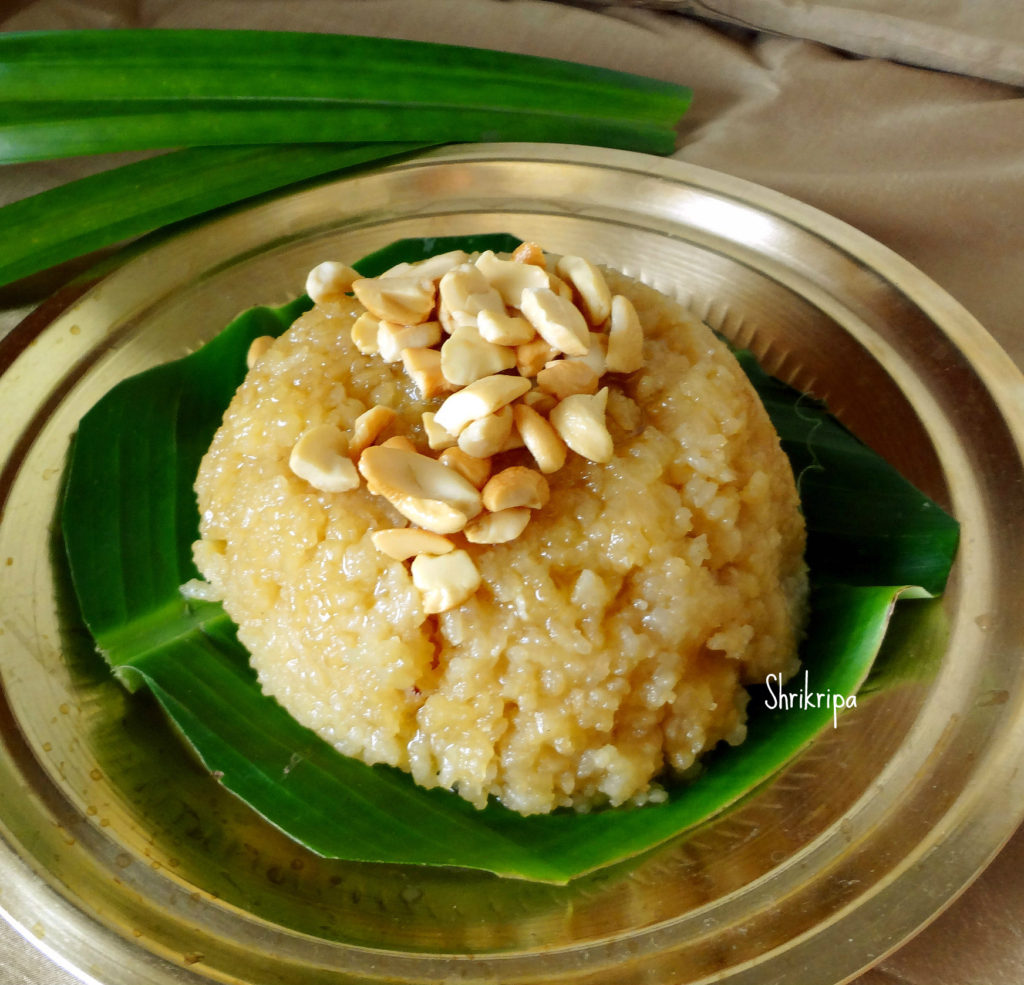
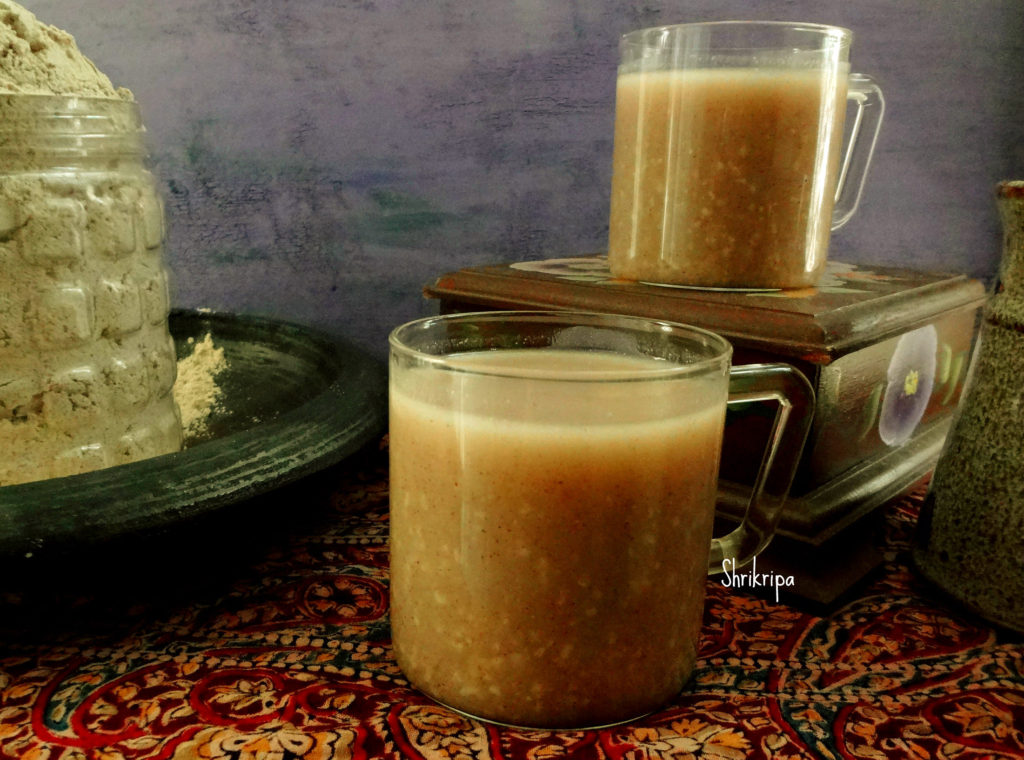
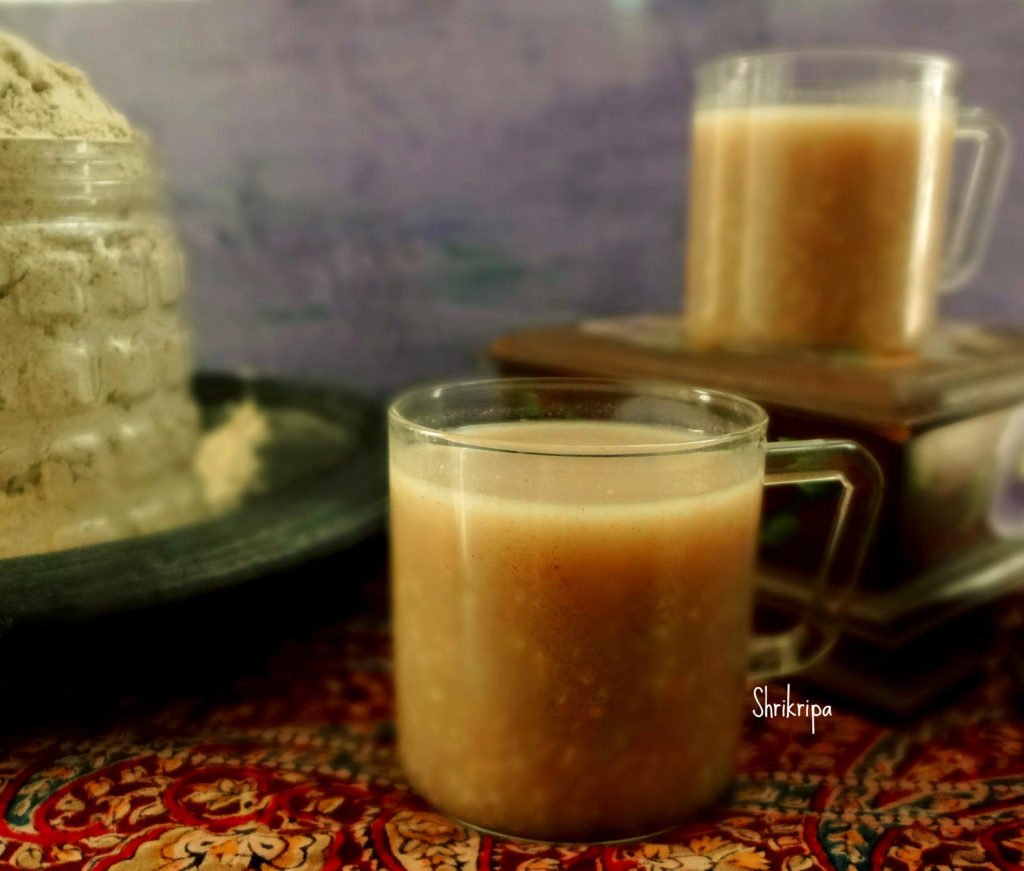
Millet health mix is a wholesome breakfast solution for people who leave their home very early in the morning and yet they can get goodness of wholefood by preparing quick porridge. Once the powder is ready, it is super easy and quick to prepare and consume. One can even prepare this drink and carry it in their bag and have it at their convenience as well.

Health benefits of millets and sprouts are numerous. They are filled with nutrients, vitamins and minerals. It really boosts immune system and overall health of human body.

I prepare this porridge specially for my husband, who started following Naturopathic diet after staying and enjoying this simple diet in a Naturopathic centre. Gradually my niece who leaves home by 6:45 AM from home, started carrying this drink as her mid-morning “meal”. It is very tasty, and at the same time, healthy, filling and nutritious too.

DSC03935_Fotor

At first, we will prepare the powder and the procedure goes like this-

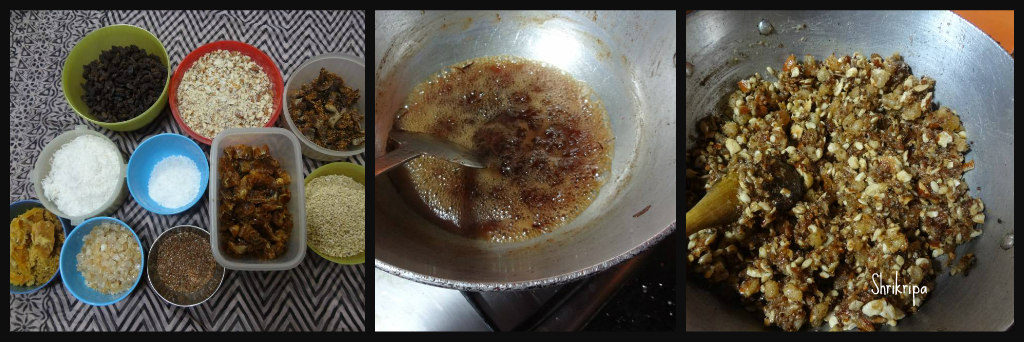
Ingredients to sprouts and Roast:

Whole wheat – 500 grams

Finger millet / Ragi – 500 grams

Pearl millet/ Bajra – 100 to 150 grams

Green gram / whole moong – 250 grams

Black Chana – 250 grams

Ingredients Only to roast:

Fox tail millet – 50 grams

Sorghum / Jowar – 50 grams

Organic Red rice – 50 – 100 grams

Sago – 100 grams

Roasted Chana – 50 to 100 grams

Almonds – 100 grams

Flax seed – 25 grams

Other ingredients:

Cardamom – 10 (whole)

Method:

-First wash all the ingredients under “Ingredients to sprouts” one by one.

Ribbet collage 1

-Soak all these for 6 to 8 hours or Overnight.

-Drain and keep it covered to germinate.

-Next day morning, spread these on a clean cloth separately, and dry under partial or direct sunlight.

-It takes 2 to 3 days to perfectly dry.

-Now you can start roasting all these dried items one by one, as well as ingredients under “Only to roast”.

-After roasting each ingredient, spread this on a newspaper or clean cloth and cool.

-Add cardamom.

– Powder this mixture in a flour mill.

Ribbet collage 2

-Store this ready flour in an air tight container and use as needed.

How to make the porridge:

I make it in two ways. One is plain and another one is with oats.

For the plain one:

Ribbet collage 3

Take 4 spoons of porridge powder, add 450 ml of water, or as much as you want, according to the required consistency, and boil until it is cooked properly.

At that time, mixture will become glossy.

My husband likes this porridge with a little rock salt and a tinge of sweet (usually I add sugar free Natura)

You can either add plain sugar or Jaggery or brown unrefined sugar as well.

With Oats:

DSC03932_Fotor

Take 2 spoons of porridge powder, 2 spoons of Oats and proceed with the above procedure.

Paramanna/ Pindi payasam:

Pindi payasam is nothing but our traditional rice kheer without adding any milk or coconut milk, which is usually offered to god as a Naivedyam and served as a prasadam at any pooja. It is considered as a favourite of goddess Devi. When I look back and think, Pandan leaves were widely used in our region(Mangalore) as well. One can make this payasam even without adding Pandan leaves.

pic main

Pandan leaves are known as gandhasaale ele in our Mangalore region.
Gandhasaale rice is a traditional, flavoured and scented rice variety of Karnataka and Kerala, cultivated in small pockets. Gandhasaale rice is the best rice for meals, Pulav, payasam and other eatables. The Gandhasaale rice is known especially for its rich aroma. It is also called Kerala’s basmati.
In our native, to get aroma of “gandhasaale” in ordinary rice, my grand mom used to put these leaves in, while cooking the rice. Pandan (Scientific Name: Pandanus, also known as screw pine or palm pine) is a herbaceous tropical plant that grows in Southeast-Asia. In Chinese, it is known as ‘fragrant plant’ because of its unique, sweet aroma. The cultivated plant features upright bright green leaves, and it’s the leaves that are used for cooking up many Thai and Southeast-Asian dishes. Pandan is also made into a paste that is used in cakes and desserts, much the way we use vanilla flavouring in the Western cuisine. However, in addition to flavour, Pandan paste also instil foods with a bright green colour. Some Thai and Malayan desserts which I have tasted are Pandan baked cake, Pandan jelly and Pandan sticky rice in Malaysia. Personally, I dint like it much because of its overpowering fragrance and felt that, like my ajji (grand mom), one should use one or 2 leaves to get that perfect blend.

DSC05949_Fotor

Ingredients:

White rice – 1 cup (I have used small grain rice)

Grated jaggery – 1 cup

Ghee – 2to 3 table spoons

Coconut – 2 table spoons (grated)

Cardamom powder – 1 tea spoon

Pandan leaves – 2

Cashew bits – as needed

Method:

-Wash rice, Pandan leaves. Soak rice for 10 minutes.

-Boil 2 to 3 cups of water, add rice, Pandan leaves and cook until it is done.

Ribbet collage 1

-After cooking, remove Pandan leaves.

-In the meantime, take one cup of water, boil, add jaggery and melt.

-Sieve this solution and remove all the impurities.

-Add this solution to cooked rice and boil.

-When the mixture becomes thick, add ghee and mix nicely.

Ribbet collage 2

-Lastly add coconut, cardamom powder and give a stir for 2 to 3 minutes or until it becomes like a creamy mass.

-Roast cashew bits in a little ghee and garnish.

-If you want to offer this to god, do that and then serve. Other wise serve hot and enjoy this delicacy.


Cucumber Chutney:

When I saw this chutney recipe in our Facebook Foodie group, I was attracted mainly because of the veggie. One of my daughters loves cucumber and I tried this recipe by pairing it with very mild flavoured Fresh chick peas Pulav. It was a pair made in heaven, and everyone liked this chutney, not only with the Pulav, but also with rice, Dosa or chapati. 

This recipe is by Jayanth Desai one of our Foodie member and all thanks to him for sharing this flavourful chutney of North Karnataka region.

DSC05898_Fotor

Ingredients:

Cucumber – 2 (grated)

Green chillies – 3 to 4

Curry leaves – 2 strings

Turmeric – ½ tea spoon

Oil – 1 table spoon

Hing – ¼ tea spoon

Cumin – 1 tea spoon

Peanuts – 5 tea spoons

Sesame seeds – 2 tea spoons

Tamarind – gooseberry size

Jaggery – small piece

Salt

Seasoning:

Oil – 1 tea spoon

Mustard – ½ tea spoon

Peanut – 1 tea spoon

Method:

-Dry roast sesame seeds until it splutters.

-Dry roast peanuts. Keep aside.

Ribbet collage 1

-In the same pan, heat oil, add hing, cumin, curry leaves, green chillies and fry for a minute.

-Add grated cucumber, turmeric and fry until cucumber changes in colour and cooks.

Ribbet collage 2

-Cool the mixture.

– Take one mixer jar, add roasted sesame, peanuts and make powder.

-To this, add cooled cucumber mixture, jaggery, tamarind and salt.

– If necessary, add very little water and blend into smooth paste.

-Do seasoning by heating little oil, mustard and peanuts.

-Serve as you wish.


Winter Veggie Pickle/Gajar, Gobhi aur shalgam ka achar:

Winter vegetables are very juicy, which can be preserved and enjoyed during the off season as well. In Northern India mainly in Punjab, they preserve these veggies by making pickle. I am very much fond of all kinds of pickles right from our traditional non-oily baby mango pickle to Andhra Avakaya and Punjabi mustard oil soaked root vegetables. No meal is complete without pickle. I usually prefer homemade pickles over store bought one and usually stocks lots of varieties for our regular usage. People who know me will surely agree with this. 😀

DSC05599_Fotor

In this Pickle we use seasonal Red carrots, radish, cauliflower and Turnip chunks. Which is mixed with assorted spices, salt, jaggery and mustard oil. It is a classic combination with any kind of Indian flat breads.

How I make-

Ingredients:

Carrot – 250 grams (Red or Baby carrots)

Radish – 250 grams

Turnip – 250 grams

Cauliflower – 250 grams

Salt – ½ cup+ 1 table spoon (as needed)

Mustard oil – 50 ml

Refined cooking oil – 50 ml

Garlic cloves – 10

Yellow mustard – 50 grams

Turmeric – 1 + 1 tea spoon

Kashmiri chilli powder – 20 grams

Normal chilli powder – 20 grams

Vinegar – 50 ml

Jaggery – 75 grams

Method:

  • Wash, cut carrots, Radish, Turnip into long pieces.

DSC05546_Fotor

  • Remove small florets from cauliflower. Wash and drain.
  • Boil 4 to 6 cups of water in a big vessel. Add 1 table spoon of salt and 1 tea spoon of turmeric.

Ribbet collage 1

  • Blanch cauliflower, radish, Turnip, carrot pieces separately and drain and cool.
  • Spread these on a clean towel and keep it under the sun for 1 to 2 hours to remove all the water content.

Ribbet collage 2

  • If you are keeping and drying it inside the house, please switch on the fan or keep it for long hours, until it is dry.
  • Now keep everything ready for pickle masala and seasoning.
  • Take one thick kadai, pour oil, when it is hot, add garlic and fry for 2 to 3 minutes.

Ribbet collage 3

  • Add crushed yellow mustard, fry for one to two minutes.
  • Immediately add turmeric and dry veggies. Mix nicely.
  • Add both the chilli powders, salt and mix nicely.
  • Then add grated jaggery (I have kept the jaggery piece to show) and vinegar.

Ribbet collage 4

  • Cook until all the masalas and liquid absorb and becomes like a mass.
  • Cool the mixture, store this in a clean, dry glass bottle.
  • It will set in a weeks’ time and one can relish after that period.
  • After it sets, I usually prefer storing it in the fridge to prolong its shelf life.

Radish Thepla/Paratha:

Thepla is a Guajarati word. It is an easy form of paratha. Enjoyment without much work 😉 Yes!!! There is no need to prepare stuffing separately. Put everything together, knead and make.

Radish is not liked by many, let alone be in their list of favourite vegetables. But it ranks very high in nutrition and health benefits. You can make raw salads, sambar or add them in any veggie recipes. If you don’t like the pungent taste, add couple of carrots, tone down the taste and enjoy.

Winter is the time when we get fresh juicy radishes in India. When It is home grown, the joy doubles. I wish to use every edible part without any wastage and without any usage of pesticide. Thus, it is healthy as well.

DSC09149_Fotor

Ingredients:

Radish and its greens – one small bunch

Coriander – 1 tea spoon

Cumin – ½ tea spoon

Carom seeds – ½ tea spoon

Garlic – 3-4 cloves

Green chilli – 1

Coriander leaves – 1 table spoon (chopped)

Curd – 2 table spoons

Salt- to taste

Whole wheat powder – as required

Oil – to cook

Method:

-Wash radish as well as green leaves.

-Grate the radish and chop the greens. Sprinkle salt.

Ribbet collage 1

-Crush coriander and cumin, add.

-Dry grind green chilli and garlic, add.

-Add carom seeds, chopped coriander and curd as well.

-Mix everything, make a firm dough by using required amount of whole wheat flour.

Ribbet collage 2

-Now take lemon sized chapati dough in hand, roll this ball by using a roller, like regular chapati.

-Cook both the sides by using either oil, ghee or butter.

-Serve with sweetened curd or pickle.

Fresh Pigeon pea and Methi Pulav:

Winter is that time of the year, where you can relish all the fresh produce from the bean family. One such bean is Thogari kayi/Fresh Tuvar/Pigeon peas. These are beautiful green pearls with maroon spots all over them and we can make so many varieties of dishes from them. This rice dish is a very easy, one pot meal which has the goodness of Tuvar dal, methi leaves with coconut flavour which will enhance the flavour of the dish to another level.

DSC05585_Fotor

Recipe goes like this-

Ingredients:

Rice – 3 cups

Onion – 2

Fresh Pigeon peas – 1 cup

Fresh methi leaves – 1 small bundle

Veggies of your choice – 1 cup (French beans, carrot)

Ghee /oil – 2 to 3 table spoons

Bay leaves -2

Cumin – 1 tea spoon

Mace – 1

Marathi moggu – 2

To grind: Little coriander leaves, Cinnamon one stick,3 to 4 green chillies and 1-inch ginger.

Coconut milk – 1 cup

Lemon –  ½

Salt

Method:

-At first take a fresh Tuvar bean pod, remove outer thick green skin and separate the green bean with the beautiful red spots. Collect all the shelled beans.

Ribbet collage 1

-Wash rice and soak for 10 minutes, drain and keep aside.

-Chop onions, methi leaves and vegetables of your choice.

-Grind a paste of coriander leaves, cinnamon, green chillies and ginger by adding little water and keep.

-Take one cooker, add oil and ghee or only ghee. Drop whole masalas like bay leaves, cumin and mace.

Ribbet collage 2

-Fry onions until brown and add methi leaves, fresh tuvar, chopped veggies and fry until it wilts.

-Add salt, ground masala and fry for 2 minutes and add drained rice and fry for a minute.

Ribbet collage 3

-Add coconut milk and 5 cups of water, juice of half lemon, boil, close the lid and cook until one whistle and 2 minutes into simmer.

DSC05591_Fotor

-Serve with any kind of raita.


Pineapple Menaskai/ Gojju:

Menaskai/Menaskayi is one of our coastal specialities, which is a hot, sweet and sour, sesame flavoured coconut-based curry. Normally made with bitter or tangy things like Bitter gourd, raw mango, wild mango or pineapple. We even prepare by mixing Bitter gourd and raw mango as well. It is a common dish in any of our elaborate menus for festivities, usually served on a plantain leaf, like poojas or weddings. This same curry is prepared in a little different way in other parts of Karnataka and known as “Gojju”.

Here, the main trick is-balancing of all the flavours.

If you are preparing with sour vegetable or fruit, there is no need to add additional tamarind. For example, if you are preparing raw mango or mixture of bitter gourd and raw mango Menaskai, there is no need to add tamarind. If you are using pineapple, tamarind should be added.

Here I have used pineapple and the procedure goes like this-

Ingredients:

Pineapple – 1/2 (chopped into bits)

Raw mango – 1/4 (chopped into bits)

Tamarind – gooseberry size (if the mango is not available)

Jaggery – as needed

Salt

Green chillies – 2 (slit)

For masala:

Fresh Coconut gratings – 1 to 1 ½ cups

Methi seeds – 1/4 tsp

Urad dal – 2 teaspoons

Sesame seeds – 2 teaspoons (U can use black or white)

Dried red chillies – 8 – 10 (we use Byadagi variety)

Coconut oil – 2 to 3 teaspoons (1 for roasting + 1 for seasoning + 1 tsp to garnish)

Mustard – 1 tsp

Dried red chilli -1

Curry leaves – 2 springs

Method:

-Clean pineapple by removing the outer skin, chop into bite-size pieces.

Ribbet collage 1

-Cook pineapple pieces and mango pieces or tamarind with little water, turmeric, salt, jaggery, green chillies and curry leaves.

-Dry roast sesame seeds. Now fry all the masalas for grinding. First heat 1 tsp of oil, put methi(fenugreek) seeds. When it is light brown, add all the other ingredients like urad dal,  red chillies and fry until urad dal is light brown. Now it is the time to put coconut and fry further for 2 minutes or until you smell the nice aroma.

-Cool the mixture, grind into a paste by adding sesame seeds and sufficient water as well.

-Add this paste to the cooked pineapple, check for salt and jaggery. Adjust the consistency by adding water and boil nicely in a simmer for 5 to 10 minutes.

-After boiling, add 1 tsp of raw coconut oil as well as the seasoning with coconut oil, mustard, red chilli and curry leaves. Close the lid and leave it to soak all the masalas for half an hour.

-Serve with hot rice.

Note:

-After boiling, the gravy should be a little thicker than normal sambar.

-Taste should be sweet, sour, hot. So adjust the addition of jaggery accordingly.

– We usually relish this dish the next day of preparation, usually with Neer Dosa or chapati/Roti. 😊


Hitikida avarekalu/ Deskinned Hyacinth bean curry:

Avarekai has many names like Lablab or Hyacinth bean.

Avarekai is an integral part of every household of native Bangalore or Mysore region during every winter. People wait for its arrival. Winter special lima bean is called “Sogadavare” and it has double the aroma of what we get normally throughout the year.

DSC05495_Fotor

Initially I used to struggle with avarekai recipes and never used to get that authentic touch. Now over the years, I have mastered this authentic, tasty curry and my family started liking it and we do enjoy our share of this traditional curry with soft dosas.

If you are using fresh beans, it is a little time-consuming process. During the season we even get the deskinned ones. If you have frozen beans, curry making is an easy task.

At first, we will see the procedure of de skinning –

-At first take a fresh bean pod, remove outer thick green skin and separate the light yellowish green bean. Collect all the shelled beans, soak it in water for 3   to 4 hours.

Ribbet collage 1

 Now starts your time consuming real exercise. Dip your hand in water, remove soaked beans and start deskinning by keeping the bean in between your thumb finger and fore finger and press a little, you will see the transparent outer skin would flip and inner bean will come out. Continue the exercise until it is done and collect deskinned “Hitikida bele” and proceed to make very tasty curry.

Ribbet collage 2

Now we will see the procedure of “Hitikida bele saaru” /Curry

Ingredient-

Deskinned Avarekai – 1 big bowl

Onion – 1 for seasoning

Oil – 3 table spoons

Ghee – 2 tea spoons

Mustard – 1 tea spoon

Curry leaves – 2 springs

Green chillies – 4 (3 for grinding + 1 for seasoning)

Garlic – 8 cloves (4 for grinding + 4 for seasoning)

Coconut – 2 cups

Tamarind – marble size

 Coriander seeds – 2 tea spoons

Cumin – ½ tea spoon

Cinnamon – ½ inch

Clove – 2

Ginger – ½ inch piece

Coriander leaves – ½ cup

Method:

-Cook avarekai with required amount of water and salt. You can opt for a cooker or an open vessel. Slow coking gives a better result for this curry.

– Next is the masala preparation. Fry Coriander, cumin, cinnamon, cloves. When coriander becomes light brown, add garlic, ginger, green chillies, coriander leaves,tamarind and coconut and fry until it emits a nice aroma.

Ribbet collage 3

-Switch off the gas, cool the content and grind this in to a smooth paste by adding required amount of water.

-Now do the seasoning, heat oil, splutter mustard, curry leaves, garlic, green chilli, chopped onion and fry until onion becomes light brown.

Ribbet collage 4

-Add ground masala paste and fry for a couple of minutes. Add cooked avarekai and add enough water.

-At this time, consistency of the curry should be a little watery, as cooking proceeds and after some resting time, it becomes thick and becomes perfect.

Ribbet collage 5

-Boil this mixture until you see a thin creamy layer at the top.

-Switch off and pour 2 tea spoons of ghee, give one mix and close the lid. Rest this for some time, and serve with dosas, chapati’s or plain rice or jeera rice.

DSC05491_Fotor

Note:

-I usually prepare this curry in the night, and re heat and serve with dosas in the morning.

-In this way, it absorbs all the flavours and sets properly.


Akki Rotti Payasa /Rice flat bread kheer:

Happiness is when one of your readers messages you regarding this recipe, which he used to relish in his childhood and attempted a couple of times without any success. He wanted to know the exact recipe for the same, with proper measurements. When he explained about this payasam, I was clueless and thought it must be his grand mom’s own creation to fulfil the needs of her big family by making it easier. He patiently explained the process about how his grand mom used to prepare it and What amazed me was, as a small child, he has seen and observed how his grand mom does etc. After listening to his explanation, it was like a dream to me.  I couldn’t resist, and wanted to try it out As soon as possible. The next day was my wedding anniversary and I grabbed the opportunity and started my experiment. It indeed was a treat and I was super duper happy with the result. Here is the recipe and I am dedicating it to that great soul from whom this recipe came to light and my reader who has shared his childhood nostalgic memories with me by explaining it patiently.

DSC05209_Fotor5209 main

Now we will see how I proceeded with the recipe-

Ingredients:

Dosa rice – 1 small cup

Salt

Jaggery – 4 small cubes

One fresh coconut – to extract milk

Cardamom powder – 1 tea spoon.

Banana leaves – 2 pieces

Ghee – 1 tea spoon

Cashew pieces – 2 table spoons

Method:

-Wash and soak Dosa rice for 2 hours.

-Grind the rice into smooth paste with sufficient water (use soaked water itself) and salt.

Ribbet collage 1

-Batter should be of spreadable consistency (little thinner than regular Dosa batter)

-Next is a coconut milk extraction:

Ribbet collage 2

-Take fresh gratings, put one cup of water and grind into smooth paste and extract milk through sieve. This milk is a thick milk and is used at the end. Hence, it should be kept aside separately.

-Now once again take roughage of the coconut, put one more cup of water and grind, sieve the paste and it is our second extraction of milk.

-Repeat the process and take out a third extraction as well and if you are using the roughage of the coconut in any other purpose, you can store it in a freezer for future use.

– Take one wide thick bottomed vessel, Pour diluted, very thin milk (3 rd. extraction) and jaggery. Boil nicely.

Ribbet collage 3

-Now pour second extraction of milk (thin milk) and boil further.

-Now start preparing Rotti, take one clean banana leaf, spread a ladle of rice batter and spread as thin as possible and flip this leaf over boiling jaggery solution.

Ribbet collage 4

-Within 2 minutes, it will be ready to remove. Now start pulling your banana leaf by peeling it slowly.

-After peeling, if at all some cooked Rotti part remains, take one flat ladle and remove and put it in the boiling jaggery solution.

-Repeat the procedure, until batter finishes. I did it 4 times.

-Now boil this further for 3 to 4 minutes and mix it in-between by using very light hand.

Ribbet collage 5

-It is the time to use thick first extract of the coconut milk.

-When it starts boiling, remove from the flame. Add cardamom powder and ghee fried cashews and serve hot.

DSC05211_Fotor5211 main 2

Note:

  • We liked this dessert as a Hot option.
  • When it cools down, at room temperature it tastes good.
  • Under refrigeration, if Rotti pieces becomes slightly hard, one can relish after re heating.

Antinunde /Dry fruit laddu with edible gum:

Antinunde aka dry fruits laddu with edible gum is a super food for everyone, especially new moms or girls in their puberty, especially after their first cycle of menstruation. I came to know about this super food through my close friend’s mom, Chandu aunty.

According to her, if you are using it for a girl, after her first cycle. Traditionally it is a practice that, 5th day onwards girl should consume a little amount of ghee, small piece of copra (which is dried coconut) followed by one dry fruit laddu and a cup of milk for continuous 48 days. It is believed that, all the combined nutrition of dry fruits, edible gum and milk will take care of her and retain the calcium, iron and much needed supplements through the natural form.

If you are using after delivery, for a new mom as a postpartum supplement, method will be slightly different and here we should take care of the new born baby’s health as well. In this case, lady should consume, 1 spoon of postpartum lehya (which is a mixture of so many ayurvedic natural medicines) followed with little ghee, piece of dry coconut, one laddu and a glass of milk from 11th day onwards until 3rd month. Initial 1 ½ months content of the sesame should be more (for example 1 cup) other than this one should use ½ tsp of ajwain as well and after 2nd half one should decrease the quantity of sesame to half and quantity of the dried dates and edible gum should be more to pass on the supplements to the baby as well.

Other than these two instances, one can enjoy these delicious laddu at any given point of time with a whole lot of goodness. I will show you how I prepare this for a regular use –

DSC08344_Fotor 1

Ingredients:

Dates – 300 grams

Almonds – 100 grams

Cashew – 50 grams

Raisins – 50 grams

Fig – 50 grams (optional)

Melon seeds – 50 grams (optional)

Flax seeds – 25 grams (optional)

Desiccated coconut – 50 grams

Edible gum – 40 to 50 grams

Jaggery – 100 grams

Saffron – 10 strings

Nutmeg – 1 pinch (grated)

Cloves – 4

Ghee – 2 to 3 table spoons

Method:

-Chop dates and dry grind this in a small jar of the mixer grinder.

-Chop almonds and cashews 

-Dry roast saffron then coconut powder for 3-4 minutes, till you get a nice aroma.

-Dry roast flax seed.

-Heat one teaspoon of ghee and fry one by one, cloves, almond, cashew, melon seed and raisins.

-Put one more teaspoon of ghee to same tawa, fry those edible gum crystals, until it pops up and becomes fluffy.

Ribbet collage 2

-Make powder of this by using mixer jar and keep aside.

-Lastly, fry those chopped or churned dates and add all these items together in a bowl and keep aside.

-Now take jaggery in a small vessel and take ½ a cup of water, boil and sieve this to remove any impurities.

-Put this sieved liquid in a thick tawa, in which we have fried all those dry fruits.

Ribbet collage 1

-Boil this until it reaches one thread consistency. Switch off the gas.

-Mix in all those fried items, nutmeg powder, saffron and mix nicely.

-Rub your hand with little ghee and start to make laddu’s. 

DSC08333_Fotor 2

-Eat one laddu a day and enjoy.

Note:

  • Ratio of dry fruits and jaggery is 600 Grams:150 grams. If Fig is added, you can reduce a little.
  • I normally use normal dates, traditionally they use dried dates.
  • Instead of dry coconut (copra) I have used desiccated coconut.
  • One can use palm jaggery while making it for a new mom or use palm jaggery half and regular jaggery half.
  • My kids don’t like either poppy seeds or sesame seeds, instead I have added Melon seeds and flax seeds.
  • I normally add sugar candy crystals to enhance the crunchiness.