Sundried Amla/ Preserved Indian gooseberries:

Amla is good for human kind. It is a great source of Vitamin C and antioxidant as well as anti-inflammatory which boosts the immune system. It is a source of total nourishment for our hair as well as skin.

Traditionally each region has its own method to preserve the goodness of Amla. Be it in a morabba form or as a candy.  In our household, I make it a point to preserve it by Sun drying. One with salt and other one with plain, powder form.

Salted Amla is used for making chutney or Tambli for any stomach ailments. To drink with buttermilk by mixing it. (Raw form of goodness)

Powder form for any smoothies, hair pack or face pack.

Method:

-Wash, either grate it or cut open and remove the seed.

-Put all the pieces in a vegetable chopper / small processor. In this way, you would get nice uniform chunks in an easy way.

-If you want to make powder, don’t add any salt. Straightway sundry until it is crisp and powder and store it.

-If you want a salted one. Add some salt to gratings, mix by hand and sundry until it is crisp and store it in an air tight pouch or container.

-I normally keep it in a fridge.

How to use these salted chunks: Soak 1 tsp of dried amla chunks in a table spoon of water and after 10minutes, use it for chutneys, tambli’s or drink with buttermilk.

Dum Aloo:

Dum Aloo is originally from Kashmir. Normally baby potatoes are deep fried and dunked in a mild and flavorful gravy. Here I have made it without deep frying as well as without peeling the outer skin. I normally avoid removing outer skin of potatoes due to its nutritional value as well as the taste.

In dum aloo, curd is the main ingredient, which is used as a souring agent with the additional Indian spices. Dum aloo tastes very good with any Indian flat breads or with mild Pulav.

Ingredient:

Baby potatoes – 15

Onions – 3 medium size

Green chillies – 2

Ginger – 1 tsp (freshly chopped)

Oil – 3 to 4 table spoons

Fennel seeds – ½ tsp

Turmeric – ½ tsp

Red chilli powder – 1tsp

Garam masala – 1 tsp

Salt

Coriander powder – 1 tsp

Coriander leaves – 3 to 4 table spoons

Hung Curd – ¼ cup

Cashew chunks – 2 table spoons

Hot milk – ¼ cup

Kishmish / Dried grapes – 2 table spoons

Method:

-Soak cashews in Hot milk and keep aside.

-Wash potatoes, make half or quarter pieces according to its size.

-Heat 1 table spoon of oil and roast potato pieces a little and keep aside.

-Take one mixer jar, dry churn onions, ginger and green chillies.

-Heat oil in a kadai, add fennel seeds, roughly churned onion – ginger- chilli.

-Fry until it is light brown, add all the powders, salt and fry for a while and add roasted potatoes, cup of water and cook in a low flame.

-When potato is done, it is a time to switch off the gas. Never add curd while boiling the mixture, it curdles immediately.

-Now mix in curd, chopped coriander and mix everything, adjust the consistency by adding water and boil this mixture by switching on the gas.

-When gravy is ready, you would see a shiny layer at the surface. Switch off the gas.

-Now make a paste of cashew and milk and garnish the curry with cashew paste and dry grapes and serve with Roti or Pulav.


Lemon Bread Roll:

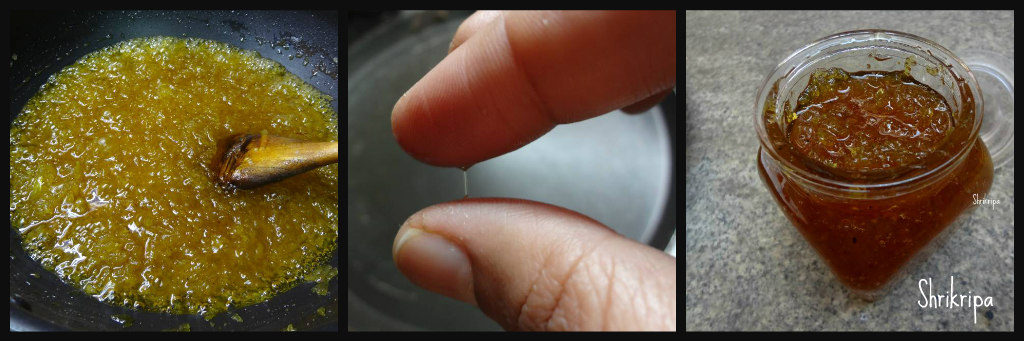
Homemade lemon curd is pretty much going with anything. It is perfect for cookies, tarts, bread or bun, or topping with any dessert.

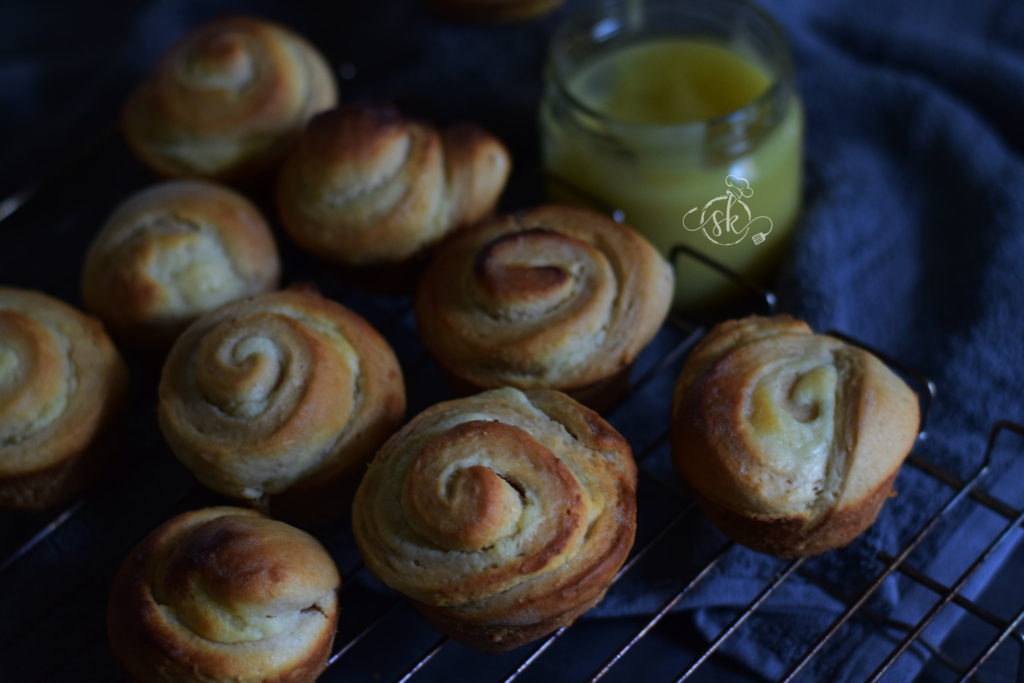
These sweet lemon rolls are packed with delicious flavours with a lemony tinge that pairs well with tea or coffee as a snack option.

If you are a lemon fan like me, this is for you. It is an alternative to the cinnamon roll, a lemon roll!!

The recipe which I follow is easy to make.

To make 8- 10 rolls

For the Dough:

Milk – 1 cup ( I usually take skimmed milk)

Butter – ¼ cup ( 50 grams)

Sugar – ¼ cup

Active dry yeast – ¾  tsp

Flour – 2 ½ cup ( I took a mixture of oats flour + brown rice flour + whole wheat flour, and All-purpose little flour )

Baking powder – ½ tsp

Salt – 1 tsp

Lemon cream cheese filling:

cream cheese or paneer – 1/3 cup

sugar – 2 tbl spoons

hung curd – 2 tbl spoons

fresh lemon juice – 1tsp

all-purpose flour /fine semolina – 2 tbl spoons

homemade lemon curd – 1/4 cup

Method:

First: Bloom the yeast:  In a large glass bowl, add warm milk, sugar, melted butter, and mix. Sprinkle yeast, stir well, close the lid, set aside for 10 minutes or until yeast starts to bloom. (Milk should barely be warm while touching. Otherwise, the yeast would not bloom; instead, it will die)

Second: Prepare a dough: Take whatever flour you are using, combine everything, add to the bloomed yeast and milk mixture. Fold everything together, keep it covered, let it rise in a warm place for another one hr or more until it nearly doubled in size.

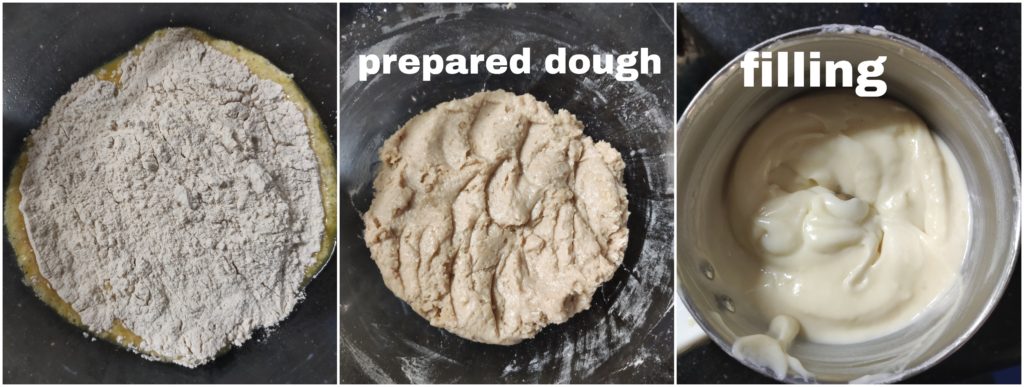
Third: Prepare the filling: In a small mixer jar, at first, churn paneer pieces, sugar, hung curd, then add the remaining ingredients and, whip once or twice and keep it ready.

Line your baking tray or grease your muffin tray and keep it ready.

Fourth: Kneading the dough for good 10 minutes: Dust the clean kitchen counter with the flour, Remove the dough from the bowl, start kneading. If needed, add little flour, and adjust the consistency. Until dough does not stick to your hand or surface. Now start kneading the dough by hand until it reaches a silky smooth texture and springs back when poked.

Fifth: Now it is ready to Roll: Roll the dough into a large rectangle using the hand and the roller. It should be around ½ inch in thickness, roughly 12” by 16” long. Fix the shape of all the corners.

Sixth: Spreading: Drop the filling here and there over the rectangle, spread evenly using a spatula or spoon.

Seventh: Make a log: Start rolling from one end ( longest side); roll up the dough slowly by sealing correctly and tightly. At the other end, seal the edge correctly, place seam side down.

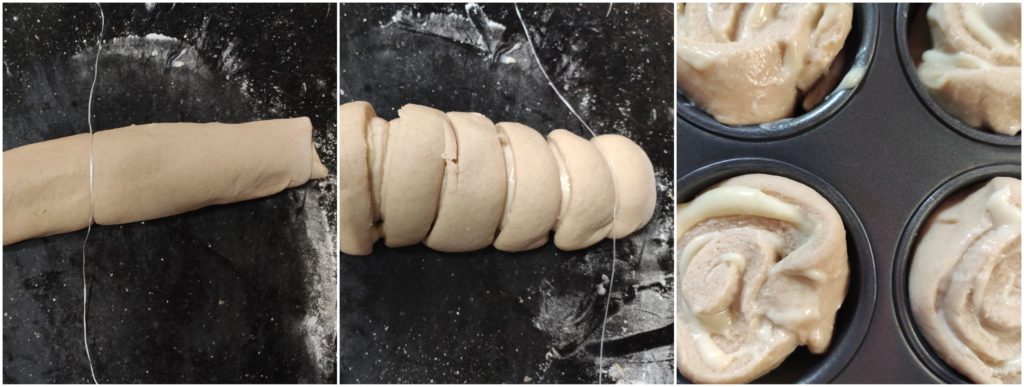
Eighth: Cutting: Cut the log into even pieces using dental floss, twine, or knife. Take a long enough string, keep it at the bottom of the rolled log and pull upwards to get uniform pieces. Place all these pieces in a baking tray. Close the tray with the kitchen towel and leave it to rise. ( mine took hardly 5 minutes)

Ninth: Baking: Preheat the oven to 180°C; if it has risen/ second proof, apply the milk wash and keep it in the pre-heated range. ( I have baked in a mid rack of my oven ) It took me around 35 minutes. Keep an eye after 30 minutes, and when its upper surface turns brown, remove it from the oven.

After taking it out, apply butter over hot rolls to retain moisture. After it cools down, break one by one and serve. I have not used any glaze or cream cheese. It was delicious as it is.


Tiffin Sambar:

Tiffin usually depicts south Indian breakfast. Normally Idli, Dosa, Pongal. This particular sambar is very good combination with Idlies or dosas as well as goes very well with mini idlies which normally known or served as 14 idlies, mini idlies or button idlies at restaurants.

In this sambar, we don’t use any coconut and basically a seasoned mixed dhal with sambar powder as well as baby onions, tomatoes and with or without drumstick pieces.

Ingredients:

Toor dal – 1 cup

Moong dal – ½ cup

Green chillies – 2 (slit)

Baby onions /shallots – 20 (halved)

Tomato – 1 (chopped)

Drum stick – 1 (Cut into 2” pieces) (optional)

Tamarind – 1 tsp

Salt

Jaggery – 1 tsp

Turmeric – 1 tsp

Sambar powder – As needed

Chopped coriander leaves – 2 table spoons

Seasoning:

Oil – 2 table spoons

Mustard – 1 tsp

Cumin – 1 tsp

Hing – ½ tsp

Curry leaves – 1 string

Method:

-Wash and cook toor and moong dal in a pressure cooker. Mash and keep aside.

-Take one tawa, do seasoning. Heat Oil, splutter mustard, cumin, hing and curry leaves.

-Fry onion until it is transparent. Add turmeric, green chillies, tomato and drumstick pieces as well as salt and fry until tomato cooks.

-Add Sambar powder toss for 2 minutes and pour tamarind water, jaggery and boil.

-Add Cooked dal and adjust the consistency and boil nicely.

-Garnish with chopped coriander and serve as a side dish for any south Indian breakfast items.

-If you are serving with Button idlies/ mini idlies Pour one to two serving spoons of sambar, place 14 idlies and once again pour some sambar over those idlies and serve.


Surnoli: (Bread dosa/ Buttermilk dosa)

Surnoli is a traditional breakfast recipe of south canara; it is also called as bread dosa or buttermilk dosa. This is usually prepared if you have left over buttermilk or curds in excess. Usually we make this by adding jaggery.

Here I am giving both sweet and normal dosa version.

Ingredients:

Dosa rice – 3 cups

Fenugreek seeds – 2 tsp.

Beaten rice /poha – 1 ½ cup

Salt – to taste

Buttermilk /curd – 2 cups

Grated coconut – from half coconut or 2 fists full.

Eno fruit salt – 1 tsp. each (for sweet/normal version)

Grated jaggery – according to taste (2 to 3tbl sp) (For sweeter version)

Turmeric powder – 1 tsp. (for sweeter version)

Method:

  • Wash dosa rice, fenugreek and beaten rice twice; discard water. Pour curds and soak this for 3 to 4 hours.
  • Grind this in to a smooth paste by adding coconut and salt to an idly batter consistency (little thicker than normal dosa)
  • If butter milk is very sour add milk while grinding or else you can add water too (if batter is too thick)
  • Now divide this batter into two, take out one portion of batter into a steel vessel in which you keep it for fermenting. This is our normal dosa batter.
  • For sweeter version, add turmeric and jaggery to the mixer jar and grind until it is homogenous.
  • Remove this batter to another vessel and keep it for fermentation.
  • Next day morning add 1 tsp. Eno fruit salt to both the batter and leave it aside for 10 min.

  • Make a dosa by pouring one serving spoon of the batter on hot iron griddle, don’t spread.
  • You will see thousands of holes on upper surface, smear with butter(Vegan’s can avoid) and cook this in a low flame by closing it with a lid.
  • Cook this dosa only on one side and don’t flip.

    -Spongy bread dosa is ready to serve and indulge in it with homemade butter or any chutney. Here I have served this with Onion-coconut chutney.

Indian Gooseberry preserve/Amla Jam:

Indian gooseberry is a sour and tangy fruit with many medicinal values as it is a rich source of vitamin C, calcium etc. It is known as Nellikai in Kannada, Amla in Hindi. This berry has been used for years in Ayurvedic medicines as well as in Home remedies, because it is rich in antioxidants. I make it a point to store Amla in a couple of forms every year- normally by Sun drying and making a jam instead of doing traditional morabba etc.

Usually early morning, weekly 3 to 4 times I do include this jam in my breakfast. It is very good for hair, skin, eye sight and overall health of a human body.

How I make –

Ingredients: 
Amla/Gooseberry (grated)-1 cup 
Sugar -1 cup 
Water -1 cup 
Red Chilli powder-¼ tsp 
Black pepper powder -¼ tsp 
Kesar – 5 -6 strings 
jeera powder -½ tsp 
Turmeric -¼ tsp 
Salt -As per taste 

Method: 

– Wash, cut open and remove the seeds. Put gooseberry either in food processor or chopper. U will get nice uniform chunks, or you can directly grate it.

-Take one thick bottomed pan, add water, grated amla, sugar. Mix well. Cook in low heat.

-When it is half done, add all the other masalas, salt and cook further.

-When mixture becomes shiny and forms a single thread, when you touch in between your fore finger and thumb.

-Switch off, cool and store it in a glass bottle.

-Stays good for one year, in cool weather like Bangalore.


Mango Pickle (North Indian style):

This pickle happened due to my daughters. It is a perfect accompaniment for any parathas or Thepla. I came to know about this recipe from my friend Kavita, who had gifted me this pickle, prepared by her. When it was about to finish my daughters insisted that I prepare it at home and this is the result of their insistence. I want to thank Kavita, who did answer all my queries patiently and guided me through the process.

According to my friend, Thothapuri variety of mango tastes good for this masala. Hence I tried with the same.

Ingredients:

Mango – 1 kg (used Thothapuri variety)

Salt

Turmeric – 1 table spoon

Mustard oil – 1 cup

For Masala:

Red chilli powder – 2 table spoons

Hing – 1 table spoon

Fennel seeds -2 table spoons

Kalonji – 2 table spoons

Yellow mustard seeds – 3 table spoons

Fenugreek/Methi seeds- 1 ½ table spoons

Method:

-Wash, dry and cut the mango into pieces.

-Marinate these pieces with 2 fistful of salt, 1 table spoon of Haldi/ turmeric and mix thoroughly by using dry hand.

-Keep this for two hours and drain the oozed-out water and reserve it for future use.


-Spread these marinated mango pieces over dry cloth and dry under partial sun light or air dry.

-In the evening , remove those shrunken mango pieces and once again mix it with oozed out salted water which we have reserved from previous Marination process.

– The next (second) morning, drain and repeat the process of drying.

-On the second evening, those mango pieces will be ready to mix masala.

-First heat half a cup of mustard oil until it is very hot, then cool it.

-Take all the ingredients from fennel seeds to methi seeds and lightly pound in a small mixer jar by using pulse option. Don’t make fine powder.

-Now take one bowl, mix in all the masalas, sun dried mango, additional salt and mix nicely by using your clean and dry hand.

-Fill the mixture in a glass bottle and pour cooled mustard oil and cover the bottle with muslin cloth and keep it under sunlight for 1 week or partial sunlight.

-After one week, pickle would reduce in quantity. Pour remaining half of mustard oil by heating at first, then cooling it.

-Cover the cloth and repeat the process of keeping it in sunlight for some more days.

-Now it is ready to consume.


How to chop young jack fruit: Beginner’s guide

 Tender jackfruit is an integral part of our traditional cooking. In our region, we start to consume raw jack in different stages and each developing stage of jack has its own unique traditional recipes and is considered as a delicacy. I have shared many recipes of jackfruit in my blog and it is available in my blog archive or you can find in recipe index as well.

Nowadays, people follow many forms of diets and Jackfruit is used extensively in other parts of the world as well. As a plant-based meat alternative, young jack is considered as a Vegan meat.  It suits very well as a vegan meat, due to its fibrous structure and its neutral flavour works very well in cooking savoury dishes and soaks the added flavours.

Tender jackfruit is a super food, which is high in vitamins, minerals and dietary fibers and at the same time, less in calories, salt and fats. Now a day, it is available in almost all parts of the globe as fresh or frozen.

If you get a whole young/ green/ tiny raw jackfruit, what you would do? How to chop? What is the procedure we normally follow? These are the aspects I want to share in this post and I am sure, you would try to use these techniques while chopping the fruit by yourself.

Wanted to include the chopping/ cleaning procedure from a long time, it is tedious to do photography with my latex laden hand while chopping. This post is all thanks to my mother in law, who offered me a helpful hand in chopping, and I grabbed the opportunity to click pictures and the result is here –

First thing is –

  • Centre core part of jackfruit contain a sticky, white latex also known as sap. So, before chopping, apply some cooking oil to your hand and the knife that you use.
  • We normally use traditional vegetable cutter. in which, half-moon shaped knife fixed into raised wooden plank in which, person sits over and holds the vegetable in both the hands and cuts and moves it against the blade. The sharp edge of the knife will face the user. In this method, large sized vegetables can be handled with ease.
  • If you are using the knife or any other material, before cutting – spread a couple of newspapers beneath the work area.
  • Keep a couple of tiny pieces of papers ready, it would be handy while removing the latex.
  • Take one bowl of water as well.
  • Now, take one young jack fruit, make half and slice them to length wise.
  • Clean the oozed-out latex by using tiny paper pieces.

  • Now remove outer thorny skin as well as inner core.
  • It is ready to chop, as per your requirement or the recipe.
  • Make pieces as required and put it in a water containing bowl.

  • Drain the pieces, discard water and proceed to cook or store it in a zip lock and refrigerate or freeze it.
  • Wash your gummy hand by applying little oil once again, rub both the hands and wash it by using normal hand wash.


Baked Carrot Halwa:

Baked halwa is an experiment to attempt halwa in an easy manner.   This halwa is not a grainy textured one, it is very smooth and flavourful.

I was thinking of trying out carrot halwa by baking and felt like using my regular carrot halwa ratio in this as well to maintain nice colour and flavour by using Delhi Red carrot which is available only during the winter months as well as the regular orange one.

In this recipe, at first, I have cooked the carrot, then pureed and baked. The recipe goes like this –

Ingredients:

Red carrot – 1 kg

Regular carrot – ½ kg

Milk – ½ cup

Sugar – 2 to 3 cups (according to your taste)

Cardamom – 1 tsp

Saffron – 8 – 10 strings (optional)

Salt – one pinch (it really helps in balancing the taste)

Ghee – ½ cup

Slivered almonds – (roasted)

Method:

-Wash, slice the carrots. Take one pressure cooker and cook carrot by adding milk and saffron until 2 to 3 whistles.

-When cooked carrot comes to room temperature, churn it into a puree by adding sugar or you can do it like me.

-Now take this puree, mix in sugar, cook until sugar dissolves and add ghee, salt and cardamom. check the sugar and if needed adjust according to your taste.

-Transfer this mixture into a baking dish and bake this in a pre-heated oven at 180 °C for 40 to 60 minutes or until top layer becomes dark and bubbly.

-Remove from the oven and spread the almond slivers at the top and you can proceed to enjoy as it is or with a scoop of ice cream.


Ubbu Rotti : ( In a Traditional way)

Made Ubbu Rotti for today’s lunch, one of the most laborious and very tasty dishes of south canara region. It is a simple rice flat bread and made by soaking Red rice. This is an age old, gluten free and healthy flat bread.

Ubbu Rotti is made as well as served in different styles. Each household has their own method even though the basic ingredient is the same Red rice which is also known as boiled rice or Kerala Matta rice.

In our household we make the Rotti by soaking Red rice and Idli rice in hot water and ground to smooth batter with salt. The ready batter is then cooked on a low heat to make a dough. Then it is pressed into discs by keeping in-between the two plantation leaves. In our native, people use clay tawa to cook the roti. I normally use my Iron Roti tawa. After cooking on both the sides, normally in villages, we put it on “Kenda” (hot burning firewood) to puff up nicely. Here I normally use direct gas flame to do the same. It is low in calorie as well as very healthy and tasty.

While serving, some families prefer chutney and some Malabar spinach gravy. It depends on one’s family preference. In our household, my Mom used to serve Garlic or Onion chutney and Mom -in -law used to serve with Raw mango chutney.

I have mentioned that it is laborious at the beginning itself. You must be thinking by now, why? It is very simple and straight forward and sounds easy as well. I am telling you, it is one of the most difficult recipes to master! Because it needs a lot of patience and time. Roti cooks really slow and vanishes very fast as well 😉 Once you get a hold of it, you can make it very easily. So, if you attempt and practice you will get the hang of it and can make easily.

Ingredients:

Boiled rice – 1 cup

Idli rice – 1 cup

Salt

Coconut oil – to apply

Method:

-Wash rice and soak it for one to two hours by adding hot boiling water and close the lid.

-Grind into smooth batter by adding enough water.

-Cook the batter( I normally add 1 tsp of coconut oil to batter to enhance the taste)  until it forms a dough consistency.

-Take out and cool a little and start making the discs.

-Take small banana leaves, wash and keep it ready as well as a roti presser or two wooden planks to press.

-Take a big lemon size dough and knead a little and form a round shape.

-Take one banana leaf, place it on a roti presser. Place the dough roundel over it and close it with another leaf and press the presser. If you are using plank, do it exactly like this by using the plank.

-Heat the griddle, place the discs (including banana leaf) over the hot iron griddle. Cook in a medium heat.

-Flip the sides couple of times, when roti cooks, leaf will become loose and at that moment, remove the leaf and discard it.

-continue to cook the roti, until you see the light brown spots. Now it is the time to place it on the direct fire and do it. Some would puff, some would not or partially puff.

-That is it. Remove, apply some coconut oil and enjoy with Onion/garlic chutney or Raw mango chutney or Malabar spinach curry.