Jackfruit seed Hummus :

In our native, jackfruit cutting is a family affair. Amma used to sit on the ‘ mettu katthi” which is a special type of sickle attached to the raised wooden plank. She used to chop the fruit, and we all used to sit in front of her and  do the odd job, like removal of jack bulbs, cut open the bulb and the separation of the seeds. Every seed used to be collected, washed, and  preserved it for the future use. In off season/ monsoon it used to be the main source of protein in our traditional cooking. I have shared couple of jackfruit seed recipes with Bamboo shoot as well as with coloured cucumber. I even preserve jack seed in a frozen form and procedure is already shared in my blog as well.

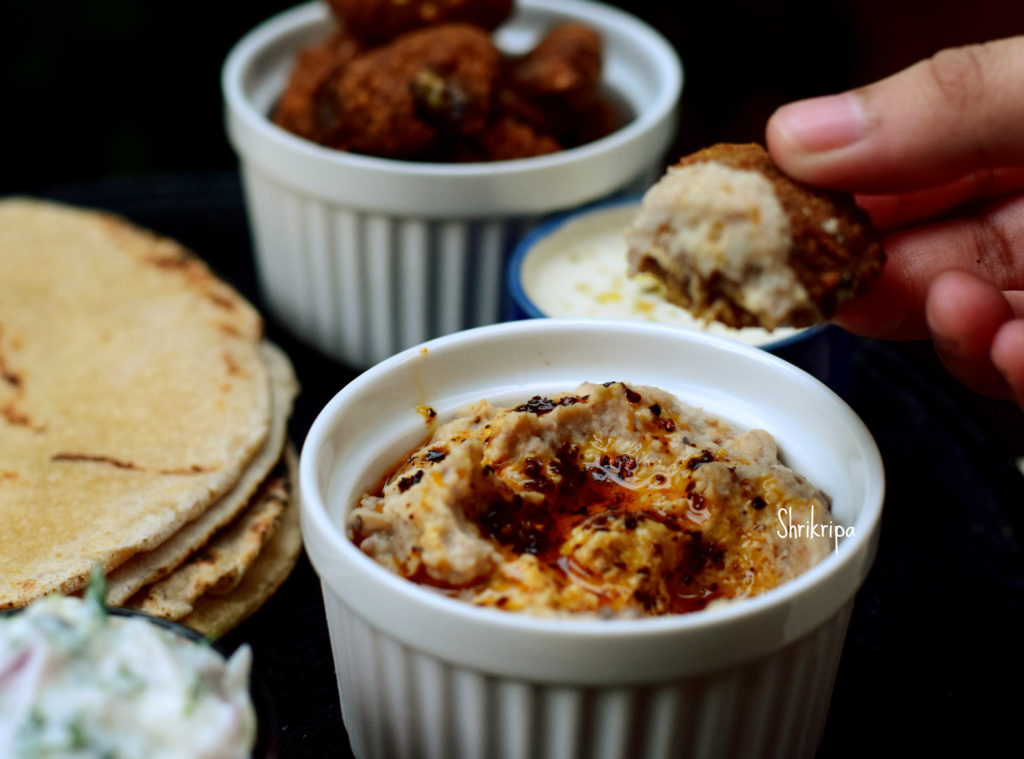
In our region, people have been using jackfruit seeds in their traditional cooking for ages. We are accustomed to its taste as well as love it in any form. This time, I tried my hand at making Hummus, as my family hates the usual hummus made of chickpeas, which is popular in Middle east and Mediterranean cuisine. Usually it is made from cooked, blended chickpeas with tahini, olive oil and some basic seasoning.

It turned out to be super delicious and we enjoyed it as a dip with some steamed vegetables as well as with pita bread pocket. Highly recommend if you don’t like the usual chickpea hummus.

Now we will see how I made this –

Ingredients:

Ingredients:

Jackfruit seeds – 10 to 15

Garlic – 6 to 8

White Sesame seeds – 1 tablespoon

Salt

Lemon juice – as needed.

Cold chilled water – to grind ( helps to achieve creamy texture)

Olive oil –1 to  3 tablespoons

Chilli flakes – 1 tsp

Method:

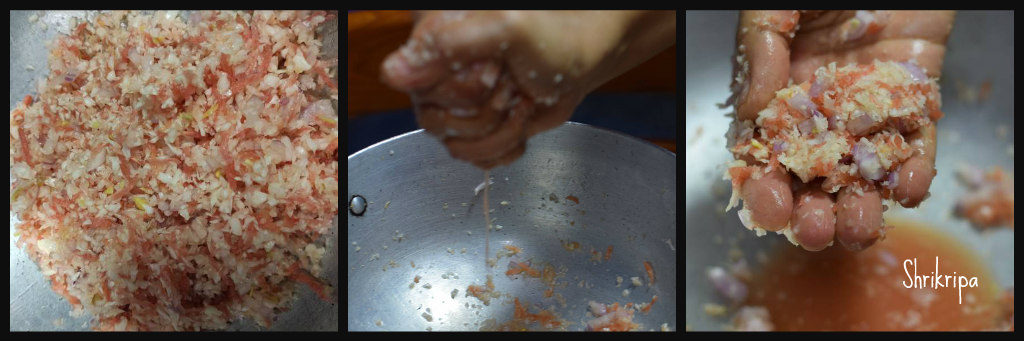
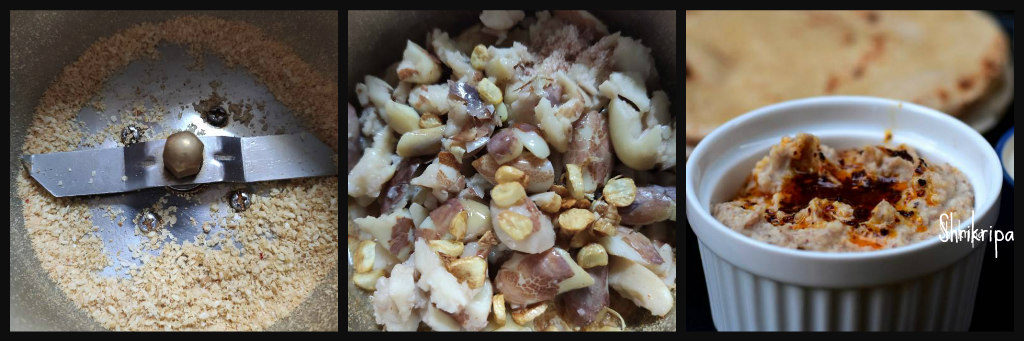
-I prefer crushing the seed at the beginning. Take a thick kitchen towel, keep the seeds and crush. ( it gives the grip. otherwise, seeds flip while crushing)

-Wash those seeds a couple of times to remove all those white traces, which oozes out from the seed.

-Put all this in a cooker, after 3 whistles, switch off the gas.

-Dry roast sesame seeds and keep it ready.

-In the meantime , slice garlic cloves , heat little oil, fry this into a golden brown and keep aside.

-When jack seed cools down , take a mixer jar or food processor, powder roasted sesame seed first. Add golden fried garlic chunks, lemon juice, salt, jack seed and sufficient cold water (it is an important to use cold water to achieve final creamy textured hummus)

-While grinding, use low speed / pulse option in your processor.

-After grinding, I have used hot olive oil ( you can blame my Indian gene 😉 who loves hot seasoning over any curries)  with red chilli flakes to give an extra zing. It is really simple.

-Take a seasoning ladle, heat olive oil, switch off the flame. Add red chilli flakes to hot oil. Now pour this over the hummus.

-Either you can enjoy as a dip with some steamed veggies like carrot, broccoli, or cucumber sticks.

-You can use as a sandwich spread or with pita bread or our Indian roti or  to prepare Rolls.


Beans Palya:

Fresh French beans are really tasty and loaded with high fibre and nutrients. One of my twin daughters doesn’t like beans in any form and it is very tedious to make her eat this veggie. Whenever I want to cook this veggie, I surely reach out to this fool proof recipe of my mom, which is really simple with very minimal ingredients, at the same time, full of flavours of green chilli and onions. This Subzi tastes good with rice or roti.

Ingredients:

French beans – ½ kg

Onion – 1 or 2 (medium)

Green chillies – 2

Salt – as needed

Jaggery -as needed

Fresh grated coconut – 2 table spoons

Seasoning:

Coconut oil – 1 table spoon

Mustard – 1 tea spoon

Urad dal – 1 tea spoon

Cumin – ½ tea spoon

Curry leaves – 2 springs.

Method:

-Wash, remove fibre from both sides by breaking both the tops of French beans.

-Hold fistful of beans in your left hand and chop uniformly.

-Chop onions and green chilli.

-Take one thick kadai or wok, do seasoning. Heat oil, splutter mustard, add urad dal, cumin.

-When urad dal becomes red, add curry leaves, onion and green chillies and fry for a while until onion becomes transparent and glossy.

-Next add chopped beans, salt, jaggery and toss for two minutes.

-Add one cup of water, close the lid and cook this in a low fire.

-When water evaporates, if beans are yet to cook, add little extra water and cook further.

-When it is done, garnish with fresh coconut and mix this mixture. Cook further for 2 minutes and enjoy this super delicious, simple palya/ Subzi either with hot rice, Rasam or with chapati/Roti.


Vegan/ Vegetarian Thai Massaman Curry:

Massaman curry, is a wholesome, flavourful ,peanut based Thai curry. It originated from the south part of Thailand, near Malaysia. It has Red fresh masala, which includes Red chilli, whole spices, lemon grass, galangal and roasted peanuts to give a creamy texture as well as the richness of coconut flavour by adding coconut milk.

Massaman curry pairs really well with small grain rice either steamed, normal or flavoured one.

Vegetables which I have used are Broccoli, beans, capsicum and carrots. Since the lock down, I am not finding all the options due to my restricted outing. Hence, it is also proved as a non-fussy curry 😉

How I made:

For homemade Massaman Curry paste: (For single use/Serves 4)

Dried red chilli – 3 to 4 (According to the required hotness)

Whole coriander – 1 tablespoon

Cumin – ¾ tsp

Cinnamon – 1” piece

Clove – 3

Whole black pepper corns – 4

Galangal – 1” piece (you can substitute with ginger as well) 

Lemon grass bulbs – 2

Garlic cloves – 3

Shallot/ tiny onion – 1

Lemon rind – From 1 small lemon

Soy sauce – 1 tablespoon

Maple syrup / jaggery syrup – 1 tablespoon

Juice of lemon – from 1 small lemon

Roasted peanuts – ½  to ¾ cup

Method:

-Take ½ cup of water, boil and add broken red chillies , close and keep aside to soak.

-Dry roast Coriander ,cumin, whole pepper corns, clove, cinnamon until it changes colour and you feel the aroma.

-Dry roast peanuts and keep aside.

-Grate lemon rind, make it half, take out the juice from the same lemon and keep it ready.

-Slice shallot,  lemon grass bulbs, galangal ( I had my home-grown harvest, sliced and frozen)

-Now, take one mixer jar, powder peanuts, add roasted masala, soaked chilli with water, lemon rind, lemon juice, maple syrup, soy sauce, shallot ,lemon grass ,galangal and make a fine paste. Now you have a fresh homemade curry paste with you 😀

Next Comes the Easy part:

For Vegetable Massaman Curry:

Ingredients:

Massaman Curry paste – Whatever you have prepared and kept.

Vegetables of your choice – 1 bowl (Broccoli, beans, carrot, capsicum)

Shallot – 1 (sliced)

Oil – 1 tablespoon

Salt

Coconut milk –1- 1 ½  cup fresh or 1 tetra pack or 1 coconut milk powder sachet.

Method:

-Take one wok, heat oil, fry sliced onion, add washed ,cleaned veggies and fry for a while.

-Add salt and when vegetables start wilting, add prepared curry paste mix everything and fry for 2 minutes.

-Add sufficient water, allow to boil , adjust salt. Lastly add coconut milk and allow to boil once and switch off.

-Serve with choice of rice you wish to have. I normally make small grain flavoured steamed rice.


Veg Momo With Chilli and Peanut Chutney:

Should I say, Momo’s are everyone’s favourite or teenager’s favourite 😉 .

 If you have teens at your house, you can relate to me 😀 . Yes, it is the easiest, cheapest and tummy filling, in their language, it is healthy too 😉 . My daughters were missing their friend group as well as their usual outing to eat Momos with 3 dipping sauces 😀  I had the recipe of Momo as well as an easy chutney recipe ,which I had noted down during our Gangtok trip from a couple of local people there.

Tried my hand at an elaborate procedure and felt happy to see a happy face as well.

You can prepare chutney in the beginning and keep it ready, before making momos.

For Momo: It gives around 15 momos

At First: Outer covering/Dough:

Ingredients:

All-purpose flour – 1 cup

Salt

Oil – 2 sp

Water – to bind.

Method:

-Take a flour, add salt, oil. Rub for a while and make a pliable dough. Cover with a wet towel and keep it for rest, while preparing stuffing.

Second: Inner stuffing:

Ingredients:

Cabbage – 1 cup (grated)

Carrot – ½ to 1 cup (grated)

Onion – 1 (chopped)

Ginger – 1 tsp (grated)

Salt

Method:

-Mix everything, keep aside for 5 minutes. Drain all the water, which oozes out by holding/ placing in your palm , folding, and squeezing properly.

-Drain the liquid and keep it ready.

Final step: Folding and steaming

-Take ready dough, take a small portion , make a ball, apply little oil to flat surface as well as to wooden roller.

-Prepare a small disc by rolling, place a little filling at the centre. You can then either close it by folding like how I did . (Lift one side make pleats and fold to the other half and seal the edges OR gather all around and close it at the centre top like a cone.)

-Prepared Momos  should be under wet towels to avoid any dehydration.

-After making some , you can start to steam, by placing it in an idli /Momo steamer. Line the steamer either by spreading banana leaf, parchment paper/ butter paper or by oiling.

-Steam for 10 minutes and serve with any kind of chutney or sauce.

Now we would see how to make,

Hot chilli Chutney and Peanut Chutney to go with steamed momos:

It is sort of a one by two preparation. At first, we are going to make chilli chutney, divide into half and add roasted peanut to one half, grind and make really tasty additional dish.

For Chilli Chutney:

Tomatoes – 4

Red Byadagi chilli – 4 to 5

Garlic cloves – 5 to 6

Roasted sesame seeds – 2 tablespoons

Salt

Method:

-Take a half cup of water, boil and add red chilli, halved tomato, and boil for 2 more minutes.

-Remove outer skin from the tomato , cool.

-Take a mixer jar, powdered sesame, add peeled tomato, cooled red chilli with water, salt and grind smooth.

-It is our Hot Chilli chutney.

For Peanut Chutney:

Roast fistful of peanuts, cool and powder it. Add half the quantity of chilli chutney , little salt, and grind into paste. Voila!!! Your two sides are ready to indulge .

If you like Mayonnaise ,fill the third cup and indulge 😊

Note:

Don’t discard  the vegetable water, which can be used while kneading the dough for any kind of roti’s. 

If you want to serve these momo’s to any kind of parties, prepare before hand, keep inside the fridge /freeze, steam on that day, before serving.

Chibud Harshale/ Mash melon Rasayana:

Chibud is a variety of Melon which is oblong and larger in size, normally found in various parts of India. Known by many names like chibbada, Chiber, Mash melon, Cucumis melo.

It belongs to the melon family; outer skin is like coloured cucumber and taste is bland and fleshy. Normally used in a raw uncooked form by making juice, lassi, salad or coconut milk or plain milk laden Rasayana as well as Poha added Rasayana. which is a snack by itself and considered as a Vrat/ fasting Food.

Just few days back, when I was returning from Karkal, found this fruit after a long time and picked up and relished with family by making Poha added Chilled Rasayana in this summer Heat.

If you want to try this recipe, you can use over ripe musk melons or Banana and proceed.

Ingredients:

Chibud melon – 1

Grated jaggery – as required

Coconut milk / plain milk – 1 to 2 cups

Cardamom powder – 1 tsp

Poha – little

Method:

-Chop Chibud melon into small chunks by removing outer skin as well as centre core.

-Mix in jaggery powder, cardamom powder and mix nicely.

-After mixing jaggery, it melts a little. If you are serving it chilled, refrigerate it.

-While serving, mix in coconut milk or plain milk according to your choice.

-Add little poha and serve as a cool snack.

Mango ginger Thokku:

Instant Raw Banana Dosa:

Raw banana has been used as a baby food from ages. It contains various essential vitamins, minerals and dietary fibre as well as small amount of protein. It is very good for digestive health and people with diabetes. In our native, raw banana is an integral part of our cooking. It starts from baby food/ banana flour porridge, side dishes, curry as well as instant dosa like this. You might be wondering, how come? Raw banana usage? Indeed, there is a reason behind extensive usage. Our elders are all from agricultural background. They all were into Areca nut farming. In between Areca nut plants, there will be Banana, pepper, Cocoa and many more side crops.

Usually we use small variety banana for this dosa and not a big banana variety. This recipe which I learnt it from one of my Atthey and trust me, it is very tasty. It is quick, instant, vegan, gluten free and what not?

Let us see, how I make it –

Ingredients:

Raw small variety bananas – 9 – 10

Salt

Soaked rice or rice flour – 1 tablespoon.

Method:

-Wash, peel outer fibre or main skin of the banana and chop into bite size.

-Immerse in water and keep aside.

-If you are using soaked rice, make a paste at first, add drained banana pieces, salt and grind into smooth paste by adding sufficient water.

-Batter should not be very thin and watery. It should be like idli batter consistency.

-heat iron griddle. When it is hot, spread thin dosas, cook both the sides by pouring little ghee or oil.

-Serve with chutney or sambar.

Fresh Turmeric Gojju:

Turmeric is a  popular spice of Indian Cuisine and we normally use it in powder form almost in all the recipes. In this time of the year, we do use fresh root in our kitchen. The fragrance of the fresh raw turmeric is very different than the powder. If you haven’t tried fresh turmeric root yet, this recipe is a delicious and refreshing way to get a taste of its earthy, sweet flavour of fresh produce.

Our ancestors had a really nice way to taking care of their health . According to the season, and depending on the local produce, they used to make and consume all the goodness of the nature in a natural way.  This recipe is one of them and it is  one of the age-old recipes which I learnt from my atte .

How it is made-

Ingredients:

Fresh Turmeric rhizome – 2 pieces

Coconut – ½ cup

Coriander – 1 table sp

Urad dal – 1 tsp

White sesame seed – ½ tsp

Red chilli – 3

Tamarind – 1 tsp

Salt

Jaggery – 2 table sp

Coconut oil – 2 tablespoons

Method:

-Clean the turmeric rhizome, grate and keep it ready.

-To prepare masala: Fry coriander, urad dal, red chilli and sesame seed in little oil. Grind this with coconut, into smooth paste.

-Now take one tawa, pour oil, fry grated turmeric, add tamarind water, salt, jaggery and cook .

-When turmeric changes its colour, add ground masala. Check for the salt and jaggery.

-Boil this nicely, serve with Hot rice and ghee. It is indeed  pure bliss and oodles of goodness for your body.


Nugge soppina Khara dosey/Moringa leaves mini dosa :

Mini dosas are traditionally known as “Sanna Polo” which is the tastiest side dish of Konkani community of our region. Basically, it is a red chilli and hing flavoured rice batter, with added goodness of any greens or chopped cabbage and chopped onion.

Here I have used chopped Moringa/ nugge soppu/ drumstick leaves which is a powerhouse of nutrients. Back in 2016  I had tried a bunch of moringa recipes to publish in Vijaya next kannada daily. Already I have shared Moringa powder and  Chutney recipe with you all and now we will see how to do a mini dosa.

Ingredients:

Dosa rice – 1 ½ cup

Byadagi chilli – 6 to 8 ( roasted)

Tamarind – 1 tbsp

Coconut – 1 cup

Jaggery – 1tsp

Salt – to taste

Turmeric – ½ tsp

Hing – peanut size

Moringa leaves – 1 bowl

Onion – 1 (big)

Method:

-Soak dosa rice for 2 to 3 hours after washing.

-Make a paste of chilli ,coconut, tamarind, salt, jaggery, turmeric, hing. Now add soaked rice and grind into small rava consistency.

-Add chopped onion and moringa leaves. Adjust the consistency by adding extra water.

-Batter consistency should be like idli batter. Start making dosas by heating iron dosa griddle.

-Pour little batter, don’t spread. Keep gas flame in simmer, spread coconut oil ,close the lid and cook.

-When one side is cooked, flip and roast another side. Serve as a side dish with Rasam rice, dhal rice.

Note:

-To get an authentic taste, use a coconut oil.

Apple Jam:

Apple jam is an awesome spread ,which is mild in flavour as well as with soothing colour. Homemade jams are always rich in taste, due to the usage of fruits and natural colour. It is preservative free and non-synthetic . Here I have used fruit as a whole /with skin.

Normally Apple turns out sour when you cook /boil . To avoid the sour taste, first I used baking technique , pureed , sieved and proceeded to make jam with the added mild cinnamon flavour.

It was a real hit and tasted really good and texture also turned out great. Usage of fruit skin gave the pinkish hue to the end product.

How I did –

Ingredients:

Apple – 1 kg

 Sugar – ¾ kg

Cinnamon – 1 or 2 pinches

Lemon –  ½

-Wash Apples, dice ,remove seed part and arrange in a baking dish.

-Bake this in a 170°C pre-heated oven for 15 minutes at first.

-Remove, flip those apple pieces and continue further 15 minutes.

-After 30 minutes, check the doneness. If it is soft, well cooked ,remove it.

-If it is not done, bake for further 5 or 10 minutes.

-When it is cool, add a little water and churn in a juicer by adding 1 or 2 cups of water.

-Sieve ,discard the roughage ( fibre as well as outer skin remains)

-Put this pulp in a thick bottomed kadai, add sugar, cinnamon powder and cook until it is done.

-To check the doneness, take some water in a small bowl, drop the cooked mixture in it, immediately it should form a thick mass. If it dissolves, then you should proceed cooking.

-When it is done, add lemon juice and cook for 2 minutes

-Remove from the fire and cool completely and pour it into a glass bottles to set.

– Store this in a clean, dry bottle and refrigerate.

NOTE:

-If you prefer sweeter jam add 1 kg sugar and adjust the quantity of sugar according to your need.