Ginger Molasses Cookies:

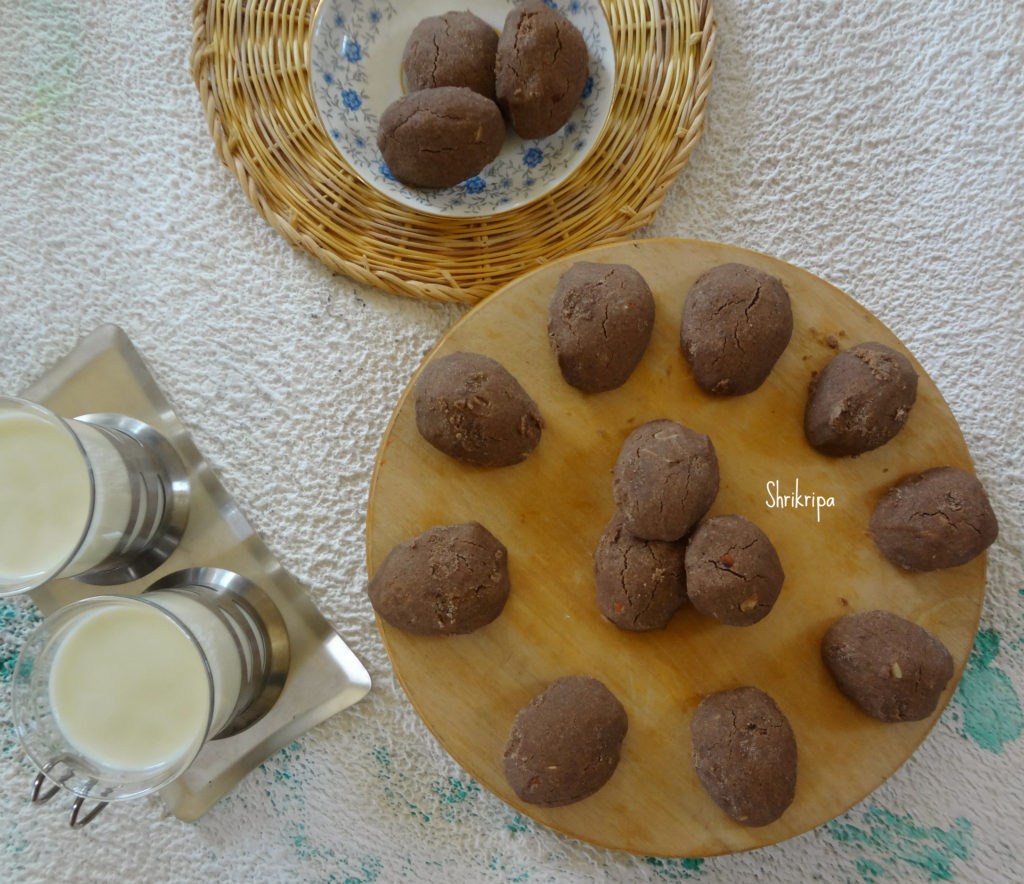
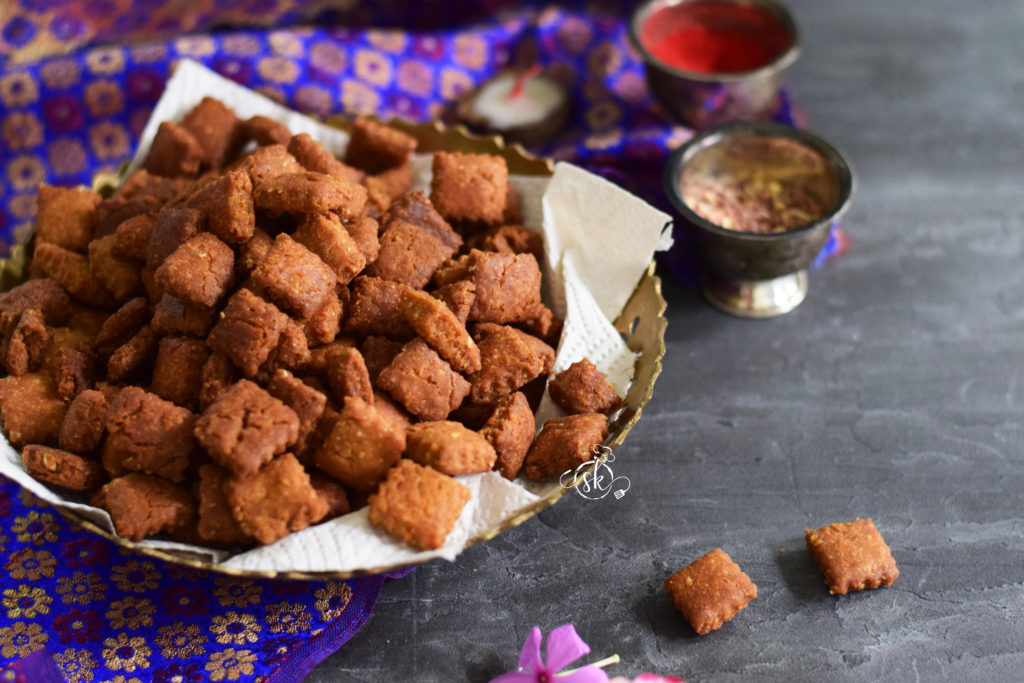
Molasses cookies are chewy compared to any normal cookies. If it is made with wholesome flour with added ginger flavour, there’s nothing like it. It finally transforms into an absolute delicious wholesome snack for small kids or elders. Here is my Healthy, no all-purpose flour Ginger Molasses Cookies.

It is easy to make, with no rolling or freezing. Make the dough, scoop it out, roll this in crystal sugar and bake. That is, it. Stays good for a week or more.

If you want to make a huge batch, follow as it is. Otherwise, please make it half and proceed. Here I have taken multi millet flour (morning porridge powder) and whole wheat powder. You can play with the flour or straight away use All purpose flour or whole wheat flour according to your choice.

Ingredients:

Flour quantity – 4 ½ cup (porridge powder + whole wheat)

Butter – 300 grams (softened)

Brown sugar – 2 cups

Molasses / Jaggery syrup – ½ cup

Eggs – 2

Cooking soda – 4 tsps.

Ginger powder – 1 table spoon

Cinnamon powder – 1 tsp

Chocolate chunks/ chips – as needed (optional)

Salt – 1 tsp

Sugar – to coat

Method:

-Whisk all the dry ingredients (flour, cooking soda, ginger powder, Cinnamon powder, salt, chocolate chips.

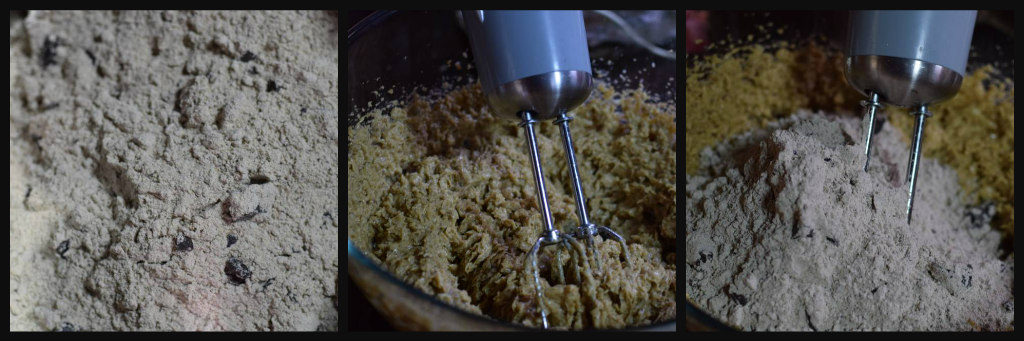
-Take a big bowl or a processor, cream butter and sugar. Add eggs one by one and beat.

– Add molasses and beat one more time. Pour mixture of dry ingredients and prepare a dough.

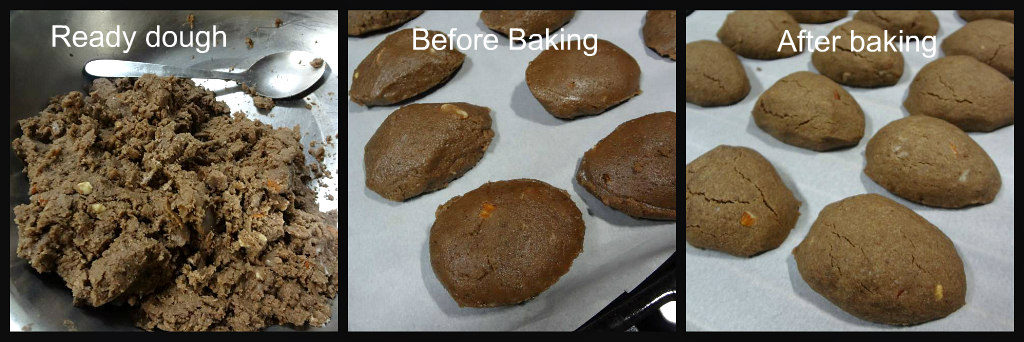
-Place this dough (little sticky dough) in a fridge by closing a cling wrap, for one or two hours.

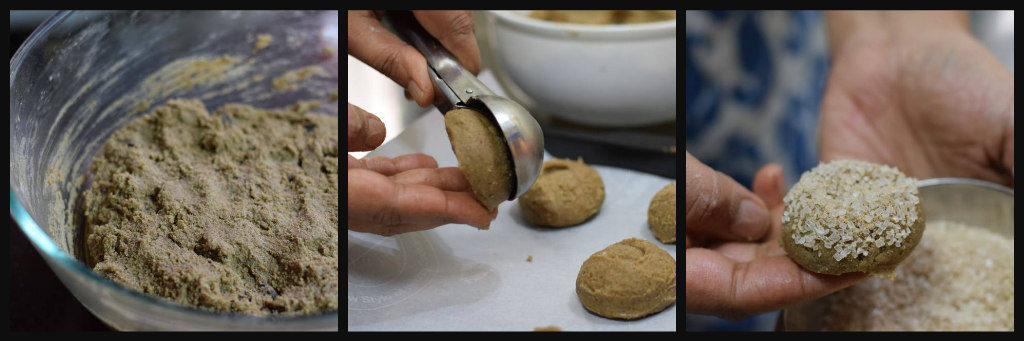
-Pre heat oven at 170 °C.

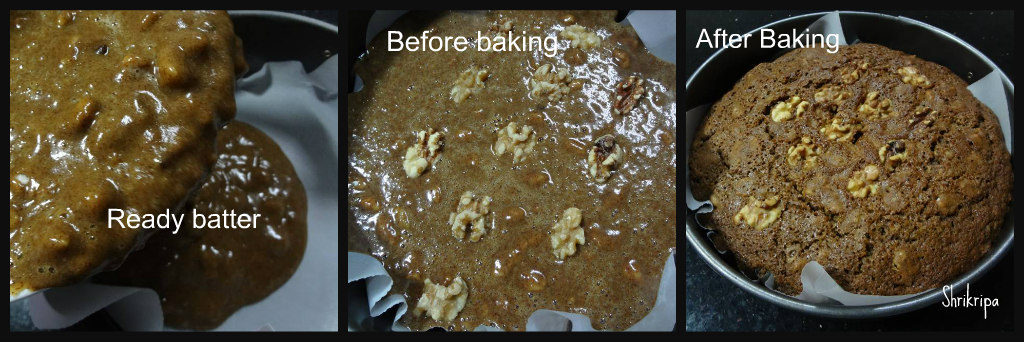
-Take out the dough, scoop out, roll the top part in crystal sugar and place it on the butter paper lined cookie tray.

-Bake for 12 to 15 minutes. Remove, cool and store it in an air tight bottle.

Note:

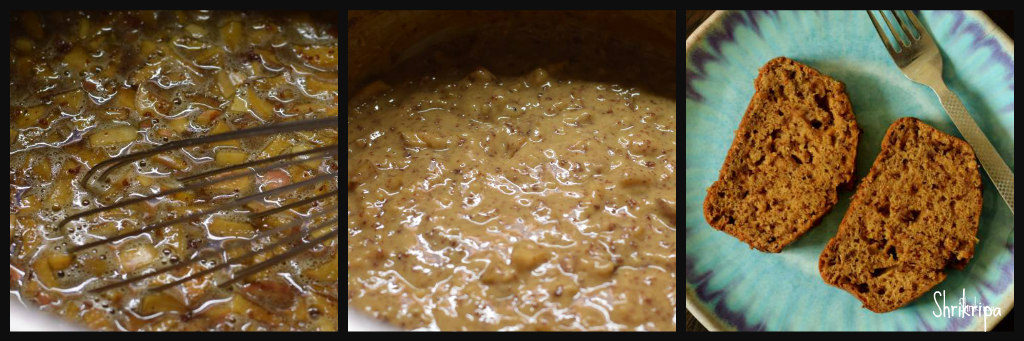
-If you don’t have Molasses, please melt half cup of jaggery powder in little water and boil until it is  thick and use it.

You can mix sugar crystals with half tsp of ginger and cinnamon powder to get more flavour.

I have made plain cookies as well as with chocolate chunk and both tastes equally good and stays good for many days.

Ghee Residue Apple-Cinnamon Tea cake:

Ghee residue is a moist, brown coloured, by-product formed after preparing ghee from white butter. It is a rich source of essential fatty acids, anti-oxidants and proteins.

As of now, you will know my love towards this sediment and I usually make it a point to prepare any tea cakes after making fresh homemade ghee. Usually I play with the ingredient and flavours in these cakes. Already I have Egg less Tea cake and Chocolate cake in my blog.

This time, I included cinnamon flavour in my cake by using chopped fresh apple. I have used tasteless mini apples which I took in the market for its attractive size and colour, turned out to be a tasteless apple, after cutting 😉 

Now we will see how to make this,

Ingredients:

Apples – 1 cup (chopped)

Ghee residue  – 2 to 3 table spoons

Sugar – ½ cup

Organic jaggery powder – ½ cup

All purpose flour – 1 cup

Whole wheat flour – 1 cup

Cinnamon – 1/2 tea spoon

Eggs –  2 (beaten)

Water – 1 cup

Cooking soda – 1 tsp or little less.

Method:

– Wash all the apples and chop it into tiny pieces. No need to remove the peel.

-Grease the baking tray (you can use bread tin as well). Line this with butter paper, keep it ready.

–In another bowl, dry mix All purpose flour, whole wheat flour, cinnamon powder and keep aside.

-Take vessel in which you prepare ghee. There will be 2-3 table spoon ghee residues.

-To this add water, chopped apples, sugar, jaggery and heat it until sugar dissolves. Switch off and cool.

-Add cooking soda and keep aside at least for 20 min.

– After it cools, add beaten eggs and mix nicely.                        

-Now fold in flour mixture, mix gently and pour this batter to a greased and lined baking vessel.                                           

-Bake this in a pre- heated oven for 35 -40 min or until done at 180 C.

-If you want to check its doneness, use tooth pick or knife. Insert this, if it comes out clean, remove the tin, keep it outside.

-After some time, remove butter paper and cool further.                  

-When it reaches room temperature, you can slice it or cut according to your wish and enjoy with cup of coffee or tea.

Note:

-You can use only All-purpose flour or mixture of any flour.

-You can use only sugar, Jaggery or mixture of both.

-If you like it sweeter, please increase the quantity of sweet by adding ¼ cup more of sugar or jaggery.


Walnut – Chocolate chip Coffee Cake:

Coffee flavoured cake happened by chance. I had some unused Nescafe instant coffee and wanted to finish it ASAP. So, I thought of baking a cake. It is made up of healthy flour and a very good option as a snack.

While getting ready to assemble everything, I thought of adding chocolate chip and walnut as an attraction to kids and it worked out very well with finger millet or Ragi flour as well. Now we will see how I proceeded with the ingredients.

DSC06113_Fotor

Ingredients:

Whole wheat Flour – 1 cup

Ragi/ Finger millet flour – 1 cup

Baking soda – ½ tea spoon

Baking powder – ½ tea spoon

Salt – ¼ tea spoon

Walnuts – ½ cup

Choco chip – ½ cup

Butter – 100 grams

Eggs – 2

Sugar – 1 ½ cup

Hot milk – 1 cup

Instant Coffee powder – 1 to 1 ½ table spoon

Hot water – ¼ cup (you can take little less than ¼ cup)

Method:

-Pre heat oven at 180°C, line a baking tray with the butter paper.

-Take one bowl and mix all the dry ingredients like, flour, baking soda, baking powder, salt, walnuts and Choco -chips.

-In another bowl, beat melted butter, eggs, sugar, milk by adding one by one respectively.

Ribbet collage 1

-Make dark coffee by mixing powder and water. Mix in the liquid and beat.

-Now wet mix is also ready.

-Pour this wet mixture to dry ingredients and fold the batter by using any spatula.

-Pour the batter in lined baking tray and keep this for baking until done.

Ribbet collage 2

-It takes anywhere between 40 to 50 minutes.

-Before removing, check with a knife by inserting, in the baked cake.

-Knife should come out clean.

-Remove the cake, cool before cutting, and serve.

DSC06109_Fotor

Note: For the Eggless Version, use 1/2 cup of flax gel and you can refer my earlier post for the preparation.

Choco Almond Biscuits:

These are melt- in- the -mouth and loved by all, kind of cookies or biscuits. Added to all that, it is rich with all the healthy stuff. I got an opportunity to taste this goodie at “RAGA” Mangalore and it was prepared by Nalini akka who is a super talented and down to earth person. Our acquaintance started in 2012 through a Facebook group named “FOODIE” and I got to know her through her hubby Sadashiva Rao Mailankodi, who started our group and has shared this recipe on the group long ago. It was in my “to try” list and after tasting these cookies at their residence, I couldn’t wait much and prepared it immediately. I am posting it over here by thanking Nalini akka for this wonderful recipe.

pic 1

Ingredient:

Whole wheat flour – 3 cups

Almond – ½ cup

Cocoa powder – ¼ cup

Powdered sugar – 3 cups

Ghee – 1 ½ cup

Butter – 3 table spoons

Cooking soda – ½ tea spoon

Salt – a pinch

Method:

-Roughly Crush almonds.

-Mix all the dry ingredients like flour, cocoa powder, cooking soda and salt.

Ribbet collage 1

-Sieve couple of times or use dry wire whisk to combine uniformly.

-Now beat ghee, butter and sugar by hand or food processor.

-When it becomes like a cream, add flour and make a dough.

-Add in crushed almonds, mix well. Dough will be little crumbly and will not be like a smooth dough.

-Now shape these dough into whichever shape you like.

-Keep in a lined cookie tray and bake in a pre-heated oven at 170°C for 10 to 12 minutes.

– I have exactly followed her method to give shape by using bigger steel spoon. It was a cute oblong shape.

-After baking, cool and store it in an air tight container.


Shankarpali/Diamond biscuits:

Shankarpali is a traditional Maharashtrian, deep-fried snack. It was introduced to us by our neighbour aunty. It is a very light, flaky, melt-in-the-mouth, a small, irresistible cookie that is deep-fried and not baked. It has a good shelf life, and one can enjoy it even after Diwali.

Traditionally, Shankarpali is made by using All-purpose flour. Here, I have used Whole wheat flour and oat flour and did not feel any change other than the colour of the final product.

If you want to use All-purpose flour, follow this recipe, replace the flour, and proceed.

Ingredients:

Milk – 1 cup

Ghee – ½  cup

Sugar – ¾ cup ( I have used Brown sugar)

Salt – 1 tsp

Cooking Soda – ¼ tsp

Flour – 3 ½ to 4 cups (as required) ( All-purpose flour OR Whole Wheat and Oat Flour)

Oil – to deep fry.

Method:

-Take one bowl or food processor, beat milk, ghee and sugar until frothy.

-In another bowl, take 2 cups of whole wheat flour and ½ cup of oats flour, salt, cooking soda and dry mix everything.

-Add the mixed flour to the liquid ( beaten milk and sugar), add some more whole wheat flour and make a soft, pliable dough by adding whole wheat flour little by little.         

– Cover this bowl and keep it aside for 15 minutes. Meanwhile, Keep the oil on a low flame to deep frying.

-Take a small portion of the dough, roll it into a thick ¼ inch circle, like a Roti. Remove the outer curved portion and make a square. ( it is optional to get only square pieces)

-Take a pizza cutter or any other zigzag cutter and cut this flattened disc. Now deep fry it on a low flame.

-When it becomes light brown, take it out and spread it on a tissue paper laid plate.

-When it is cool, store this in an airtight container.

NOTE: Keep the gas flame to a simmer and maintain the temperature of the oil. If oil is overheated, the shankarpali would turn into deep brown/ half-done and charred.