Chapati Roll /Kati roll (with White Chana):

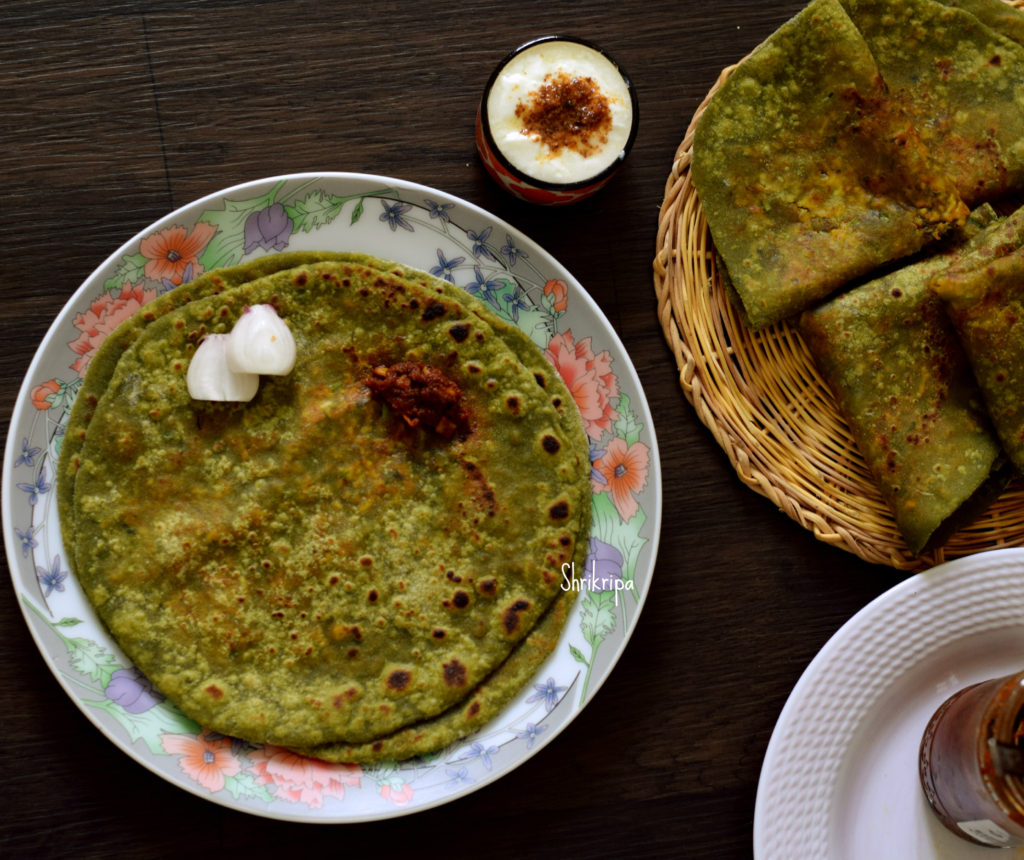
Rolls are very easy to have, when you are on the move. Kati roll is a generic name for any kind of rolls. This is a famous Indian street food, which is originated from Calcutta.  in its original form, Skewer roasted kebab was placed and wrapped with a roti. Over the years, many variants have evolved and any filling either veg or non-veg all of which now comes under this category and called as Kati roll with the name of the filling attached with it. Hence, we can call this roll as Chana Kati roll 😉

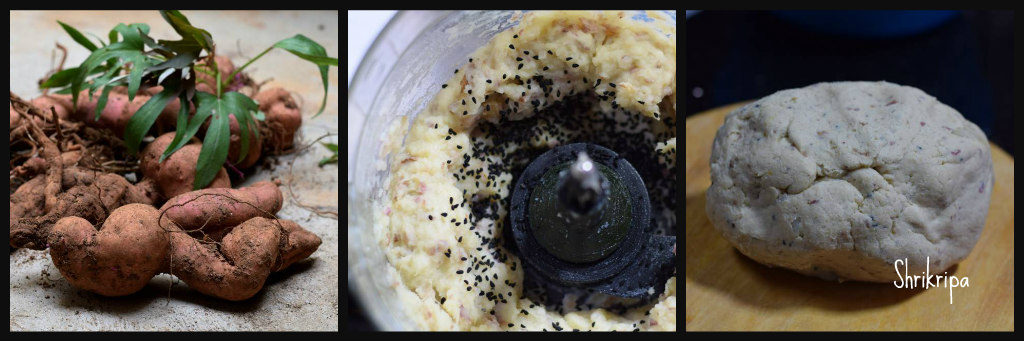
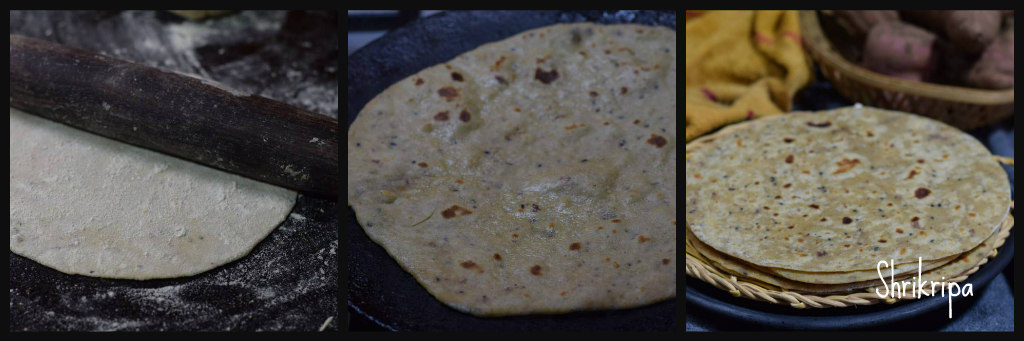
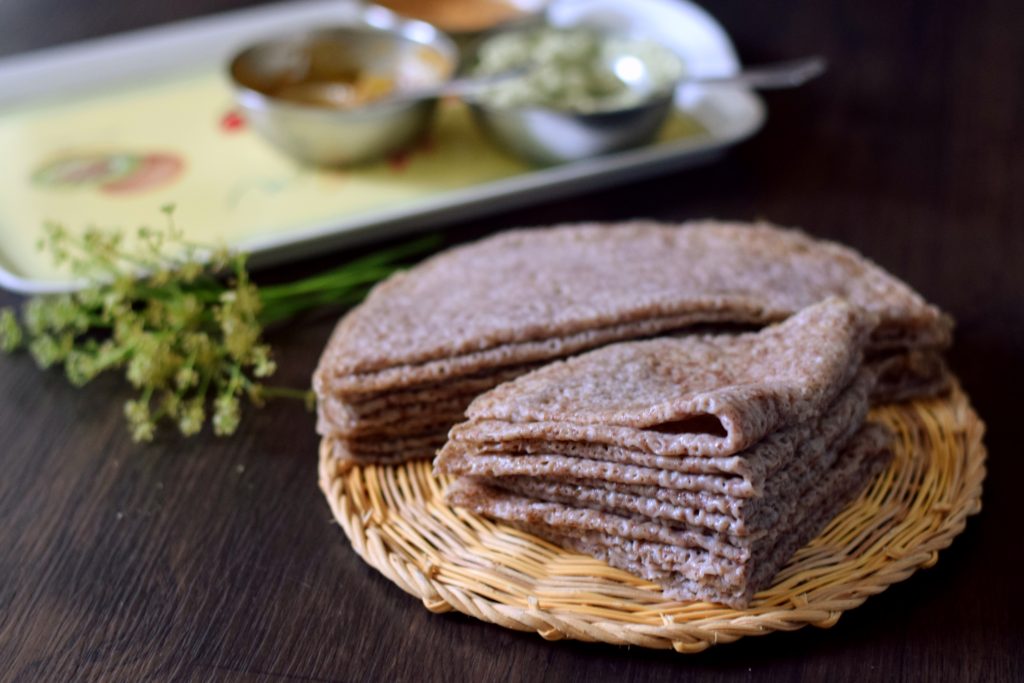
It is another easy, healthy, nutritious and tasty recipe. This recipe is well balanced with the required amount of carbohydrate, protein, fiber and fat. Easy to prepare and eat for busy people and for school going kids. Here I have used Sweet Potato roti to enhance the nutrition. You can use plain roti as well.

Ingredients:

Ready Roti’s – 6 to 8 (sweet potato roti or plain roti)

For the filling:

White chick peas/Kabuli chana – 1 cup

Onion – 1 (chopped)

Tomato – 1 Chopped

Ginger garlic paste – 1 tsp.

Cumin seeds -1 tsp

Red chilli powder – 1 tsp.

Cumin powder – ½ tsp.

Garam masala – ½ tsp.

Coconut milk powder – 3 tsp. (I use Maggi coconut milk powder)

Turmeric powder – ¼ tsp.

salt to taste

 Oil – 1Tblsp.

For the topping:

 Onion chopped – ½

Coriander leaves- chopped

Salt pinch

Lemon – half

Method:

-Soak Chana at night or 7 to 8 hours. Cook with salt and required amount of water. Drain and keep aside.

Now to prepare the stuffing:

Take one Tawa and put 2 tsp. of oil, cumin and chopped onion. Sauté till it is done. Sprinkle little turmeric, add ginger garlic paste, fry till raw smell disappears.

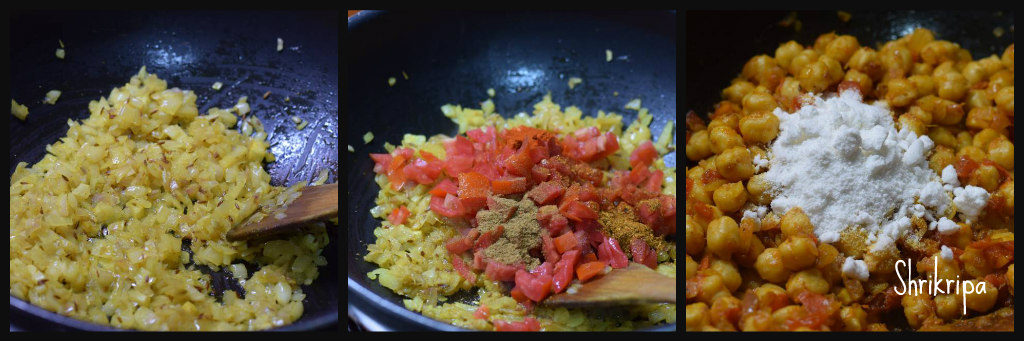
-Now add tomato, and all the powders (red chilli, garam masala, cumin, salt), add cooked chana, coconut milk powder and sprinkle water (2 to 3 tbsps.)

-Mash a little and when it starts boiling and masala coats well, remove from the flame.

How to assemble:

-Mix all the ingredients from the Topping together (onion, chopped coriander leaves, salt, lemon juice) and keep the mixture aside.

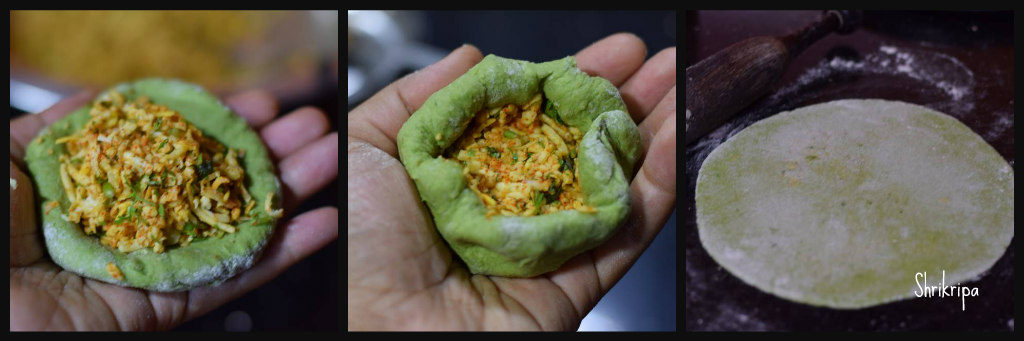
-I normally make little bigger, elongated Roti’s (not round) for rolls.

-When Roti, Filling mixture, everything becomes cool, take one aluminium foil and keep one Roti over it.

-Spread the prepared Chana at one end, sprinkle onion topping.

-Now comes the folding part. You can roll in two methods.

-One is straight away, roll and both the ends can be sealed by folding aluminium foil.


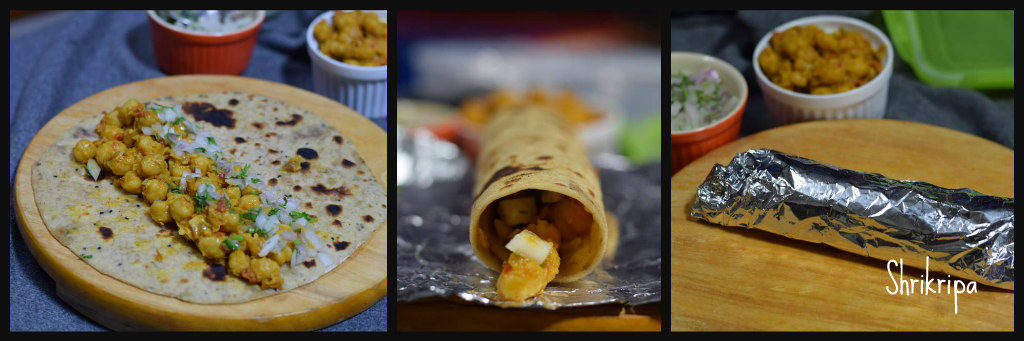
-Second method is, Fold at each end of the roti, then roll like a mat.

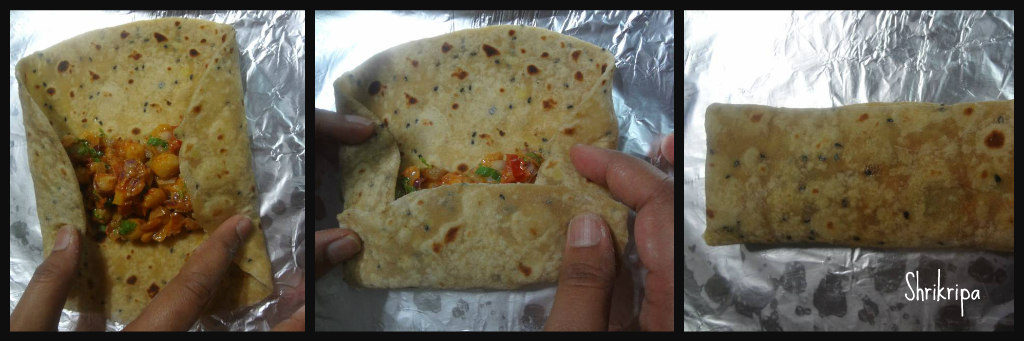
-In this way, roll is automatically sealed by itself and here you can avoid usage of an Aluminium foil and can carry directly in a Lunch box.


Sweet Potato Roti / Chapati:

Today I am going to share one among my family’s favourite dishes, Sweet potato Parata/ roti. Sweet potato is a large starch, tuberous root vegetable. This tuber is not only readily available and very versatile but also contains vitamin B6, Vitamin C, Vitamin D, minerals like magnesium, iron and potassium along with beta carotene. When It is home grown, the joy doubles. It is an awesome tiffin box option for school going kids as well. I normally use these roti’s for preparing rolls, which stays fresh, soft for longer duration and enhances the taste of the roll with its natural sweetness. 

Ingredient:

Sweet potato – 2

Whole wheat powder – as needed

Kalonji / Onion Seed – 1 Tsp.

Milk – ½ cup

Oil – 2tsp

Salt – to taste

Method:

  • Boil sweet potato, remove skin and mash the flesh in a bowl or a food processor.

  • To this add onion seed, salt, milk, oil, along with whole wheat powder by adding little by little water prepare dough.
  • Take enough dough and prepare roti, just like our regular roti.

      Note: You can add flaxseed powder while making dough to enhance the nutritional value of this Roti.

Vegetable Pulav (Bangalore Style):

Vegetable Pulav is very versatile and made in many ways. Each house or family has their own favourite recipes. But this one is found in any small darshini or small eateries in Bangalore. It is a native Bangalore style Pulav which is green in colour due to the usage of Pudina and coriander leaves. It is fried with onion and other masalas and ground to paste. Selection of the vegetable is also unique. With other vegetables, Knol khol, double beans as an added attraction, when compared to normal Pulav. Added to all this, we find deep fried bread croutons.  

Ingredients:

Basmati rice – 3 cups (small steel tumbler)

Beans – 10

Carrot – 1

Knol khol – 2

Green peas – ¾ cup

Double beans – ¾ cup

Lemon – 1

Bread slices – 3

For Masala: (please refer the picture)

Oil – 2 table spoons

Cinnamon – 4 to 5 small pieces

Clove – 4

Cardamom – 2

Black pepper – 10 to 15

Cumin – 1 table spoon

Onion – 2 (medium)

Green chillies – 5 to 8

Ginger – 2-inch piece

Garlic – 12 to 14

Mint / Pudina leaves – 1 fist full

Coriander leaves – 1 fist full

Fresh Coconut – 1 small cup

Seasoning:

Oil – 8 to 10 table spoons

Cumin – 1 tea spoon

Bay leaves – 3 half pieces

Marathi moggu – 2

Star anise – 2

Method:

-Wash rice a couple of times, soak and keep aside.

-Wash pudina, coriander leaves, Chop veggies, onions etc. If you are adding double beans and green Peas keep it ready.

-Now prepare ground masala: Take everything under masala and keep it ready by washing or chopping.

-Take one wok, heat oil, drop all the dry spices from cinnamon to cumin.

-Fry onions, garlic, ginger, green chillies when onion becomes transparent add pudina and coriander.

-Fry until it wilts. Add coconut and fry for 2 minutes and switch off the gas.

-Cool, grind into paste by adding very minimum water. Keep aside.

-Now we would move towards the main preparation. It is the time to drain the soaking rice.

-Take one pressure cooker, pour oil for the seasoning, drop all the dry spices from cumin to star anise, fry for 2 minutes.

-Now put all the veggies, green peas, double beans and fry nicely until raw smell vanishes and all the pieces coats with the oil.

-Next comes the turn of adding ground green masala and salt. Fry nicely and lastly add drained rice and fry for couple of minutes.

-Add water (I normally add 1: 2 for Basmati rice or Sona masuri rice) If you are using small grain (Jeera rice) Use 1: 1 ½ ratio for water. Here 1 is rice and 2 or 1 ½ is water.

-Use rice measured cup for water measurement.

-Check for salt and squeeze lemon and close the lid. Cook for 1 whistle and keep it in a simmer for 2 to 3 minutes.

-During this time, we can prepare bread croutons. Usually bread pieces will be deep fried, drained and added.

But, I normally avoid deep frying and make it like this.

-Take one tawa, drop couple of spoons of ghee or oil, when it is hot, drop the bread pieces and fry for 2 to 4 minutes, until all the bread pieces coats partially and half roasted.

-Now switch off the gas, spread those bread pieces in a baking dish, bake for 20 minutes or until it is crisp in a pre-heated oven or convection microwave at 170-degree C.

-When Pressure relieves, open the cooker lid and mix in bread croutons and mix well. Close the lid and leave for some time to soak all these bread pieces to absorb the aroma.

-Then serve with Onion raita at the side.


Healthy “Brown” Neer Dosa:

Usually Neer dosa is made from using only white Dosa rice and it contains only carbohydrate and recipe is already shared and it is here

Couple of years back, when I was thinking of including millets in our regular neerdosa to make a healthier version, dosa used to turn out hard and crispy and I was not at all satisfied with the result. After couple of trial and errors, addition and deletion of ingredients, I got this soft and smooth textured neer dosa like the regular white one and henceforth it is one of our regular breakfast items and we named this as “Brown Neer Dosa”.

How I included these many items? As I mentioned above, I wanted to make soft neerdosa without any compromise on taste. Usually when we add millet in Dosa batter, Dosa becomes little hard and brittle. So, I thought of adding Whole Ragi to give softness with Fox tail millet.

Here I have added Ragi, Organic red unpolished rice with normal white rice to enhance the value, and fox tail millet. Instead of fox tail millet, one can use any other millet as well.

It is an excellent breakfast option for Toddler’s, weight watchers, diabetic diet or low carb diet as well as tiffin box options. It is very soft, easy to chew, digestible and at the same time filled with nutrients and fibre apart from carbohydrates. It doesn’t need any fermentation or planning. Soak in the night, grind and make it in the morning in a jiffy.

Recipe goes like this-

Ingredients:

White Dosa rice – 1 cup

Whole Ragi / finger millet – ½ cup

Red organic unpolished rice – ½ cup

Fox tail millet -1 cup

Salt

Method:

-Measure everything and put it in one bowl, wash twice and soak this in water for 2 to 3 hours or during the previous night like me.

-Next morning, grind this soaked rice into fine paste with water (I use soaked water while grinding, it gives nice aroma for the Dosa) and salt as per requirement.

-Make batter into pourable consistency like this (refer a picture) and check for the salt.

-Now keep Iron griddle for heat.

-When it is ready, apply oil like this.

-Pour one serving spoon of batter like how we make Rawa Dosa, you can see it in the picture below.

-Now close the lid by keeping the gas on full flame.

-After two minutes, remove the lid and keep the gas in simmer the edges of the Dosa rise a little, like this.

-Now flip this Dosa on the plate, leave for 2 minutes, then fold like this.

– Now keep repeating this with the remaining batter and stack one over the other or take one big plate and stalk one opposite another alternately.

-Serve these Dosa with coconut and grated jaggery mixture or coconut chutney.


Ghee Residue Apple-Cinnamon Tea cake:

Ghee residue is a moist, brown coloured, by-product formed after preparing ghee from white butter. It is a rich source of essential fatty acids, anti-oxidants and proteins.

As of now, you will know my love towards this sediment and I usually make it a point to prepare any tea cakes after making fresh homemade ghee. Usually I play with the ingredient and flavours in these cakes. Already I have Egg less Tea cake and Chocolate cake in my blog.

This time, I included cinnamon flavour in my cake by using chopped fresh apple. I have used tasteless mini apples which I took in the market for its attractive size and colour, turned out to be a tasteless apple, after cutting 😉 

Now we will see how to make this,

Ingredients:

Apples – 1 cup (chopped)

Ghee residue  – 2 to 3 table spoons

Sugar – ½ cup

Organic jaggery powder – ½ cup

All purpose flour – 1 cup

Whole wheat flour – 1 cup

Cinnamon – 1/2 tea spoon

Eggs –  2 (beaten)

Water – 1 cup

Cooking soda – 1 tsp or little less.

Method:

– Wash all the apples and chop it into tiny pieces. No need to remove the peel.

-Grease the baking tray (you can use bread tin as well). Line this with butter paper, keep it ready.

–In another bowl, dry mix All purpose flour, whole wheat flour, cinnamon powder and keep aside.

-Take vessel in which you prepare ghee. There will be 2-3 table spoon ghee residues.

-To this add water, chopped apples, sugar, jaggery and heat it until sugar dissolves. Switch off and cool.

-Add cooking soda and keep aside at least for 20 min.

– After it cools, add beaten eggs and mix nicely.                        

-Now fold in flour mixture, mix gently and pour this batter to a greased and lined baking vessel.                                           

-Bake this in a pre- heated oven for 35 -40 min or until done at 180 C.

-If you want to check its doneness, use tooth pick or knife. Insert this, if it comes out clean, remove the tin, keep it outside.

-After some time, remove butter paper and cool further.                  

-When it reaches room temperature, you can slice it or cut according to your wish and enjoy with cup of coffee or tea.

Note:

-You can use only All-purpose flour or mixture of any flour.

-You can use only sugar, Jaggery or mixture of both.

-If you like it sweeter, please increase the quantity of sweet by adding ¼ cup more of sugar or jaggery.


Palak paneer Parata:

Palak aka spinach and paneer is a classic combination from North Indian cuisine. It is usually in the form of Palak gravy with paneer chunks. If we convert this into Palak in a roti form and grated paneer as a filling it is a mind-blowing combination in a very healthy form. Here I have used Palak in the raw form as well as paneer.

It is a healthy option for breakfast, brunch, dinner or even in an office or school lunch box.

Palak or spinach is a healthy green which is a power house of nutrition. It contains Iron, anti-oxidants, vitamins and calcium.

On the other hand, paneer is also a very good source of calcium and if it is made from low fat cow’s milk, it is less in fat as well.

It is one more favourite from our lunch box item –

Ingredients:

For the dough:

Palak/ spinach – 1 bunch (only leaves)

Salt

Sugar – 1 tea spoon

Garlic – 2 cloves

Curd – 2 table spoons

Water – as required

Oi – 1 table spoon

Whole wheat flour – as needed

For the Filling:

Paneer – 200 grams (grated)

Coriander powder – ¾ tea spoon

Cumin powder – ¾ tea spoon

Red chilli powder – 1 ½ tea spoon

Garam masala – ¾ tea spoon

Salt

Turmeric – ½ tea spoon

Coriander leaves – ¼ cup (chopped)

Method:

-Make chapati dough at first and keep aside.

-For the dough, make a paste of chopped Palak, salt, sugar, garlic, curd and little water in a mixer grinder.

– Take out the liquid and pour oil and whole wheat flour. Knead it into a soft pliable dough, cover and keep.

-For filling, take one bowl, mix in grated paneer, coriander powder, cumin powder, red chilli powder, garam masala, salt, turmeric and mix it.

-Add chopped coriander leaves and mix once again. Now, Stuffing is ready.

-Now comes the rolling part.

-Now take lemon sized chapati dough in hand, spread as a small disc by using fingers, by applying little flour.

-Keep this in your left palm, in a cup shape, put filling (smaller in size) and cover it.

-Now take extra flour for dusting and spread or roll this ball with light pressure by using a roller.

-Cook both the sides by using either oil, ghee or butter.

-Enjoy this either with sweetened curd, boondi raita or pickle.


Red cabbage Sandwich:

Red cabbage or purple cabbage? This vegetable has an identity crisis. Red or purple, it is one and the same and this vegetable has numerous health benefits as well. It is a cruciferous vegetable and can be consumed both raw and cooked.

It is a power house of Vitamins, Minerals such as Iron and calcium and dietary fibre . I normally avoid buying cabbages, due to its high pesticide content. Now a day, we do get organic cabbages here in Bangalore. Hence, there is an opportunity to have this beautiful veggie in a raw form as well. When we were shopping, my daughter remembered my Red cabbage sandwich, which I used to prepare for her when she was small and asked me to prepare the same. So, picked up and made this sandwich and tried one rice recipe as well. In coming days, you can expect my new recipe of Red cabbage and sweet corn one pot meal.

Now I will share my sandwich recipe from the scratch-

Ingredients:

Shredded red cabbage – 2 cups

Onion – 1 big

Garlic mayonnaise – 2 table spoons

Honey mayonnaise – 2 table spoons

American mustard – 1 tea spoon

Hung curd – 1 to 2 table spoons (to adjust the consistency)

Oregano – 1 tea spoon

Tomato ketch up – 1 to 2 tea spoons

Red chilli flakes – ½ tea spoon

Grated cheese – 2 table spoons

Bread of your choice – 1 loaf

Butter – to apply while roasting.

Method:

-Take one bowl, put shredded cabbage, chopped onion, garlic mayo, honey mayo, American mustard and hung curd. Mix nicely.

-Now mix in Oregano, chilli flakes, tomato ketchup and grated cheese.

– Mix and make a spreadable mixture. Now your sandwich stuffing is ready.

-Take one slice of bread, spread this mixture and close another bread slice over this.

-Apply butter on both the slices at outer side and keep it in a pre-heated sandwich maker.

-When outer surface becomes light brown, remove and proceed to make remaining sandwiches.

-If you want an extra zing, you can serve this with tomato ketch up or as it is.

Rava idli with Oats/ Semolina idli with Oats:

I normally used to make plain Oats idli, earlier. It is our favourite breakfast item and I wanted to make a slight change while preparing and used my Rava idli making method with oats added in it and served with Potato Sagu as how I serve normal Rava idli. It tasted good and we started liking this method instead of making plain Rava idli. This is one more instant and handy recipe for me and works just fine even in kid’s lunch box as well. Addition of oats increases the nutritional value of the dish. So, whenever excess curd is there, this is one more recipe to indulge in that too without any grinding and prior planning.

I normally prepare the dry mixture the previous night and keep it ready to cut short my early morning job. It works very well. Dry mix consists of seasoning and roasting part.

How I make –

Ingredients:

Normal Rava / Semolina – 2 cups

Oats – 2 cups

Curds – 2 cups

Water – 3 cups

Eno fruit salt – 1 tea spoon

Salt

Coriander leaves – ¼ cup (chopped)

Seasoning:

Ghee or oil – 2 table spoons

Mustard – 1 tea spoon

Urad dal – 1tea spoon

Chana dal – 1 tea spoon

Hing – ¼ tea spoon

Cumin – 1 tea spoon

Cashew bits – 2 table spoons (optional)

Curry leaves – 2 springs (Shredded)

Method:

-Take one kadai, do seasoning part. Heat ghee, splutter mustard, then add urad and chana dal.

-When dals become red, add cashew, hing, cumin, curry leaves and fry for 1 minute.

-Add Rava and roast for a while (until it is grainy) and add oats and proceed the roasting process for some more time. (May be 2 minutes more).

– Add in chopped coriander and mix until it distributes evenly and wilts a little.

-Switch off the gas and leave this mixture to cool. (I usually prepare this much in the previous night and keep it ready)

-Next comes the batter preparation. Use room temperature mixture. Don’t use hot Rava mixture to make idli batter.

-Take one big bowl, pour in curd and water (here I normally take one cup of liquid to each cup of oats and 1 ½ cup of liquid to each cup of rawa) It is a very simple calculation 😊

-Add salt and Eno fruit salt (you can use cooking soda as well) beat a little to attain frothy texture.

-Add seasoned Rava and oats mixture to this and mix.

-Now comes the idli steaming part.

-Take one cooker, pour one cup of water at the base and heat.

-Rinse idli mould by using fresh water. (it is an alternate to greasing the mould)

-Pour ready batter to idli mould, keep it in a steamer and steam cook for 10 minutes.

-Remove, cool, de mould and serve with chutney or potato Sagu.


Mango mini cake doughnuts:

Mini cake doughnut is an eye pleaser for any one. As summer is coming to an end and it’s school reopening time, wanted to try my hand at this Mango cake by using my protein rich millet health mix instead of All purpose flour. Usually I make this cake by using All purpose flour /Maida. I don’t like the taste of whole wheat with mango. When I was thinking to replace Maida in this recipe, I thought of using millet flour and proceeded. It turned out very tasty and soft. It worked out just fine as a short break snack for my ever-supportive daughter V, who tastes and gives her feedback in every step of my kitchen experiments. 

It is an eggless recipe as well as healthy and I don’t consider this as a dessert. It is a 100 % snack and very filling as well as filled with goodness and natural flavour from summer fruit Mango. If you are into healthy baking and want to try it out, I am sure, you will like this recipe.

I’m excited to share this recipe with you all –

Ingredients:

Millet health mix – 1 ½ cup (you can use all purpose flour as well)

Salt – ¼ tsp

Chocolate chip – ¼ cup

Cardamom powder – ½ tea spoon

Baking powder – ½ tea spoon

Baking soda – 1 tea spoon

Mango puree – ¾ cup

Butter – 100 grams

Sugar – ½ cup

Curd – ½ cup

Method:

-Pre heat oven at 180°C. If you are using a baking tin, line the tray with butter paper or apply some butter, grease the mould and keep it ready.

-Mix all the dry ingredients together – Flour, salt, Choco chip, cardamom powder, baking powder, baking soda.

-Dry whisk everything and mix properly and keep aside.

-make mango puree from the cut pieces of mango’s. You can take any good variety of mango.

-Now take another bowl, take melted butter and beat. Add in sugar, mango puree, curd one by one respectively and beat nicely.

-Fold in dry ingredient and make homogenous mixture by using wooden or rubber spatula or with a light hand with a wire whisk.

-Pour the batter in cake tin, here I have used doughnut shaped mould.

– Bake the cake in a pre-heated oven for 15 to 20 minutes or until done.


Paddu:

Paddu or Guliyappa is a very popular South Indian breakfast item. Which is nothing but Dosa batter or idli batter which is seasoned with some onion and poured and cooked in an appe pan, which normally has 7 or 9 small round molds. Traditionally, people use left over batter to make this delicacy to finish off the batter. But, personally I prefer to make fresh batter to make only this, because my family just loves this, and we enjoy our dose of guliyappa in any given point of time.

These super tasty roundels have many names in south Indian kitchens. In coastal region we call this as Guliyappa, In Bangalore, it is known as Paddu. In Tamilian house hold it is Kuzhi paniyaram, Telugu it is Gunta ponganalu, Malayalm it is Paniyaram. All the above which means that, a dish which is cooked in an appe pan.

My procedure goes like this-

Ingredients:

Dosa rice – 2cups

Urad dal – ½ cup

Poha – one fist full

Salt

Spring onion – as needed (onion and greens)

Coriander leaves – as needed

Ghee/ oil – for cooking

Method:

-Wash and soak rice, urad dal and poha. Soak for 2 to 3 hours.

-Grind this into smooth batter by adding salt.

-Consistency should be a little thicker than Dosa batter.

-Ferment this over night or according to your climatic conditions.

-Next day, add chopped coriander and spring onion and mix in.

-Heat appe or Paddu pan. When it is hot, pour ¼ tsp of ghee or oil.

-Pour the batter in each mold and close the lid and cook for a couple of minutes.

-Flip the side and cook upper side as well.

-Serve with chutney. We normally prefer Zucchini chutney as a side dish for Paddu.

-Repeat the process and enjoy your breakfast or brunch or dinner.

Note: If you want to make it vegan, use any vegetable oil and skip ghee.