Fresh Turmeric Gojju:

Turmeric is a  popular spice of Indian Cuisine and we normally use it in powder form almost in all the recipes. In this time of the year, we do use fresh root in our kitchen. The fragrance of the fresh raw turmeric is very different than the powder. If you haven’t tried fresh turmeric root yet, this recipe is a delicious and refreshing way to get a taste of its earthy, sweet flavour of fresh produce.

Our ancestors had a really nice way to taking care of their health . According to the season, and depending on the local produce, they used to make and consume all the goodness of the nature in a natural way.  This recipe is one of them and it is  one of the age-old recipes which I learnt from my atte .

How it is made-

Ingredients:

Fresh Turmeric rhizome – 2 pieces

Coconut – ½ cup

Coriander – 1 table sp

Urad dal – 1 tsp

White sesame seed – ½ tsp

Red chilli – 3

Tamarind – 1 tsp

Salt

Jaggery – 2 table sp

Coconut oil – 2 tablespoons

Method:

-Clean the turmeric rhizome, grate and keep it ready.

-To prepare masala: Fry coriander, urad dal, red chilli and sesame seed in little oil. Grind this with coconut, into smooth paste.

-Now take one tawa, pour oil, fry grated turmeric, add tamarind water, salt, jaggery and cook .

-When turmeric changes its colour, add ground masala. Check for the salt and jaggery.

-Boil this nicely, serve with Hot rice and ghee. It is indeed  pure bliss and oodles of goodness for your body.


Red velvet Cake :

Hey, this is Anushree here and this is my first guest post on my mom’s blog! I have been home from college for a few days now and thought I’d make something special as Christmas is coming up and my sister is coming back from college in 2 days! So, I decided to make a Red velvet cake.

Yes! You heard it right. It is not deep red in colour but filled with healthy ingredients. It is No Artificial colour and No All-purpose flour recipe. And to pull this off, I obviously needed some assistance from an expert in healthy cooking, who happens to be my mom, so that worked out great for me!

In olden days, Red velvet cake was made with All-purpose flour and Beets. Here I have used Mixed healthy flour ( Amaranth , Red rice and Almond flour) with beetroot. So, it is not a white cake with red dye.

While frosting, instead of new age cream cheese, I have opted for an original Ermine icing , which is also known as boiled milk frosting. Here, instead of All-purpose flour I have used mixture of  Almond flour and Arrowroot powder with milk to attain a creamy and flowy texture.

Here is my recipe- Fits for 9” spring foam pan.

Ingredient:

For the Cake:

Beetroot – 1 (small,  to get 3 tablespoons of puree)

Amaranth flour – 1cup

Brown rice flour – 1cup

Almond flour – ½ cup

Cocoa powder – 1 tablespoon

Cooking soda – 1 tsp

Salt – ¼ tsp

Eggs – 2

Brown Sugar – 1 ½ cup

Butter – 200 grams

Vanilla – 1 tsp

Buttermilk – 1 ¼ cup

For the Frosting:

Milk – 1 cup

Almond flour – 5 tablespoons

Arrowroot powder – 1 tablespoon

Butter – 50 grams

Sugar – ½ cup

Vanilla – 1 tsp

Desiccated coconut – as needed

Slivered Almonds – As needed

Method:

To Bake the cake:

-Pre heat oven for 180° C . Line the baking tray and keep it ready.

-Cook Beetroot in a pressure pan for 2 to 3 whistles, peel the skin and grate.

-Measure every ingredient and keep it ready. Melt butter and keep aside.

-Take a mixer jar, make a paste of grated beet with ¼ cup of buttermilk ,which we have kept for the batter preparation.

-Take one glass bowl, beat eggs, then sugar, melted butter ,pureed beetroot, vanilla and lastly one cup of buttermilk.

-Beat everything until it is well mixed and keep aside.

-Now take one more bowl, put all the dry ingredients, all the three flours, cocoa powder, salt and cooking soda. Sieve couple of times or dry whisk and keep it ready.

–Pour the previously prepared wet mixture to dry ingredients and fold the batter by using any spatula.

-Pour the batter in lined baking tray and keep this for baking for 40 -50  minutes or until done.

-Before removing, check with a knife by inserting, in the baked cake. It should come out clean.

-Cool the cake completely before doing the frosting part.

Method for Frosting:

-Take milk ,Almond flour and Arrowroot powder in a saucepan. Boil the mixture until it is cooks and becomes creamy.

-Switch off the flame, add in butter ,sugar and Vanilla, mix well. Cool the mixture and keep it in the fridge to cool further making it more solid. ( I have not kept in the fridge)

-Now, slice the cake, make a 2-equal slice, Apply the frosting on first layer and cover it with the second slice.

-Now pour frosting on the top, as well as apply at the sides as well. Take desiccated coconut and dust at the top as well as at the sides.

-Decorate the cake with slivered almonds and serve and enjoy with the family <3

Note: 

For Egg less version, please use any egg replacer or 

Flax gel:The basic ratio is 2 ½ tsp of flax seed powder and three tablespoons of  hot water  and then you simply whisk in the mixture until it becomes gelatinous  to replace one egg.

Seven cup Burfi :

I am celebrating my blog’s 3rd Anniversary, what more reason do we need to celebrate than this? Presenting  one of the easiest sweets which can be prepared in a jiffy and with a straightforward. It is very easy to follow, no hassles of  making sugar syrup and worrying about its consistency. I must say, it is a beginner’s recipe, which is pretty simple, straight forward and hassle free. Mix everything, start making and at the end, be vigilant while achieving the right consistency and follow the notes, whatever I have listed. Even if you messed up a little, no worries, it would turn out delicious. If it is under done, it would be fudgy and if it is overdone, it would be like sweet granules. 😀

Ingredients:

Besan /Bengal gram four – 1 cup

Milk – 1 cup

Ghee – 1 cup

Fresh grated coconut – 1 cup

Sugar – 3 cups ( I normally put 2 ¾ cup)

Method:

-Take one thick bottomed kadai, add everything from Besan to sugar.

-Switch on the gas. Fire should be kept at low flame and you should continue stirring without removing your hand.

-After 10 to 15 minutes you will see the changes and mixture will become bubbly and shiny.

-Now it is the time to add cardamom powder and be vigilant. It will be ready in any moment from now.

-When it is done, mixture will leave the sides, base and sides of the vessel will become light brown or sometimes we see the ghee separating and oozing out from the bubbles. (these are the indications to remove)

-Now pour this mixture to a greased vessel, don’t touch or press after pouring, leave as it is.

-Cool it for about 5 min and mark the lines by using a sharp knife.

-Once it is completely cooled (it takes anywhere between 2 to 3 hours), invert the plate on another plate or by keeping butter paper. It needs some knocking at the base because air bubbles would restrict the easy exit.

–   Remove gently, break all the pieces and store it in an airtight container.

Your 7 cup Burfi is ready to serve!


Bendekai sambar/ Okra sambar:

Sambar is a very essential part of south Indian meal. In Mangalore region, we normally use freshly roasted and ground coconut masala for vegetables as well as each vegetable has its own suitable masala recipe.

Normally, the main ingredients will be the same and here and there some additional ingredients or frying techniques will be different.

In this particular recipe, we don’t use coconut as it is.  Masala is fried as well as coconut and made into powder form and added. It is very flavourful and tasty.

We normally use heirloom variety of Bendekai/ ladies’ finger /Okra for sambar. This masala tastes very good even with small variety dark green bhindi as well.

Ingredient:

Bendekai/Bhindi /Okra – ½ kg

Toor dal – ½ cup

Tamarind – size of a small lemon

Green chillies – 2

Salt

Jaggery – 1 tsp

Methi – ¼ tsp

Coriander seeds – 1 tablespoon

cumin – 1tsp

Urad dal – 1 ½ tsp

Dried Red chillies – 2 to 3

Curry leaves – 1 spring

Coconut – ½  to ¾ cup

For the seasoning:

Coconut oil – 1 tsp

Mustard – ½ tsp

Red chilli – 1

Curry leaves – 1 spring

Method:

-Cook toor dal and keep aside.

-Soak tamarind, boil with little added water, salt, jaggery, slit green chillies.

-When it starts boiling, add chopped bhindi. Allow to cook in a low flame.

-To avoid sliminess,  don’t close the lid or put a spoon to mix while boiling bhindi.

-In the meantime, prepare masala. Heat coconut oil, fry methi, add coriander, cumin , urad dal, red chillies and fry until all the spices are roasted.

-Next add curry leaves, coconut ,turmeric and fry until you get a nice aroma.

-Cool and make a powder of roasted coconut mix and keep aside.

-When bhindi is cooked, add dhal, masala powder and boil nicely by adding sufficient water to adjust the consistency.

-Do the seasoning and serve with hot rice.


Ripe Jackfruit Idli:

Jack fruit idli is Instant , if you have left over Jackfruit dosa batter 😀 . Other wise you should soak dosa rice for 2 hours and then you can proceed to make idli. Last week when I made dosa , I had some left-over batter and tried this idli instead of our usual traditional kottige. Which is wrapped and steam cooked in Plantain leaf.

It turned out to be super soft and fluffy. It is very easy, at the same time no compromises in taste.

How I made:

Ingredients:

Dosa rice – 1 cup

Cleaned jack fruit – 1 big bowl 

Salt

Coconut gratings – ½ cup

Grated Jaggery – 2 tablespoons ( as required)

Ghee – 1 table soon (optional, but it surely enhance the taste)

Eno fruit salt – ½ tsp (optional)

Method:

-Wash and soak Dosa rice in sufficient water for 2 to 3 hours.

– Chop the jack fruit, remove bulbs and separate outer cover and inner seed.

– Collect only the outer yellow fruit shell and put it in a mixer grinder, give couple of whipping sessions and remove.

-Divide it in half ( use one half for grinding and other half to ready batter. to enhance the taste.

– Now take soaked rice, half of  fruit chunks  , put little water and grind this into a smooth paste by adding sufficient salt. Batter consistency should be  little thicker.

-Take coconut gratings, mix in jaggery, little ghee( if you wish) and mix in half of jack pieces which we have kept aside.

-Mix this mixture with ground batter. If you want, add Eno and mix everything and make idlies by using idli mould.

-serve this with honey or with ginger chutney.            

Note:

For ginger chutney: Fry red chillies with little oil and grind it with coconut, salt, little tamarind and piece of ginger.

If you have ready Dosa batter, add jack fruit pieces, coconut, jaggery ,ghee, Eno and mix everything and proceed.

If you are using idli stand, grease the idli plate with oil/ghee and pour a ladle full of batter and steam cook them in pressure cooker for 10-15 minutes.
Let it cool for few minutes before serving the idlis with spicy chutney and ghee.

Halasina hannina Guliyappa/ Jackfruit Paddu:

Jackfruit is an integral part of our kitchen during the Summer months. In our native, it is an everyday affair to make something or the other out of home-grown huge jack fruits. A lot of family bonding happens during its chopping, separating the fruit bulbs and cleaning. After cleaning, it is time to think about what to make? One says Dosa, other one Kottige or Guliyappa. Even after making all these delicacies if it is in excess, then it is time to make Berati and preserve it for a long.

Guliyappa is usually an instant thing if the rice has been soaked and ready. But I like Paddu out of fermented batter. Let us see how I make it.

Ingredients:

Dosa rice – 2 cups

Jackfruit – 1 big bowl

Coconut – 1 small bowl

Jaggery – I piece (according to taste) Or Jaggery Syrup as needed.

Salt

Method:

-Wash, soak Dosa rice in water for 3 to 4 hours. Clean jack fruit bulbs by removing fibre and seed.

– Drain the water, grind Rice, jaggery ( I would suggest using jaggery syrup), salt, coconut and chopped jackfruit with adding minimal water.

-The batter should be a little coarse, and the consistency should be like idli batter (should neither thick nor thin)

-Allow fermenting overnight in cold weather, or 2 to 3 hrs is enough.

-Heat Appe or Paddu pan. When it is hot, pour ¼ tsp of ghee or oil.

-Pour the batter into each mould, close the lid, and cook for a few minutes.

-Flip the side and cook the upper side as well.

-Serve with chutney. We normally prefer Ginger and coconut chutney as a side dish for jackfruit items.

-Repeat the process and enjoy your breakfast or brunch or dinner.

Note:

For ginger chutney: Fry red chillies with little oil and grind this with coconut, salt, tamarind, and a piece of ginger.

Brahmi Tambli:

Centella Asiatica is commonly known as Centella /Gotu kola or Asiatic pennywort locally known as Thimare /Brahmi or Ondelaga in our region. Popularly known as a memory enhancer and from ages, it has been used as a brain tonic. In our coastal Brahmi is considered as a body coolant and used as a culinary herb during summer either by making chutney or Tambli.

Brahmi is a small runner/succulent herb and contains numerous fibrous roots at its every node. In our coastal belt, it grows widely in our paddy fields or Areca nut garden. It has small tiny seed-like flowers with a neutral colour. The whole plant including its roots can be used in cooking as well as medicinal purpose. It has little bitter sweetish taste when it is consumed in a raw form without any added taste enhancer. 2 teaspoons of Raw extract can be used for 3 to 7 days to enhance the overall health /to boost immune system/to reduce any inflammation of the body. Apart from this, it is very good for hair as well and I have shared the Hair oil recipe long ago by adding Brahmi and many other goodnesses. 

In our region, usually, we make Tambli or chutney and consumed as a raw form (not boiled) to get all the benefits of the greens. This particular recipe I learnt it from Kavya Bhat which she has shared with us in our Foodie Facebook group and I want to thank her for the wonderful tasty recipe.

How to make Tambli-

Ingredients:

Brahmi greens – 1 fistful (You can use with roots or without)

Coconut – ½ cup

Cumin – ½ tsp

Jaggery – 1 small piece

Curd – ½ cup

Salt

Seasoning:

Coconut oil – 1 tsp

Sesame seeds – 1tsp

Red chilli flakes – 1 tsp (or chopped red chilli)

Curry leaves – 1 spring

Method:

-Wash Brahmi greens and roots nicely.

-Put Brahmi, coconut, salt, cumin, jaggery and pour ½ cup of water and grind into a smooth paste.

-Sieve the content and extract the liquid.

-Take all the roughage, add curd and little water grind once again and sieve. Collect the liquid.

-Third time add little water and grind, sieve and extract the liquid and discard all the remaining roughage.

-Prepare seasoning- heat oil, add sesame, when it turns light brown switch off the gas. Add red chilli flakes, curry leaves and add to Tambli.

-Adjust the salt and enjoy either as an appetiser or with white or brown/ red rice.


Masala Dosa:

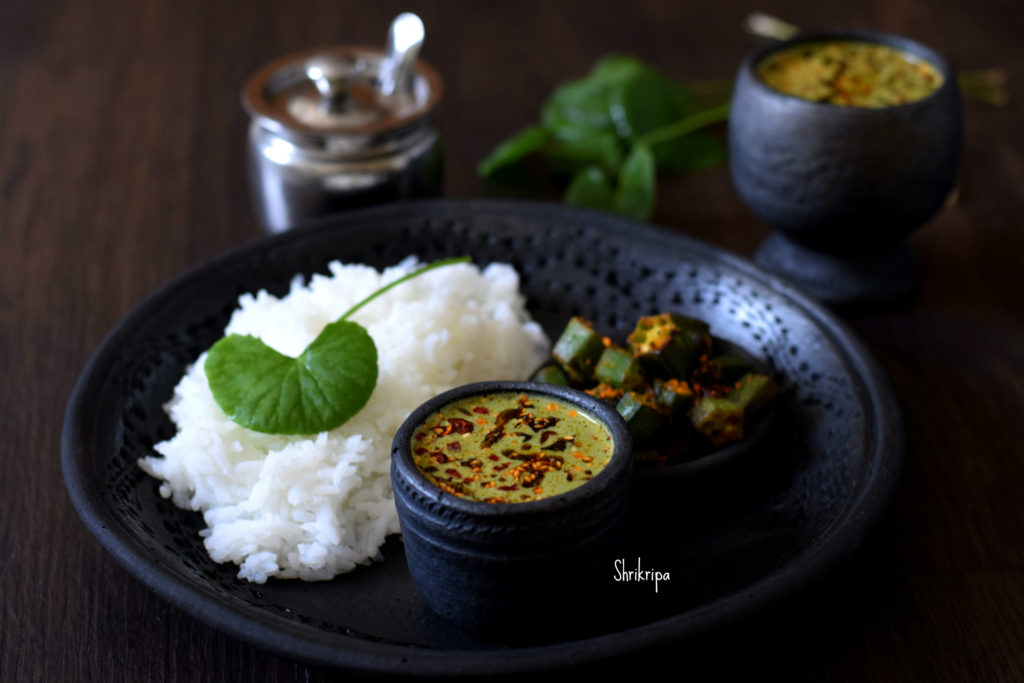
Who doesn’t love Masala Dosa? It is an absolute favourite in our family.

A properly made crisp Dosa is very delicious if the batter is perfectly fermented with little sour flavour and correct consistency.

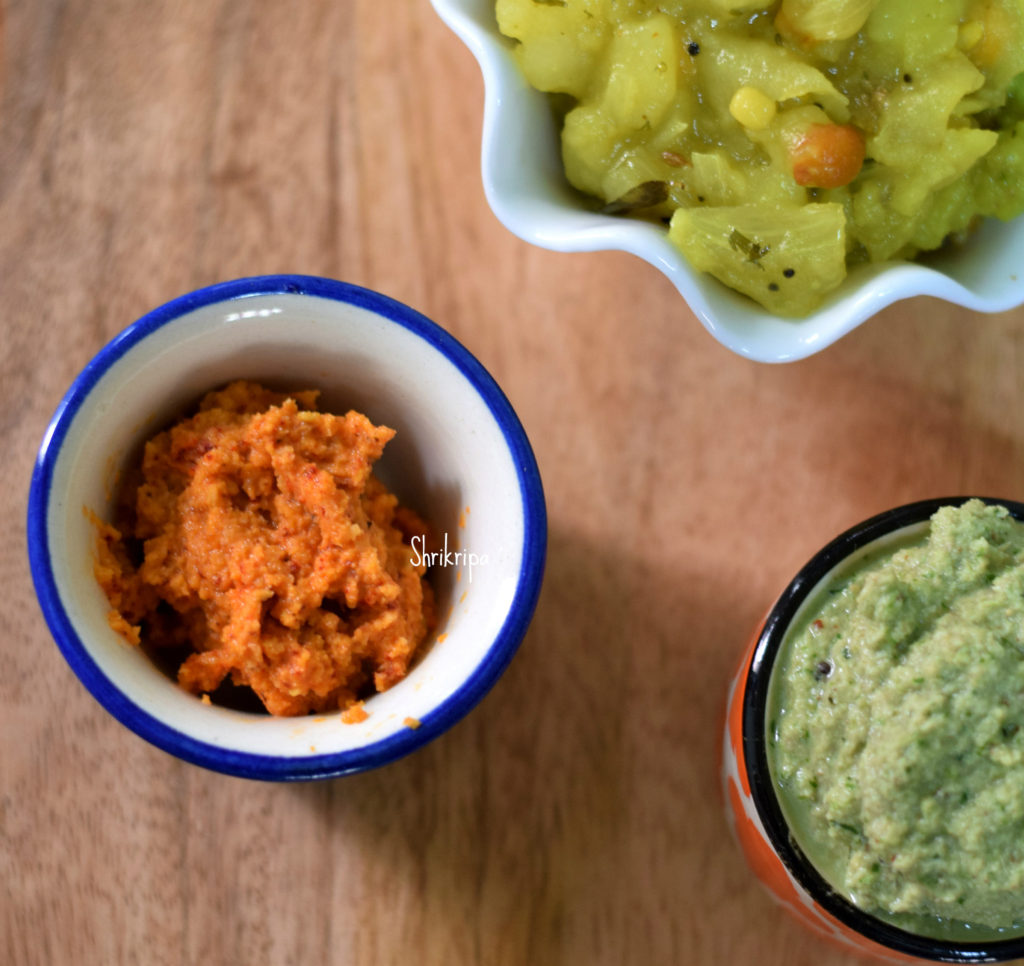
Normally Masala Dosa can be served either by applying Red chutney or Green chutney.

Red chutney what I make is not very hot and made with only chillies. It is coconut-based garlic flavoured chutney.

In other hand, green chutney smeared Dosa is something I relish in Hotel MTR outlet in Bangalore. I tried to replicate the taste at home, and it is once again a coconut chutney, which is flavoured by coriander leaves.

In our coastal region, you never get to see red chutney applied Masala dosas. It is normal paper plain Dosa with bhaji at the centre and rolled like a paper roll and served with the watery ginger chutney and sambar as an accompaniment.

In our house we normally make red chutney and apply and enjoy garlicky flavoured chutney with aloo masala.

First, we will see How to make Dosa Batter:

Ingredient:

Dosa rice -1 cup

Idly rice -1 cup

Urad dal – ½ cup

Bengal gram/Chana dal – 1 tbl sp

Fenugreek/methi seeds – 1 tsp.

Beaten rice – ¼ cup

  Method:

-Wash all these ingredients couple of times.

-Soak this in a sufficient water (washed rice and dal should submerge) for 3 to 4 hours. Drain water from the rice and keep aside. This water is used while grinding according to the requirement. Grind soaked rice –dal mixture by adding salt in to a very fine /smooth batter by using wet grinder or Mixer grinder. I prefer Wet grinder and it certainly gives much finer, perfect batter. After removing the batter adjust the consistency by mixing properly. Now keep this ground batter for fermentation in a big vessel, so that it will allow room for puffed/fermented batter. It will take anywhere between 8 to 16 hours (according to the outside weather)

Note: In Bangalore I usually soak my lentils around morning, grinding happens around afternoon 2 to 3 pm and until next morning I keep the batter for fermentation. This is how I get my perfectly fermented batter. 

Potato Bhaji/ filling:

Ingredients:

Potato – 6 big

Onion – 3 big

Green chilli – 2 to 3

Grated ginger – ½ “

Turmeric – ½ tsp.

Salt

Seasoning: Coconut oil -2 tbl sp, mustard- 1tsp, Urad dal -1 tsp., chana dal-1 tsp, Cumin seeds – ½ tsp, hing – ¼ tsp, Red chilli -1, curry leaves -2 springs.

Chopped coriander leaves for garnishing.

 Method:

-Wash potato cut in to half and put this in a cooker with sufficient water. Cook for two whistles. Cool, remove outer skin, mash and keep aside.

-Slice onion and slit green chillies.

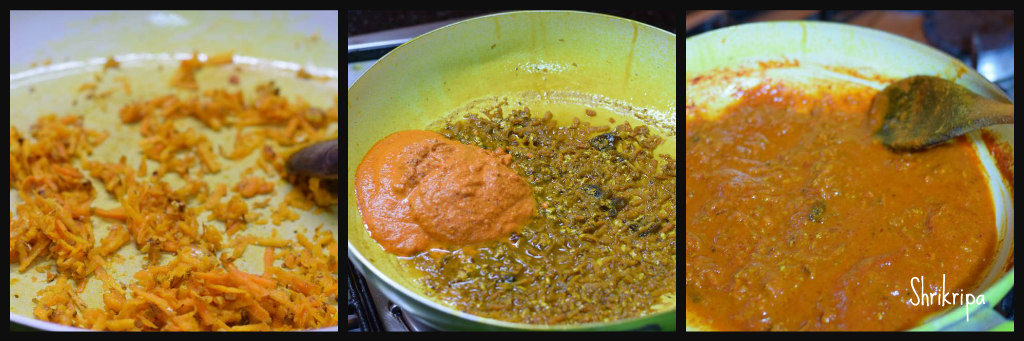
-Take one kadai, add coconut oil, mustard, when it starts to splutter, add cumin, hing, Urad dal, chana dal, red chilli. When dal becomes red add Curry leaves, slit green chillies and onions.

-Add turmeric and fry onions till it becomes light brown.

-Now add one to two cups of water, add salt.

-When water starts boiling add mashed potato and mix nicely. Check for the seasoning and close the lid and cook for a while until it becomes homogenised and water drains.

-Switch off the gas and garnish with chopped coriander leaves.


Red Chutney: It is garlic flavoured very thick coconut chutney.

Ingredients:

Grated fresh coconut – 1 cup

Red chilli – 2

Garlic cloves -7 to 8

Tamarind – ¼ tsp.

Salt

Method: Roast Red chillies by putting ¼ tsp of oil.

Put all the ingredients together in a mixer jar, dry grind at first and then put very little water and make very thick consistency. This chutney is used for applying over the Dosa while making.


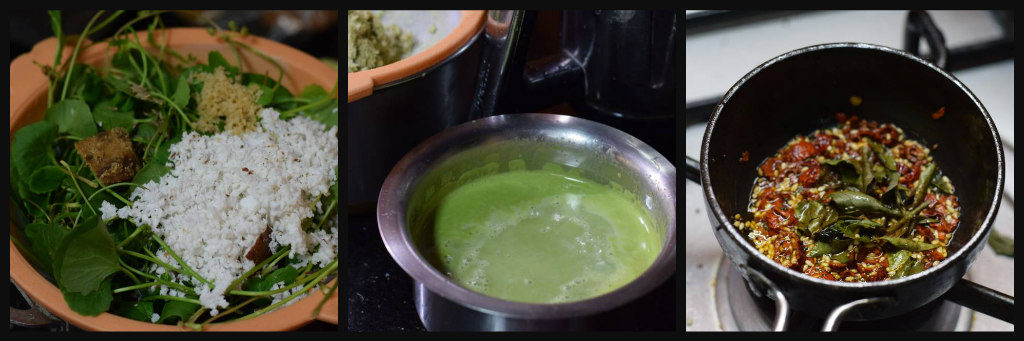
Green chutney: This chutney can be smeared as well as served as an accompaniment with Dosa. If you are smearing, keep the consistency little thick and if you are serving as a side, you can add little water and make it thin.

Ingredient:

Grated fresh coconut – 1 cup

Roasted gram/ puffed gram – ½ cup (putani or Hurigadale)

Green chillies – 3 to 4

Tamarind – little

Sugar – ½ tsp

Salt

Coriander leaves – 1 small cup

Curry leaves – 1 spring

Method:

Fist grind coconut, puffed gram, salt, tamarind by adding little water. Then add chopped coriander and curry leaves and churn a little and add seasoning with mustard and curry leaves.


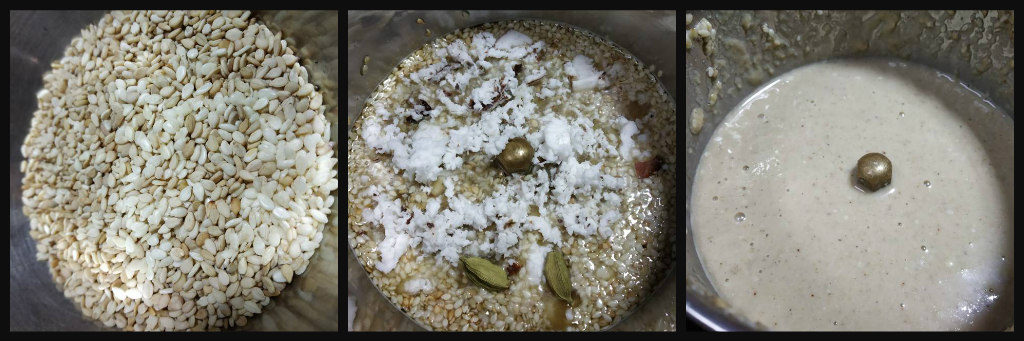
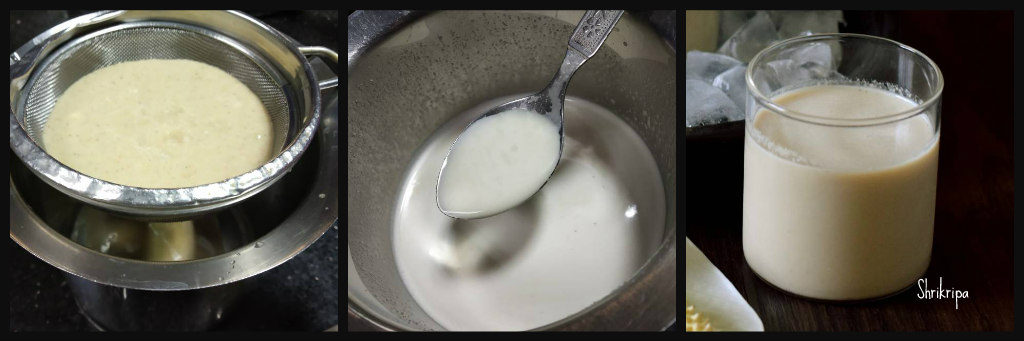
White Coconut Chutney: This is served as a side dish and usually with ginger flavour.

Ingredients:

Fresh grated coconut – 1 cup

Green chilli – 1 or 2

Tamarind – ¼ tsp.

Salt

Ginger – ½ “     

Method: Grind all these by putting sufficient water and adjust the consistency. Do seasoning by putting coconut oil, mustard, red chilli and curry leaves.


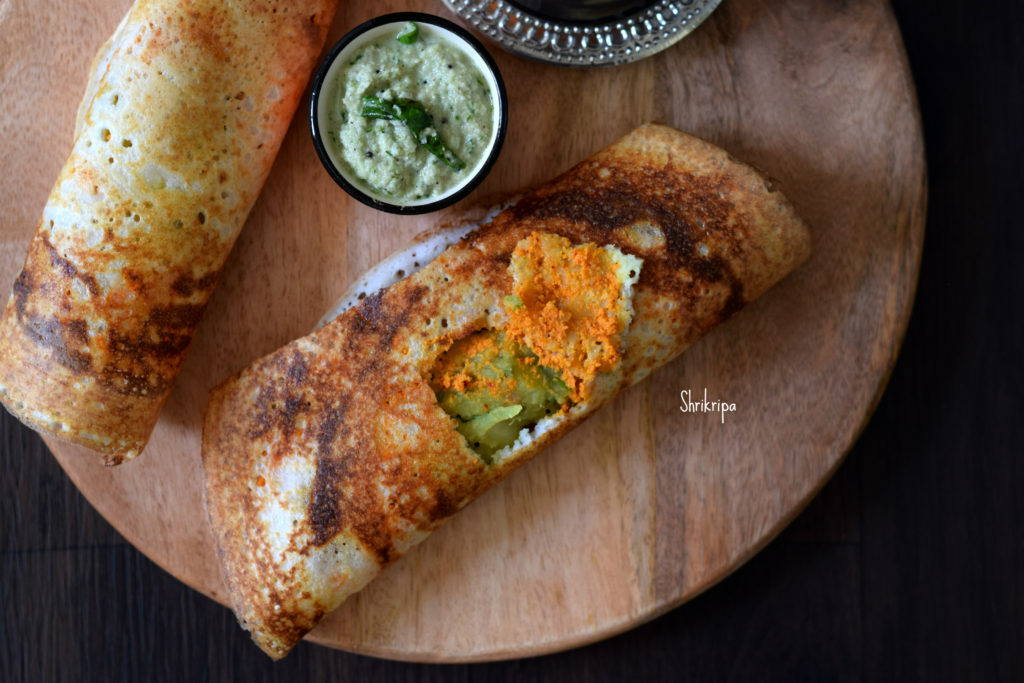
How to Prepare Masala Dosa:

Now everything is ready, and we can proceed with our preparation.

-Keep the Dosa griddle over the gas stove for heating. You can use Iron griddle or Non-stick one.

-Nicely mix fermented Dosa batter and check for the consistency. If it is thick add ½ cup of water and adjust and keep it ready.

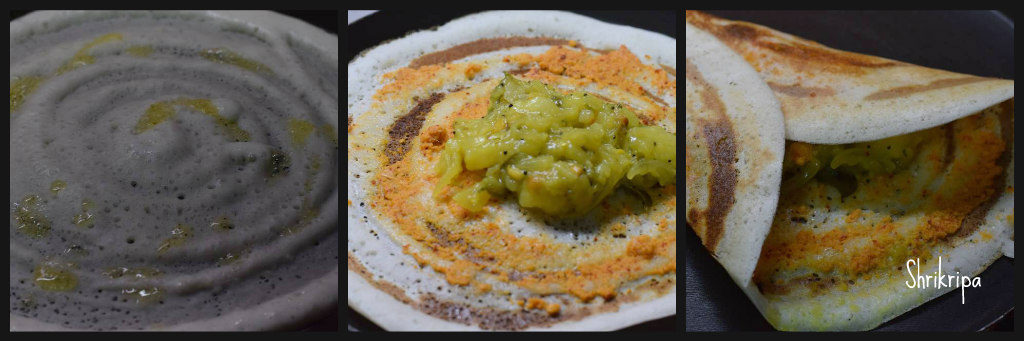
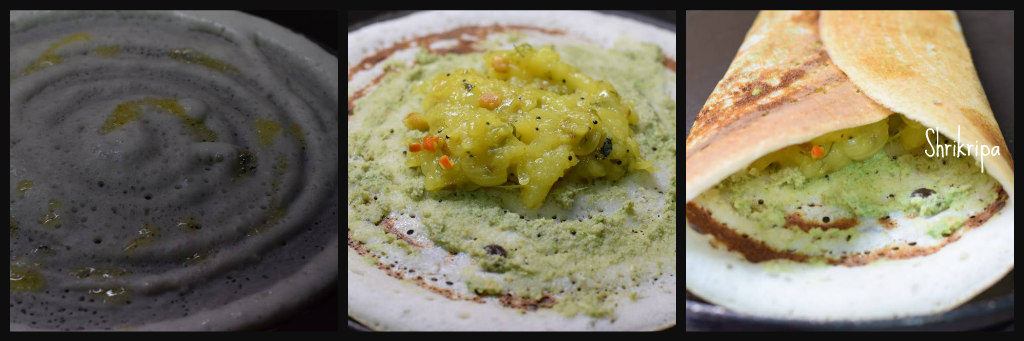
-When Dosa tawa becomes hot, pour one serving spoon of Dosa batter, move spatula in to a circular motion and spread the batter.

-sprinkle little ghee /butter/oil and cook until it is little brown in a low flame.

-when it is light brown spread Red garlic chutney or Thick green chutney at the centre of the Dosa in a circular motion and keep one serving spoon of potato filling at the centre and fold.        

-Now serve this ready Masala Dosa with White coconut chutney and Enjoy.


Ellu Juice / Sesame Juice:

Ellu juice is a well-known coolant drink of summer, especially in and around Mangalore and Udupi region.  As I grew up in Puttur, little away from the coastal line, never tasted this juice until my marriage. I came to know about this healthy drink very recently, may be around three years back.

Ellu juice and masala buttermilk is sold in and around coastal temples, during summer. After tasting chilled, soothing drink I asked the shopkeeper to elaborate the recipe and noted it down and tried it at home here in Bangalore. According to me, chilled juice tastes really nice in hot weather.

Sesame seeds are tiny, healthy, oil rich seeds. Un-hulled seeds are black or dark brown in colour and hulled seeds look off white and fully polished one look pure white and known as Nylon variety.

To prepare this juice, one can use any type of sesame seeds and can be used raw as well as toasted.

Here I have used raw seeds and mixed coconut milk as well as regular milk. If you want to make Vegan drink, please use coconut little more or replace milk with any other plant-based milk and proceed. Now, we will proceed with the method.

Ingredients:

Sesame seeds – 1 table spoon (for 2 cups)

Coconut – 2 table spoon (grated)

Milk – ½ to ¾ cup

Whole Cardamom – 1 or 2

Jaggery – as needed

Water – approximately one cup

Method:

-Wash sesame, grind into paste by adding coconut, cardamom, jaggery and quarter cup of water.

-Strain and collect the sesame milk. Repeat the process by adding little water until coconut and sesame turns into small, rough fibre.

-Now, discard the roughage and use collected milk, add plain milk and adjust the consistency.

-Cool this and serve.


Carrot – Bell fruit Kosambari /salad:

When you have abundant supply of home-grown Bell fruits in Summer, you tend to use it in anything and everything for sure 😀

Bell fruit has many names like Java apple, Wax apple, Water apple, Syzygium, Jambi fruit or Jambu nerale. I normally prefer to use local, easily available and pesticide free stuffs as much as possible. I have shared the juice recipe before and now I am sharing one salad or commonly known as Kosambari in our local term. Which is “no onion and no garlic” and ideal for any fasting or festivities.


Ingredients:

Carrots – 2 (red or normal)

Bell fruit – 10 – 12

Salt

Raw mango or lemon – as needed

Grated coconut – 2 table spoons

Coriander leaves – 1 table spoon (chopped)

Seasoning:

Coconut oil – 1 tea spoon

Mustard – 1 tsp

Hing – ¼ tsp

Green chilli – 1 or 2

Curry leaves – 1 spring

Method:

-Grate carrots, chop bell fruits into very small chunks.

-If you are using raw mango, grate and add or else use lemon juice.

-Mix in coconut, coriander leaves, salt.

-Now prepare seasoning, heat oil, splutter mustard, add chopped green chillies, curry leaves fry for a min and add it to the salad bowl and mix everything and check once.

– Serve as a salad or as a Kosambari /side dish for lunch.