Mysorepak /Mysorepaka:

There are a lot of sweets which have originated from south Indian kitchens, even then Mysore Pak has a very special place in people’s hearts. Some like it very soft, ghee dripping melt in the mouth kind and some like little harder, porous and little grainy in texture.

Usually in the Mysore – Bangalore side, you will find softer version and In Mangalore we usually get latter one, with grainy texture.

I have received a couple of requests to update my version of Mysorepak recipe, which I prepare almost from past 25 years and it is our family and extended family member’s favourite sweet. My little niece who relishes it, and thinks it is the ultimate sweet, ends up having couple of pieces at one go. I usually wait to see her priceless expression while relishing her share of Mysorepak. This recipe yields firm, porous and grainy in texture with darkish inner and light colour on both the outer sides. Last week I prepared this sweet on my husband’s birthday and now sharing the recipe with you all.

Recipe goes like this-

Ingredients:

Besan /Bengal gram flour – 2 cups

Ghee – 3 cups

Sugar – 3 ¾ cups

Water – 1 cup

Cardamom powder – 1 to 2 tea spoons

Method:

-Take one baking tray or any deep wide vessel, apply ghee and keep aside.

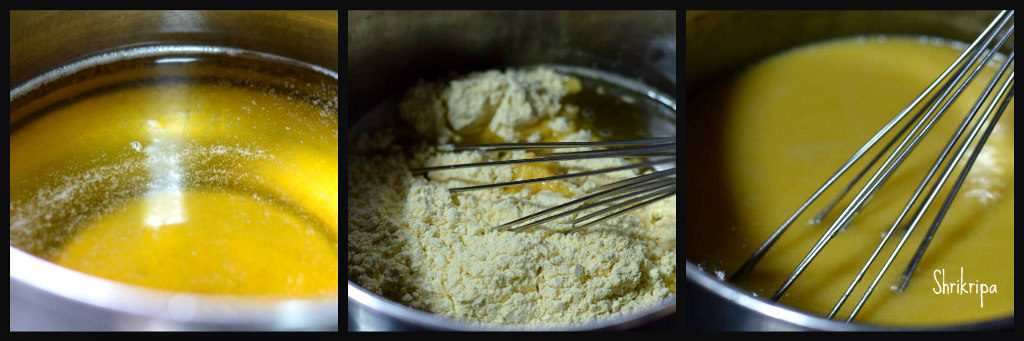
-Take one vessel, pour ghee and keep it on the flame. When it becomes hot (before boiling), switch off the gas, add Besan to hot ghee, stir well and keep aside.

-Mixture should be uniform and without any lumps. I prefer to use wire whisk to do this.

-Next comes the main part.

-Take one thick bottomed kadai, add sugar, pour water and keep it on the flame, boil until it is frothy and reaches single thread consistency.

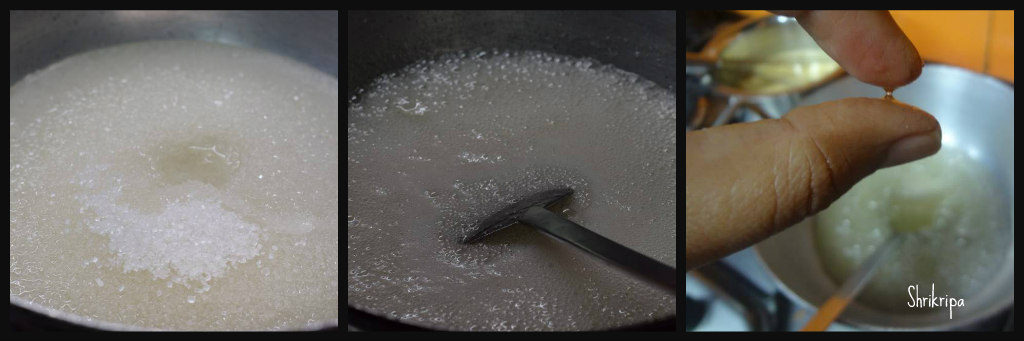
-During boiling, fire should be kept at low and you should stir in-between.

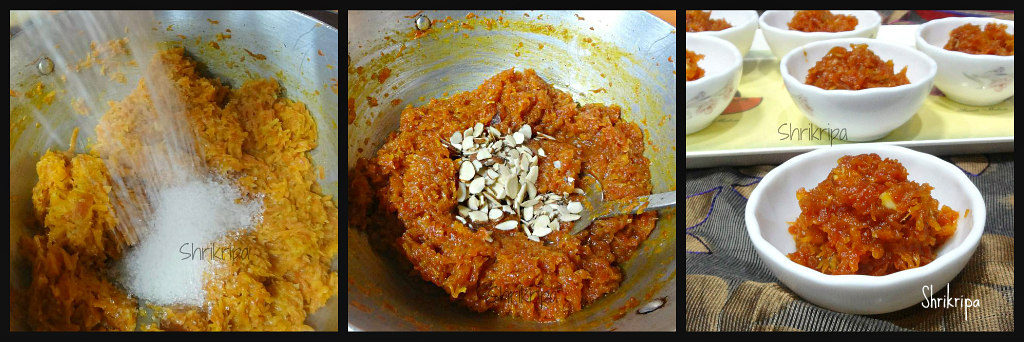
-When the consistency of the sugar is ready, add ghee mixed Besan and start stirring.

-Fire should be kept at low flame and you should continue stirring without removing your hand.

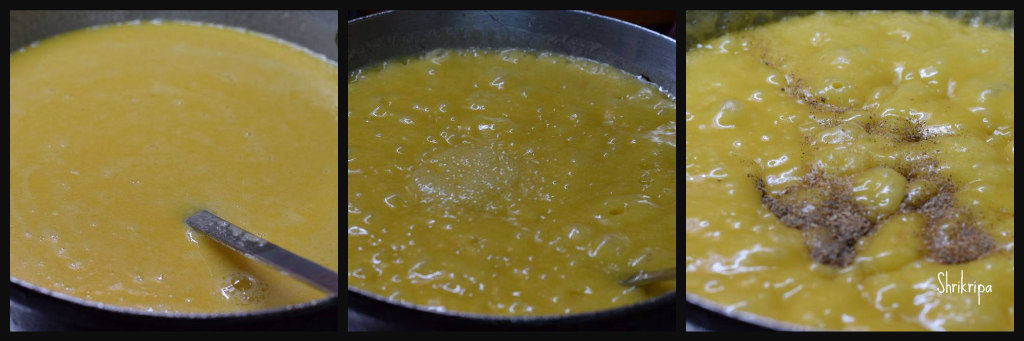
-After 10 to 15 minutes you will see the changes and mixture will become bubbly and shiny.

-Now it is the time to add cardamom powder and be vigilant. It would be ready in any moment from now.

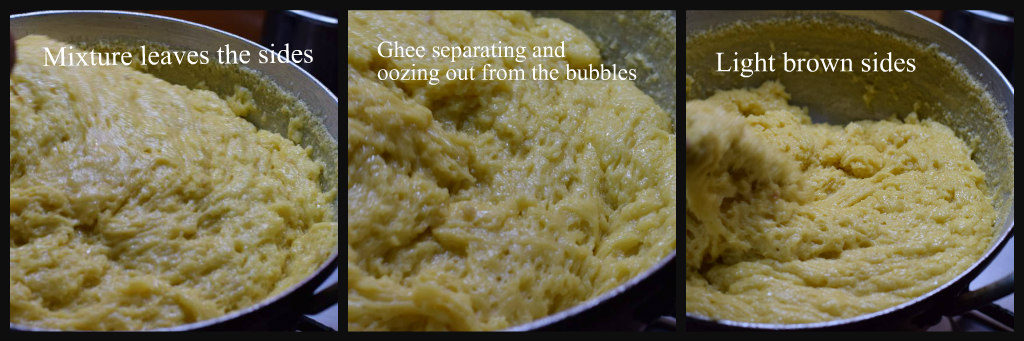
-When it is done, mixture will leave the sides, base and sides of the vessel will become light brown or sometimes we see the ghee separating and oozing out from the bubbles. (these are the indications to remove)

-Now pour this mixture to a greased vessel, don’t touch or press after pouring, leave as it is.

-Cool it for about 5 min and mark the lines by using a sharp knife.

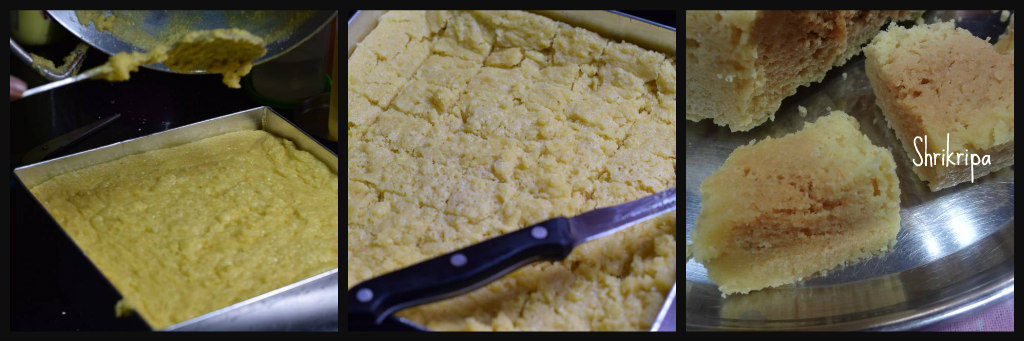
-Once it is completely cooled (it takes anywhere between 2 to 3 hours)

-Invert the plate on another plate or by keeping butter paper. It needs some knocking at the base because air bubbles would restrict the easy exit.

-Remove gently, break all the pieces and store it in an air tight container.

Your Mysorepak is ready to serve!

Note:

-Besan should be as fresh as possible. (do check the manufacturing date)

-When ghee is hot, you will hear couple of “tup” “tup” sound. That is the time you should mix in the Besan.

-Ghee shouldn’t boil.

-When sugar reaches single thread consistency, solution will start bubbling and rise upwards.

-Take a deep pan or baking tin or deep flat vessel to get long pieces and two tone colours.


Rava idli with Oats/ Semolina idli with Oats:

I normally used to make plain Oats idli, earlier. It is our favourite breakfast item and I wanted to make a slight change while preparing and used my Rava idli making method with oats added in it and served with Potato Sagu as how I serve normal Rava idli. It tasted good and we started liking this method instead of making plain Rava idli. This is one more instant and handy recipe for me and works just fine even in kid’s lunch box as well. Addition of oats increases the nutritional value of the dish. So, whenever excess curd is there, this is one more recipe to indulge in that too without any grinding and prior planning.

I normally prepare the dry mixture the previous night and keep it ready to cut short my early morning job. It works very well. Dry mix consists of seasoning and roasting part.

How I make –

Ingredients:

Normal Rava / Semolina – 2 cups

Oats – 2 cups

Curds – 2 cups

Water – 3 cups

Eno fruit salt – 1 tea spoon

Salt

Coriander leaves – ¼ cup (chopped)

Seasoning:

Ghee or oil – 2 table spoons

Mustard – 1 tea spoon

Urad dal – 1tea spoon

Chana dal – 1 tea spoon

Hing – ¼ tea spoon

Cumin – 1 tea spoon

Cashew bits – 2 table spoons (optional)

Curry leaves – 2 springs (Shredded)

Method:

-Take one kadai, do seasoning part. Heat ghee, splutter mustard, then add urad and chana dal.

-When dals become red, add cashew, hing, cumin, curry leaves and fry for 1 minute.

-Add Rava and roast for a while (until it is grainy) and add oats and proceed the roasting process for some more time. (May be 2 minutes more).

– Add in chopped coriander and mix until it distributes evenly and wilts a little.

-Switch off the gas and leave this mixture to cool. (I usually prepare this much in the previous night and keep it ready)

-Next comes the batter preparation. Use room temperature mixture. Don’t use hot Rava mixture to make idli batter.

-Take one big bowl, pour in curd and water (here I normally take one cup of liquid to each cup of oats and 1 ½ cup of liquid to each cup of rawa) It is a very simple calculation 😊

-Add salt and Eno fruit salt (you can use cooking soda as well) beat a little to attain frothy texture.

-Add seasoned Rava and oats mixture to this and mix.

-Now comes the idli steaming part.

-Take one cooker, pour one cup of water at the base and heat.

-Rinse idli mould by using fresh water. (it is an alternate to greasing the mould)

-Pour ready batter to idli mould, keep it in a steamer and steam cook for 10 minutes.

-Remove, cool, de mould and serve with chutney or potato Sagu.


Alasande Palya / Yard long beans dry curry:

Alasande aka yard long bean is very popular and one of the age old cultivated crops of Mangalore coast. It is tender, immature pods of black eye pea. In rainy season, most of the vegetable kitchen gardeners grow this super tasty veggie for day to day use.

Immature pods are one of the favourite food for little birds as well. It is a low calorie, high in fibre vegetable and tastes little sweetish and texture is little chewy and watery.

Alasande side dish is one of the very popular dishes during the festivities- either in weddings, festival cooking or day to day cooking. For day to day cooking, we normally toss this veggie with mild seasoning and for festivity cooking, we use coconut masala. Today I am going to share the recipe of my house hold which my family relishes whenever I prepare.

Ingredients:

Alasande / Yard long beans – 500 grams

Red chilli powder – ½ tea spoon

Turmeric – ½ tea spoon

Salt

Jaggery – 1 tea spoon

For seasoning:

Coconut oil – 1 table spoon

Mustard – 1 tea spoon

Urad dal – 1 tea spoon

Red chilli – 1 (optional)

Curry leaves – 1 spring

For Masala:

Coconut – ¼ cup

Roasted Byadagi Red chillies – 2 to 3

Cumin – 1 tea spoon

Tamarind – ½ tea spoon

Method:

-Wash, remove two ends of yard long beans and chop as required.

-Dry grind coconut with roasted chillies, cumin and tamarind for masala and keep aside.

-Now take one kadai, heat oil for seasoning, splutter mustard, add urad dal. If you are adding red chilli add that as well.

-When urad dal becomes red, add curry leaves, chopped beans, turmeric, salt, jaggery, red chilli powder and toss for two minutes.

-Add one small cup of water and cook until it is soft and firm.

-Add dry ground masala and mix everything. Keep it covered for two to three minutes and switch off the gas.

-Serve with hot rice or with thali as a side dish.


Simple Bele saaru /Rasam:

This Rasam is a very good option, if one has to cook no onion and no garlic meal. Usually it is an option for us during any festivity or “No mood to cook” meal. Olden days usage of onion or garlic was a taboo in our community and our grand moms used to prepare this kind of Rasam, which we call as saaru in local language. My hubby has fond memories attached to this Rasam, which he used to relish as a small child in his grand mom’s place and he usually asks for it and calls this Rasam as Doddajji saaru (grandma’s saaru) to signify. It is a plain Rasam, with ginger and hing flavour. In our region, we see this Rasam in some of the temple meals as well. If it is ginger flavoured one, no Rasam powder will be used and Rasam will be yellow in colour, due to the addition of turmeric and dhal.

DSC_0002_Fotor

Ingredients:

Toor dal – 1 cup

Tomatoes – 3 to 4

Green chillies – 4 to 6

Hing – peanut sized

Ginger – ½ inch (slivered)

Curry leaves – 2 springs

Salt

Jaggery – ½ to 1 tea spoon

Turmeric – ½ tea spoon

Tamarind – 1 tea spoon

Coriander leaves – little (optional)

Seasoning:

Coconut oil or ghee – 1 table spoon

Mustard – 1 tea spoon

Red chilli – 1

Curry leaves – 1 spring

Method:

-Wash and cook toor dal in a pressure cooker, mash a little and keep aside.

-Soak tamarind, chop tomatoes, green chillies and ginger.

Ribbet collage

-Take one Rasam pot (I normally use clay pot) and take 3 to 4 cups of water, tomato, green chillies, ginger, hing, curry leaves, turmeric, salt and jaggery.

-Cook this until everything cooks properly.

-Now add toor dal and mashed soaked tamarind.

-Boil this and adjust the consistency and check for salt, ginger and green chilli. If needed adjust by adding extra.

-When it is boiled, add chopped coriander leaves.

Ribbet collage 1

-Season with oil or ghee by spluttering mustard, red chilli and curry leaves.

-Serve with hot rice .


Nendra Balekai Chips / Kerala plantain chips:

A person who can resist chips, let alone not like them, is unheard of.

Nendra is a variety of banana, which is very popular in Kerala and our coastal region. We usually use this in various snack preparations. Raw banana chips are very popular in South India and it’s usually served as a savoury side dish in a traditional meal or just as munchies. This is very addictive and has a distinct flavour due to usage of coconut oil for frying.

I got this raw banana from my cousin brother’s farm and prepared these chips after ages. All thanks to them.

DSC08387

Now we will proceed towards the recipe-

Ingredients:

Green Nendra Banana – 10

Salt – 1 tbl sp

Water – 1 small cup

Coconut oil – To deep fry.

Chips slicer – to slice

Method:

Apply some oil to your hand. To some extent it will protect your hand from blackening.

Take fresh, green plantain, wash properly. Take one small sharp knife, remove top and bottom part and give slits on outer skin at regular intervals (may be 4 to 5) from top to bottom.

Ribbet collage

Now slowly insert your thumb at the slit and open the outer skin.

Don’t throw away this skin; you can make very tasty palya/Subzi out of this.

Immerse these peeled bananas in a bowl of water.

Ribbet collage 2

Take one small bowl of water and mix salt and keep aside.it is your salted water, which is used while frying chips.

Now you can keep coconut oil for heating. When it is very hot, start making chips. To test the hotness of oil, drop one small piece of plantain, if it pops up immediately, it is ready.

Take out plantain from water, pat dry and start slicing directly to the hot oil by using slicer.

Ribbet collage 3

Use one or two plantains at a time.

Keep flame at medium. When the slices of plantain cook, the bubbling sound of the oil becomes faint. Now you can add 1 tbl spoon of salted water, and you will hear lot of bubbles and bubbling sound. When the sound reduces, the chips are ready to be removed from the oil.

Remove the chips from the oil and keep them on a tissue-laid plate.

After cooling store, it in an air tight container and proceed with the remaining plantain.


Temple Style Vegetable Sambar:

Usually people ask me regarding recipe of sambar, which is served in Coastal Mangalore temples. In our coastal temples, prasadam is served in the form of afternoon lunch. It is a simple lunch, served on a plantain leaf. which usually includes palya, rice, Rasam, sambar, payasam and buttermilk. Speciality of this lunch is, taste of the Rasam or sambar will linger in your mouth even after some time.

Commonly used vegetable for this kind of sambar is Ash gourd, sweet pumpkin or Coloured cucumber. You can take any one of these above-mentioned veggies and make. Here freshly roasted and ground masala has been used and onion or garlic is a taboo ingredient in prasadam lunch.

DSC_4627_Fotor

Here I have used home grown Sweet pumpkin –

Ingredients:

Sweet pumpkin – ½ kg (you can use coloured cucumber or Ash gourd as well)

Salt

Jaggery – 1 to 2 tea spoons (adjust according to your taste)

Red chilli powder – ½ tea spoon

Coriander seeds – 1 table spoon

Cumin – 1 tea spoon

Methi – ¼ tea spoon

Hing – pea nut size (hard hing) or ½ tea spoon of powdered hing.

Urad dal – 1 tea spoon

Chana dal – 1 tea spoon

Red chillies – 3 to 4

Coconut – ½ cup

Curry leaves – 1 spring

Toor dal – ¼ cup

Turmeric – ½ tea spoon

Tamarind – ½ – 1 tea spoon

Seasoning:

Coconut oil – 1 table spoon

Mustard – 1 tea spoon

Red chilli – 1

Curry leaves – 1 spring

Method:

-Cook toor dal after washing and keep aside. (don’t use more dal)

-Remove central seed part. Chop veggies, as bigger chunks.

Ribbet collage 1

– Cook chopped veggie by adding sufficient water, salt, jaggery, red chilli powder.

-In the meantime, roast masala for grinding.

Ribbet collage 2

-Take one thick kadai, add 1 tea spoon of coconut oil, fry methi seeds until light brown.

-Add in coriander, cumin, Hing, Red chillies, urad and Chana dal and proceed frying until dal becomes light brown and red chillies puffs and roasts.

-Add in coconut, curry leaves and turmeric, proceed frying for 2 to 3 minutes or until you feel the aroma of coconut.

-Cool this mixture and grind into not so smooth paste by adding tamarind and sufficient water.

– Now mash cooked dal add dal and freshly ground masala to cooked veggie and boil.

-Check for salt, jaggery and adjust. When it boils add seasoning.

-Heat coconut oil, mustard, red chilli, when mustard splutters, and curry leaves and pour over the prepared(boiled) sambar.

-Serve with hot rice.


Pasta and Carrot Kheer:

My teenage daughter who loves to experiment in food as well as to try or taste new combinations gave an idea to mix her favourite pasta with carrot in payasam and here is the result. I want to dedicate this post to her.

I did follow any regular kheer recipe. To give an extra zing I added ghee fried Chironji and carrot.

DSC04835_Fotor

Recipe follows like this-

Ingredients:

Pasta – 1 small cup

Chironji –  2 table spoons

Carrot – 1 (grated)

Ghee – 1 table spoon

Milk – 1 litre pack

Sugar – As needed

Cardamom powder – ½ tea spoon

Method:

-First cook pasta. Boil water, put one tea spoon of oil and ½ tea spoon of salt in it.

Ribbet collage 1

-Drop pasta and cook until Al Dente and drain, keep aside.

-Take one thick bottomed wok, add ghee.

-Fry Chironji, then carrot, until it changes colour.

Ribbet collage 2

-Add milk and cook until milk becomes little thick and becomes little cream in colour or reduced to ¾ th.

Ribbet collage 3

-Add sugar and boil. Now drop in drained pasta, garnish with cardamom, mix and adjust the consistency by boiling more or adding more milk if needed.

DSC04838_Fotor

-Serve hot and enjoy the treat with your loved ones.

Carrot Halwa (South Indian Style):

Carrot Halwa or Gajar ka halwa is a very popular Indian dessert. This halwa is everyone’s favorite in my place. They love it hot directly from the stove top as it is or with vanilla ice-cream.

It is a south Indian style preparation, which we follow in our homes. i.e. Without khoya/milk solids and it is cooked in whole milk.

DSC09043_Fotor

Now we will see my style of preparation,

Ingredients:

Red Delhi carrot – 1 kg

Regular carrot – ½ kg

Milk – ½ litre

Sugar – ¾  to  1 cup (according to your taste)

Ghee – ¼ cup  

Roasted Slivered almonds – 1  to2 tablespoon

Roasted cashew bits – 1 to 2 tablespoon

Cardamom powder – 1 tsp.

Method:

-Wash and peel the outer skin and grate the carrots.

carrot halwa 1

-Take one thick bottomed pan, heat 2 tablespoons of ghee and fry grated carrots for 10 min, till it completely wilts.

-now add milk, cook until milk evaporates and carrot cooks.

Ribbet collage 1

-now add sugar (here we must check for required sweetness, we usually prefer a little less sweet), and mix nicely by adding the remaining ghee until the mixture leaves the sides of the pan.

-now garnish this with cardamom powder, roasted slivered almonds and 1 tablespoon ghee. Mix this nicely.

Serve hot as it is or with vanilla ice cream and enjoy your winter treat.

Paramanna/ Pindi payasam:

Pindi payasam is nothing but our traditional rice kheer without adding any milk or coconut milk, which is usually offered to god as a Naivedyam and served as a prasadam at any pooja. It is considered as a favourite of goddess Devi. When I look back and think, Pandan leaves were widely used in our region(Mangalore) as well. One can make this payasam even without adding Pandan leaves.

pic main

Pandan leaves are known as gandhasaale ele in our Mangalore region.
Gandhasaale rice is a traditional, flavoured and scented rice variety of Karnataka and Kerala, cultivated in small pockets. Gandhasaale rice is the best rice for meals, Pulav, payasam and other eatables. The Gandhasaale rice is known especially for its rich aroma. It is also called Kerala’s basmati.
In our native, to get aroma of “gandhasaale” in ordinary rice, my grand mom used to put these leaves in, while cooking the rice. Pandan (Scientific Name: Pandanus, also known as screw pine or palm pine) is a herbaceous tropical plant that grows in Southeast-Asia. In Chinese, it is known as ‘fragrant plant’ because of its unique, sweet aroma. The cultivated plant features upright bright green leaves, and it’s the leaves that are used for cooking up many Thai and Southeast-Asian dishes. Pandan is also made into a paste that is used in cakes and desserts, much the way we use vanilla flavouring in the Western cuisine. However, in addition to flavour, Pandan paste also instil foods with a bright green colour. Some Thai and Malayan desserts which I have tasted are Pandan baked cake, Pandan jelly and Pandan sticky rice in Malaysia. Personally, I dint like it much because of its overpowering fragrance and felt that, like my ajji (grand mom), one should use one or 2 leaves to get that perfect blend.

DSC05949_Fotor

Ingredients:

White rice – 1 cup (I have used small grain rice)

Grated jaggery – 1 cup

Ghee – 2to 3 table spoons

Coconut – 2 table spoons (grated)

Cardamom powder – 1 tea spoon

Pandan leaves – 2

Cashew bits – as needed

Method:

-Wash rice, Pandan leaves. Soak rice for 10 minutes.

-Boil 2 to 3 cups of water, add rice, Pandan leaves and cook until it is done.

Ribbet collage 1

-After cooking, remove Pandan leaves.

-In the meantime, take one cup of water, boil, add jaggery and melt.

-Sieve this solution and remove all the impurities.

-Add this solution to cooked rice and boil.

-When the mixture becomes thick, add ghee and mix nicely.

Ribbet collage 2

-Lastly add coconut, cardamom powder and give a stir for 2 to 3 minutes or until it becomes like a creamy mass.

-Roast cashew bits in a little ghee and garnish.

-If you want to offer this to god, do that and then serve. Other wise serve hot and enjoy this delicacy.


Pineapple Menaskai/ Gojju:

Menaskai/Menaskayi is one of our coastal specialities, which is a hot, sweet and sour, sesame flavoured coconut-based curry. Normally made with bitter or tangy things like Bitter gourd, raw mango, wild mango or pineapple. We even prepare by mixing Bitter gourd and raw mango as well. It is a common dish in any of our elaborate menus for festivities, usually served on a plantain leaf, like poojas or weddings. This same curry is prepared in a little different way in other parts of Karnataka and known as “Gojju”.

Here, the main trick is-balancing of all the flavours.

If you are preparing with sour vegetable or fruit, there is no need to add additional tamarind. For example, if you are preparing raw mango or mixture of bitter gourd and raw mango Menaskai, there is no need to add tamarind. If you are using pineapple, tamarind should be added.

Here I have used pineapple and the procedure goes like this-

Ingredients:

Pineapple – 1/2 (chopped into bits)

Raw mango – 1/4 (chopped into bits)

Tamarind – gooseberry size (if the mango is not available)

Jaggery – as needed

Salt

Green chillies – 2 (slit)

For masala:

Fresh Coconut gratings – 1 to 1 ½ cups

Methi seeds – 1/4 tsp

Urad dal – 2 teaspoons

Sesame seeds – 2 teaspoons (U can use black or white)

Dried red chillies – 8 – 10 (we use Byadagi variety)

Coconut oil – 2 to 3 teaspoons (1 for roasting + 1 for seasoning + 1 tsp to garnish)

Mustard – 1 tsp

Dried red chilli -1

Curry leaves – 2 springs

Method:

-Clean pineapple by removing the outer skin, chop into bite-size pieces.

Ribbet collage 1

-Cook pineapple pieces and mango pieces or tamarind with little water, turmeric, salt, jaggery, green chillies and curry leaves.

-Dry roast sesame seeds. Now fry all the masalas for grinding. First heat 1 tsp of oil, put methi(fenugreek) seeds. When it is light brown, add all the other ingredients like urad dal,  red chillies and fry until urad dal is light brown. Now it is the time to put coconut and fry further for 2 minutes or until you smell the nice aroma.

-Cool the mixture, grind into a paste by adding sesame seeds and sufficient water as well.

-Add this paste to the cooked pineapple, check for salt and jaggery. Adjust the consistency by adding water and boil nicely in a simmer for 5 to 10 minutes.

-After boiling, add 1 tsp of raw coconut oil as well as the seasoning with coconut oil, mustard, red chilli and curry leaves. Close the lid and leave it to soak all the masalas for half an hour.

-Serve with hot rice.

Note:

-After boiling, the gravy should be a little thicker than normal sambar.

-Taste should be sweet, sour, hot. So adjust the addition of jaggery accordingly.

– We usually relish this dish the next day of preparation, usually with Neer Dosa or chapati/Roti. 😊