Pumpkin Flower Tawa fry:

Pumpkin flower is bright yellow coloured, which is loaded with essential nutrients, minerals and used in a different cuisine around the world and considered as a rare delicacy in a gourmet cuisine as well. 

Pumpkin plant bears male as well as female flowers separately. Usually Male flowers appears initially, and female flower is a rarity. These flowers last only for a day and wither by the evening. That is the reason why we see only Male flower in cooking. It has a main role in pollination and after that it will wither, and female flower will grow as a Pumpkin. If you have a doubt in distinguishing between male and female flowers, male has only a long stalk and the female has a round green, big swollen structure(ovary) at the base of the petals.

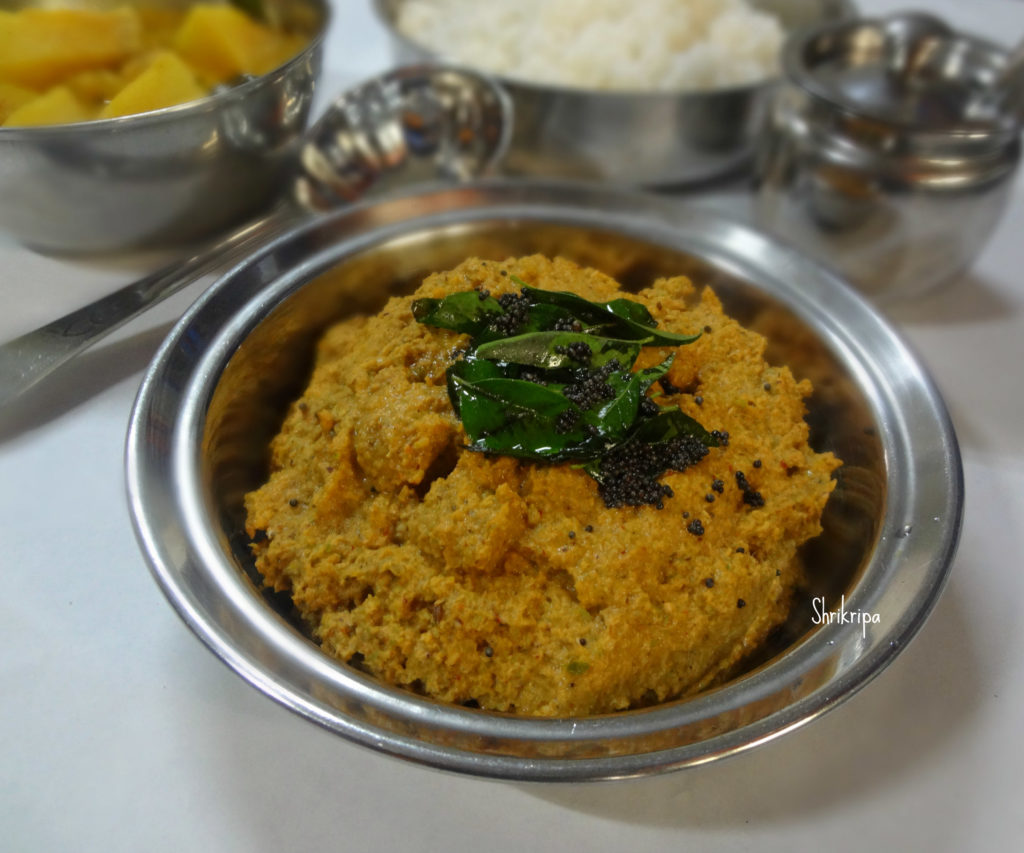
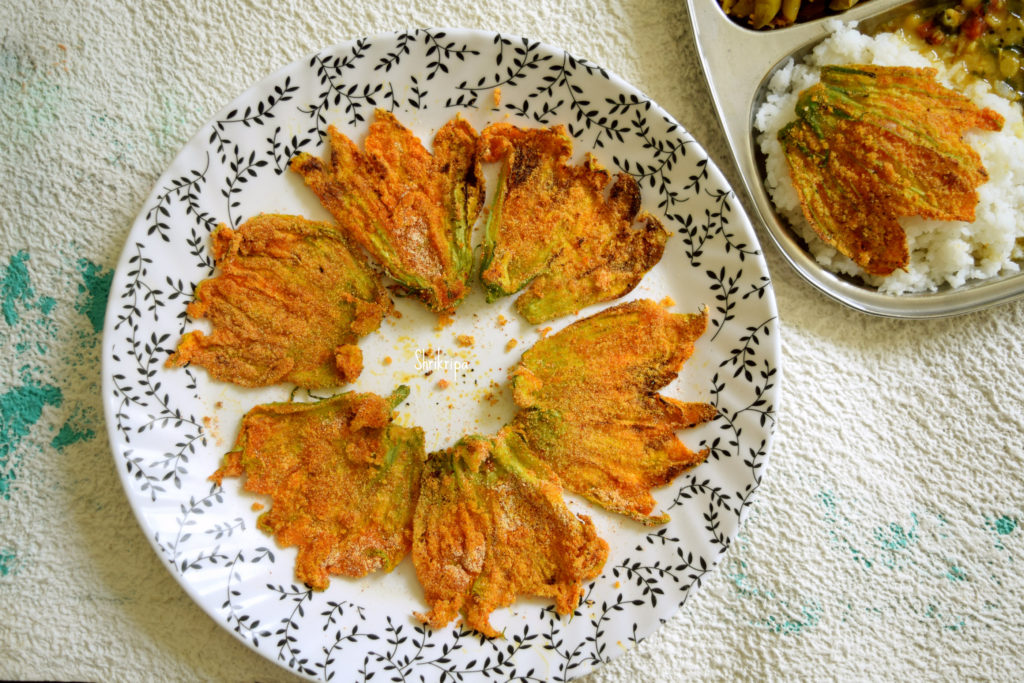
Pumpkin flowers are used either in a raw, tossed, pan fried, cooked forms in various recipes and it is found occasionally in salads, soups or batter fried. Here I am showing Mangalore style tawa fry in which pumpkin flower will be coated with seasoned fine semolina and tawa roasted by drizzling some coconut oil to give coastal touch.

If you have Pumpkin, squash or Zucchini plant in your garden, collect all the male flowers and make this and enjoy your meal. You can collect the fresh flowers every day and store it in an air tight box for 3 to 4 days and utilise in your cooking.

DSC_4222_Fotor main

This is how I make-

Ingredients:

Pumpkin flowers – 5 to 6

Fine semolina – 1 small cup (chiroti rawa)

Salt

Hing – ¼ tea spoon

Turmeric powder – ½ tea spoon

Red chilli powder – 1 tea spoon

Coconut oil – as needed

Method:

-Wash flower, give one fine slit at the bottom of the flower and cut open.

-Remove stamen.

Ribbet collage 1

-Dry mix all seasoning items from rawa, salt, red chilli powder, turmeric powder and hing.

-Take each flower and coat with the seasoning, by rolling.

-Heat iron tawa/ griddle, place all these coated flowers.

Ribbet collage 2

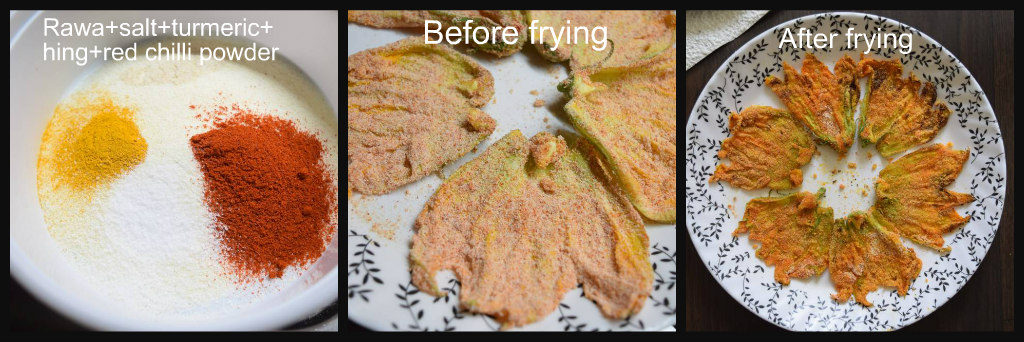
-Roast these by using sufficient coconut oil on both the sides.

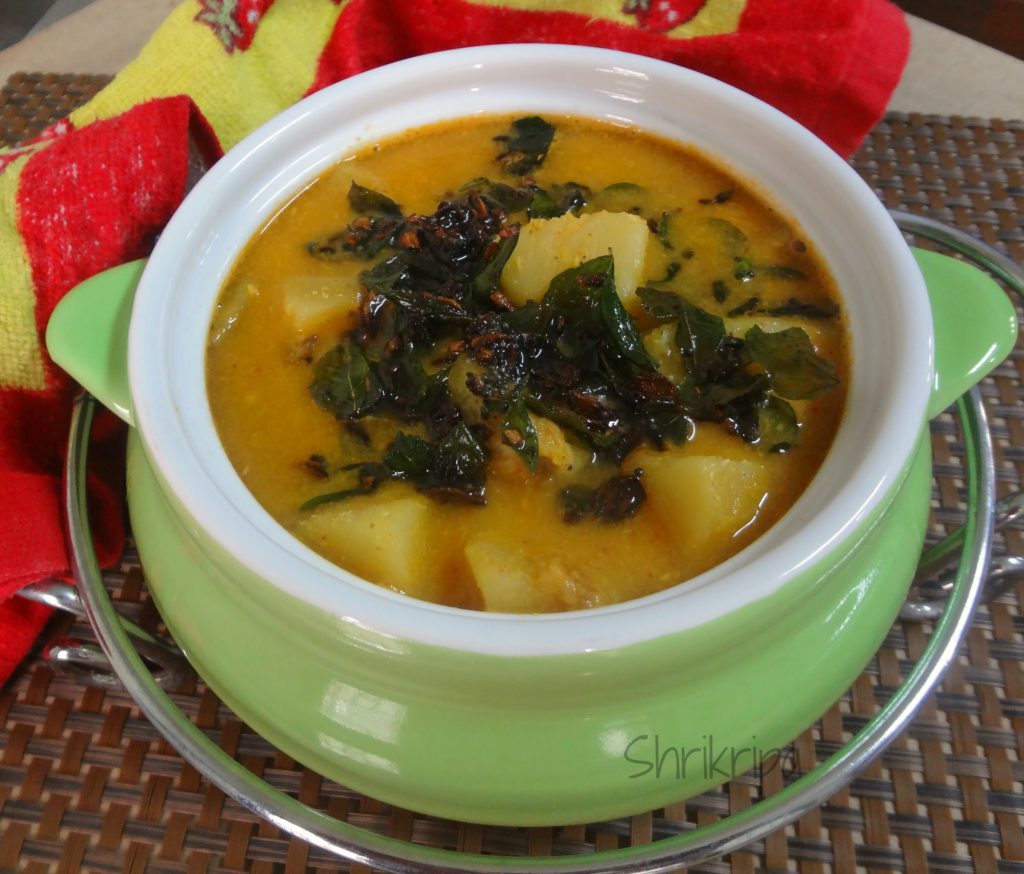
-Serve these with hot rice and Rasam or dhal.


Plantain / Banana Flower Chutney:

We call Coconut tree as a Kalpavriksha. In my opinion Banana plant also should come under this category, because almost every part of the banana plant is used in some way or the other.

The leaves, flowers, fruits, stem, stem fibre etc. Nothing is wasted over here, and it is very useful in many ways.

The male banana flower is purple coloured, dome shaped, and can be seen hanging at the bottom of every fruit bunch. In banana plant, female flowers appear first and appear as a hand like structure in clusters. These female flowers will develop as the real fruit, which we normally eat, and male flowers will remain intact in layers of purplish outer bracts.

After fruit matures, we harvest the fruit and use the male flower that we see at the end of the fruit bunch in cooking. It is loaded with fibre, anti-oxidants, iron, potassium, calcium, vitamins and all other minerals. Flower is used mainly to treat constipation and anaemia in villages of our native in and around Mangalore.

This Chutney recipe is handed down to me by my amma (mother), and I used to relish this from my childhood. It is a perfect combination with hot rice, topped with fresh home-made ghee. We can feed this to small toddlers as well.

DSC04353_Fotor main

Ingredients:

Banana flower – 1

Cumin – 1 tea spoon

Pepper – 1 tea spoon

Tamarind – ½ tea spoon

Salt

Water – 1 bowl

Curd – 1 serving spoon

Grated coconut – 1 cup

For Seasoning:

Ghee – 1 table spoon

Cumin – ½ teaspoon

Curry leaves – 1 spring

Method:

-Wash banana flower from outside and remove outer purple bract (remove 2 layers) and discard.

Ribbet collage 1

-Now take one bowl of water with 1 serving spoon of curd and mix and keep it ready. (This water will avoid decolouration of the chopping’s)

-Start chopping banana flower from the tip (refer picture)

Ribbet collage 2

-Keep on adding chopped part to curd water.

-While chopping, whenever outer shell opens by itself, discard that and proceed chopping.

– After chopping is done, drain the curd water and collect the banana flower chopping’s.

-Take one vessel, add chopping’s, salt, pepper, cumin, tamarind, 1 cup water and cook.

Ribbet collage 3

-When it is done, remove from the fire and cool.

-Add coconut, required amount of water and grind the content.

-Now take one tawa, add ghee, cumin, curry leaves and pour the ground mixture and boil.

DSC04355_Fotor main 1

-This chutney will stay good for a couple of days under refrigeration and can be served either with hot rotis or with rice.


Mixed millet Masala Cookies:

Millets are a very good alternative to normal All-purpose flour or whole wheat flour in gluten free baking. You can’t even recognize the core ingredient. It is gluten free as well as high in nutritional value too.

When I was trying out some recipes for the 2017 Millet calendar, I dished out a couple of recipes, which had turned out super tasty, and at the same time, healthy, filling and as an alternate snack for kid’s tiffin boxes as well.

I tried pizza based seasoning in this cookie recipe and it tasted super delicious.

pic main

Ingredients:

Mixed Millet flour – 1 cup

Butter – 50 grams

Sugar – 2 table spoons

Salt – ½ teaspoon

Baking powder – ½ teaspoon

Baking soda – ½ teaspoon

Curd – 2 table spoons

Pizza seasoning or Oregano – 1 tea spoon

Chilli flakes – 1 tea spoon

Cumin – 1 tea spoon

Grated cheese – to decorate.

Method:

  • Mix flour, salt, baking powder, baking soda, pizza seasoning, chilli flakes and cumin and keep aside.
  • Now beat butter and sugar until it becomes fluffy and creamy. Add in curd and beat once again.
  • Mix in flour mixture and bind all the ingredients together, the resultant dough will be like Chapati dough.

Ribbet collage 1

  • Take dough little by little, roll it into half inch thickness and take a cookie cutter and cut.
  • Arrange this in a lined baking tray.
  • Sprinkle grated cheese on top.
  • Bake this in a pre-heated oven at 170 ºC for 10 to 12 minutes.

pic 2

Note:

  • Here mixed millet flour is store bought pre- mixed flour.
  • Alternately one can mix two to three millet flours and make their own flour or use all purpose flour as well.


Moringa / Drumstick leaves powder:

In our coastal area, we never used Moringa in any other form than using its pods which we call as drumstick as a vegetable. During my growing age, I tasted only drumstick in our style cooking. After marriage and coming to Bangalore, slowly I got used to its greens and blooms. My house- help, normally brings organic and home-grown drumstick greens in the spring season.

Moringa greens are packed with vitamins and nutrients and it is considered as a new superfood of the world. The leaves are rich in vitamins, calcium, iron and protein. I have read that, one ounce of moringa powder boasts seven times more vitamin C than oranges, 4 times more beta carotene than carrots, 3 times more potassium than bananas and 2 times more protein than yogurt.

Moringa leaves can be cooked like any other greens and included in our day to day cooking. Apart from that, we can dry it and keep it in a powdered form to add in our day to day consumption in the form of juice, smoothie or in seasonings. It is known to help with anxiety, lethargy, acidity, skin ailments and diabetes. After reading so much about this super food, I made an attempt to make homemade powder to include it in our diet and recipe is here –

main_Fotor 1

Ingredients:

Moringa Fresh leaves

Method:

-Wash the greens as it is with small branches intact, without removing leaves. And drain water.

-Spread these greens on a clean cloth indoors. No sun light is needed for this.

Ribbet collage 1

-After 2 days of drying, you will be able to remove all the tiny leaves without any hassles.

-Remove all the sticks and discard.

-Dry further for couple of days, until it is crisp to touch.

-Powder and collect fine powder by sieving.

Ribbet collage 2

-Spread this fine powder and dry for couple of hours to remove any traces of moisture.

-Store this in a clean jar and use as needed.


Turmeric Milk /Turmeric Latte:

This is an age-old remedy for sore throat during flu season in India. Turmeric is a key ingredient in Indian cooking and has a very important place in our kitchen shelf. It offers many health benefits since it has both anti-inflammatory, analgesic, antiseptic and anti-oxidant properties. It is considered as a “natural aspirin” in Ayurvedic medicine. In our family we combine turmeric and pepper with milk to make concoction to soothe sore throat. Pepper corns is said to help in absorption of turmeric by the body.

pic main

How we prepare –

Ingredients:

Water – ¾ cup

Milk – ½ cup

Turmeric – ½ tea spoon

Black Pepper corns – ¼ tsp (crushed) or pepper powder-2 pinch

Sugar – 1 tea spoon

Method:

-Boil water, add turmeric and pepper and allow to simmer for 10 minutes.

Ribbet collage 1

-Add milk and sugar and heat a bit, sieve the mixture and drink as warm as possible.

-It really gives a soothing effect.

Note: Vegans can use any other form of milk.

Breadfruit Peel Chutney:

Yes!!! You heard it right. In our household we never throw out nutritionally filled outer peel of the veggie or the seeds. I normally make it a point to use as frequently as possible in one form or the other. Normally vegetable stock is an easy option. If only one variety is available, chutney or relish is an alternative tasty option too.

Don’t throw away organically grown or home-grown veggie skins. These are a real treasure of flavour and vitamins. Normally breadfruit is grown without any pesticide. 

This chutney can be relished with hot plain rice with ghee or with any flat breads. 

chutney main

Ingredients: 

Breadfruit peel – From one fruit

Coconut – ½ cup

Urad dal – 1 tea spoon

Cumin – ½ tea spoon

Dried red chilli – 2

Green chilli – 1 or 2

Garlic – 3 to 4 cloves

Tamarind – ½ tea spoon

Coconut oil – 1 table spoon

Salt

Seasoning:

Coconut oil – 1 tea spoon

Mustard – ½ tea spoon

Curry leaves – 1 spring

Method:

-Wash bread fruit peel before peeling. Once again wash and remove white latex, which oozed out while peeling.

-Take one small kadai, pour oil, when it is hot add urad dal fry until it is light brown.

Ribbet collage 1

-Next add cumin, red chilli, and fry until chilli puffs and becomes crisp.

– Now add peels, garlic, green chilli and fry until outer peel changes its colour and wilts a little.

-Next you can add coconut, tamarind and salt, switch off the gas. Toss for one minute and cool this mixture.

-Grind this cooled mixture in a mixer grinder with enough water.

– Do seasoning by heating oil, splutter mustard and add curry leaves and pour it over the chutney.


Breadfruit/Deevi halasu sambar:

Breadfruit is seasonal much-loved veggie in our coastal region of Karnataka.

It is something we all grew up with – “a comfort food”

It can be consumed when it is mature, but still firm and can be cooked and eaten in so many forms.

This picture is not enough to bring out the glory of this sambar. This veggie is very soft, melt in the mouth type and combined with this sambar, it makes a heavenly gravy.

breadfruit main

Let us see how to prepare it –

Ingredients:

Bread fruit – 1

Salt

Red chilli powder – 1 tea spoon

Jaggery – 1 to 2 tsp

Toor dal – ¼ cup (cooked)

For masala:

Coriander – 1 table spoon

Cumin – ½ table spoon

Urad dal – 1 ½ table spoon

Hing – ¼ tea spoon

Grated fresh Coconut – 1 bowl

Tamarind – 1 tea spoon

Seasoning:

Coconut oil – 1 table spoon

Mustard – 1 tea spoon

Curry leaves – 1 spring

Onion – ½ (chopped)

Method: 

– Apply some oil to your hand. To some extent it will protect your hand from blackening

– Take fresh breadfruit, wash properly. Take one sharp knife and remove outer skin as thin as possible and reserve this to make chutney. Yup!! you heard it right: D

Ribbet collage 1

– Make four longitudinal pieces, remove inner pith (which is slightly harder and rubbery in nature)

-Immerse these pieces in bowl of water for 2 minutes.

– Take out and Make chunk like pieces.

– Cook these pieces with sufficient water, salt, jaggery, red chilli powder.   

Ribbet collage 2                     

–  Now take one kadai, add 1 tsp of coconut oil, put coriander, cumin, urad dal, hing and red chillies – fry in a low flame. When urad dal becomes red, switch off.

-Grind this masala by adding coconut, tamarind and required amount of water to fine paste.                            

-When breadfruit pieces are done, add cooked dal and ground masala. Check for the salt. Keep this on the stove top and boil this mixture.

-After it boils switch off and add seasoning by heating coconut oil, add mustard when it starts spluttering. Add curry leaves and chopped onion. Fry nicely till onion chunks are brown and add this over ready sambar.

-Enjoy this sambar with hot rice.


Arrowroot Halwa:

Traditionally we call this Arrowroot halbayi. Which is easy to digest and considered as a very light food during fasting or illness. This should be consumed fresh and the shelf life of any halbayi is only 24 hours.

Arrowroot powder is extracted from the arrowroot plant, which is milky white in colour and powdery like corn starch. It has high nutritional content and is a very good substitute for bleached corn starch as a thickening agent in cooking. It is odourless and works well too.

Arrowroot powder’s “Easy to digest” quality is qualified to make infant food as well as to treat diarrhoea. It is usually consumed in a porridge form in our region. Usually, 1 tablespoon of powder is mixed with little water (according to the consistency) and cooked until it is shiny and glossy. Then with preferred seasonings like salt or jaggery.

Although it is a starch, it contains no gluten, so works well in gluten-free baking or cooking as well.

pic main

Ingredients:

Use a small tumbler to measure arrowroot, milk and jaggery or sugar.

Arrowroot powder – 1 cup 

Coconut milk or milk – 1 cup

Jaggery or sugar – 1 cup (grated)

Ghee – 2 tablespoons

Water – 2 cups

Cashew bits – 2 tablespoons

Cardamom powder – 1 teaspoon

Method:

– Mix arrowroot powder in water and keep aside for one hour.

– After an hour, pour the top/soaked water. Add 2 cups of water, mix nicely and sieve this solution to remove any impurities.

collage 1

– Make jaggery syrup by adding little water, boil and sieve the solution to remove any impurities.

– Grease one steel plate with little ghee and keep it aside. Roast cashew bits with a drop of ghee and keep aside.

– Mix sieved mixture, coconut milk, jaggery syrup in one thick Kadai and heat the mixture by stirring continuously on low fire.

collage 2

– Add ghee in-between, when it is half done add cardamom powder, cashew and stir once.

– When the mixture leaves the sides of the vessel and becomes one mass and non-sticky, pour the mixture to a greased plate.

– Take one flat spoon/ladle, apply some ghee to the back of the ladle and press the mixture to give a uniformly smooth texture and even thickness.

– When it cools down a little, mark and cut this into the desired shape and serve.

– Please note, this halwa/ halbayi stands good only for one day. If you want to enjoy this dish over more days, you should store this in a refrigerator and reheat it before serving.


Banana/Plantain Stem Salad:

Traditionally we have used banana stem from ages and it is a super-rich vegetable and neglected by many. Our ancestors were very intelligent and included all the available nutritive vegetables from their surroundings. In our native, usually most of the people rely on agriculture for a livelihood and include all parts of banana plant in day to day cooking. When a bunch of bananas is harvested, the banana tree is cut away. Which is 80% water and 20% fibre.

Eating banana stem is very good for health as well as the kidney. It’s high fibre nature is known for its cleansing property of the digestive system. So, it is very good for diabetic or kidney stone patients.

It has layers of covers which should be peeled off and foot long pieces are made by retaining only a couple of outer layers as a protective layer for this vegetable and they are stored and kept aside for future use.

According to the requirement, before chopping this veggie, chop off required length of the stem, remove outer remaining sheath, until you find the very soft inner core.

Now comes the chopping part. Make thin slices, while slicing you will see the thread like fibre, which sticks to the knife and sometimes it will stick to the slices itself. If you find any thread like fibre either in sliced pieces or knife, remove it by hand.

After slicing the roundels, stack 5 to 6 roundels one over the other and chop as desired. I usually make square small pieces for this salad.

pic main

Ingredients:

Plantain stem – 10-inch long.

green chillies – 2 (if available use bird eye chillies)

Fresh Coconut – 2 table spoons

Salt

Lemon – ½

Coriander leaves – 1 table spoon (chopped)

Coconut Oil – 2 tsp

Mustard – 1 tsp

Hing – 1 pinch

Curry leaves – 1 spring

Method:

  Chop banana stem as described in description.

  Now, remove the remaining outer cover.

collage 1

  Slice inner pith into roundels by removing thread like fibre.

  Stack all the roundels and chop as needed. I prefer small square pieces.

collage 2

  Sprinkle salt and lemon juice and mix it thoroughly.

  Chop chillies.

  Do seasoning, heat oil, splutter mustard, add chopped chillies, hing and curry leaves.

  Add this seasoning over salad.

  Garnish with chopped coriander leaves and grated coconut.

  Goes very well with hot rice or curd rice.


Breadfruit chips:

Breadfruit is commonly known as Jeegujje or Deevi halasu in our native language. It is a staple food in many tropical region and considered as an exotic veggie and wonder food only because of its richness either in its taste, fragrance, its high source of gluten free carbohydrate, protein and minerals.

pic 4

Breadfruit is a seasonal, much-loved veggie in our coastal region of Karnataka. It can be consumed when it is mature, but still firm and can be cooked and eaten in many forms. Today I am going to write about its chips. How we can make this exotic savoury and enjoy the gloomy weather.

I got this fresh Breadfruit from my cousin brother’s farm and got an opportunity to make these chips and had them after ages. Guidance was given by my lovely co sister who prepares this in our native, during every season.

pic 2

Ingredients:

Breadfruit – 2

Salt -1 table spoon

Turmeric – ½ tea spoon (optional)

Water – 1 small cup

Coconut oil – To deep fry

Chips slicer – to slice

Method:

– Apply some oil to your hand. To some extent it will protect your hand from blackening.

– Take fresh breadfruit, wash properly. Take one sharp knife and remove outer skin as thin as possible.

– Make four longitudinal pieces, remove inner pith (which is slightly harder and rubbery in nature)

– Immerse these pieces in bowl of water.

collage 1

– Take one small bowl of water and mix salt, turmeric powder and keep aside. It is your salted water, which is used while frying and addition of turmeric will enhance the colour of the chips.

– Now you can keep coconut oil for heating. When it is very hot, start making chips. To test the hotness of oil, drop one small piece of breadfruit, if it pops up immediately, it is ready.

collage 2

– Take out breadfruit from water, remove traces of water by wiping it out. Make each quarter into half and now you will get 8 total pieces from one bread fruit.

– Take each piece and start slicing directly to the hot oil by using slicer. Keep gas flame at medium.

– When the breadfruit slices cook, the bubbling sound of the oil becomes faint. Now you can add 1 to 2 tsp of salted water.

collage 3

– You will hear lot of bubbles and bubbling sound immediately after adding salted water to the hot oil.

– When the sound reduces, the chips are ready to be removed from the oil.

pic 1

– Remove the chips from the oil and keep them on a tissue paper laid plate.

– After cooling store it in an air tight container and proceed with the remaining bread fruit.