Buddha Bowl:

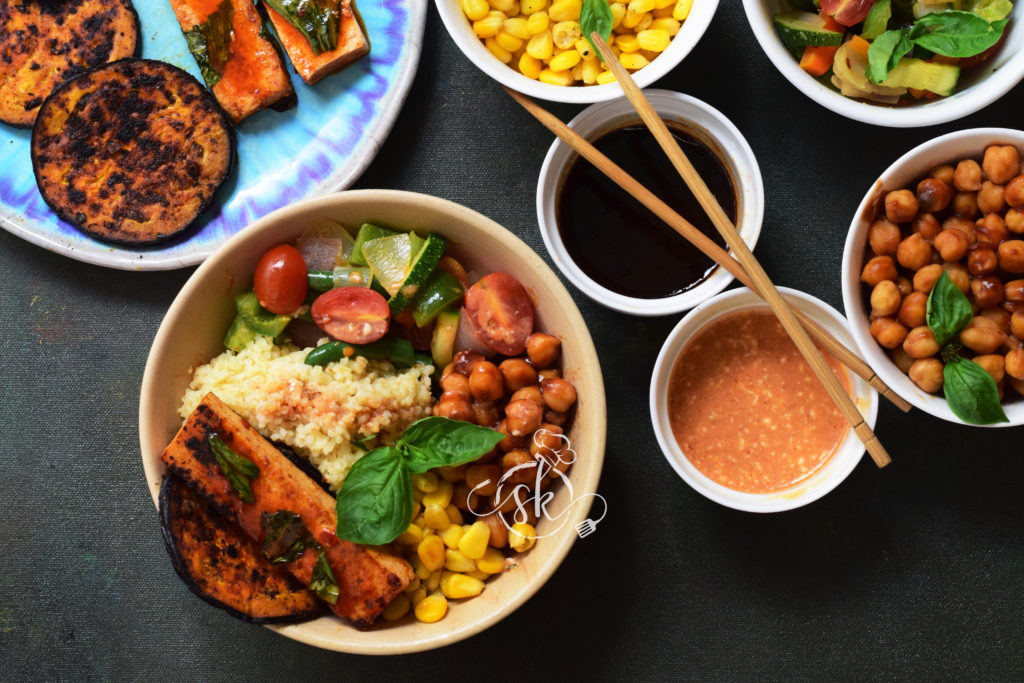
Buddha bowl is wholesome and rich in protein, fibre, and goodness.

When my daughter wanted to experience the dish’s taste, it was a real challenge to me. She had an idea about the final dish, what all should contain, a list of vegetables, how it should turn out everything in her mind and had given a list of her choices.

Dalia: Source of carbohydrate

She was not happy about the usage of rice. Hence, prepared the broken wheat precisely like how we cook rice for fried rice, by putting in a lot of water, oil, salt. Boil well, cook and strain. It tasted pretty well.

Then comes the Chana/Chickpea – Source of plant protein

– Soaked the Kabuli chana, sprouted, cooked in a cooker by adding salt two drops of oil. Drained and tossed with little tomato sauce, Soy sauce, and cooked for 2 minutes.

I follow one more method: heat oil, add ginger juvenile, hing, cooked chana, salt, coriander powder, cumin powder, a pinch of sugar.

Note Addition of oil while cooking high protein legumes helps to avoid bloating.

Next, Brinjal: Cut brinjal into 4 to 5 slices. Marinate with salt, crushed garlic, red chilli powder, Rasam powder, tamarind powder, little olive oil.

Roast it on a hot iron skillet by sprinkling little oil.

Tofu – Protein

Slice 4 pieces marinate with Sriracha sauce, Sweet chilli garlic sauce, four basil leaves (torn), olive oil.

Roast it in a hot iron skillet.

Tossed Veggies:

Veggies used here are – Cauliflower, Broccoli, Beans, Carrot (blanched)

green capsicum, red and yellow capsicum – half each

One onion – diced

I have used butter for tossing these veggies. At first, onion, then capsicum, then blanched veggies. Add garlic salt, pepper, red chilli flakes.
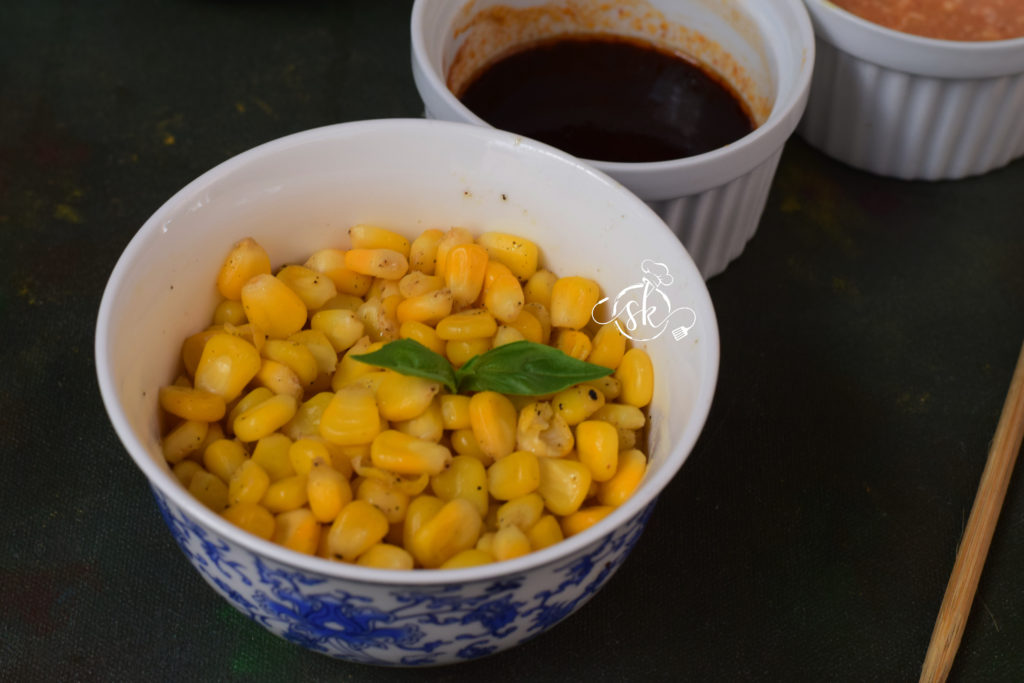
Sweetcorn:

Boil, drain, toss with salt, butter, pepper powder.

2 Sauces: Dressings

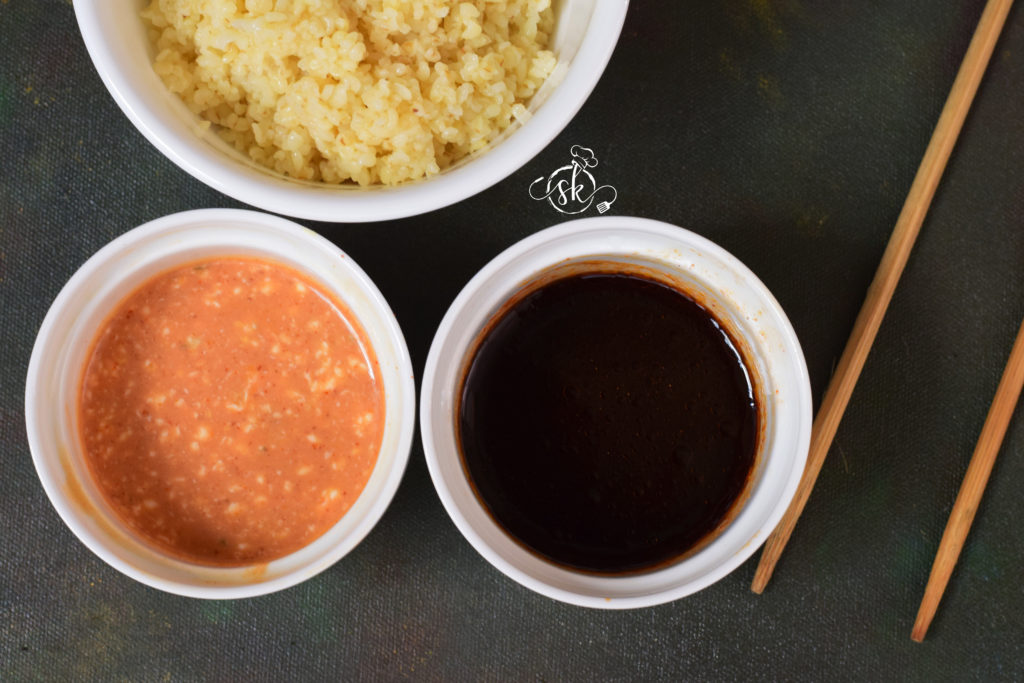
One sauce is: Add Sriracha sauce, Honey, little sesame oil and Soy Sauce (add according to your taste). Adjust the consistency by adding 1 or 2 spoons of water.

The second sauce is: Add Sriracha sauce, Veg Mayonnaise, Red chilli powder ¼ tsp, Sweet chilli sauce, Maple syrup (add according to your taste). Adjust the consistency by adding 1 or 2 spoons of water.


Ambate /Hog Plum pickle :

We call Hog plum “Amtekai” in Kannada and “ambate” in our local language. In our region, you will find two varieties of hog plums. One is Wild variety, also known as Indian sour hog plum, and the other is grafted or Kashi Amtekai/ hog plum.  Grafted variety is nothing but Hog plums which we usually find in South America or Southeast Asia. Also known as Ambarella or Golden apple, which belongs to Spondias Dulcis.

The wild variety, Spondias pinnata, is commonly known as Amtekai/ Amra/Amda/Hog Plum/Junglee Aam in India. Because of its sour taste, it is usually used in pickle making or as a souring agent in some traditional curries. When it matures, a seed becomes woody, and skin becomes thin.

After a long time, I found these beauties in the Mangalore store, which I frequently visited. A lot of preparation goes behind the making of a pickle. I observed that the recipe flowed down from generation to generation. A spoonful of this pickle, which is spicy and tangy, is enough to perk up a bland meal, or as a south Indian, it is a divine combo with thick curd rice.

Ingredients:

Hog plum – 500 gms

Salt – 2 cups

Water – 2 cups

For the pickle Masala:

Dried Red chillies – 100 grams ( I have taken ½  of Byadagi and  ½ of Guntur to balance the heat)

Mustard – 25 grams

Methi – 1 tbl spoon

Hing – ½ tsp

Turmeric – 2 tsp

Method:

-Wash, drain the hog plums. Put it under the sunlight for 2 hours.

-Now, crush and separate the skin from the inner hard seed. Keeping under the sun would help loosen up the skin from the core.

-Now, prepare saltwater. Take 2 cups of salt, 2 cups of water and boil nicely.

-Switch off the gas, add the hog plum pieces, inner core and leave it to cool. In this way, hog plum would soften quick and absorb the salt properly.

To make Pickle Masala:

-Dry Roast Methi seeds until dark brown, then mustard seeds until it pops, then hing, turmeric.

-Put 1 tsp of oil and roast chillies until it puffs and becomes crisp. Cool everything and make powder.

-Add this powder to a cooled hogplum added salt solution, and mix properly. Store it in a dry glass bottle, leave it aside for a couple of days to mature and absorb all the flavours.

-Then, store it in a refrigerator to extend its shelf life. When it is ready, enjoy it with curd rice.

Carrot Kosambari :

Kosambari is a South Indian style vegetable salad, an integral part of any festival South Indian menu. It can be made with or without the tempering, which has significantly less oil, with all sorts of fresh flavours, such as grated veggies, raw legumes, raw mango or lemon,  coconut oil and hing.

Here, what I am sharing is our family favourite, Carrot corn salad. That is how my family identify this salad and demands it. Here, one can add or delete or increase or reduce the quantity of any ingredients without any compromise on taste.

Ingredients:

Grated carrot – 1 or 2

Boiled corn – 1 small cup

Sprouted Moong/green gram – 1 small cup ( optional)

Pomegranate kernels – as needed

Grated Raw mango/lemon juice – as needed

Salt

Chopped coriander – 1 – 2 tbl spoons

Fresh Coconut – 1 to 2 tbl spoons

Seasoning:

Coconut oil – 1 tsp, Mustard – 1 tsp, Hing – ¼ tsp

Green chilli – 1 or 2 (chopped), Curry leaves – 1 spring

Method:

-Take one bowl, mix in Grated carrot, boiled and cooled corn, Pomegranate kernels, Sprouted moong, Grated raw mango, Salt, chopped coriander, fresh Coconut and mix everything.

-Do the seasoning by heating coconut oil, splutter Mustard, add hing, chopped green chilli roast a bit. Add Curry leaves and put them over the salad.

-Mix everything, enjoy as a filler, healthy appetiser or as a side dish or as an evening snack.

Taro Root/ Arbi Fry:

A perfect side dish to enjoy with humble curd rice or Rasam rice. It is flavourful, healthy, and easy to make a side dish.

Now prepare the Taro root or Arbi;  if you are new to the usage of Arbi, please go through my detailed description of handling Arbi, how to cook etc., in “Understanding the roots and tubers.” And go down until Tubers, and you would find the Taro/Arbi under Number 7, and it is HERE.

Now, the procedure for Arbi Fry:

Ingredients:

Arbi root – ¼ kg

Salt – as needed

Turmeric – ½ tsp

Red chilli powder – 1tsp

Tamarind powder or paste – ½ tsp

Coriander powder – ½  – 1 tsp

Hing – one pinch

Garam masala powder – ½ – 1 tsp

Curry leaves – 1 – 2 springs

Oil – 2 – 3 tablespoons

Rice flour – 1 to 2 tablespoons

Method:

-Wash the Arbi root, cook for one whistle in a pressure cooker. Peel the skin and slice it ( ½ inch thick pieces).

-Take one bowl, put these slices, all the masalas from salt to garam masala from the ingredient list. Let it sit for half an hour to 1 hour.

-Take one iron skillet, heat oil, put curry leaves, then marinate taro, toss-up and down in a slow flame.

When it is slightly crisp, sprinkle some rice flour and toss further and enjoy with your meal to make it crispier.

Tips: For example, while roasting Arbi, adding little rice flour when 3/4 is done gives it a crisp texture and does not get sticky and mushy. And the necessity to use excess oil also does not arise, thus making it healthier.


Milk Noodles: Instant noodles with coconut milk

As I always say, learning is an ongoing process. This particular recipe, which I learnt from my daughter. Yes! You heard it right 😀 Here, she has used coconut milk powder, which is an easy option for a hostller.

Instant noodles can be a super tasty, comforting meal by themselves if we consider replacing it with a little healthier option by opting for millet noodles and some tossed veggies. When I heard milk and the explanation of the recipe, I was a little hesitant. After tasting it, I can tell you; it was creamy and delicious. I felt the addition of curry leaves and coconut milk was a game-changer.

Here, I have used Instant Millet based noodles. One can opt for any preferred noodle and its masala for this recipe.

Ingredients:

A small pack of instant noodles – 1 ( with masala)

Onion – 1 ( slightly bigger pieces)

Garlic – ½ tsp (chopped)

Ginger – ½ tsp (chopped)

Green chilli – 1 (sliced)

Curry leaves – 2 springs

Coconut milk/powder– 1 sachet or as required

Chopped veggies – of your choice ( I used Carrot, green peas)

Turmeric – ½ tsp

Coriander powder – ½ tsp

black pepper powder – if needed ( optional)

Garam masala – ½ tsp

Sugar – to enhance the taste ( to balance)

Method:

-Take one tawa, heat a tbl spoon of oil, when it is hot, season with lots of curry leaves.

-Then, add chopped onion, green chilli, garlic, ginger fry for 2 min.

-Add turmeric, coriander powder, salt and add chopped veggies and green peas.

-Fry all these until veggies wilts. Add 2 cups of water, ready Maggi masala, and adjust the salt.

-Now, drop those noodle blocks, cook. When it is almost done, add coconut milk or coconut milk powder, add water to adjust the consistency.

-if you want some more zing, sprinkle a little pepper powder and serve.


Bassaru Palya :

Now, what is bassaru? The literal transition of bassaru is Basida (drained) saru (Curry) in the Kannada language.  Here, we cook the legumes or dals and the choice of greens or veggies in an open vessel with little more water than the required amount to cook. When the cooking process ends, drain the water (stock) and use it for gravy by adding ground masala. Cooked veggies would turn into the dry curry with added seasoning. They are usually served with Ragi Mudde (finger millet balls) or Rice, topped with ghee with chopped onions or papads as an add-on. Bassaru is a staple affair in Bangalore, Mysore, Mandya, Hassan, Kolar, Tumkur region of Karnataka.

Bassaru Can be prepared using either Toor dal, Sprouted green gram, soaked black eye peas (karamani or Alasandekalu) or Sprouted horse gram etc. for protein ( also as a thickening agent to the curry)

If you prefer Greens, you can use the choice of greens except for fenugreek or Methi leaves.

If you don’t prefer greens, you can opt for any veggies such as French Beans, Ridge gourd, Cabbage etc.

Bassaru can be prepared in various ways, and each family has their method. Here, I am sharing how I make it and relish our Mudde Oota.

Ingredients for Saru:

Black eye bean – 1 cup (overnight soaked)

Chopped greens – 1 bowl

Salt

Green chillies – 4 to 5

Onion – ½ (chopped)

Garlic – 5 – 8

Curry leaves – 4 leaves

Coriander – 1 tsp

Cumin – ½ tsp

Coriander leaves – 1 tablespoon (chopped)

Coconut – 1 tablespoon

Tamarind – 1 tsp

For seasoning:

Oil – 1 tbl spoon

Mustard – 1tsp

Onion – ½ (chopped)

Curry leaves – 1 spring

Method:

-Take one vessel, cook soaked bean. When it is half done, add chopped greens, salt and a pinch of jaggery (it is purely optional) and cook further.

-When beans and greens are perfectly cooked and done, drain the stock, collect the water and keep it ready. (take out one serving spoon of cooked legume to grind the masala).

-At first, we would prepare the masala.

-First, heat 1 tsp of oil, add coriander, cumin, curry leaves, green chillies, onion, garlic and fry until onion becomes translucent. Switch off the gas. Add in chopped coriander, coconut, tamarind and mix everything.

-When fried content is cooled, grind it into a smooth paste by adding one serving spoon of cooked legume by adding a little water.

-Now, reserve little ground masala in the mixer jar ( to make palya) and proceed to make saru.

-Take one vessel, mix drained water/stock, ground masala, adjust the consistency, check for the salt, boil until it is frothy.

-Do seasoning, heat oil, splutter mustard, add curry leaves, chopped onion and fry until light brown. Add it to boiled bassaru.

Now we would see the procedure of palya:

-Take one tawa, heat oil, splutter mustard, add curry leaves, chunks of onion, fry until it is translucent. -Add reserved ground masala, fry for 2 minutes. Now, add cooked and drained legumes and greens.

-Check for the salt, seasoning, garnish with freshly grated coconut and mix everything and enjoy with ragi mudde or Rice.

Note:

-Please cook legumes or dals in an open cooking method. Don’t use the pressure cooker. It indeed makes it mushier and soggier.


Ragi Mudde/ Finger millet balls:

Ragi Mudde is a Humble, day to day meal of Hassan, Bengaluru, Mysuru, Tumkur, Kolar region of Karnataka. As a coastal girl, I never used to like Ragi Mudde earlier. As time passed, I learnt to make perfect; please read as “suitable to our palate” mudde and tasty Bassaru palya to go with it. It is one of our family favourites too.

Ragi Mudde is rich in calcium, well balanced, wholesome, healthy food. Perfect meal for elderly, diabetics, weight watchers.

Making of mudde is a real art. It needs little patience and perseverance. Like preparation, eating is also a tactic. Instead of chewing, Ghee laden mudde should be swallowed by dipping it in veg or non-veg curry.

Mudde can be prepared in various ways, and each family has their method. Here, I am sharing how I make it.

Ingredients:

Finger millet / Ragi flour – 1 cup

Water – 2cups

Salt – one pinch( optional)

Cooked rice – 1 or 2 tbl spoons

Ghee – 1 tsp

Method:

-Take one saucepan or thick vessel, heat water by adding salt, ghee, rice.

-When water starts boiling well, keep it in a simmer, add ragi flour and keep one wooden spoon or steel spoon and close the vessel with leaving a gap to allow to escape steam.

-After 5 min, you could smell the cooked ragi. At this juncture, open the lid, start to move the spoon in a circular motion to cook further until you feel the dough doesn’t stick to your finger while checking and the aroma of cooked ragi fills the nostrils. It takes a reasonable amount of time ( from 5 to 10 min)

When ready, transfer the cooked dough to a wooden chopping plank or a wet steel plate. Immerse your hand in a bowl of water, start making the required sized ball by pinching the main dough.

-If you are serving immediately while serving, add ghee and serve. Otherwise, reserve all the balls in a hot box.

Note: -The colour of the Mudde depends on the Ragi flour. 

-For the vegan version, omit ghee and use any vegetable oil.


Kayi Ganji: Coconut Flavoured Rice porridge

It is my go-to recipe for a lazy, Simple, soulful meal on weekends or rainy/winter evenings. This recipe of Kayi Ganji is not our traditional recipe. My way of making a one-pot meal is by mixing my mom’s Theli saru, nothing but rice starch Rasam and rice.

 Amma used to make fantastic ginger flavoured Rasam by using drained rice starch of cooked rice. We sisters used to enjoy Hot white rice with Amma’s theli saaru and pickle a lot. Hence, I introduced those two aspects in a single one-pot meal, and the recipe is here.

Here, one can use freshly extracted coconut milk as well as instant coconut milk powder. Freshly extracted milk does taste out of this world, and for sure, there is no comparison in taste. When you are sick and have no mood to cook, it is a soothing and relaxing one-pot meal option.

The procedure is simple-

Ingredients:

Rice – 1 cup

Water – 4 cups

Salt

Green chillies – 1 or 2

Ginger – ½ inch (julienne)

Coconut milk or powder – according to the taste

Seasoning: Ghee/coconut oil, mustard, cumin and curry leaves.

Method:

-Wash rice, boil water in an open vessel or a cooker. Add rice, slit green chilli, ginger, salt and cook.

-Here, the rice should become mushy. If it is the cooker, switch it off after 3rd whistle.

-Open the lid, add coconut milk, adjust the consistency by adding more water.

-Boil for 2 minutes and switch off.

-Do seasoning by heating ghee or oil, splutter mustard, cumin, and curry leaves. Pour it over the rice and mix everything and serve. You can enjoy it with any side dish or plain pickle.

-You can garnish with chopped coriander as well as lemon juice (completely optional)

Note: I have added one pandan leaf to enhance the flavour. It is entirely optional.


Bendekai Kayirasa / Ladies finger coconut curry:

Kayirasa is one of our almost extinct dishes, which can be seen only in our rural houses and found only in our community / homely recipe. It is coconut-based, slightly sweetish, and pairs well with hot boiled red rice or white rice.

Like Sambar, we always use a light green or purple coloured heirloom variety of Bhindi to make Kayirasa. I have never tried Kayirasa with any other types of Bhindi. It is my childhood favourite, and I used to ask my ajji / Grandmother to prepare whenever I visited her. Her preparation tasted like heaven, and I could never replicate that taste even if I used clay pot like her. Grandmothers are ultimate, and they have a magic wand in their hand to dish out such a delicious meal.  

Ingredient:

Bendekai / Ladies finger – ½ kg

Tamarind – big gooseberry size.

Salt

Jaggery

Red chilli powder – ½ tsp

Fresh coconut – 1 big bowl

Urad dal – 1 tablespoon

Dried red chillies – 3 to 4

Seasoning:

Coconut oil – 2 tsp

Mustard – 1 tsp

Red chilli – 1

Curry leaves – 1 to 2 springs

Method:

–Soak tamarind, boil with little added water, salt, jaggery, red chilli powder.

-When it starts boiling, add chopped Bhindi. Allow cooking on a low flame.

-To avoid sliminess,  don’t close the lid or put a spoon to mix while boiling Bhindi.

-In the meantime, prepare the masala: heat coconut oil, fry urad dal, red chillies. Grind into smooth paste by adding coconut and water.

-Add the ground masala to cooked veggie, boil nicely by adding sufficient water to adjust the consistency.

-Do the seasoning and serve with hot rice.


Eggless Chocolate Banana Cake:

After trying my hand in Homemade Pure Cocoa powder, I thought of using Cocoa powder in several recipes; I first wanted to include it in my all-time favourite banana cake. It is an ideal recipe to finish off overripe bananas and the perfect tea time snack for anyone, including small kids. The cake, which has whole wheat flour, natural cocoa, natural vanilla as well as milk. If you want to make it vegan, replace it with vegan milk and proceed to bake.

Let us see how I have done it –

Ingredients:

Whole Wheat flour – 1 1/3 cup ( I took 1 cup of whole wheat flour + 1/3 cup of Emmer wheat flour)

Fresh/Desiccated coconut – 2 tbl sp

Baking soda – 1 tsp

Baking powder – 1 tsp

Salt – ¼ tsp

Milk – ¾ cup

Coffee powder – 1 tsp

Pure Cocoa powder – ½ cup (unsweetened cocoa powder)

Brown Sugar – ½ cup

Oil – 1/3 cup

Vanilla – 1 tsp (I have used pure powdered vanilla)

Bananas – 2 ( ½ to ¾ cup of pulp)

Chocolate chip or Cocoa nibs – 3 tbl sp

Method:

-Mix dry ingredients like flour, baking soda, baking powder, salt, desiccated coconut in a bowl and keep aside.

-In a saucepan, heat milk, mix in cocoa, coffee powder and make a concoction. Add in vanilla, Sugar and oil one by one. Beat well.

-Next, make a puree of banana and mix in, beat well. Now, the wet ingredient is ready.

-Fold in dry ingredient to wet ingredient. Don’t over mix.

-Pour the mixture into a lined loaf pan, top it with the choco-chip or cocoa nibs and bake at 180°C preheated oven for 40 minutes or until it is done.

-Take out, cool the cake and slice it and enjoy. It stays good for 3 to 4 days under refrigeration.

-Reheat the cake for 30sec in the microwave and enjoy with a cup of coffee or tea.