Ambate /Hog Plum pickle :

We call Hog plum “Amtekai” in Kannada and “ambate” in our local language. In our region, you will find two varieties of hog plums. One is Wild variety, also known as Indian sour hog plum, and the other is grafted or Kashi Amtekai/ hog plum.  Grafted variety is nothing but Hog plums which we usually find in South America or Southeast Asia. Also known as Ambarella or Golden apple, which belongs to Spondias Dulcis.

The wild variety, Spondias pinnata, is commonly known as Amtekai/ Amra/Amda/Hog Plum/Junglee Aam in India. Because of its sour taste, it is usually used in pickle making or as a souring agent in some traditional curries. When it matures, a seed becomes woody, and skin becomes thin.

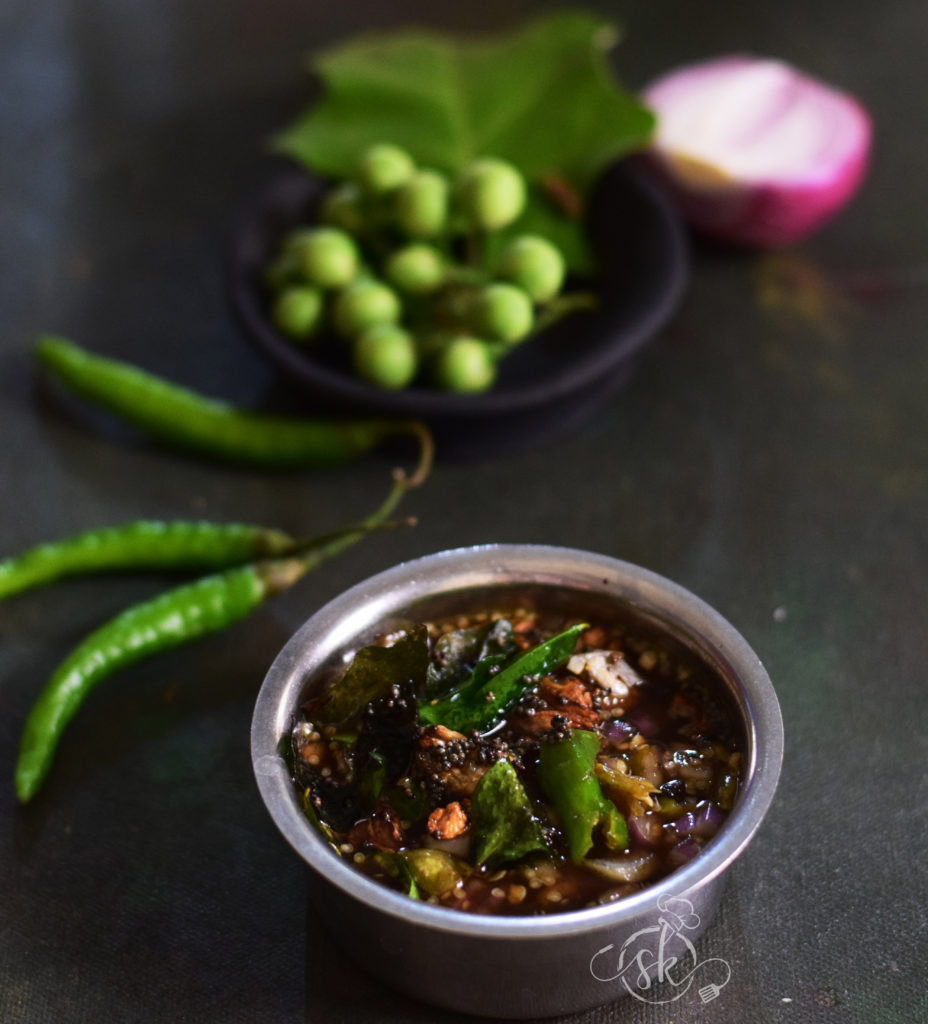
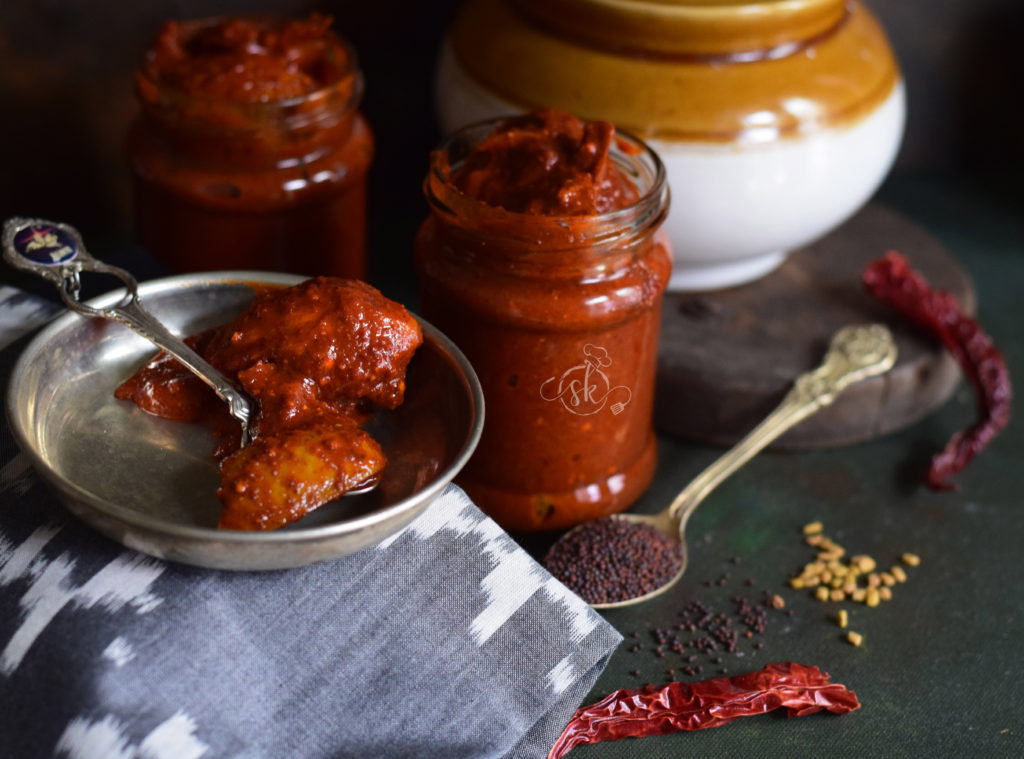
After a long time, I found these beauties in the Mangalore store, which I frequently visited. A lot of preparation goes behind the making of a pickle. I observed that the recipe flowed down from generation to generation. A spoonful of this pickle, which is spicy and tangy, is enough to perk up a bland meal, or as a south Indian, it is a divine combo with thick curd rice.

Ingredients:

Hog plum – 500 gms

Salt – 2 cups

Water – 2 cups

For the pickle Masala:

Dried Red chillies – 100 grams ( I have taken ½  of Byadagi and  ½ of Guntur to balance the heat)

Mustard – 25 grams

Methi – 1 tbl spoon

Hing – ½ tsp

Turmeric – 2 tsp

Method:

-Wash, drain the hog plums. Put it under the sunlight for 2 hours.

-Now, crush and separate the skin from the inner hard seed. Keeping under the sun would help loosen up the skin from the core.

-Now, prepare saltwater. Take 2 cups of salt, 2 cups of water and boil nicely.

-Switch off the gas, add the hog plum pieces, inner core and leave it to cool. In this way, hog plum would soften quick and absorb the salt properly.

To make Pickle Masala:

-Dry Roast Methi seeds until dark brown, then mustard seeds until it pops, then hing, turmeric.

-Put 1 tsp of oil and roast chillies until it puffs and becomes crisp. Cool everything and make powder.

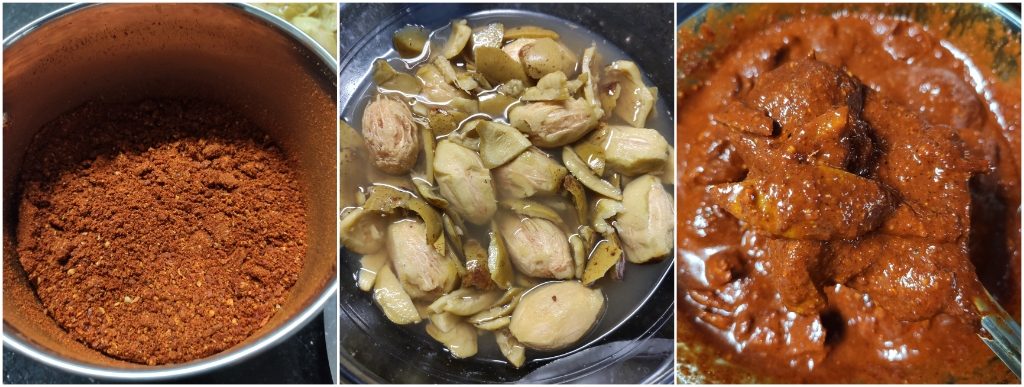
-Add this powder to a cooled hogplum added salt solution, and mix properly. Store it in a dry glass bottle, leave it aside for a couple of days to mature and absorb all the flavours.

-Then, store it in a refrigerator to extend its shelf life. When it is ready, enjoy it with curd rice.

Carrot Kosambari :

Kosambari is a South Indian style vegetable salad, an integral part of any festival South Indian menu. It can be made with or without the tempering, which has significantly less oil, with all sorts of fresh flavours, such as grated veggies, raw legumes, raw mango or lemon,  coconut oil and hing.

Here, what I am sharing is our family favourite, Carrot corn salad. That is how my family identify this salad and demands it. Here, one can add or delete or increase or reduce the quantity of any ingredients without any compromise on taste.

Ingredients:

Grated carrot – 1 or 2

Boiled corn – 1 small cup

Sprouted Moong/green gram – 1 small cup ( optional)

Pomegranate kernels – as needed

Grated Raw mango/lemon juice – as needed

Salt

Chopped coriander – 1 – 2 tbl spoons

Fresh Coconut – 1 to 2 tbl spoons

Seasoning:

Coconut oil – 1 tsp, Mustard – 1 tsp, Hing – ¼ tsp

Green chilli – 1 or 2 (chopped), Curry leaves – 1 spring

Method:

-Take one bowl, mix in Grated carrot, boiled and cooled corn, Pomegranate kernels, Sprouted moong, Grated raw mango, Salt, chopped coriander, fresh Coconut and mix everything.

-Do the seasoning by heating coconut oil, splutter Mustard, add hing, chopped green chilli roast a bit. Add Curry leaves and put them over the salad.

-Mix everything, enjoy as a filler, healthy appetiser or as a side dish or as an evening snack.

Kudane gojji/ Turkey Berry gojju :

Kudane, Thai brinjal, is widely used in our coastal region. We use it in its fresh, raw form, not dried. Earlier, it grew as a wild plant, and people never cultivated it. When my mother in law offered a sapling, I was excited and took the plant with me. Now, it is a part of my terrace garden and yields well.

Solanum torvum is its Scientific name. It also has many other names such as wild eggplant, baby brinjal, Devil’s fig, sundakai in Tamil and Usthi kai in Telugu.

 It is not only a nutritional powerhouse; it can heal our gut ( various intestinal issues ) and increase haemoglobin levels. It is one more locally-grown veggie, much neglected by us.

The taste of the turkey berry is more on a bitter side. Berry has to be processed in a particular way to eradicate its bitterness and to enhance the flavour. There are two ways to process.

The cleaning process is simple. The first one is to remove the stalk, crush it gently, and immerse it in water until you are done crushing every berry. Now, just before cooking, wash it a couple of times; in this way, most of the woody seeds settle at the bottom. Collect those cleaned berries, and proceed to cook according to the recipe, the recipe is HERE

If you opt for the second process, you need to fry those berries after washing them with Ghee or Oil. Then, mash a little and proceed to cook.

Now, let us know the recipe of Gojji / gojju. It is raw curry, no cooking recipe. If you are a person who is fond of sweet-sour-hot curry, this is for you.

Ingredients:

Fresh Turkey berries – 15 – 20

Ghee or coconut oil – 1 tsp.

Tamarind – small gooseberry size.

Onion – ½ (chopped)

Green chillies – 2 Or Bird eye chillies – 4 -6

Jaggery – grated

Salt – to taste

Seasoning: Coconut oil – 1 tsp, mustard – ½ tsp, crushed garlic – 6 – 8, curry leaves – 1 spring.

Method:

-Soak tamarind in ¼ cup of water.


-Remove stalks from the berries, wash properly.

-Take one small Kadai, put ghee or Oil, fry those berries until it turns light/ pale and starts bursting. Switch off the flame.

-Take one spoon, mash a little by using the back of the spoon.

-Now, extract tamarind juice, add it to the crushed berries. Add in salt, jaggery, chopped onions, crush the green chillies and check the taste and adjust.

-Now, heat oil, splutter mustard, fry garlic until it is brown. Add curry leaves and pour over the gojju. Serve with plain rice or with curd rice.


Kesari bath:

Kesari bath is made in many ways. Traditionally, it is made with Bansi Rava, and that is how my husband likes it. Since it is our Anniversary, presenting one of the much-cherished desserts and an integral part of our wedding menu.

Today, I am celebrating five years of blogging and 23 years of our togetherness with the much-loved sweet of my Husband, Kesari bath.

It is a simple sweet, with minimal ingredients like Bansi Rava, Sugar, Saffron and ghee, garnished with ghee fried cashews and raisins. Earlier I used to eyeball the measurements and prepare. The traditional measure and this foolproof recipe, which we cherish, is by my friend Madhu.

For measurements, use any tumbler of your choice.

Ingredients:

Bansi Rava- 1cup

Water-3cup

Sugar – 1 ½ to 2 cups ( Acc to your sweet level)

Salt – ¼ tsp

Cardamom powder – 1 tsp

Saffron – 10 to 12 strings (soak it in hot water or milk)

Ghee- ½ cup or a little more, as needed.

Cashews 10-15

Dry grapes- 15-20

Method:

-Take a small cup, add saffron, pour little hot milk or water, and allow soak.

-Keep water to boil in a saucepan.

-In a pan, add a tablespoon of ghee, fry cashew and dry grapes and keep aside.

-In the same pan, roast Bansi Rava till a pleasant aroma comes and turns grainy.

-Add salt and pour boiling water and allow to cook on a low flame.

– Once Rava is cooked, add sugar stir well to make sure there is no lump.

-While stirring, In every small interval, add ghee and proceed to stir.

– After 10 minutes of stirring, you can add saffron laced milk and mix well.

– Keep adding ghee little by little and mix well. Cook this mixture until ghee starts leaving from the sides.  Finally, add cardamom powder,  dry fruits mix well.

Serve hot.

NOTE:

If you wish to make square pieces out of it, when the Kesari bath is done, Spread the content on a ghee applied plate.

Allow to cool, mark the shape, get the perfectly shaped pieces, and store them in an air-tight container.

Air potato French fry:

The trial of French fries by using Air potato was the best decision. It turned out super delicious and got a demand again and again from my family. If you caught hold of Air potato, don’t hesitate to try this out.

If you are new to the usage of Air potato, please go through my detailed description regarding the aerial tuber, how to cook etc., in “Understanding the roots and tubers.” And go down until Tubers, and you would find the Air potato under Number 8, and it is HERE. If you want to try the soup recipe, you can check my Air potato soup recipe over HERE.

Ingredients:

Air potato – 2

Corn flour – 1 – 2 tablespoons

Salt -to taste

Pepper -to taste

Red chilli powder – to taste

Oil – to deep fry

Method:

-Peel the outer skin, slice into ½ inch thickness, cut into fingers.

-Wash a couple of times, drain by spreading it on a kitchen towel.

-Heat oil, deep fry for a couple of minutes, remove, spread in a tissue, drain all the oil as much as possible.

-Sprinkle cornflour, coat nicely and keep this in a freezer for 30 minutes.

-Once again, deep fry until it is slightly brown, remove.

– Sprinkle salt, red chilli powder, pepper and serve with tomato ketchup.

Air potato onion soup:

I am fortunate enough to experiment with this rare tuber for Roots and Tubers 2020 calendar project—by Sahaja Samrudha noble cause of supporting farmers and introducing all the nutritious and most ignored products to the community at large.

Who doesn’t love soup? That too in winter months. This Air Potato onion soup recipe is earthy, delicious, healthy and soothing to our souls.

It uses simple everyday ingredients. In place of Air potato, one can use our regular potato. It doesn’t use fresh cream, so it is excellent for people with a sensitive gut. It is easily adaptable to make vegetarian or vegan.

If you are new to the usage of Air potato, please go through my detailed description regarding the aerial tuber, how to cook etc., in “Understanding the roots and tubers.” And go down until Tubers, and you would find the Air potato under Number 8, and it is HERE

Ingredient:

Air potato – 2 

Spring onion – 3 to 4 springs

Sweet corn – 2 tablespoons

Butter – 1 tablespoon

Garlic – 3 cloves

Seasoning – oregano or any preferred choice of yours.

Pepper powder – ½ tsp

Method:

-Peel potato, dice. Chop spring onion.

-Heat butter, sauté Spring onion and garlic, add potato, sweet corn and fry for a while.

-Add salt, preferred herbs as a seasoning, pepper and mix everything. Add sufficient water and cook.

-Churn the content, adjust the consistency by adding water. Boil, adjust the seasoning and serve.

Taro Root/ Arbi Fry:

A perfect side dish to enjoy with humble curd rice or Rasam rice. It is flavourful, healthy, and easy to make a side dish.

Now prepare the Taro root or Arbi;  if you are new to the usage of Arbi, please go through my detailed description of handling Arbi, how to cook etc., in “Understanding the roots and tubers.” And go down until Tubers, and you would find the Taro/Arbi under Number 7, and it is HERE.

Now, the procedure for Arbi Fry:

Ingredients:

Arbi root – ¼ kg

Salt – as needed

Turmeric – ½ tsp

Red chilli powder – 1tsp

Tamarind powder or paste – ½ tsp

Coriander powder – ½  – 1 tsp

Hing – one pinch

Garam masala powder – ½ – 1 tsp

Curry leaves – 1 – 2 springs

Oil – 2 – 3 tablespoons

Rice flour – 1 to 2 tablespoons

Method:

-Wash the Arbi root, cook for one whistle in a pressure cooker. Peel the skin and slice it ( ½ inch thick pieces).

-Take one bowl, put these slices, all the masalas from salt to garam masala from the ingredient list. Let it sit for half an hour to 1 hour.

-Take one iron skillet, heat oil, put curry leaves, then marinate taro, toss-up and down in a slow flame.

When it is slightly crisp, sprinkle some rice flour and toss further and enjoy with your meal to make it crispier.

Tips: For example, while roasting Arbi, adding little rice flour when 3/4 is done gives it a crisp texture and does not get sticky and mushy. And the necessity to use excess oil also does not arise, thus making it healthier.


Mullu Sauthe Guliyappa / Cucumber Appe:

Like Kendathadya, this is one more recipe, which I love and cherish the fond memories of my childhood. This recipe is usually made with heirloom cucumber of our region, which is flavorful and watery compared to commercially available salad cucumber.

Ajji, my maternal grandma or my aunt used to prepare this dish for the evening snack. It used to be real fun, sitting in front of the wood fire, chatting with ajji, holding the plate full of two types of Guliyappa. One is the sweeter version with added jaggery, and the other is savoury, with added onion, chilli, and curry leaves. It is pure bliss, and we never recreate the moment of such a warm, comfortable atmosphere in today’s world.

Now, we would see the procedure of making Sweet and Savory version –

Ingredients:

Dosa rice – 1 + 1 cup

Cucumber – 1 Big

Fresh grated Coconut – ½ + ½ cup

Salt

Jaggery – ½ cup (grated)

Onion – 1 medium

Curry leaves

Green chilli

Method:

-Wash, Soak rice in two bowls separately for 3 to 4 hours. Drain soaked water before grinding. (We are using an oozed water out of cucumber for grinding rice)

-Make jaggery syrup by boiling grated jaggery with very little water, sieve the liquid to remove all the impurities.

-Take one big cucumber, peel the skin, make halves, remove the inner core and seeds and grate it. Mix salt to the gratings, leave aside for 5 minutes.

When cucumber oozes its water, strain it through a sieve by extracting all oozed water and collecting it for grinding rice.

-Now, grind the batter for a sweeter version, take one set of drained rice, add ½ cup of Coconut, jaggery syrup, required amount of cucumber water and grind into not so smooth batter.

-To this batter, add tightly packed one cup of cucumber gratings and whip the mixer grinder to mix it thoroughly with the batter.

-Remove this batter to one vessel and allow to rest for 2 to 3 hours. (Resting the batter would help to make Guliyappa softer and flavorful)

-Now, it is time to make batter for the Savory version. Grind the same as the sweet version without adding jaggery. After adding and mixing the cucumber gratings, add chopped onion, green chilli and curry leaves.

-Remove this batter to one vessel and allow to rest for 2 to 3 hours. (Resting the batter would help to make Guliyappa softer and flavorful)

-After the resting period, heat the Appe/ Paddu pan, pour little ghee into each mould. When the paddu pan is hot, pour the batter, cook in a low flame, turn around, cook both sides properly, and enjoy the flavourful and delicious Sweet and Savoury Cucumber Guliyappa.


Milk Noodles: Instant noodles with coconut milk

As I always say, learning is an ongoing process. This particular recipe, which I learnt from my daughter. Yes! You heard it right 😀 Here, she has used coconut milk powder, which is an easy option for a hostller.

Instant noodles can be a super tasty, comforting meal by themselves if we consider replacing it with a little healthier option by opting for millet noodles and some tossed veggies. When I heard milk and the explanation of the recipe, I was a little hesitant. After tasting it, I can tell you; it was creamy and delicious. I felt the addition of curry leaves and coconut milk was a game-changer.

Here, I have used Instant Millet based noodles. One can opt for any preferred noodle and its masala for this recipe.

Ingredients:

A small pack of instant noodles – 1 ( with masala)

Onion – 1 ( slightly bigger pieces)

Garlic – ½ tsp (chopped)

Ginger – ½ tsp (chopped)

Green chilli – 1 (sliced)

Curry leaves – 2 springs

Coconut milk/powder– 1 sachet or as required

Chopped veggies – of your choice ( I used Carrot, green peas)

Turmeric – ½ tsp

Coriander powder – ½ tsp

black pepper powder – if needed ( optional)

Garam masala – ½ tsp

Sugar – to enhance the taste ( to balance)

Method:

-Take one tawa, heat a tbl spoon of oil, when it is hot, season with lots of curry leaves.

-Then, add chopped onion, green chilli, garlic, ginger fry for 2 min.

-Add turmeric, coriander powder, salt and add chopped veggies and green peas.

-Fry all these until veggies wilts. Add 2 cups of water, ready Maggi masala, and adjust the salt.

-Now, drop those noodle blocks, cook. When it is almost done, add coconut milk or coconut milk powder, add water to adjust the consistency.

-if you want some more zing, sprinkle a little pepper powder and serve.


Bassaru Palya :

Now, what is bassaru? The literal transition of bassaru is Basida (drained) saru (Curry) in the Kannada language.  Here, we cook the legumes or dals and the choice of greens or veggies in an open vessel with little more water than the required amount to cook. When the cooking process ends, drain the water (stock) and use it for gravy by adding ground masala. Cooked veggies would turn into the dry curry with added seasoning. They are usually served with Ragi Mudde (finger millet balls) or Rice, topped with ghee with chopped onions or papads as an add-on. Bassaru is a staple affair in Bangalore, Mysore, Mandya, Hassan, Kolar, Tumkur region of Karnataka.

Bassaru Can be prepared using either Toor dal, Sprouted green gram, soaked black eye peas (karamani or Alasandekalu) or Sprouted horse gram etc. for protein ( also as a thickening agent to the curry)

If you prefer Greens, you can use the choice of greens except for fenugreek or Methi leaves.

If you don’t prefer greens, you can opt for any veggies such as French Beans, Ridge gourd, Cabbage etc.

Bassaru can be prepared in various ways, and each family has their method. Here, I am sharing how I make it and relish our Mudde Oota.

Ingredients for Saru:

Black eye bean – 1 cup (overnight soaked)

Chopped greens – 1 bowl

Salt

Green chillies – 4 to 5

Onion – ½ (chopped)

Garlic – 5 – 8

Curry leaves – 4 leaves

Coriander – 1 tsp

Cumin – ½ tsp

Coriander leaves – 1 tablespoon (chopped)

Coconut – 1 tablespoon

Tamarind – 1 tsp

For seasoning:

Oil – 1 tbl spoon

Mustard – 1tsp

Onion – ½ (chopped)

Curry leaves – 1 spring

Method:

-Take one vessel, cook soaked bean. When it is half done, add chopped greens, salt and a pinch of jaggery (it is purely optional) and cook further.

-When beans and greens are perfectly cooked and done, drain the stock, collect the water and keep it ready. (take out one serving spoon of cooked legume to grind the masala).

-At first, we would prepare the masala.

-First, heat 1 tsp of oil, add coriander, cumin, curry leaves, green chillies, onion, garlic and fry until onion becomes translucent. Switch off the gas. Add in chopped coriander, coconut, tamarind and mix everything.

-When fried content is cooled, grind it into a smooth paste by adding one serving spoon of cooked legume by adding a little water.

-Now, reserve little ground masala in the mixer jar ( to make palya) and proceed to make saru.

-Take one vessel, mix drained water/stock, ground masala, adjust the consistency, check for the salt, boil until it is frothy.

-Do seasoning, heat oil, splutter mustard, add curry leaves, chopped onion and fry until light brown. Add it to boiled bassaru.

Now we would see the procedure of palya:

-Take one tawa, heat oil, splutter mustard, add curry leaves, chunks of onion, fry until it is translucent. -Add reserved ground masala, fry for 2 minutes. Now, add cooked and drained legumes and greens.

-Check for the salt, seasoning, garnish with freshly grated coconut and mix everything and enjoy with ragi mudde or Rice.

Note:

-Please cook legumes or dals in an open cooking method. Don’t use the pressure cooker. It indeed makes it mushier and soggier.