In our native, usually, most people rely on agriculture for a livelihood, and these roots and tubers are easy to grow and stay good for many months even after harvest. Due to this, many root vegetables are an integral part of our traditional cooking. It is super rich in nutrients and neglected by many. Our ancestors were brilliant and included all the available nutritional vegetables from their surroundings.
I gathered all these to conduct an interactive session towards the Roots and Tubers 2020 calendar project—by Sahaja Samrudha noble cause of supporting farmers and introducing all the nutritious and most ignored products to the community large.
First of all, we need to understand that though all the vegetables growing below the ground/undergrounds are generally categorised as “Root Vegetables”, they differ.
Classified as Bulbs, Rhizomes, Tap Root / Root Vegetables, Tubers.
Vegetables like Onion and garlic fall under the bulb category.
While Bamboo, Ginger, Lotus root (stem)/kamal kakdi, Mango Ginger, Turmerics are classified as Rhizomes.
Beetroot, Carrot, Radish, Turnip, etc., belong to the taproot vegetables.
Potato, Sweet Potato, Arrowroot, Yam varieties belong to tubers, and Air potato has aerial tubers because it grows outside the soil.
But, special care needs to be taken while pre-cooking and cooking when it comes to some root vegetables and tubers. The procedure may sound a bit tedious, but it can cause a bit itchy sensation if not treated using the proper techniques. Not many are aware of it, like other common root vegetables. More often than not, I get queries from people regarding handling vegetables like Colocasia/Arbi/Taro, elephant yam, etc… / and the likes. So, I thought I would highlight that. There are different varieties of taro and yam.
To start with Roots and Tubers, we will see some of the Rhizomes I have in my garden and often used in my cooking.
1)Galangal: Now, the first question you all would ask me regarding the plant’s availability. I used fresh galangal root, which I bought at the supermarket, which comes as a raw material for Thai green curry. I took a small node and planted and propagated it.

Harvesting time: Once in a year or 2 years, I harvest fresh turmeric during January end. Immediately, I use the new plant bud and repot it in a fresh pot mix.
How I store: After cleaning the root, I usually slice it and store it in a freezer by using a ziplock.

My observation: It is woody, not soft as ginger. Hence, I prefer to slice before storing it in the freezer. Unlike zinger, it has uniform scale leaves (horizontal line) at regular intervals. Leaves are somewhat like a narrow blade (lanceolate shape) that widens at the centre.
The botanical name is – Alpinia galanga . They are commonly known as Thai ginger or greater galangal.
I use it for Thai green curry paste or any Southeast Asia Soups or while making veg stock. Thai green Curry paste recipe is available in my blog, and the link is here.
Flavour: Galangal is sometimes confused with other spices of the ginger family; Ginger offers a fresh, sweet-yet-spicy taste, while galangal’s flavour is sharper, spicier, and slightly more peppery.
2)Mango ginger:

Mango ginger! Yes, it is a rhizome, resembles ginger and tastes like a Raw mango sans tanginess.
Usually, people make a mistake in recognising ginger and mango ginger.
How to recognise: Ginger is a little dark when compared to mango ginger. The outer skin is glossy, thinner, pale in colour.

Mango Ginger or Curcuma amada is a plant of the ginger family Zingiberaceae and is closely related to turmeric. It is locally known as kukku shunti/ Mangannari. Mavinakai shunti in Kannada and Aam Haldi in Hindi. Mango ginger is antioxidant,anti-fungal, antibacterial as well as anti-inflammatory in nature.
In our native, it is widely used in our traditional cooking. We usually make Chutney or Tambli, added with lemon in Pickle.
Other than this, one can use the Rhizome to make flavorful rice, Rasam, soup, Thokku, raita, preserve etc.
I have not done the Mango ginger oil, but I heard Oil prepared from mango ginger is beneficial for treating skin and scalp irritations. Info by @sahaja farms.
3)Turmeric:

Do we need an introduction to this Rhizome? Naaa. It is an integral part of our day to day cooking for generations. Other parts of the world just realised the importance of our Haldi, and consider under the tag “Superfood”.
Turmeric is Curcuma longa and falls under the Zingiberaceae family.

Growing turmeric is very easy. Every year, usually at the time of June, fresh turmeric will start sprouting, and we should plant them at that time. It will take six months to grow, and when it is ready, the plant will begin wilting, and leaves will become yellowish-brown and become dry. It happens at the end of December and is then ready to harvest.
Turmeric is a popular spice of Indian Cuisine, and we usually use it in powder form almost in all the recipes. At this time of the year, we do use fresh root in our kitchen. The fragrance of the fresh turmeric rhizome is quite different from the powder. If you haven’t tried fresh turmeric root yet, this recipe of Gojju is a delicious and refreshing way to get a taste of its earthy, sweet flavour of fresh produce.
Our ancestors had an excellent way of taking care of their health. This recipe is one of them, and it is one of the age-old recipes I learned from my atte. Our traditional recipes are treasures to the next generation, and It includes all the local produce, depending on the season and its availability.
If anyone wants to see a pictorial guide, please head into my blog post of “Fresh turmeric Gojju.”
If you want to make homemade turmeric powder, the recipe is here
4) Bamboo Shoot:

Bamboo is belonging to the grass family, characterized by a jointed stem called Culm. Each culm/ internode has a solid joint called a NODE at each end.
Even the underground root system in Bamboo is similar to the upper shoot but grows horizontally in the soil; hence, it falls under Rhizome.
In the Coastal region, it is known as Kanile, seasonal, hollow grass, a young shoot of Bamboo, and is available in a short period of the rainy season. It has a very distinct subtle, earthy flavour with a crunchy texture while eating. It is considered one of the healthiest foods because it is high in dietary fibres, minerals and low in fat.
I usually buy my stock from the Mangalore store. After purchasing, remove a tough outer layer, brown in colour, by peeling one by one starting from the bottom by using a hand.
After removing this outer woody shell, you will see only the inner core, white in colour.
– This white inner layer will have 2 parts. One is a soft edible part and in between nodes.
– Nodes will be thick, a little sturdy and can be used in Pickle making by adding lemons or mangoes.
–Now this is ready to chop. Preparing a Bamboo shoot for cooking is a little bit of work.
Detailed post regarding chopping, as well as many traditional recipes of our region which I have done, are available in my blog posts as follows –
How to Chop Fresh Bamboo Shoot/Kanile:
Kanile Gashi /Bamboo Shoot and sprouted moong Gravy:
Kanile palya/Bamboo Shoot and jack seed palya:
These are some of the Rhizomes, which I use /grow in my garden.
Next, I want to move towards Tubers.
First, I want to share my experience of growing sweet potato.
1)-Sweet Potato :

Sweet potato is no fuss easy to grow vine. Which is belong to the Convolvulaceae family.
After the harvest, I usually plant rooted fresh cuttings from the mother plant. One can opt for a sprouted sweet potato slip as well. It grows in a wide upcycled/broken plastic tub.
It takes anywhere between 100 to 120days from planting to harvest.
I usually decide by seeing sweet potato vine. When it is mature, leaves become a little pale, and it starts flowering.
After the harvest, let it sit for 3 to 4 days or a week to enhance the sweetness. After this period, you can wash the mud and use it accordingly.
Here, I am sharing some of my family’s favourite dishes,
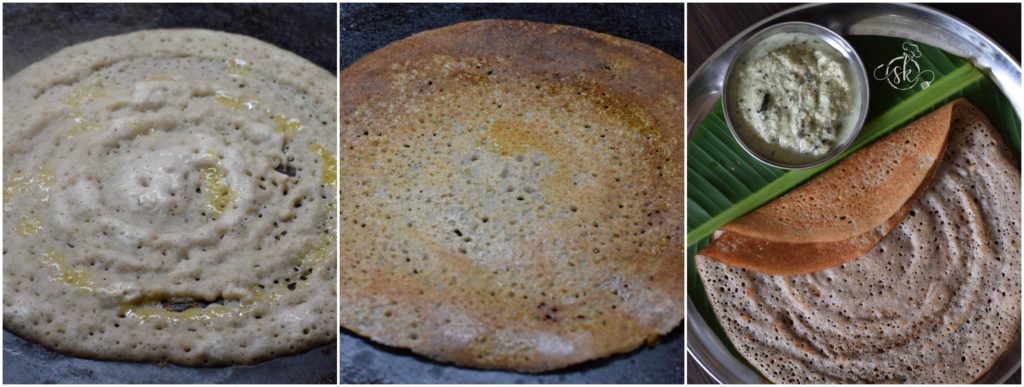
Steamed sweet potato: We do love steamed sweet potatoes as much as any curry. It is straightforward. Wash the tubers, make 2-inch roundels, steam cooks like momo or idli for 10 min and enjoy.
Genasina Upkari. Usually served with seasoned poha, and the combo is known as Kadle Bajil. It is a very nutritious,protein-rich combo breakfast option and truly filling to our tummy as well. I have already shared the stepwise procedure in my blog post, and the recipe link is here
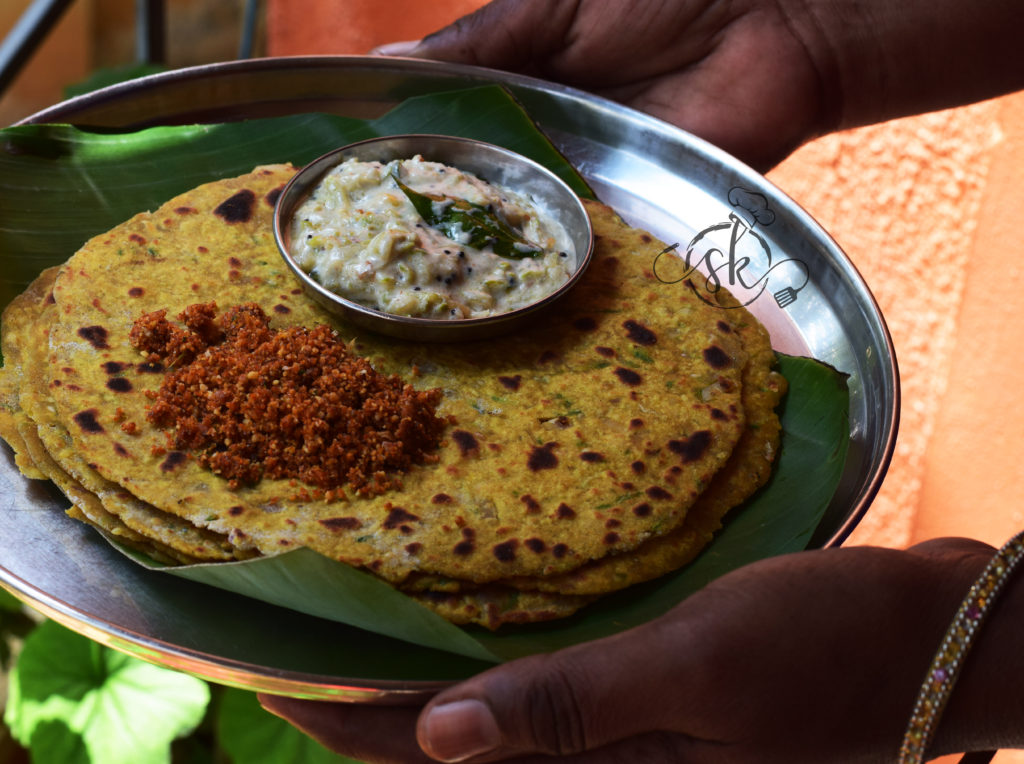
Sweet potato with Mixed vegetable with spinach: Sweet potato is a versatile veggie, and it blends very well with any veggies. I made this side dish to use my little harvest of spinach and Sweet potato by mixing it with my favourite seasonal cauliflower to make it attractive. It is a perfect healthy side dish for Rotis.I have already shared the stepwise procedure in my blog post, and the recipe link is here
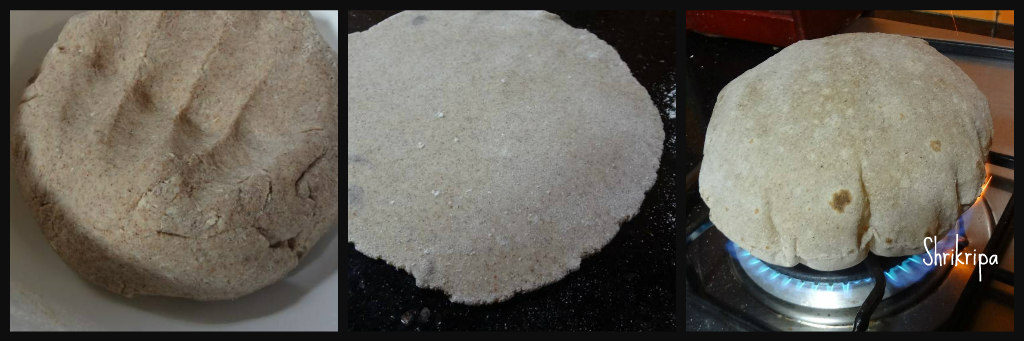
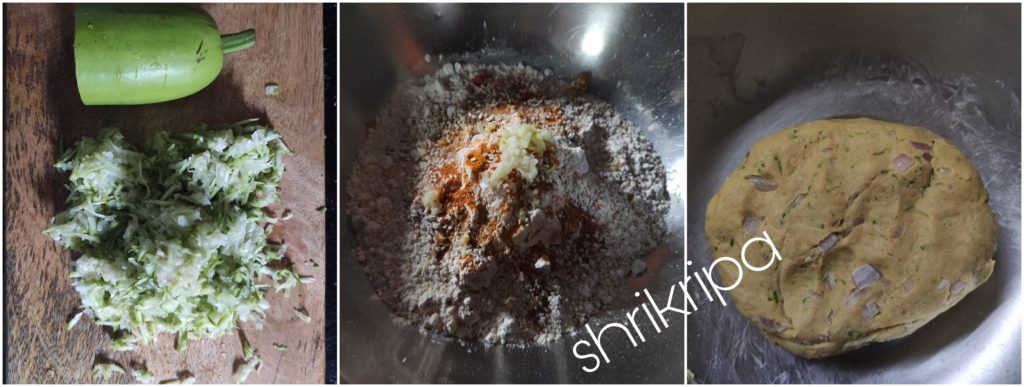
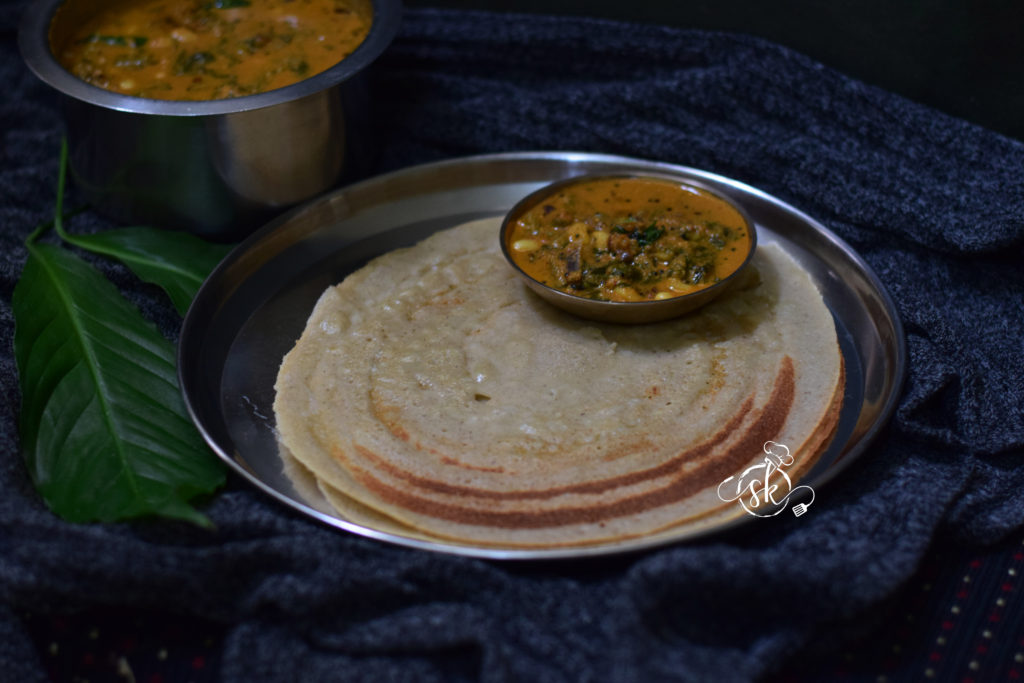
Sweet potato Parata/ roti: It is an excellent tiffin box option for school-going kids (god knows when we are reliving in a fear-free world). I usually use these Rotis for preparing rolls, which stays fresh, soft for a longer duration and enhances the taste of the roll with its natural sweetness. If you want to see the Sweet potato – whole wheat Roti recipe – please hop into my blog, and the link is here. For the roll, the recipe link is here.
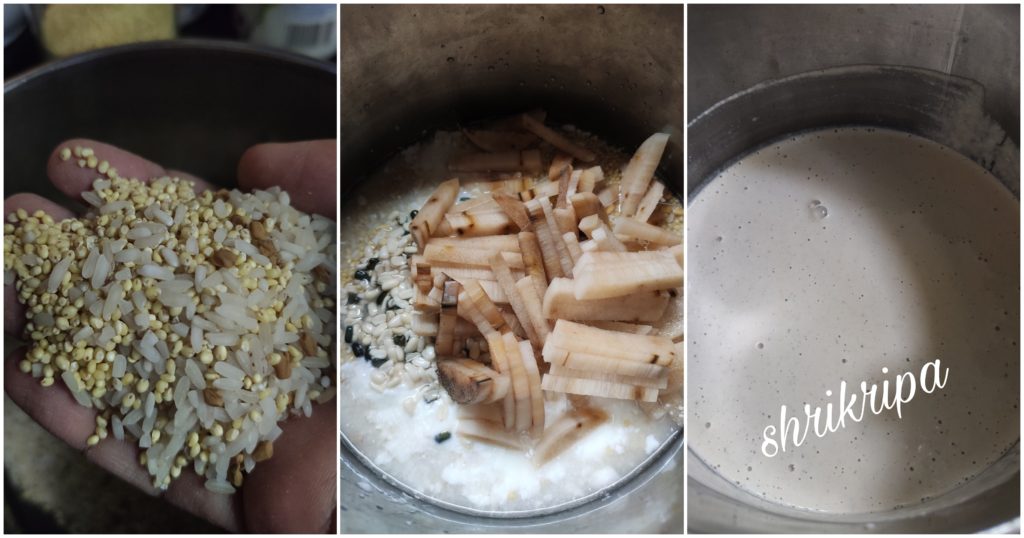
2)Arrowroot:

Arrowroot/maranta arundinacea is a starchy root vegetable, belong to the family Marantaceae the rhizomes or rootstocks, yielding an edible starch. It is an underground stem with multiple roots that store Above ground, having big, ovate leaves and a few white flowers.
It is a rainy season crop and takes around 5 to 6 months to grow/ ready to harvest.
Here, the processing is important more than the treatment, especially when preserving and storing the powder for a long time.
Arrowroot is an integral part of our day to day life in our native. Growing, processing and everything that happens in the home atmosphere. It is a little lengthy and needs much involvement.
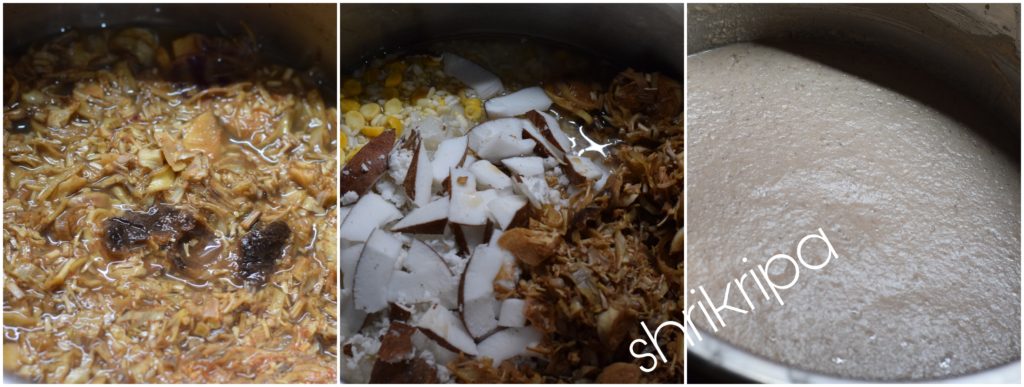
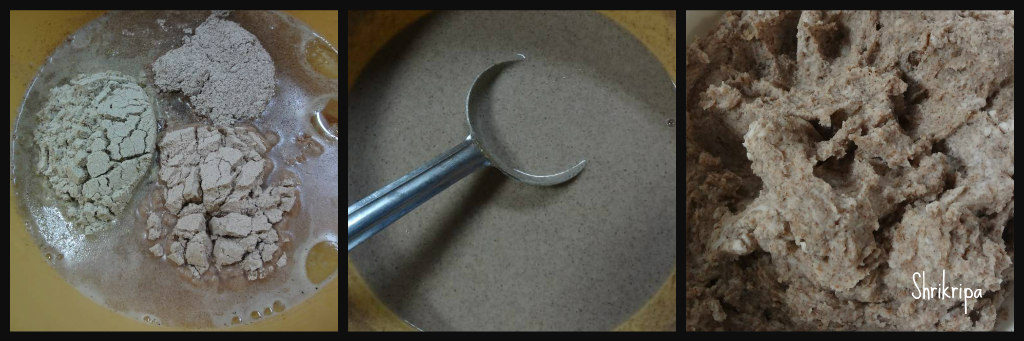
-First, after harvest, wash properly. Chop and grind into a paste by using sufficient water in a mixer grinder.
-After grinding, wash the paste by pouring water and using your hand, like how we wash rice, before cooking.
-Discard blackish greywater and continue the process until you get crystal clear water.
-Now tie one cloth to the mouth of a big vessel, by stirring, pass the liquid through a thin muslin cloth.
-After sieving, make a pocket and hang it ( like how we make paneer) for an hour or until the water gets drained.
-Next step is sun drying, and a vital part of processing to get a grainy crystal white powder.
-Make a bed by spreading a couple of clothes. Open the pocket and loosen the content by using your hand.
-Spread as much as possible. After every hour, make it a point to loosen the particles and dry.
-When it is a little dry/ maybe after 2 to 3 hours of drying, use a big sieve and pass all the particles through it and once again spread it properly and continue sun drying for 2 to 3 days.
Note:
-Washing does result; If it has done properly, the powder would be in pure white colour.
Draining ( tying and drying) would remove all the moisture, resulting in uniform and quick drying.
-If you do sieve in between the drying process, the end product/powder would be grainy and uniform in texture. Otherwise, you would get uneven granule or pebble-shaped moisture-laden balls, affecting shelf life while storing.
Usage / Goodness of Arrowroot powder/flour:

It has high nutritional content and is an excellent substitute for bleached corn starch as a thickening agent in cooking. It is odourless and works well too.
Although it is a starch, it contains no gluten, so it works well in gluten-free baking or cooking.
Medicinal Property of Arrowroot powder/flour is endless:
It considered as “Divyaushadha” of home remedies.
- It can treat dysentery, at the same time, can treat constipation too.
- Can reduce body heat ( if you are prone to mouth ulcer, headache, dry cough etc.)
- It is very safe for infants and can be used in tummy upset. If the baby is tiny and breastfed, mom can have the porridge/ drink and help gain baby to heal.
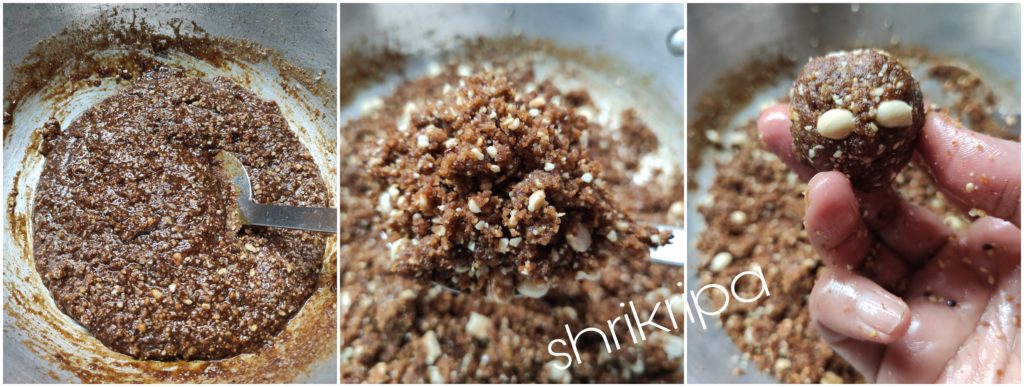
- Arrowroot powder’s “Easy to digest” quality is qualified to make infant food as well as to treat diarrhoea. It is usually consumed in a porridge form to reduce body heat during summer in our region. Usually, 1 tsp of powder is mixed with little water (according to the consistency) and cooked until it is shiny and glossy. According to your liking, you can either add milk with sugar or jaggery. Or add salt and buttermilk.
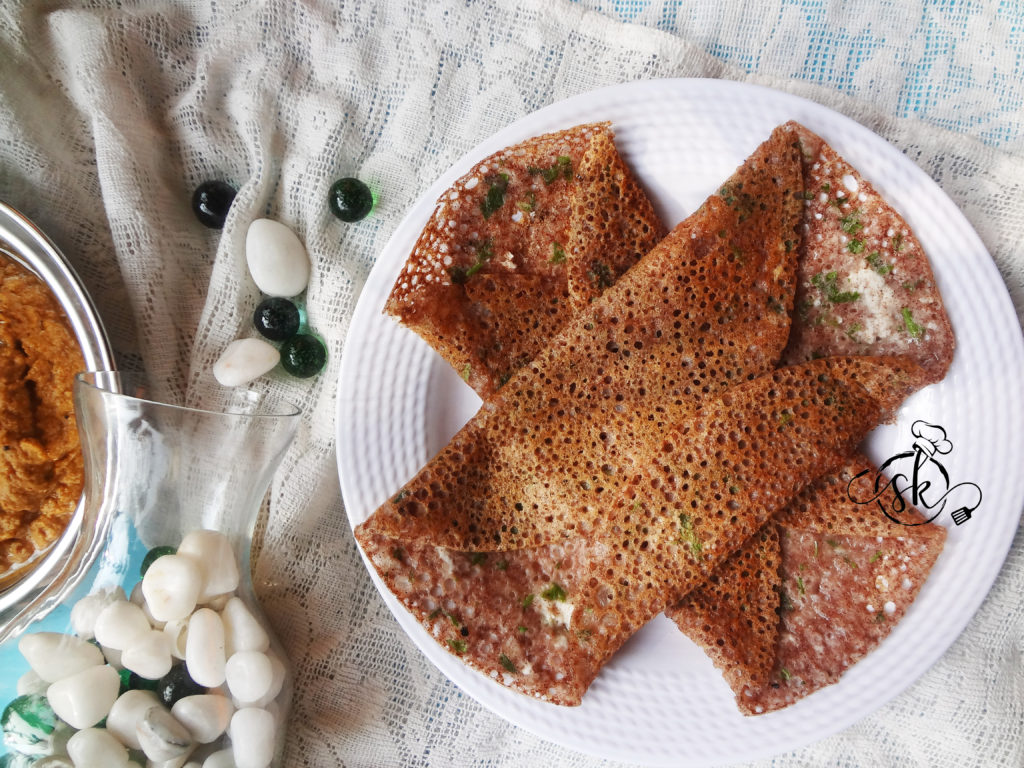
-If you want to see the traditional Arrowroot Halwa/ Halbayi recipe – please hop into my blog, and the link is here.
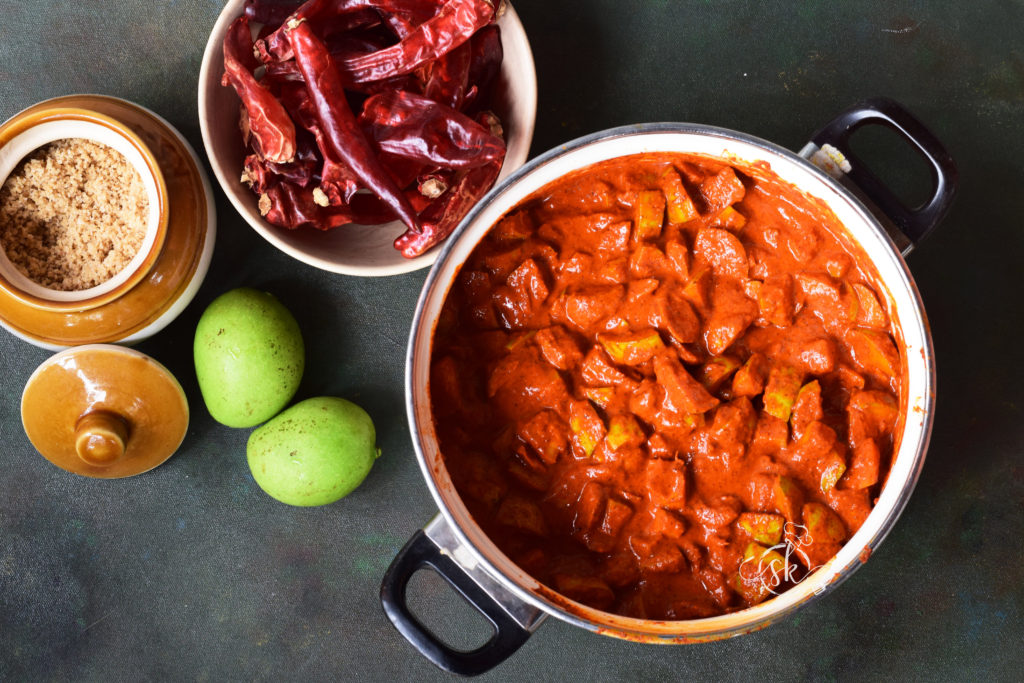
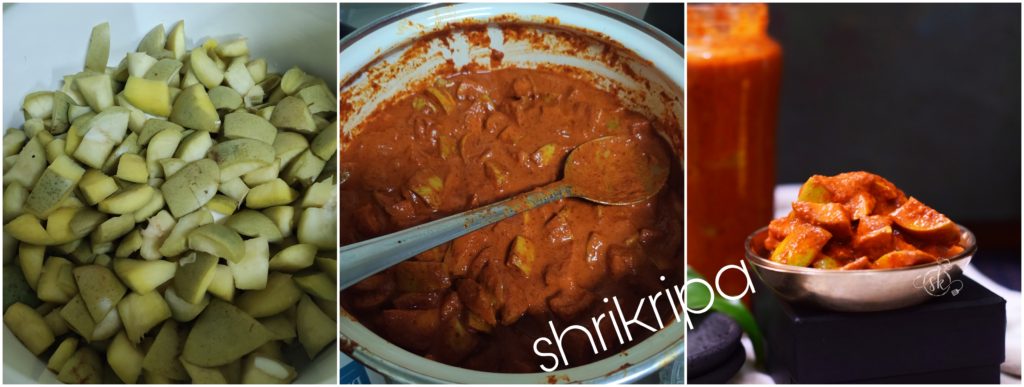
3)Chinese Potato / Sambrani gadde in Kannada.

It is super rich in nutrients and neglected by many, commonly known as Kooka or Koorka.
These are winter delicacies of our region. Small herbs resemble pudina leaves and belong to the mint family of the Lamiaceae ⁄ Labiatae and produces tiny edible tubers, round or egg-shaped, hairy, dark brown, and aromatic.
Like any other root vegetable, propagated by sprouted tubers, it takes 5 to 6 months from planting to harvest. It can be grown in grow bags or small containers. Until now, I have not attempted Chinese potato, and it is time to try it myself.
I feel, Peeling the skin of koorka does discourage many people from using it in their kitchen. Traditionally, it does need little practice and patience. It is done by putting all those roundels in a jute bag (gunny bag or sack) and beat it on the floor till the skin peels off, and then a knife is used to scrape off the remaining skin, even though it takes more time to scrape off of the skin its unique taste always hit the spot and are so comforting!
I usually prefer to peel the skin by soaking it for half an hour. Yes! It does the magic. Peel comes out very quickly while using the knife.
My procedure includes, wash, soak it, peel the skin, keep the koorka immersed in water all the time to avoid blackening.
When you are ready to cook, add those chopped pieces by draining the water and proceed for any preferred recipe of your choice.
Chinese potato stirfry is perfect sidedish with Hot rice and simple dhal. The recipe for how to peel the skin and the Chinese potato palya/ stirfry is HERE.
4) Greater Yam / Dioscorea alata :

Dioscorea alata is a tuberous root vegetable, is a species of Yam. Under which, we can find 2 varieties of Yam. One is Purple Yam, and the other one is White Yam.
Today, we are going to see white Yam. It does not itch but, you can feel the sliminess during cooking. Once it is cooked, pieces become firm, and slime vanishes.
White Yam has many names like Greater Yam (English), Kachil (Malayalam), Rasavalli kilangu (Tamil), Thuppa Genasu( Kannada) or Toona or Soona kerungu ( In Tulu)
Propagation happens through small tuber sections, which needs to have dormant buds. This species requires open space, deep, well-drained sandy soil, and climbers’ spreads all over. The total duration from planting to harvest takes around 10 months. Hence, it has the name “ ten months yam” or “winged yam” as well.
It is straightforward to use, it doesn’t itch and can be included in our day to day cooking.
Some White kachils have purple colour, at the outer surface, just below the skin. Some have only white colour. Both tastes the same.
-If you want to see the traditional Thuppa Genasu Melara / Greater Yam Kayi Huli recipe – please hop into my blog, and the link is here.
– If you want to see the traditional Kerala style kachil Curry / Greater Yam Curry recipe – please hop into my blog, and the link is here.
5)Mundi Kesavu/Giant taro :

Belong to the Alocasia family, and leaves are giant, glossy, resembles an elephant ear. Hence, it is also known as Elephant’s ear plant. Alocasia means “like the colocasia but not the colocasia”. Giant Taro is a good source of Vitamin C, Iron, and phosphorus.
In our native, leaves are used as an alternative to the plastic sheet, while sun drying papads or fryums in Summer months.
Which is best described as a “Stem crop” as the edible starchy stem is seen above the ground, which is light brown in colour, coarse outer surface grows upright, erect, in a cylindrical shape.
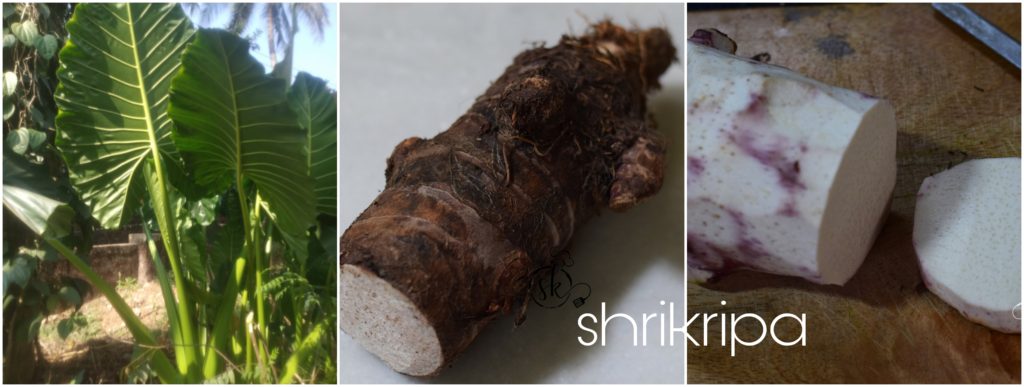
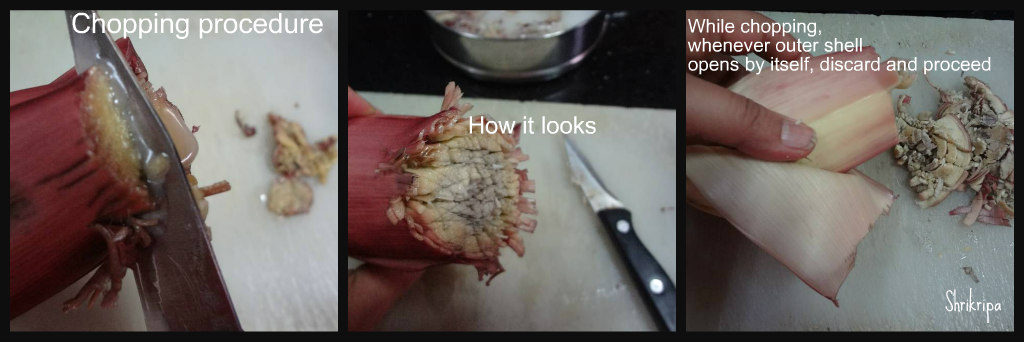
We usually do not wash the Giant taro stem before cutting nor peeling. Spread one newspaper, remove all the outer brown woody skin, chop the stem into pieces.
As most plant in this taro family, even this has Calcium oxalate, which itches our hand or mouth while eating if we do not handle it properly. Here, using hot boiling water and using the right amount of tamarind takes care to emit the itchiness.
Like Taro, wash those pieces in water by using a spatula, drain and put immediately in boiling water, cook until it is almost done, drain and proceed to the actual cooking. Boil little water, add tamarind extract salt and boil for some time, and make a sambar or dry curry like any regular root vegetable.

-If you want to see the traditional Mundi gadde Palya recipe – please hop into my blog, and the link is here.
6)Kene gedde /Yam / Elephant foot yam:

Belong to the Arums family, and The scientific name is Amorphophallus paeonifolius, which is a tropical tuber crop. In our native, we do use Yam in many curries. This vegetable might not look as appealing, but it packs with a lot of health benefits.
As a most plant in this taro/Yam family, even this has Calcium oxalate, which itches our hand or mouth while eating if we do not handle it properly. Here, using hot boiling water and using the right amount of tamarind takes care of emitting itchiness.
When handling any vegetable belonging to the Yam family, like regular yam or elephant yam, chopping/washing must be done very carefully.
We usually don’t wash the Yam before cutting nor peeling. Spread one newspaper, remove all the outer muddy skin of Yam. Wipe in a clean cloth, chop Yam into pieces.

Like Taro, wash those pieces in water using a spatula, drain and put immediately in boiling water, cook until it is almost done. Add tamarind extract, salt and boil for some time and proceed. You can make sambar or dry curry like any regular root vegetable.

Now comes the crucial deciding factor. Before cooking, how you would decide if it is a slow cooking yam or fast cooking one?
-See the texture. Yes!! You heard it right. If it is smooth and there is no granule like texture, it needs a pressure cooker to cook 😀

-If it is fresh, has a grainy texture, and while chopping, it makes a sound, like a fresh and able to cut easily, need to be added into boiling water, it cooks fast.
I usually cook with very minimal water; after it cooks, I absorb the water completely; I usually add salt, tamarind water, and red chilli powder, boil further, and proceed.
We can use Yam or Elephant Yam for Dry curry / palya, mixing with any other vegetables or chana., even bajji or tawa fry we can make.
To make bajji/ tawa fry, you need to cook, marinate with tamarind and masala, roll in chiroti Rawa and proceed.
Note:
# Peel the skin without washing.
# Wash in running water, drain and immediately put into boiling water. Here while washing or draining, don’t use your hands.
If you want to see the traditional Suvarna gadde- Kadle Melara / Elephant foot yam -Kabuli chana Kayi Huli recipe – please hop into my blog, and the link is here.
7) Taro root / Arbi /Kesavina Gadde :

Taro is one plant where the entire plant is edible – from leaves to stems to the roots. The edible underground stem is starchy, spherical, and small in size, belonging to the Arum family ( Araceae).
When compared to other tubers, handling is easy. Here, we need to tackle only two things—Sliminess as well as itchy character.
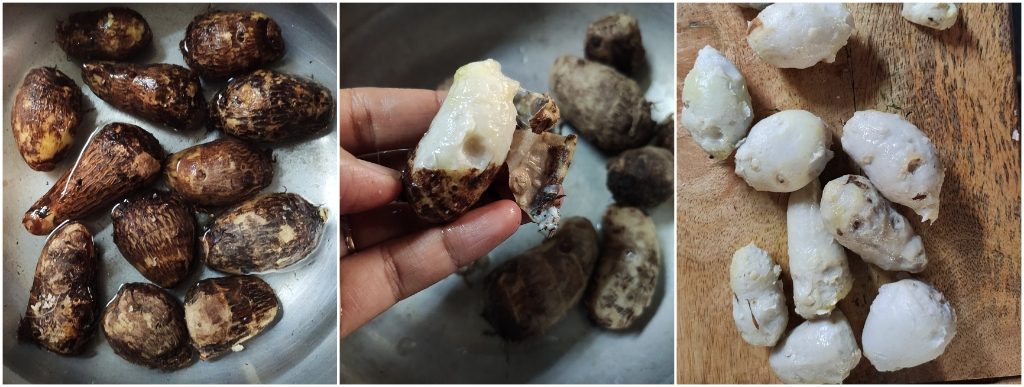
If you are using a pressure cooker, it needs only one whistle. Put water, cook for one whistle, drain and cool completely. Remove outer skin by using your hand. Chop however you want and proceed to your respective recipe. This method works well for tawa roasts ( which we usually prepare by marinating. Here tamarind extract is essential while marinating.
Tips: For example, while roasting Arbi, adding little rice flour when 3/4 is done not only gives it a crisp texture but also does not get sticky and mushy. And, the necessity to use excess oil also does not arise, thus making it healthier.
If you are cooking in an open vessel, Peel the skin, wash those pieces in water, drain and put immediately in boiling water, cook until it is almost done. Add tamarind extract salt and boil for some time and proceed. You can make sambar or dry curry like any regular root vegetable.
If you want to see the Taro root Fry recipe – please hop into my blog, and the link is here.
8) Air Potato:

Dioscorea bulbifera, commonly known as Air potato, air yam, aerial Yam, belongs to the yam family, Dioscoreaceae. While it is hardly ever found in urban areas, it has been cultivated and used for very long in rural India.
Known by different names like Balli Batate in Kannada. Adathappuas in Malayalam. Gaithi as Uttarakhand. Karanda as Goa and Maharashtra region.
Air potatoes are a rich source of carbohydrates, protein, and calcium and contain medicinal properties.
It has two varieties. One is light in the shade and smooth outer skin (picture which I have shared)—another one, with a darker shade with the spooky outer surface.
Unlike Yam or Potato, it doesn’t grow below the ground. It appears as an ariel tuber and the perfect substitute for the usual potato for people who avoid underground tubers in their diet.

I am fortunate enough to experiment with this rare tuber for Roots and Tubers 2020 calendar project—by Sahaja Samrudha noble cause of supporting farmers and introducing all the nutritious and most ignored products to the community at large. (The above pictures are by Mr Krishna Prasad Sir)
Air potato has three skin layers. One is outer brown skin. Just beneath the skin, green layer, which is also the reason for its sliminess. Inner yellowish-white edible part.
When compared to other tubers, handling is easy. Here, we need to tackle only two things—Sliminess as well as detoxification.
-If you are peeling the skin, remove the skin properly. To avoid sliminess, remove the green part as well. Then chop, blanch and discard the water. Now, it is ideal for cooking any curries of your choice.
If you want to use the pressure cooker for cooking the tuber, cook for one whistle, peel the skin and use the tuber and proceed to cook.
It has a potato-like shape, Yam like taste with an added earthy flavour.
If you want to see the Air potato Soup recipe – please hop into my blog, and the link is HERE. For the french fry recipe, using Air potato is HERE.