Citrus medica / Dudle huli Chithranna:

Dudle huli is a big lemon and is known as Citrus medica. Citrus medica is much bigger than normal lemon with thick outer rind and less sour and sweeter than normal lemon, excellent for thin Rasam, juice, pickles or Chithranna. This Chithranna is fragrant, rich in vitamin C and very tasty. We normally serve this in any festivals or weddings. It is a no onion no garlic recipe and we use mustard, dry red chilli and coconut for flavour. This is our traditional and much-loved recipe for Chithranna.

chithranna main

Ingredients:

Rice – 3 cups

Citrus medica – 1 (big citrus fruit)

Dried red chillies – 2 to 3

Mustard – 1 tsp

Coconut – ½ cup

Jaggery – 1 to 2 tsp

Salt

Oil – 1 tsp

Seasoning:

Coconut Oil – 3 tbl sp (any refined oil is ok)

Mustard – 1 tsp

Urad dal – 1 tsp

Cumin – 1 tsp

Hing – ¼ tsp

Curry leaves – 2 springs

Ground nuts – ¼ cup

Method:

-For cooking rice:

Boil water in a big vessel by putting 1 tsp of salt and oil. Add washed rice and cook for 7 to 8 minutes or until it is soft and firm and cooks. Drain cooked water and spread this rice in a colander.

– Grind masala by putting coconut, roasted red chillies, mustard, jaggery and dry run without adding any water.

-Seasoning:

-Take one thick bottomed kadai, add oil and heat. When it is hot, add mustard.

collage 1

-When it starts splutter, add urad dal and ground nut and fry until it becomes little dark. Next add cumin, hing and curry leaves.

-Now add ground masala and fry for 2 minutes. Add drained rice, juice of citrus medica and salt.

collage 2

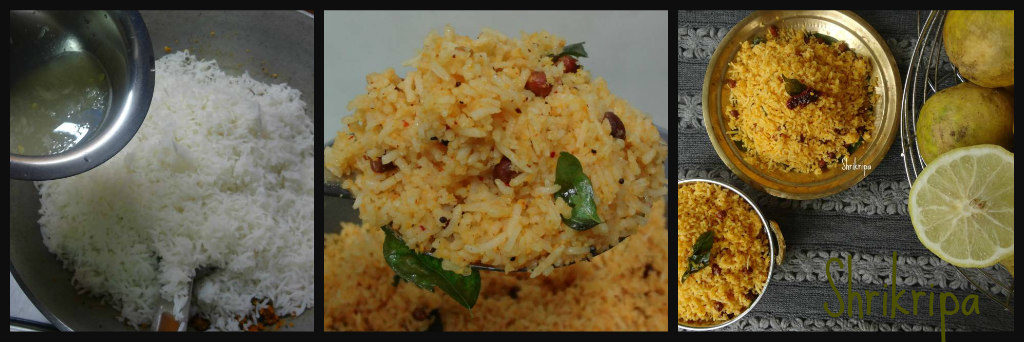
-Mix well and switch off the gas. Check for the seasoning and adjust according to your taste.

– This is very ideal vitamin C rich option for tiffin box as well.


Sorekayi Kottige / Bottle gourd steam dumpling:

Sorekayi is nothing but humble bottle gourd, which we usually neglect to use in our daily diet, which incidentally has numerous health benefits. In our native, bottle gourd is mainly used to treat stomach illness or jaundice. It is believed that, it has the power (anti-inflammatory properties) to heal our Liver and intestine during the illness. Bottle gourd has close to 90% water content and is great on the stomach and light on digestion. Apart from this, bottle gourd juice is very good for weight watchers, diabetics and for a healthy heart too. We have so many traditional preparations of bottle gourd and all are very low in calories and tasty too.

DSC06039_Fotor

Ingredients:

Dosa rice – 2 cups

Bottle gourd – 1 or 2 (according to size)

Salt

Banana leaves or turmeric leaves – to wrap

collage 1

Method:

-Wash Dosa rice and soak it for 3 hours.

-Grate bottle gourd by using big hole of a grater or chop it into very small chunks.

-Grind soaked rice into a fine paste with minimal amount of water and salt.

-Mix chopped or grated veggie and rice batter.

-If you are using turmeric leaves, wipe it and use as it is.

-If you are using banana leaves, take banana leaf, hold it over a gas flame (for wilting) then clean it with a wet cloth.

– If you are using turmeric leaves, use 2 leaves, place it in a “Plus” position, now pour one serving spoon of batter and fold the leaves like a packet.

collage 2

-If you are using banana leaf, pour batter, fold side wise, then close the ends.

collage 3

-Steam cook these ready packets in a water filled idly steamer for 30 minutes to 40 minutes in a medium heat.

collage 4

– Serve this kottige with jaggery syrup with ghee / Honey, coconut chutney or sambar.


Thai Clay Pot Rice with Vegetables:

This recipe is my entry for BetterButter Contest in collaboration with SPRIG.

SPRIG is a brand that scours the world to get the finest gourmet ingredients into kitchens of people who love to experiment in their kitchen.

It was basically an introduction to SPRIG’s range of unique spice blends, to be used in our dishes covering cuisines from Europe to the Middle east to Asia.

To participate, at first there were four choices of spice blends and they made us select one spice blend from the lot and asked us to create a dish and recipe.

I chose Malacca: Oriental spice Blend.

This spice blend is a symphony of fragrant herbs and spices, inspired by the orient. It captures the rustic richness of South East Asian curries, with a twist. Flavourful chilies make for a delightful fusion, best enjoyed when sprinkled into curries, sauces, salad and stir fries. This versatile ingredient can be used as rub, marinade, glaze, paste, crumb, sprinkle or dressing!

We relish Thai food, lemon grass flavour, one pot meals. Being a Mangalorean, we love our dose of coconut milk too. So, I tried my hand in creating Thai flavoured rice, using clay pot. The dish turned into a super tasty, mildly flavoured one pot meal.

pic main 2


Ingredients:

Rice – 2 cups (small grain rice/ Jeera samba variety)

Vegetables – 1 bowl

Tofu – 100 grams

Onion – 1 medium

Ginger – ½ inch

Thai chillies – 3

Lemon grass – 4 sticks

SPRIG MALACCA spice blend – 2 table spoons

Thick Coconut milk – I tetra pack or 200 ML

Water – 3 ½ cups

Salt – as required

Oil – 2 table spoons (any refined oil)

Sesame oil – 1 table spoon.

Clay pot – for cooking

Method:

– Wash rice and drain the water and keep aside.

– Chop vegetables according to your choice.

pic 1

– I have used Broccoli, cabbage, three colours of capsicum and baby corn.

– Chop onion, slice chillies, sliver ginger and keep aside.

– Make 3-inch pieces of lemon grass, make a bunch and tie it with a small piece of cord.

-Take a clay pot and smear it with Sesame oil.

– Sesame oil will act as a non-sticky coat for clay utensil while cooking for long.

collage 1

-Now take oil for seasoning. When it is hot, add onion, chillies, ginger, lemon grass and fry until onion is glossy.

-Add all the vegetables and fry for a while.

-Now add tofu, Malacca spice, salt and mix everything thoroughly.

collage 2

– Next proceed with addition of drained rice and fry for 2 minutes.

-Add coconut milk, water.

collage 3

-Cook the mixture by closing the lid, in a very low flame for 20 to 30 minutes or until done by mixing twice in between.

-Serve hot by discarding lemon grass sticks. (Used to enhance flavour, since they can’t be swallowed)

pic main 1

NOTE:

  • If Thai chillies are not available, one can use any variety of chilli.
  • I have used bird eye chilli.
  • If sesame oil is not there, one can use refined oil to smear the clay pot.

Plantain/Raw banana flour:

Plantain flour is a powdered form of dried banana, which can be a good raw material for any healthy baking or cooking, for people who follow Paleo, Vegan, gluten-free diet and it is diabetic friendly and organic too. Last month when I was thinking about gluten-free baking and options regarding its flours, what immediately comes to mind is our day to day available ingredient- the cheaper, more nutritious alternative to commercially available gluten-free flours. I have seen banana flour as baby food in my native and people prepare this flour at home and feed their babies as a healthy top food. Keeping that in my mind, I headed towards preparing homemade banana flour. I took small varieties of homegrown bananas from my native and started my journey.

pic 1

Ingredients:

Raw bananas – 1 kgs

Method:

-Select firm and raw bananas.

-wash, peel outer skin and immerse in plain water.

collage 1

-Take one wide, big plate. Line with one clean towel.

-Slice bananas directly on towel. Keep this in bright area, either near window sill or under sunlight.

collage 2

-If you keep under sunlight, it will take 2 days to dehydrate and become crisp.

-If you keep indoors, it will take 4 days to dehydrate.

-After it becomes crisp and dry, powder this in a dry grinding jar in a mixer grinder.

-Sieve the mixture and collect the fine powder.

pic 2

-Such a simple method and you will be ready with your gluten-free healthy flour for any of your bakes or for cooking!

Aviyal/Avial OR Avilu:

Aviyal is a mixed vegetable dish cooked in coconut gravy by adding some curd/yoghurt, Raw coconut oil and lots of curry leaves. It is an integral part of any festival cooking and It is believed that Bhima, one of the Pandava’s, invented this dish, during their exile period. Avial is a must dish during Onam Sadhya in Kerala. Aviyal is one of the favorite dishes of my family. I learnt this recipe from my mom-in-law. This is how we do this recipe in our family.   

pic mainIngredients:

Ivy gourd – 250gms.

Brinjal – 1

Snake gourd -1

Raw banana -1

Yam -250 grams.

Ridge gourd-1

Yard long beans -250 grams.

Bitter gourd -1

Coloured cucumber – 1

Raw mango-1 or Hog plum -4

Fresh grated Coconut – From one coconut.

Butter milk – 1 cup

Coconut oil – 6 tsp.

Jeera/cumin -1 tsp.

Dry red chilli – 2

Green chilli -4 to 5

Red chilli powder – 1tsp.

Turmeric Powder – 1tsp.

Curry Leaves- 5 springs.

Salt 

Procedure:

1. Cut all the above-mentioned vegetables in a matchstick manner (slightly big pieces).     collage 1     

2. Take all the vegetables and slit green chilies in a heavy bottomed vessel. To this add little red chilli powder, turmeric powder, salt and little water and cook till the veggies are done.                           

3. In the meantime, prepare coconut paste by adding grated coconut, jeera, dry red chilli in a mixer jar. Add little water, grind and keep it aside.

4.When veggies are cooked add this coconut paste along with butter milk. Mix nicely.

5.To this mixture add lot of curry leaves and pour raw coconut oil. Press everything using back of the ladle, close tightly using a plate and continue cooking till it boils nicely.                            

6.Once it starts boiling, switch-off the gas and delicious avial is ready to serve.

7. You can enjoy this Avial with rice, roti or Neer Dosa.                  

 NOTE: -Try to add all the mentioned vegetables as much as possible.

            – Usage of coconut oil will give the authentic taste.


Idly/Idli Batter:

Idli is very basic, staple breakfast of south India. It is very healthy steam cooked rice and lentil cake which is very nutritious too. Each place has their own rice and lentil ratio or proportion and grinding technique also changes from region to region. In Mangalore, we soak rice and dal separately and grind very fine paste of urad dal and either we mix rice rawa or we are grinding the rice, we keep it a little coarse, hence this batter will be a little coarse. After fermenting the batter, the next day we proceed to make idlies by using either idly stand or idly cups. In our region, idly cups are regular and very common in every house hold and we use special type of idly steamer and invariably we use this for so many kinds of steam cooking.

pic 14

Ingredients for idli batter:

Idly rice or Idly rawa – 2 cups

Urad/Black gram dal – 1 cup

Poha – 1 fist full

salt

Method:

-Wash and soak rice in one vessel. If you are using idli rawa, you can wash idly rawa and put very little water and keep aside.

collage 1

-Wash Urad dal and poha in another vessel and soak for 3 to 4 hours.

-At first, drain excess water from urad dal and put this into wet grinder.

-Grind this into smooth paste by adding water in-between while grinding.

-When urad dal batter becomes fine and smooth, its consistency becomes almost double and colour of the batter looks milky white.

collage 2

– When you think urad dal batter is ready, add soaked rice or rice rawa by draining its soaked water.

-You can use this water while grinding or adjusting the consistency of the batter or to wash wet grinder at first to remove the dough that is stuck on the stone.

-Grind this into small rawa consistency by adding salt and remove this ready batter into big vessel. If you are using rice rawa ,allow batter to mix for couple of minutes and then remove.

-I usually grind urad dal first, then mix in drained rice so that batter mixes uniformly and becomes light and airy. 

– Batter consistency should be a little thick and when u hold and drop the batter it should not drop very easily and it should stick to the spoon.

pic 7

-Close the lid and keep this batter for 8 to 10 hours or more (according to outside weather where you live) for fermentation.

-Next day morning fill idly steamer or pressure cooker with sufficient water, place the porous plate at the centre of the vessel and keep this on the fire.

collage 3

-Mix fermented batter vigorously, if needed add water and adjust the consistency keep it ready.

-Rinse the idly moulds in fresh water once, it will act as a non-sticky layer between idly and mould.

-When water starts boiling, pour one spoon of batter into respective moulds and steam cook.

collage 4

-If you are using cups, cook this in a steamer for 15 to 20 minutes. Cups holds more batter than idly stand.

-If you are using idly stand, 7 to 8 minutes of steam cooking is sufficient.

-When it is done, switch off the gas, open the lid and remove moulds outside.

-Once it is cool, remove idly and serve with chutney or sambar or with your choice of side dish.

NOTE:

-Use wet grinder to get awesome soft idlies.

– Use soaked and drained water from the dal or rice while grinding. It will enhance the taste.

-Always mix and pour the batter to the moulds, only after water starts boiling.


Breadfruit chips:

Breadfruit is commonly known as Jeegujje or Deevi halasu in our native language. It is a staple food in many tropical region and considered as an exotic veggie and wonder food only because of its richness either in its taste, fragrance, its high source of gluten free carbohydrate, protein and minerals.

pic 4

Breadfruit is a seasonal, much-loved veggie in our coastal region of Karnataka. It can be consumed when it is mature, but still firm and can be cooked and eaten in many forms. Today I am going to write about its chips. How we can make this exotic savoury and enjoy the gloomy weather.

I got this fresh Breadfruit from my cousin brother’s farm and got an opportunity to make these chips and had them after ages. Guidance was given by my lovely co sister who prepares this in our native, during every season.

pic 2

Ingredients:

Breadfruit – 2

Salt -1 table spoon

Turmeric – ½ tea spoon (optional)

Water – 1 small cup

Coconut oil – To deep fry

Chips slicer – to slice

Method:

– Apply some oil to your hand. To some extent it will protect your hand from blackening.

– Take fresh breadfruit, wash properly. Take one sharp knife and remove outer skin as thin as possible.

– Make four longitudinal pieces, remove inner pith (which is slightly harder and rubbery in nature)

– Immerse these pieces in bowl of water.

collage 1

– Take one small bowl of water and mix salt, turmeric powder and keep aside. It is your salted water, which is used while frying and addition of turmeric will enhance the colour of the chips.

– Now you can keep coconut oil for heating. When it is very hot, start making chips. To test the hotness of oil, drop one small piece of breadfruit, if it pops up immediately, it is ready.

collage 2

– Take out breadfruit from water, remove traces of water by wiping it out. Make each quarter into half and now you will get 8 total pieces from one bread fruit.

– Take each piece and start slicing directly to the hot oil by using slicer. Keep gas flame at medium.

– When the breadfruit slices cook, the bubbling sound of the oil becomes faint. Now you can add 1 to 2 tsp of salted water.

collage 3

– You will hear lot of bubbles and bubbling sound immediately after adding salted water to the hot oil.

– When the sound reduces, the chips are ready to be removed from the oil.

pic 1

– Remove the chips from the oil and keep them on a tissue paper laid plate.

– After cooling store it in an air tight container and proceed with the remaining bread fruit.

Bendekayi/Okra Palya:

Bendekai/lady’s finger/okra/bhindi- so many names for this simple, high fibre, low calorie vegetable. Some people just avoid this slimy vegetable without knowing how to cook. It is just simple, if you know the right technique.

We normally don’t use any onion, garlic or tomato in festive cooking. In Mangalore, we prefer this simple coconut based side dishes for any weddings or festivities.

Here we use tamarind base to cook Bendekai to remove its slime. To avoid sliminess , you should remember 2 to 3 things. First thing, drops the veggie, only after tamarind water starts boiling. secondly, don’t over mix the veggie, while cooking. Thirdly, don’t cover the lid, while cooking lady’s finger. These are all the tricks I learnt from my elder’s while learning cooking from over the years.

You can use any varieties of lady’s finger for this recipe. Here I have used local variety from Mangalore which I have grown and harvested from my terrace garden. It is Red Okra and after cooking, it becomes like any other okra.

pic 1

Ingredients:

Ladies’ finger – ½ kg

Tamarind – 1 tsp

Salt

Jaggery

Red chilli powder – ½ tsp

To grind:

Fresh Coconut – 1 small cup

Red chillies – 2 to 3

Mustard – ½ tsp

Hing – very little

Seasoning:

Coconut oil – 1 tbl sp

Mustard – 1tsp

Urad dal – 1 tsp

Red chilli – 1

Curry leaves – 1 string

Method:

-Wash and cut the bhindi into half inch pieces.

collage 2

-soak tamarind in one cup of water.

-Roast red chillies and hing in a drop of coconut oil.

-Dry grind coconut, roasted red chillies, hing, mustard and keep it aside.

– Take one tawa, do the seasoning by putting oil, mustard seeds, urad dal, red chilli.

collage 3

-When mustard starts spluttering, add curry leaves and pour tamarind water (squeeze soaked tamarind in water and use)

-Add required amount of salt, jaggery and red chilli powder.

-When it starts boiling, add chopped Bendekai and cook this in a low flame.

-when water drains or Bendekai cooks, add ground coconut mixture and mix thoroughly and keep this in a simmer for couple of minutes.

pic 3

-serve this as a side dish with hot rice or Chapati.

Vegetarian Thai Noodles: Gluten free and Vegan

This time when I had visited my sister, who stays in America, I got an opportunity to experiment with some new ingredients, veggies etc and I bought a couple of new items back home as well. This gluten free, Brown rice & millet ramen noodle is one of them.

When we were shopping, my eyes went to this noodle pack. I love to work with new ingredients and wanted to pick it up. After trying a couple of recipes, my daughter told me, how it should be. She asked me to prepare this as a little wet, soup kind. She said, regular kind of preparations tastes bland and it needs some flavoured soup to enhance the taste of this kind of sticky noodles and she was right. Ramen is a Japanese dish, consisting of a clear broth containing thin white noodles and sometimes vegetables, meat etc.

Finally, I came up with this, and got a green signal from my super-efficient critic!!! She said, hmmm yummy, go ahead and post: D

pic 10

Ingredients:

Noodles – 3 cakes

Shallots – 10

Baby corn -4

Carrot-1

Broccoli- couple of small florets

Ginger garlic paste – ½ tsp

Tomato sauce – 1tbl sp

Thai sweet chilli sauce – 1tbl sp

Sriracha sauce -1 tbl sp

Soy sauce -1 tbl sp

Cooked broth – 1 small cup

Salt

Sesame oil – 2 tbl sp

Basil leaves – 5 to 6

Roasted peanut halves – 1 table spoon

Method:

-Boil water with one spoon of salt and oil. Put noodle, cook until al dente (it should cook and texture should be firm)

collage 1

-Drain the water, rinse the noodle in cold tap water.

-Collect one small cup of drained water and keep aside for next use.

– Chop vegetables according to your taste.

collage 2

– wash basil and roast peanuts, remove skin and make halves and keep aside.

– Mix all the sauces in one small bowl and keep it ready

-Take one wide kadai, add sesame oil. When it is hot, add chopped shallots and fry for a while.

-Next, drop in all the veggies and fry for a while.

collage 3

-Add ginger garlic paste, fry until veggies are fried.

-Add all the sauce mixture and fry vigorously to avoid this to burn.

-Add reserved cooked and drained water of noodles. Check for the salt. If needed add and adjust.

collage 4

-When it starts boiling, add noodles and mix.

-Garnish with torn basil leaves and sprinkle roasted peanuts and serve.

pic 11

Note:

-You can use any noodles instead of gluten free noodle.

Marakesavu Pathrode:

Pathrode, name itself will make any Mangalorean drool. That too if it is marakesavu leaf, fun is even more. Marakesavu is non-itchy, seasonal colocasia leaves. It is one more classic monsoon special from Mangalore. Pathrode is usually served with coconut oil either plain or pan fried by slicing.

pic main

Marakesavu is commonly known as hitchhiker elephant ear and botanical name of this leaf is Remusatia vivipara. Leaf is large, oval, leathery textured, glossy on both the sides. Foliage disappears in winter and emerges after the first rain during monsoon. Grows widely on big tree trunks or in-between the stones, mainly emerges from the moss bed. The name itself suggests about its habitat. Here, “Mara” is Tree and “Kesavu” is colocasia.

collage 1

We will see the Procedure-

Ingredients:

Dosa rice – 3 cups

Fresh Coconut – 1 ½ cup

Dried red chillies – 12 (Roasted)

Hing – ¼ teaspoon

Salt

Jaggery – 1 table spoon

Tamarind – 1 table spoon (if normal colocasia use little more)

Marakesavu – 3 bundles

Coconut oil – for serving

Method:

Wash the leaves, remove stem and trim.

  Wash and soak rice for 3 hours.

  Fry red chillies by putting very little oil.

collage 2

Grind soaked rice, coconut, tamarind, jaggery, salt, roasted red chillies into smooth paste by adding sufficient water.

  Batter consistency should be like Dosa batter.

  Now, we are ready to make Pathrode.

collage 3

  Take biggest leaf from the lot, place upper glossy part downwards and apply ground batter on back side of the leaf. (pc:step 1)

 After applying on the first leaf, keep second one (slightly smaller than the first one)

Proceed with the application. After applying on second leaf, keep the third leaf then fourth one and proceed.(pc: step 2&3)

collage 4

  Now lift sideways, and fold. Make it like a mat. Apply some batter on these folds as well.

  Roll from the tip and proceed until the end and apply some batter on outer shell and keep this in a water filled idly steamer.

collage 5

  Cook this for 45 minutes to one hour, depending on the quantity of the content inside the vessel, in a low fire.

collage 6

  Serve fresh with coconut oil by slicing these cooked rolls or apply coconut oil and fry these in an iron tawa on both the sides and enjoy as it is for breakfast or with lunch or dinner.

NOTE:

-Tamarind is a key ingredient while making Pathrode.

– If it is Mara Kesavu, it is non-itchy and quantity of the tamarind doesn’t matter.

– If you are using normal colocasia leaves, tamarind plays a very crucial part, in removing the itchiness of the leaves. Use little more quantity than normal.

– You can prepare this same recipe by using big spinach leaves as well.