Apple – Banana Halwa (Microwave Method):

Traditionally halwa making takes a very long process and I have shared the recipe already.  You need a time and patience to attempt. When you make the same halwa with a less effort by using microwave, nothing like it. I do agree with the side effects of using microwave and personally I myself avoid using microwave many times.

This time, I wanted to finish off lot of over ripe bananas as well as tasteless apples and at the same time, I was pressed for time as well. That is how, I opted for this method and here is the procedure. I must tell you that, taste or texture wise there is no change or variation.

Here, I have not removed the outer skin of the apple and it was perfectly blended while cooking.

Ingredients:

Banana – ¾ kg (over ripe one)

Apple – ¾ kg (any variety)

Sugar – 2 cups

Ghee – 4 to 6 tsp

Cardamom – 1 tsp (powdered)

Cashew bits – optional

Method:

-Here I have used my LG Microwave and opted for Gajar halwa under Indian Cooking setting and proceeded. As I write the method, I would mention the timing, so that any one can make this halwa by using any Microwave.

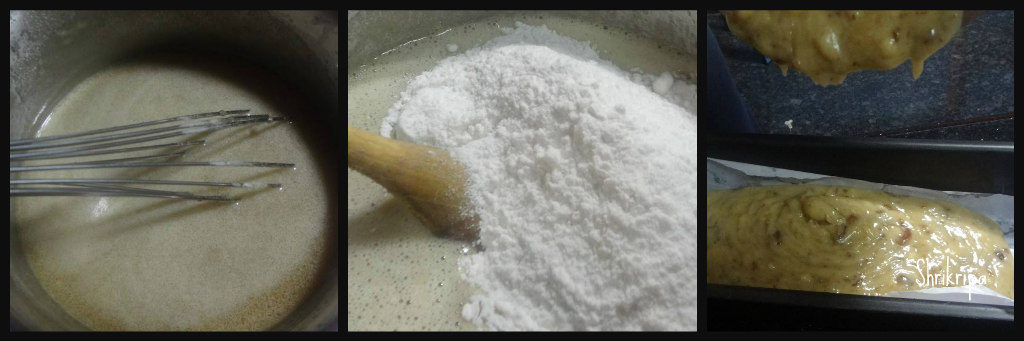
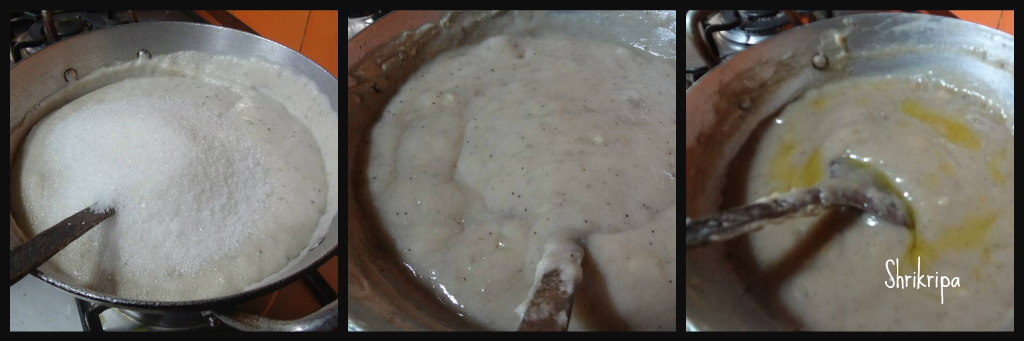
-Chop Banana and apples (with skin) and put it in a glass bowl (microwave safe)

-In LG Microwave, when I opted for microwave IC1 = Gajar halwa and in one cycle it runs for 14 min.

-So, cook for 13 to 14 minutes at first. After first cycle, mix everything properly and keep it for 2nd cycle (again 13 to 14 minutes)

-Remove the bowl, add sugar and mix everything properly and keep it for 3rd cycle (again 13 to 14 Minutes)

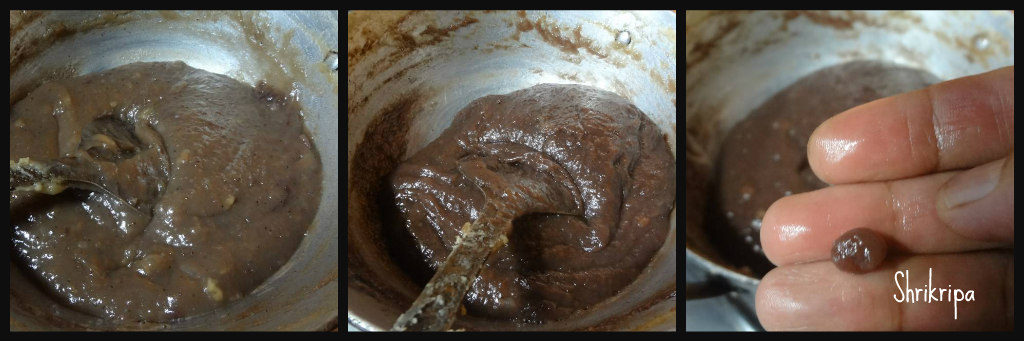
-After taking out, add 4 tsp of ghee and mix everything and keep it for 4th cycle (again 13 to 14 minutes)

-Lastly add 2 tsp of ghee and keep it for 5th cycle (again 13 to 14min) and at this time, it appears as non-sticky and turns into a mass like structure.

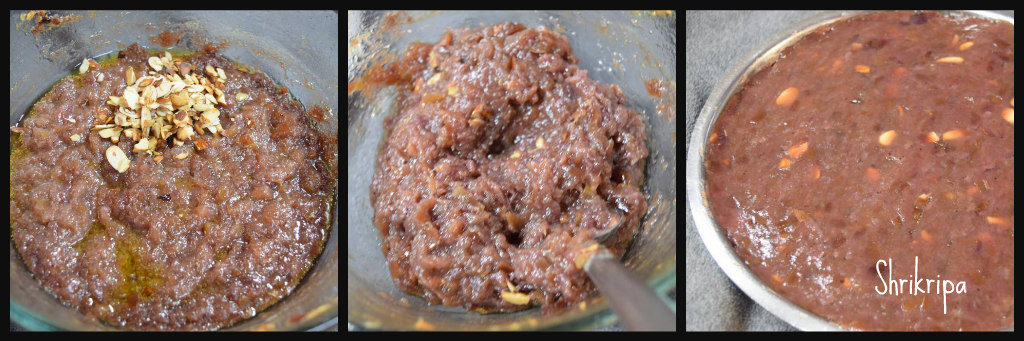
-Over all it took me 1 hour and 10 minutes but in between my work, I did it whenever I pleased and finishes the work 😀

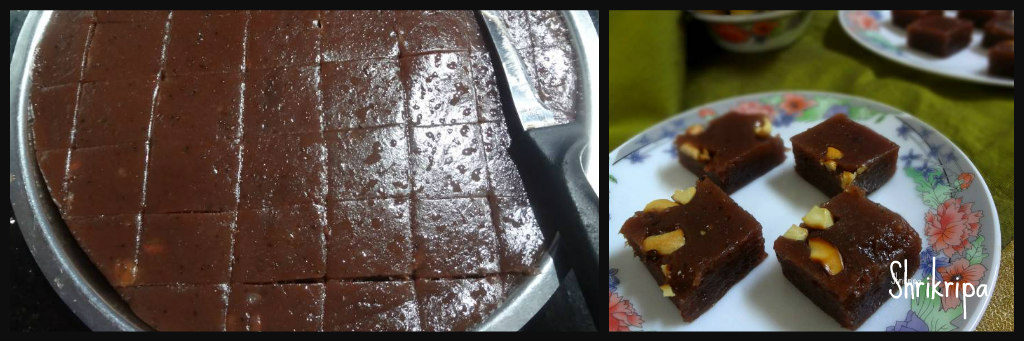
-Add in roasted cashew bits. If needed, please cook for some more minutes and spread the mixture in a ghee applied plate.

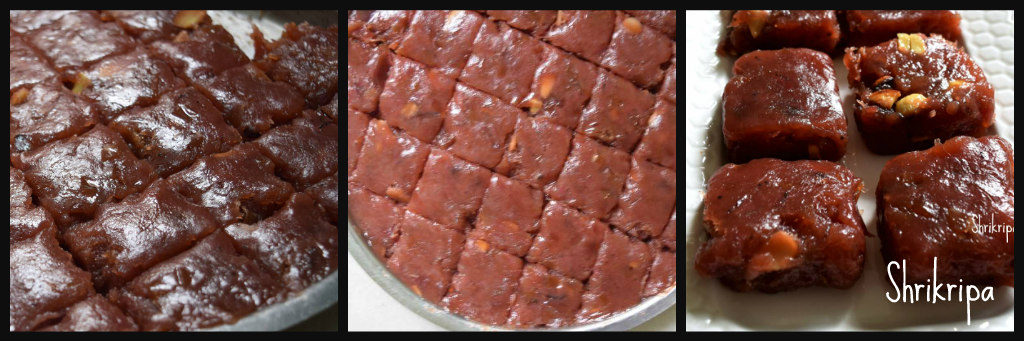
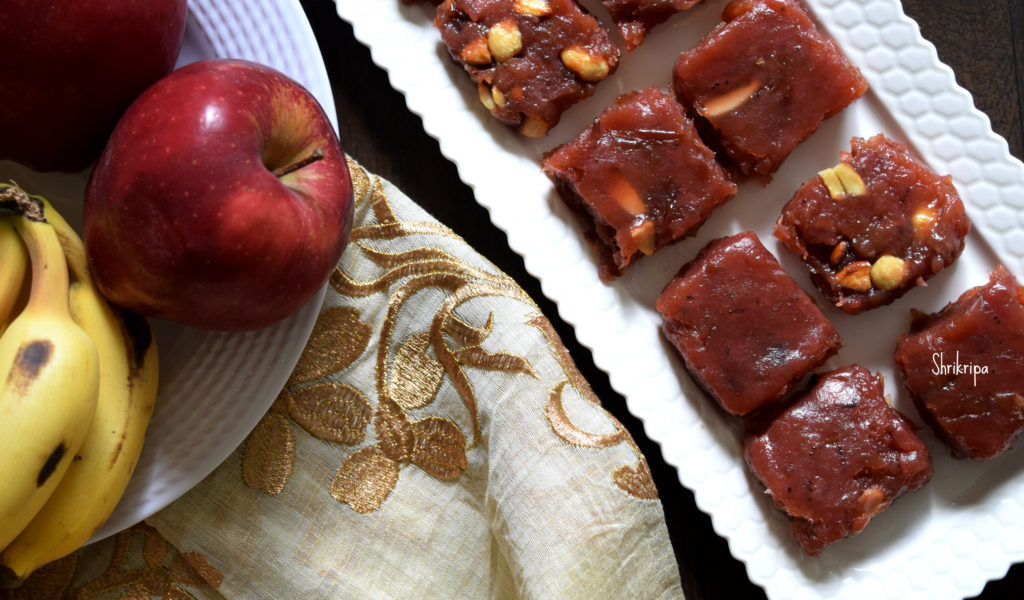
-After it cools down, maybe overnight, cut into pieces and store it in an air tight box. It stays good and shelf life is very long.

Note: You can use only banana as well.


Kadu Mavina hannina Hasi Gojji/ Wild Mango Gojju:

Wild mangoes are known as Kadu mavina hannu in our local language. Which is very fibrous, tangy as well as sweet in taste. It has distinct taste; it is widely used in varieties of curries in our region. Hasi Gojju is nothing but, raw form of curry. Which can be prepared in a jiffy and doesn’t need any heating and is a perfect treat for summer. Usually we enjoy this with hot rice as well as devoured like a dessert :D. In Mango season, we do prepare varieties of curries like Sasame or Sasive, saaru and Gojju are the most loved dishes of our region.

Ingredients:

Wild mangoes -5-6

Salt – to taste

Jaggery – to taste

Green chillies – 1 or 2

Seasoning: Coconut oil – 1 tsp, mustard – 1 tsp, Red chilli – 1, Curry leaves – little.

Method:

  • Wash wild mangoes, remove top part of the mango, remove outer skin and keep this in a separate vessel. Keep inner fruit part in another vessel.

  • Add one cup of water to outer skin, mash nicely, collect pulpy water and add this to fruit.
  • Discard outer remaining skin. Add required amount of jaggery, salt and crush green chillies by using your hand.
  • Mix everything, check for the seasoning. If needed add some more grated jaggery or salt.
  • Season by using coconut oil. When it is hot, add mustard, after it splutters, add red chilli and curry leaves, add this to mango curry.

  • Enjoy this with hot rice.

NOTE:

-If you don’t have access to wild mango, don’t worry. Pick up any (little sour) varieties of mango, peel the outer skin and chop the fruit into bite size pieces or mash a little and proceed with above method.


Carrot – Bell fruit Kosambari /salad:

When you have abundant supply of home-grown Bell fruits in Summer, you tend to use it in anything and everything for sure 😀

Bell fruit has many names like Java apple, Wax apple, Water apple, Syzygium, Jambi fruit or Jambu nerale. I normally prefer to use local, easily available and pesticide free stuffs as much as possible. I have shared the juice recipe before and now I am sharing one salad or commonly known as Kosambari in our local term. Which is “no onion and no garlic” and ideal for any fasting or festivities.


Ingredients:

Carrots – 2 (red or normal)

Bell fruit – 10 – 12

Salt

Raw mango or lemon – as needed

Grated coconut – 2 table spoons

Coriander leaves – 1 table spoon (chopped)

Seasoning:

Coconut oil – 1 tea spoon

Mustard – 1 tsp

Hing – ¼ tsp

Green chilli – 1 or 2

Curry leaves – 1 spring

Method:

-Grate carrots, chop bell fruits into very small chunks.

-If you are using raw mango, grate and add or else use lemon juice.

-Mix in coconut, coriander leaves, salt.

-Now prepare seasoning, heat oil, splutter mustard, add chopped green chillies, curry leaves fry for a min and add it to the salad bowl and mix everything and check once.

– Serve as a salad or as a Kosambari /side dish for lunch.


Balehannina Berati Payasa / Payasam by plantain preserve:

First, I want to wish a very very happy “Ugadi” to all my readers.  Ugadi marks the beginning of the new Hindu lunar Calendar, which is based on the change in the moon’s orbit. Ugadi is a Lunar New year for us.

On the eve of this festival I made our traditional payasam and enjoyed with my family.

“Berati” is nothing but preserved fruit pulp, which is cooked until it forms into thick mass and usually made when it is in abundance and stored for future use.

How to preserve jackfruit and Banana / Berati is already shared in my blog. 

In Coastal region we love jack and Banana in many forms. Berati Payasa (preserved Banana or Jack)  is one of them.

Now we will see traditionally how it is made:

Ingredients:

Berati / Banana preserve – 1 bowl

Coconut – 1 (To extract milk)

-OR-

Thin coconut milk – 2cups

Thick coconut milk – ½ cup

Salt – ½ tsp

Cardamom powder – ½ tsp

For Seasoning:

Ghee – 1 tbl sp

Thin Coconut slices – 2 tbl sp

Cashew pieces – 2 tbl sp

OR

Toasted black sesame – 1 table spoon

Fresh coconut slices – 1 to 2 table spoons

Method:

  • Take out Berati from your freezer and keep aside for some time to attain room temperature.

  • Slice coconut by using small knife, chop these sliced pieces into small bits.
  • Toast black sesame and keep aside.
  • Take little ghee and fry coconut bits and keep aside.
  • If you want to, you can add ghee roasted cashew bits as well.
  • Grate coconut (coconut should be fresh), put one cup of water and grind this in a mixer jar and extract milk by sieving this ground mixture. This is thick coconut milk and you should keep this separately. We use this at the end stage of Payasa making.
  • Do this procedure a couple of times to get a thin extract and lastly discard coconut fibre.
  • If you are using readymade coconut milk, please skip this step.
  • Now take one thick bottomed vessel, put Berati, thin coconut milk and dissolve Berati and keep this on a gas stove to boil.
  • Usually while making Berati, we put Sugar, so no need of additional sugar.

  • Lastly add thick extract of coconut milk and give one boil. Don’t boil it much. Add Cardamom powder and mix.       
  • Remove from fire and add fried coconut pieces, toasted black sesame or cashew brittles to prepared Payasa.
  • Serve with lunch thali or as a dessert.

NOTE:

  • Traditionally only toasted sesame and coconut bits are added.
  • Vegans can omit ghee and roast all the items, instead of frying.


Lemon Bread Roll:

Homemade lemon curd is pretty much going with anything. It is perfect for cookies, tarts, bread or bun, or topping with any dessert.

These sweet lemon rolls are packed with delicious flavours with a lemony tinge that pairs well with tea or coffee as a snack option.

If you are a lemon fan like me, this is for you. It is an alternative to the cinnamon roll, a lemon roll!!

The recipe which I follow is easy to make.

To make 8- 10 rolls

For the Dough:

Milk – 1 cup ( I usually take skimmed milk)

Butter – ¼ cup ( 50 grams)

Sugar – ¼ cup

Active dry yeast – ¾  tsp

Flour – 2 ½ cup ( I took a mixture of oats flour + brown rice flour + whole wheat flour, and All-purpose little flour )

Baking powder – ½ tsp

Salt – 1 tsp

Lemon cream cheese filling:

cream cheese or paneer – 1/3 cup

sugar – 2 tbl spoons

hung curd – 2 tbl spoons

fresh lemon juice – 1tsp

all-purpose flour /fine semolina – 2 tbl spoons

homemade lemon curd – 1/4 cup

Method:

First: Bloom the yeast:  In a large glass bowl, add warm milk, sugar, melted butter, and mix. Sprinkle yeast, stir well, close the lid, set aside for 10 minutes or until yeast starts to bloom. (Milk should barely be warm while touching. Otherwise, the yeast would not bloom; instead, it will die)

Second: Prepare a dough: Take whatever flour you are using, combine everything, add to the bloomed yeast and milk mixture. Fold everything together, keep it covered, let it rise in a warm place for another one hr or more until it nearly doubled in size.

Third: Prepare the filling: In a small mixer jar, at first, churn paneer pieces, sugar, hung curd, then add the remaining ingredients and, whip once or twice and keep it ready.

Line your baking tray or grease your muffin tray and keep it ready.

Fourth: Kneading the dough for good 10 minutes: Dust the clean kitchen counter with the flour, Remove the dough from the bowl, start kneading. If needed, add little flour, and adjust the consistency. Until dough does not stick to your hand or surface. Now start kneading the dough by hand until it reaches a silky smooth texture and springs back when poked.

Fifth: Now it is ready to Roll: Roll the dough into a large rectangle using the hand and the roller. It should be around ½ inch in thickness, roughly 12” by 16” long. Fix the shape of all the corners.

Sixth: Spreading: Drop the filling here and there over the rectangle, spread evenly using a spatula or spoon.

Seventh: Make a log: Start rolling from one end ( longest side); roll up the dough slowly by sealing correctly and tightly. At the other end, seal the edge correctly, place seam side down.

Eighth: Cutting: Cut the log into even pieces using dental floss, twine, or knife. Take a long enough string, keep it at the bottom of the rolled log and pull upwards to get uniform pieces. Place all these pieces in a baking tray. Close the tray with the kitchen towel and leave it to rise. ( mine took hardly 5 minutes)

Ninth: Baking: Preheat the oven to 180°C; if it has risen/ second proof, apply the milk wash and keep it in the pre-heated range. ( I have baked in a mid rack of my oven ) It took me around 35 minutes. Keep an eye after 30 minutes, and when its upper surface turns brown, remove it from the oven.

After taking it out, apply butter over hot rolls to retain moisture. After it cools down, break one by one and serve. I have not used any glaze or cream cheese. It was delicious as it is.


How to chop young jack fruit: Beginner’s guide

 Tender jackfruit is an integral part of our traditional cooking. In our region, we start to consume raw jack in different stages and each developing stage of jack has its own unique traditional recipes and is considered as a delicacy. I have shared many recipes of jackfruit in my blog and it is available in my blog archive or you can find in recipe index as well.

Nowadays, people follow many forms of diets and Jackfruit is used extensively in other parts of the world as well. As a plant-based meat alternative, young jack is considered as a Vegan meat.  It suits very well as a vegan meat, due to its fibrous structure and its neutral flavour works very well in cooking savoury dishes and soaks the added flavours.

Tender jackfruit is a super food, which is high in vitamins, minerals and dietary fibers and at the same time, less in calories, salt and fats. Now a day, it is available in almost all parts of the globe as fresh or frozen.

If you get a whole young/ green/ tiny raw jackfruit, what you would do? How to chop? What is the procedure we normally follow? These are the aspects I want to share in this post and I am sure, you would try to use these techniques while chopping the fruit by yourself.

Wanted to include the chopping/ cleaning procedure from a long time, it is tedious to do photography with my latex laden hand while chopping. This post is all thanks to my mother in law, who offered me a helpful hand in chopping, and I grabbed the opportunity to click pictures and the result is here –

First thing is –

  • Centre core part of jackfruit contain a sticky, white latex also known as sap. So, before chopping, apply some cooking oil to your hand and the knife that you use.
  • We normally use traditional vegetable cutter. in which, half-moon shaped knife fixed into raised wooden plank in which, person sits over and holds the vegetable in both the hands and cuts and moves it against the blade. The sharp edge of the knife will face the user. In this method, large sized vegetables can be handled with ease.
  • If you are using the knife or any other material, before cutting – spread a couple of newspapers beneath the work area.
  • Keep a couple of tiny pieces of papers ready, it would be handy while removing the latex.
  • Take one bowl of water as well.
  • Now, take one young jack fruit, make half and slice them to length wise.
  • Clean the oozed-out latex by using tiny paper pieces.

  • Now remove outer thorny skin as well as inner core.
  • It is ready to chop, as per your requirement or the recipe.
  • Make pieces as required and put it in a water containing bowl.

  • Drain the pieces, discard water and proceed to cook or store it in a zip lock and refrigerate or freeze it.
  • Wash your gummy hand by applying little oil once again, rub both the hands and wash it by using normal hand wash.


DATE CAKE:

I must say, this cake is my Signature dish and very close to my heart. When I was trying my hand in baking, I experienced a lot of failures, but this recipe has uplifted my faith in trying and achieving my goal.

Whenever I made this, everyone liked it for its soft, moist texture. As a little treat to help you relax and settle into Christmas mood, I will share my very easy Date cake recipe with very minimal ingredients. If anyone wants to try their hand at baking, this is just the recipe for you. Just go ahead and try this, you will never regret it.

Now we will see how to make this,

Ingredients:

Dates – 1 cup

Butter /oil – 1 cup

Sugar – 1 cup

All purpose flour – 2 cups (you can mix whole wheat and all purpose too)

Eggs –  2 (beaten)

Water – 1 cup

Cooking soda – 1 tsp or little less.

Method:

– De-seed the dates and chop it either by using food processor or knife, keep aside.

-Grease the baking tray (you can use bread tin as well). Line this with butter paper, keep it ready.

– Take water in a small bowl and boil. When it starts boiling switch off the gas, add chopped dates, butter, sugar, and cooking soda to boiled water and keep aside at least for 20 min.

– After it cools, add beaten eggs and mix nicely.                          

-Now fold in All-purpose flour, mix gently and pour this batter to greased and lined baking vessel.                                              

-Bake this in a pre- heated oven for 35 -40 min or until done at 180 C.

-If you want to check its doneness, use tooth pick or knife. Insert this, if it comes out clean, remove the tin, keep it outside.

-After some time, remove butter paper and cool further.                  

-When it reaches room temperature, you can slice it or cut according to your wish and enjoy with cup of coffee or tea.

Note: For the Eggless Version, use 1/2 cup of flax gel and you can refer my earlier post for the preparation.


Beet and apple salad:

Low calorie eye pleasing, wholesome salad . This is a very light and tasty salad and at the same time, crunchy and healthy too. This salad gets its pink colour from boiled beetroot. Dressing is very light with the usage of hung curd in it. It is a complete meal by itself with loaded nutrients.

Ingredients:

Beetroot – 1 big.

Apples – 2

Lettuce – 6 -8 leaves

Vinegar – 1 tb Sp.

Dressing: Hung curd – 1 cup , mayonnaise – 2 tb spoon ,garlic salt ,sugar -1 tsp ,English mustard – 1 tsp.

Garnish : roasted nuts of your choice

Method:

-Wash beetroot , peel outer skin and chop it into finger shaped pieces. Take one cooker and put some water and cook . After one whistle ,switch off ,cool and drain and mix vinegar to this and keep this  atleast for 2 hrs in the fridge.

-When you want to prepare salad , mix all the ingredients listed under dressing and keep it ready.

-Chop Apple . Make lettuce strips and add this to prepared dressing ,add in marinated beet too and mix.         


-While serving ,garnish with roasted walnuts/pine nuts or any other nuts of your choice and enjoy.


Banana Halwa:

Banana or Plantain Halwa was an integral part of my childhood. Usually this Halwa is made by using Kerala big banana which is called as” Nendra variety” but in our home, we used to have lots of overripe bananas from our family farm. To finish off all those overripe small bananas (Kadali variety of Mangalore), amma used to make Halwa or Banana Preserve/ Berati all the time. It was a very regular sweet at our house hold. Today I will share this recipe to all our readers-      

Ingredients:

Over ripe banana – 22

Sugar – 1 bowl

Ghee – ½ to ¾ cup

Cashew nuts – 2 tbl sp.

Method:

-Put all the peeled bananas to mixer grinder and make a smooth paste. Measure this by using any bowl of your choice.

-If this paste is 3 cups in quantity take one cup of sugar in that same measurement cup. So, your ratio of banana paste and sugar will be 3:1.

-Fry cashew bits in a teaspoon of ghee and keep aside. Grease one plate with ghee and keep it ready.

-Take one thick bottomed kadai, put this paste and keep gas flame in a very low flame and cook for a while.

-When it changes its colour to milky white and then to a pale colour and when you smell the banana flavour in the air, add sugar and mix this in at a regular interval.

-Add ghee 2 table spoons at a time in-between while stirring. If you feel that the banana paste needs a little more ghee, add up to ¾ cup, some varieties of bananas need very less ghee and some need more.

-Now we will see, how we decide the quantity of ghee. While stirring if you feel that the mixture is a little dry and the bottom part becomes a little brown, keep adding it.

-If the ghee starts oozing at the sides, it is an indication to stop the addition of ghee.

-Now we will see how you know the doneness. It is very simple, keep on stirring until mixture leaves the sides of the kadai and ghee oozes out from the mixture.

-You can add cashew pieces at this stage or spread those pieces in a greased plate like me. After you are done with this, it is almost ready to shift to the plate.

-Before shifting I prefer to check, by taking one small peanut sized portion of the mixture and rolling it in-between your thumb and forefinger to make a small ball like structure. If it holds a ball like structure and does not stick to your finger, it is ready.

-Now remove from the flame, shift to a greased plate and pat this mixture evenly by using a flat, greased (apply some ghee) back of the spoon.

-Keep this aside for two or three hours to cool. Then cut this into the desired shape and store it in an airtight container.

-You can store this Halwa for a really long time (up to a month or two).


Halasina Hannu Berati Payasa / Preserved jack fruit payasam:

First, I want to wish a very very happy “Krishna Janmashtami” to all my readers. On the eve of this festival I made our traditional payasam and enjoyed with my family.

Berati” is nothing but preserved jackfruit pulp, which is cooked until it forms into thick mass and usually made during Jack fruit season and stored for future use.

How to preserve jackfruit / Berati is already shared in my blog and it is here .

In Coastal region we love jack in many forms. Berati Payasa is one of them.

Now we will see traditionally how it is made:

Ingredients:

Berati / jackfruit preserve – 1 bowl

Coconut – 1 (To extract milk)

-OR-

Thin coconut milk – 2cups

Thick coconut milk – ½ cup

Jaggery – to taste

Salt – ½ tsp

Cardamom powder – ½ tsp

For Seasoning:

Ghee – 1 tbl sp

Thin Coconut slices – 2 tbl sp

Cashew pieces – 2 tbl sp

OR

Toasted black sesame – 1 table spoon

Fresh coconut slices – 1 to 2 table spoons

Method:

  • Take out Berati from your freezer and keep aside for some time to attain room temperature.
  • Slice coconut by using small knife, chop these sliced pieces into small bits.

  • Toast black sesame and keep aside.
  • Take little ghee and fry coconut bits and keep aside.

  • If you want to, you can add ghee roasted cashew bits as well.
  • Grate coconut (coconut should be fresh), put one cup of water and grind this in a mixer jar and extract milk by sieving this ground mixture.
  • This is thick coconut milk and you should keep this separately. We use this at the end stage of Payasa making.
  • Do this procedure a couple of times to get a thin extract and lastly discard coconut fibre.
  • If you are using readymade coconut milk, please skip this step.
  • Now take one thick bottomed vessel, put Berati, thin coconut milk and dissolve Berati and keep this on a gas stove to boil.

  • Usually while making Berati, we put little jaggery, so add required amount of jaggery and boil until raw smell of the jaggery vanishes.
  • Lastly add thick extract of coconut milk and give one boil. Don’t boil it much. Add Cardamom powder and mix.    

  • Remove from fire and add fried coconut pieces, toasted black sesame or cashew brittles to prepared Payasa.
  • Serve with lunch thali or as a dessert.

NOTE:

  • Traditionally only toasted sesame and coconut bits are added.