Pineapple Menaskai/ Gojju:

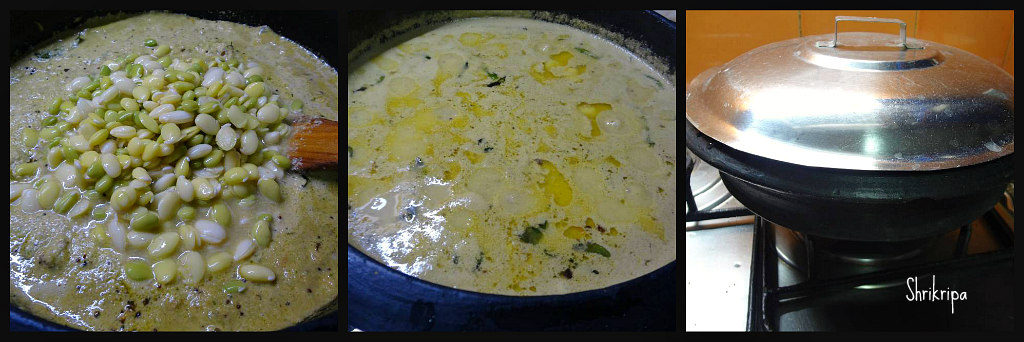
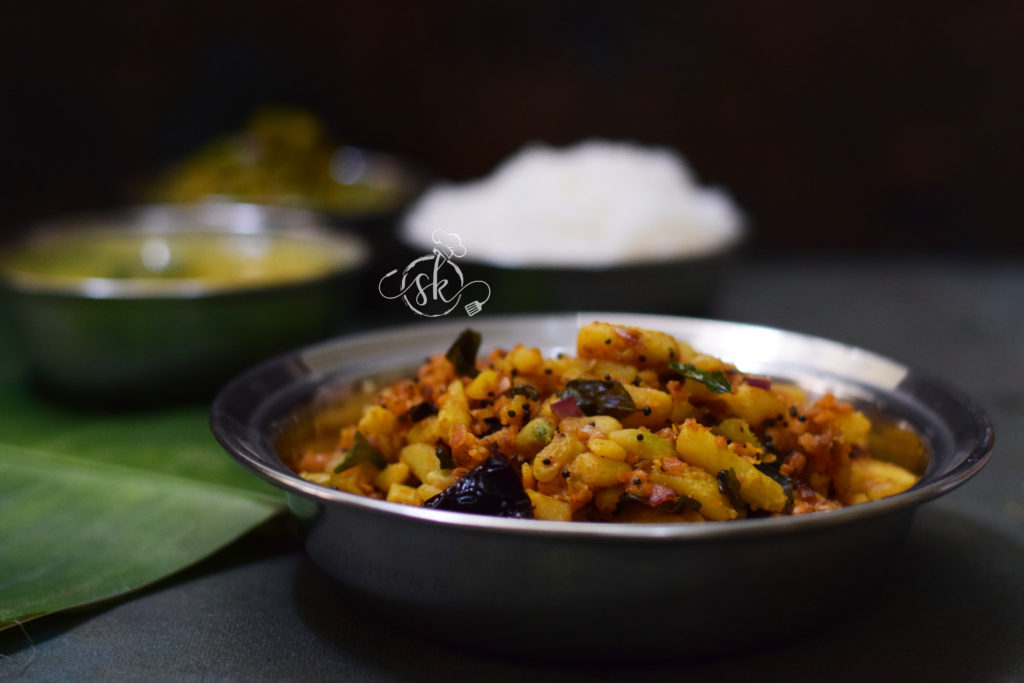
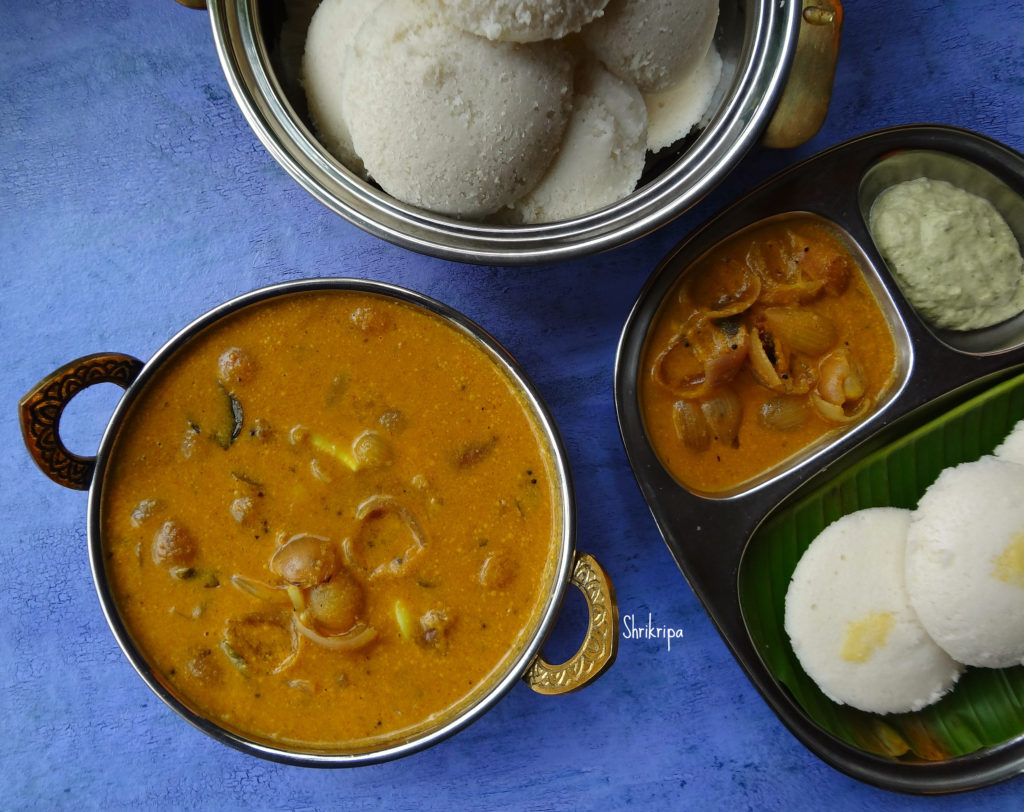
Menaskai/Menaskayi is one of our coastal specialities, which is a hot, sweet and sour, sesame flavoured coconut-based curry. Normally made with bitter or tangy things like Bitter gourd, raw mango, wild mango or pineapple. We even prepare by mixing Bitter gourd and raw mango as well. It is a common dish in any of our elaborate menus for festivities, usually served on a plantain leaf, like poojas or weddings. This same curry is prepared in a little different way in other parts of Karnataka and known as “Gojju”.

Here, the main trick is-balancing of all the flavours.

If you are preparing with sour vegetable or fruit, there is no need to add additional tamarind. For example, if you are preparing raw mango or mixture of bitter gourd and raw mango Menaskai, there is no need to add tamarind. If you are using pineapple, tamarind should be added.

Here I have used pineapple and the procedure goes like this-

Ingredients:

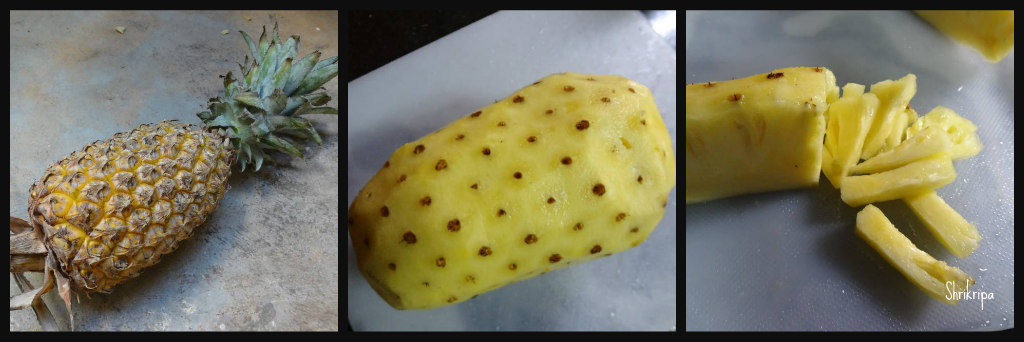
Pineapple – 1/2 (chopped into bits)

Raw mango – 1/4 (chopped into bits)

Tamarind – gooseberry size (if the mango is not available)

Jaggery – as needed

Salt

Green chillies – 2 (slit)

For masala:

Fresh Coconut gratings – 1 to 1 ½ cups

Methi seeds – 1/4 tsp

Urad dal – 2 teaspoons

Sesame seeds – 2 teaspoons (U can use black or white)

Dried red chillies – 8 – 10 (we use Byadagi variety)

Coconut oil – 2 to 3 teaspoons (1 for roasting + 1 for seasoning + 1 tsp to garnish)

Mustard – 1 tsp

Dried red chilli -1

Curry leaves – 2 springs

Method:

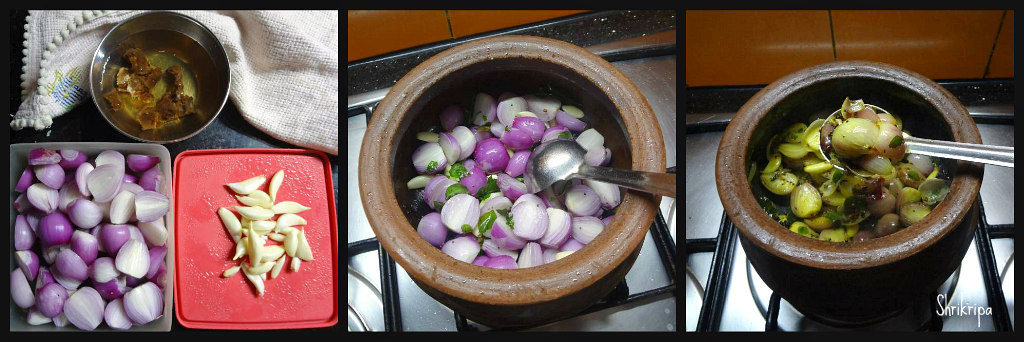
-Clean pineapple by removing the outer skin, chop into bite-size pieces.

Ribbet collage 1

-Cook pineapple pieces and mango pieces or tamarind with little water, turmeric, salt, jaggery, green chillies and curry leaves.

-Dry roast sesame seeds. Now fry all the masalas for grinding. First heat 1 tsp of oil, put methi(fenugreek) seeds. When it is light brown, add all the other ingredients like urad dal,  red chillies and fry until urad dal is light brown. Now it is the time to put coconut and fry further for 2 minutes or until you smell the nice aroma.

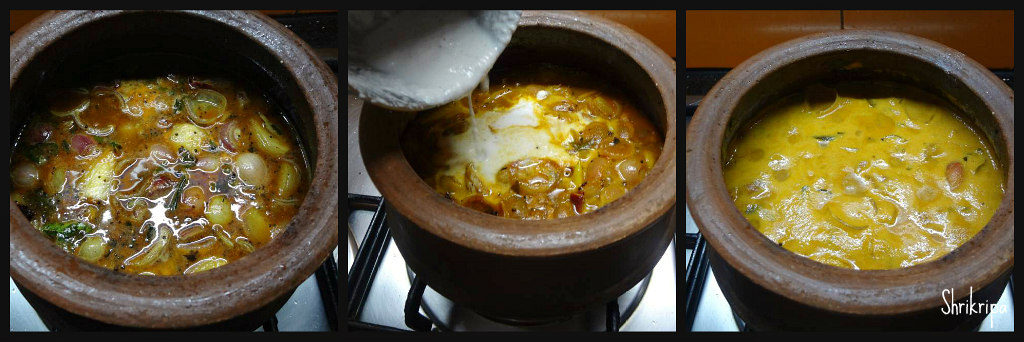
-Cool the mixture, grind into a paste by adding sesame seeds and sufficient water as well.

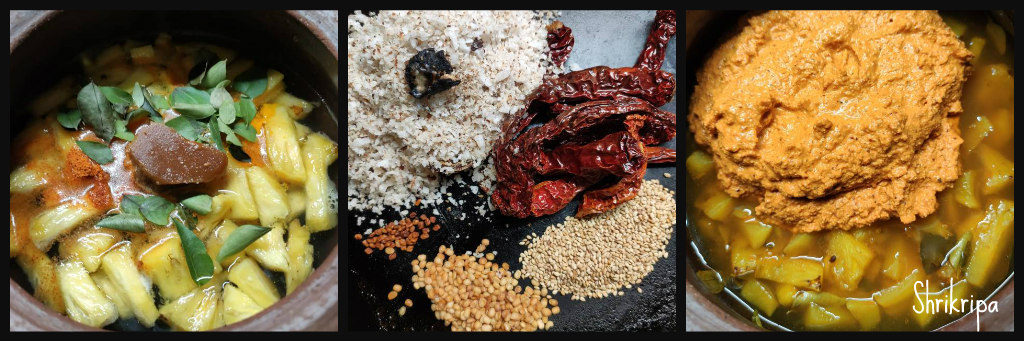
-Add this paste to the cooked pineapple, check for salt and jaggery. Adjust the consistency by adding water and boil nicely in a simmer for 5 to 10 minutes.

-After boiling, add 1 tsp of raw coconut oil as well as the seasoning with coconut oil, mustard, red chilli and curry leaves. Close the lid and leave it to soak all the masalas for half an hour.

-Serve with hot rice.

Note:

-After boiling, the gravy should be a little thicker than normal sambar.

-Taste should be sweet, sour, hot. So adjust the addition of jaggery accordingly.

– We usually relish this dish the next day of preparation, usually with Neer Dosa or chapati/Roti. 😊


Hitikida avarekalu/ Deskinned Hyacinth bean curry:

Avarekai has many names like Lablab or Hyacinth bean.

Avarekai is an integral part of every household of native Bangalore or Mysore region during every winter. People wait for its arrival. Winter special lima bean is called “Sogadavare” and it has double the aroma of what we get normally throughout the year.

DSC05495_Fotor

Initially I used to struggle with avarekai recipes and never used to get that authentic touch. Now over the years, I have mastered this authentic, tasty curry and my family started liking it and we do enjoy our share of this traditional curry with soft dosas.

If you are using fresh beans, it is a little time-consuming process. During the season we even get the deskinned ones. If you have frozen beans, curry making is an easy task.

At first, we will see the procedure of de skinning –

-At first take a fresh bean pod, remove outer thick green skin and separate the light yellowish green bean. Collect all the shelled beans, soak it in water for 3   to 4 hours.

Ribbet collage 1

 Now starts your time consuming real exercise. Dip your hand in water, remove soaked beans and start deskinning by keeping the bean in between your thumb finger and fore finger and press a little, you will see the transparent outer skin would flip and inner bean will come out. Continue the exercise until it is done and collect deskinned “Hitikida bele” and proceed to make very tasty curry.

Ribbet collage 2

Now we will see the procedure of “Hitikida bele saaru” /Curry

Ingredient-

Deskinned Avarekai – 1 big bowl

Onion – 1 for seasoning

Oil – 3 table spoons

Ghee – 2 tea spoons

Mustard – 1 tea spoon

Curry leaves – 2 springs

Green chillies – 4 (3 for grinding + 1 for seasoning)

Garlic – 8 cloves (4 for grinding + 4 for seasoning)

Coconut – 2 cups

Tamarind – marble size

 Coriander seeds – 2 tea spoons

Cumin – ½ tea spoon

Cinnamon – ½ inch

Clove – 2

Ginger – ½ inch piece

Coriander leaves – ½ cup

Method:

-Cook avarekai with required amount of water and salt. You can opt for a cooker or an open vessel. Slow coking gives a better result for this curry.

– Next is the masala preparation. Fry Coriander, cumin, cinnamon, cloves. When coriander becomes light brown, add garlic, ginger, green chillies, coriander leaves,tamarind and coconut and fry until it emits a nice aroma.

Ribbet collage 3

-Switch off the gas, cool the content and grind this in to a smooth paste by adding required amount of water.

-Now do the seasoning, heat oil, splutter mustard, curry leaves, garlic, green chilli, chopped onion and fry until onion becomes light brown.

Ribbet collage 4

-Add ground masala paste and fry for a couple of minutes. Add cooked avarekai and add enough water.

-At this time, consistency of the curry should be a little watery, as cooking proceeds and after some resting time, it becomes thick and becomes perfect.

Ribbet collage 5

-Boil this mixture until you see a thin creamy layer at the top.

-Switch off and pour 2 tea spoons of ghee, give one mix and close the lid. Rest this for some time, and serve with dosas, chapati’s or plain rice or jeera rice.

DSC05491_Fotor

Note:

-I usually prepare this curry in the night, and re heat and serve with dosas in the morning.

-In this way, it absorbs all the flavours and sets properly.


Akki Rotti Payasa /Rice flat bread kheer:

Happiness is when one of your readers messages you regarding this recipe, which he used to relish in his childhood and attempted a couple of times without any success. He wanted to know the exact recipe for the same, with proper measurements. When he explained about this payasam, I was clueless and thought it must be his grand mom’s own creation to fulfil the needs of her big family by making it easier. He patiently explained the process about how his grand mom used to prepare it and What amazed me was, as a small child, he has seen and observed how his grand mom does etc. After listening to his explanation, it was like a dream to me.  I couldn’t resist, and wanted to try it out As soon as possible. The next day was my wedding anniversary and I grabbed the opportunity and started my experiment. It indeed was a treat and I was super duper happy with the result. Here is the recipe and I am dedicating it to that great soul from whom this recipe came to light and my reader who has shared his childhood nostalgic memories with me by explaining it patiently.

DSC05209_Fotor5209 main

Now we will see how I proceeded with the recipe-

Ingredients:

Dosa rice – 1 small cup

Salt

Jaggery – 4 small cubes

One fresh coconut – to extract milk

Cardamom powder – 1 tea spoon.

Banana leaves – 2 pieces

Ghee – 1 tea spoon

Cashew pieces – 2 table spoons

Method:

-Wash and soak Dosa rice for 2 hours.

-Grind the rice into smooth paste with sufficient water (use soaked water itself) and salt.

Ribbet collage 1

-Batter should be of spreadable consistency (little thinner than regular Dosa batter)

-Next is a coconut milk extraction:

Ribbet collage 2

-Take fresh gratings, put one cup of water and grind into smooth paste and extract milk through sieve. This milk is a thick milk and is used at the end. Hence, it should be kept aside separately.

-Now once again take roughage of the coconut, put one more cup of water and grind, sieve the paste and it is our second extraction of milk.

-Repeat the process and take out a third extraction as well and if you are using the roughage of the coconut in any other purpose, you can store it in a freezer for future use.

– Take one wide thick bottomed vessel, Pour diluted, very thin milk (3 rd. extraction) and jaggery. Boil nicely.

Ribbet collage 3

-Now pour second extraction of milk (thin milk) and boil further.

-Now start preparing Rotti, take one clean banana leaf, spread a ladle of rice batter and spread as thin as possible and flip this leaf over boiling jaggery solution.

Ribbet collage 4

-Within 2 minutes, it will be ready to remove. Now start pulling your banana leaf by peeling it slowly.

-After peeling, if at all some cooked Rotti part remains, take one flat ladle and remove and put it in the boiling jaggery solution.

-Repeat the procedure, until batter finishes. I did it 4 times.

-Now boil this further for 3 to 4 minutes and mix it in-between by using very light hand.

Ribbet collage 5

-It is the time to use thick first extract of the coconut milk.

-When it starts boiling, remove from the flame. Add cardamom powder and ghee fried cashews and serve hot.

DSC05211_Fotor5211 main 2

Note:

  • We liked this dessert as a Hot option.
  • When it cools down, at room temperature it tastes good.
  • Under refrigeration, if Rotti pieces becomes slightly hard, one can relish after re heating.

Red Amaranth and Beet Pulav:

Red amaranth is very beautiful and a natural source of energy, rich in iron and a whole lot of micro nutrients and fibre. It is very high in calcium and very good for all ages, from infants to adults.

On the other hand, beets are also packed with anti-oxidants, Folic acid and Iron. Which is considered as a super food to fight anaemia.

When my home grown red amaranth is harvested, this rice dish is what we love to eat, by adding Beetroot chunks to enhance the nutritional value. One can enjoy this one pot super tasty dish with any form of yogurt based side dish or even with plain yogurt and pickle. One can carry this in a tiffin box as well. It is a very good idea to feed greens to those who don’t like them, without they even noticing 😉

This time, when I harvested red amaranth, I thought of using fresh ground masala and it really tasted divine, oozing with flavours.

second 2

Ingredients:

Basmati Rice – 3 cups

Beet root – 1 big

Red Amaranth – 1 Small bunch

Onions – 2 (sliced)

Ghee/oil– 3 table spoons+1 tea spoon

Cumin -1 tea spoon

Bay leaves – 2 (small)

Ginger garlic paste – 1 table spoon

Milk – 1 cup

Curd -1 cup

Brown Bread – 3 slices

For Fresh masala:

Coriander – 1 tea spoon

Cumin – ½ tea spoon

Cardamom -2

Cloves- 2

Cinnamon – 1”

Black pepper – 8

Nutmeg – 1 pinch

Dried Red chillies – 2

Fenugreek seeds – ¼ tsp

Method:

-Wash rice and soak for 15 minutes.

-Wash Beetroot, chop into bite size pieces.

– Wash Amaranth greens, chop.

-Dry roast fenugreek seeds. When it is slightly brown, add all the other ingredients under masala and fry.

Ribbet collage 1

-Make a powder and keep it.

-Now take one pressure cooker. Add ghee or oil, fry cumin and bay leaves.

Ribbet collage 2

-Add sliced onion, fry until it is brown.

-Add ginger garlic paste, fry for 2 minutes.

-Add beetroot, chopped greens, fry until green wilts.

Ribbet collage 3

-Next add fresh ground masala powder, drained rice, salt.

-Mix everything and add milk, curd , 4 cups of water and 1 tea spoon of ghee,close the lid.

-After one whistle, keep it in a simmer for one/two minutes and switch off the gas.

Ribbet collage 4

-Now make small square size pieces of brown bread and deep fry and drain out excess oil.

-When pressure releases, add bread croutons and lightly mix everything.

second 3

– serve with any raita or plain curd and pickle.


Soppavare/Winged beans stir-fry:

Soppavare name itself is very much nostalgic. We had a widespread vine in our front yard and we used to relish a whole lot of Mangalorean traditional recipes in our childhood days.

Winged bean is a nutritionally very rich, tropical vine, which needs warm weather, but in the winter season. Almost all parts of the plant are edible, and vine produces unique shaped bean with four-winged edges.

It is rich in vitamins, minerals and many nutrients. When it is cooked, bean has nutty flavour and is consumed in many forms from salad to stir fries or in a form of curry.

My family relishes on this simple stir-fried salad with this simple seasoning.

DSC05152_Fotor 1

Ingredients:

Winged beans – 10 -15

Olive oil – 2 tsp

Garlic salt – 1 tsp

Chilli flakes – ½ – 1 tsp

Method:

Ribbet collage 1

  • Wash and slice the beans.
  • Heat one non-stick tawa add olive oil, add chopped beans, garlic salt and red chilli flakes.
  • Stir fry for a while and serve as it is or with curd rice or as you wish.

Antinunde /Dry fruit laddu with edible gum:

Antinunde aka dry fruits laddu with edible gum is a super food for everyone, especially new moms or girls in their puberty, especially after their first cycle of menstruation. I came to know about this super food through my close friend’s mom, Chandu aunty.

According to her, if you are using it for a girl, after her first cycle. Traditionally it is a practice that, 5th day onwards girl should consume a little amount of ghee, small piece of copra (which is dried coconut) followed by one dry fruit laddu and a cup of milk for continuous 48 days. It is believed that, all the combined nutrition of dry fruits, edible gum and milk will take care of her and retain the calcium, iron and much needed supplements through the natural form.

If you are using after delivery, for a new mom as a postpartum supplement, method will be slightly different and here we should take care of the new born baby’s health as well. In this case, lady should consume, 1 spoon of postpartum lehya (which is a mixture of so many ayurvedic natural medicines) followed with little ghee, piece of dry coconut, one laddu and a glass of milk from 11th day onwards until 3rd month. Initial 1 ½ months content of the sesame should be more (for example 1 cup) other than this one should use ½ tsp of ajwain as well and after 2nd half one should decrease the quantity of sesame to half and quantity of the dried dates and edible gum should be more to pass on the supplements to the baby as well.

Other than these two instances, one can enjoy these delicious laddu at any given point of time with a whole lot of goodness. I will show you how I prepare this for a regular use –

DSC08344_Fotor 1

Ingredients:

Dates – 300 grams

Almonds – 100 grams

Cashew – 50 grams

Raisins – 50 grams

Fig – 50 grams (optional)

Melon seeds – 50 grams (optional)

Flax seeds – 25 grams (optional)

Desiccated coconut – 50 grams

Edible gum – 40 to 50 grams

Jaggery – 100 grams

Saffron – 10 strings

Nutmeg – 1 pinch (grated)

Cloves – 4

Ghee – 2 to 3 table spoons

Method:

-Chop dates and dry grind this in a small jar of the mixer grinder.

-Chop almonds and cashews 

-Dry roast saffron then coconut powder for 3-4 minutes, till you get a nice aroma.

-Dry roast flax seed.

-Heat one teaspoon of ghee and fry one by one, cloves, almond, cashew, melon seed and raisins.

-Put one more teaspoon of ghee to same tawa, fry those edible gum crystals, until it pops up and becomes fluffy.

Ribbet collage 2

-Make powder of this by using mixer jar and keep aside.

-Lastly, fry those chopped or churned dates and add all these items together in a bowl and keep aside.

-Now take jaggery in a small vessel and take ½ a cup of water, boil and sieve this to remove any impurities.

-Put this sieved liquid in a thick tawa, in which we have fried all those dry fruits.

Ribbet collage 1

-Boil this until it reaches one thread consistency. Switch off the gas.

-Mix in all those fried items, nutmeg powder, saffron and mix nicely.

-Rub your hand with little ghee and start to make laddu’s. 

DSC08333_Fotor 2

-Eat one laddu a day and enjoy.

Note:

  • Ratio of dry fruits and jaggery is 600 Grams:150 grams. If Fig is added, you can reduce a little.
  • I normally use normal dates, traditionally they use dried dates.
  • Instead of dry coconut (copra) I have used desiccated coconut.
  • One can use palm jaggery while making it for a new mom or use palm jaggery half and regular jaggery half.
  • My kids don’t like either poppy seeds or sesame seeds, instead I have added Melon seeds and flax seeds.
  • I normally add sugar candy crystals to enhance the crunchiness.

Sambrani gadde Palya /Chinese potato stir fry:

Chinese potato is commonly known as koorka or kooka. These are tiny tubers, with deep brown skin, unlike potato. Otherwise, it looks like baby potatoes. It is a less known, neglected vegetable and tastes good with a very little seasoning or additives. It is high in nutritional value and carbohydrate.

Ingredients:

Chinese potato – ½ kg

Salt

Coconut oil – 2 teaspoons

Mustard seeds -1 teaspoon

Urad dal – 1 teaspoon

Hing – ¼ tsp

Dried Red chillies – 2

Curry leaves – 2 strings

Onion – 1/2 ( chopped)

Tamarind – 1/2 tsp (soak it in a tbl sp of water)

Turmeric – ½ teaspoon

Red chilli powder – 1 tsp

Jaggery – ½ teaspoon

Grated coconut – 2 tablespoons

Method:

-Soak Chinese potato for 20 minutes, it will help in cleaning as well as while peeling the outer skin.

-After washing, peel outer skin by scraping it and keep immerse in water. 

-Chop like a match stick and immerse it in water to avoid blackening. 

-Now take a thick vessel, add little water, turmeric, salt, jaggery and boil. Add drained kooka pieces and cook in low heat, until it is firm and soft.

-Now, proceed with the seasoning. Take one Kadai, heat  1 a spoon of coconut oil, splutter mustard, add urad dal, hing, broken red chillies, onion and fry for 2 min.

-Add cooked kooka, red chilli powder, little tamarind water, freshly grated coconut and fry for a while.

-Lastly, add 1 tsp of raw coconut oil, curry leaves, mix everything, close the lid and keep this for 2 to 5 min on a low flame. 

-Flavour of Raw coconut oil and curry leaves would give a nice aroma to this side dish. Enjoy hot rice and dhal topped with ghee.


Mixed millet Masala Cookies:

Millets are a very good alternative to normal All-purpose flour or whole wheat flour in gluten free baking. You can’t even recognize the core ingredient. It is gluten free as well as high in nutritional value too.

When I was trying out some recipes for the 2017 Millet calendar, I dished out a couple of recipes, which had turned out super tasty, and at the same time, healthy, filling and as an alternate snack for kid’s tiffin boxes as well.

I tried pizza based seasoning in this cookie recipe and it tasted super delicious.

pic main

Ingredients:

Mixed Millet flour – 1 cup

Butter – 50 grams

Sugar – 2 table spoons

Salt – ½ teaspoon

Baking powder – ½ teaspoon

Baking soda – ½ teaspoon

Curd – 2 table spoons

Pizza seasoning or Oregano – 1 tea spoon

Chilli flakes – 1 tea spoon

Cumin – 1 tea spoon

Grated cheese – to decorate.

Method:

  • Mix flour, salt, baking powder, baking soda, pizza seasoning, chilli flakes and cumin and keep aside.
  • Now beat butter and sugar until it becomes fluffy and creamy. Add in curd and beat once again.
  • Mix in flour mixture and bind all the ingredients together, the resultant dough will be like Chapati dough.

Ribbet collage 1

  • Take dough little by little, roll it into half inch thickness and take a cookie cutter and cut.
  • Arrange this in a lined baking tray.
  • Sprinkle grated cheese on top.
  • Bake this in a pre-heated oven at 170 ºC for 10 to 12 minutes.

pic 2

Note:

  • Here mixed millet flour is store bought pre- mixed flour.
  • Alternately one can mix two to three millet flours and make their own flour or use all purpose flour as well.


Stuffed Capsicum (South Indian style)

Stuffed capsicum is usually done with potato, paneer, cheese or moong dal. In this recipe I have used coconut and onion which is mixed with south Indian style masala powder for the filling. It can be relished with plain roti or rice as a side dish. It is very tasty, and we relish it every now and then, whenever I get to catch hold of tiny capsicums. This recipe I learnt almost a decade ago by Radha athe. She is a treasure house of North canara traditional recipes and I have learnt so many things from her.

main 3

Ingredient:

Capsicum – ½ kg (small sized)

Onion – 2 to 3

Coconut – 1 cup

Salt – as needed

Tamarind powder – ½ tsp

Oil – 2 table spoons

For masala powder:

Chana dal – 2 table spoons

Urad dal – 1 tea spoon

Cumin – 1 tea spoon

Hing – small pea size

Dried red chillies – 6 to 8

White sesame seed (til) – 1 tea spoon

Mustard – ½ tea spoon

Turmeric – ½ tea spoon

Method:

-For masala, dry roast Chana dal, urad dal, cumin, white sesame and mustard and keep it aside.

-Next take couple of drops of oil and fry red chillies and hing.

-Cool everything and make powder by using mixer jar.

-Now take one bowl, add chopped onion, grated coconut, salt, tamarind powder and required amount of masala powder (don’t pour at once, use as required).

-Here salt and masala should be on a slightly higher side, because while cooking, even capsicum will absorb the masala and salt.

-Next wash small sized capsicum, make a round mark near the stalk region and cut open that top part. If possible, keep it intact.

Ribbet collage 1

-Remove inner seed part and clean inside.

-Fill ready coconut and onion masala and close it with upper stalk part and make it firm.

-Now take one wide nonstick pan, pour oil and heat.

-Place all the masala filled capsicum and sprinkle little water and close the lid.

-Cook in a simmer, check in between and turn the sides.

Ribbet collage 2

-All the sides should be uniformly cooked and outer skin should have charred effect.

-When it is done, switch off and serve hot with rice or plain phulka’s.


Onion Garlic Kulambu / Poondu – Vengaya Kulambu:

As I said in earlier post of Tamilnadu style Idli, Kulambu is a very good side dish for idli, if you like sweet and sour kind of taste. We all enjoyed this flavourful curry with idli and I had promised to post this recipe in my earlier post. Basically, it is a simple curry with tamarind base, which has shallots and garlic as the main veggies in it. Once again, all thanks to Senguttuvan Subburathina and his wife, Jayanthi Senguttuvan for this amazing recipe. I have made some changes to suit our requirement.

pic main

Ingredient:

Peeled garlic – 20

Shallots /sambar onions – 20

Tamarind – small lemon size.

Salt

Jaggery – as needed.

Red chilli powder – 1 tea spoon

Sambar powder – 1 tea spoon

Hing – pea size

Turmeric – ½ tea spoon

Coconut – ¼ cup

Rice flour – 1 tea spoon

Seasoning: Gingelly oil – 1 tea spoon, refined oil – 1 tea spoon, fenugreek seeds – ½ tea spoon, mustard – 1 tea spoon, curry leaves – 1 spring.

Method:

-Remove outer skin of shallots and garlic. If shallots are big, make couple of pieces.

-Soak tamarind in one cup of water.

-Take a vessel, do seasoning by pouring both the oils, when it is hot, add fenugreek, when it is light brown, add mustard. When it crackles, add curry leaves.

Ribbet collage 1

-Add garlic and shallots and fry for a while. Meanwhile add turmeric, hing and toss for a while.

-Add tamarind water, red chilli powder, sambar powder, salt, jaggery and cook onions and garlic.

-Grind coconut and rice flour into smooth paste and add the paste to cooked onion.

Ribbet collage 2

-Adjust the consistency by adding some water, check the seasoning like salt, sweet and hot. If needed add and adjust the taste.

– Boil this for 5 minutes, so that rice flour and coconut paste also cooks and becomes little thick.

-When it is ready, enjoy with hot idlies.

Note:

-Original recipe is a little hot, hence I reduced the quantity of chilli and sambar powder.

-Usage of gingelly oil gives the authentic taste. If you are not accustomed to its taste, mix half of any vegetable oil.

-Usage of coconut paste is optional.

-We like little thick texture Kolumbu, so I added rice flour as well. It gives a little creamy texture and is also tasty.