Moode/ Kotte kadubu:

Moode or kotte kadubu is a local delicacy of Coastal Karnataka. We especially prepare this on the eve of any festivities. Now a day It is an integral part of any weddings in our region.

Moode or kotte is leaf cup which we prepare either by using jack leaves, Kedige flower leaves (Kewda, Fragrant Screw Pine, Umbrella tree, Screw pine) or Plantain leaf. It is based on availability and accessibility to leaf.

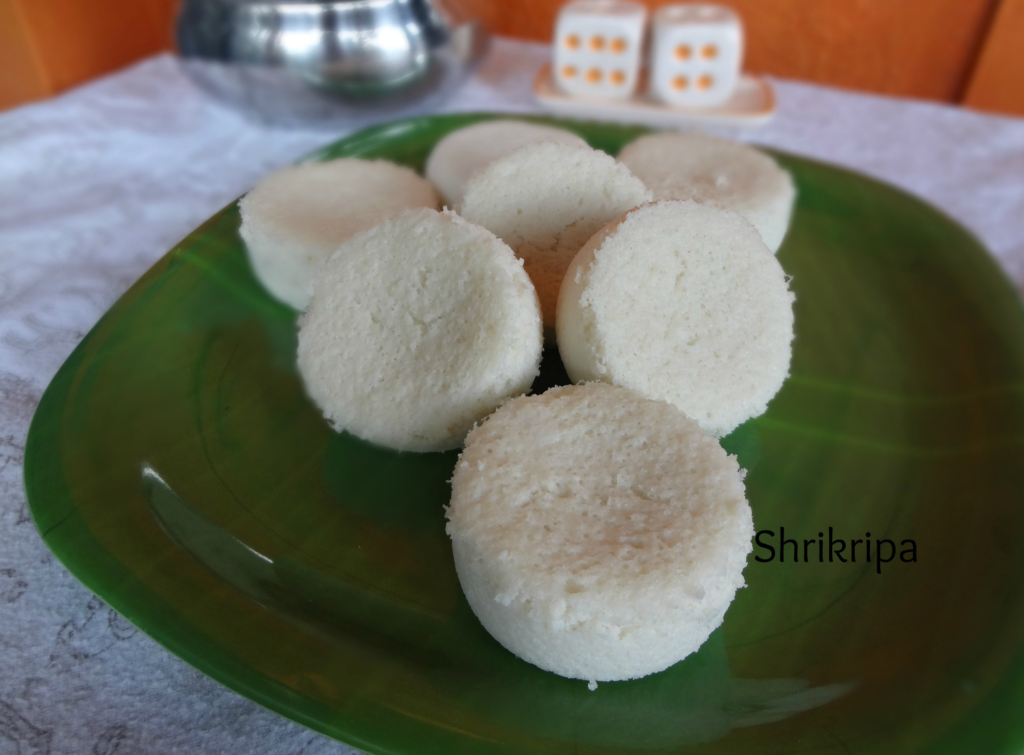
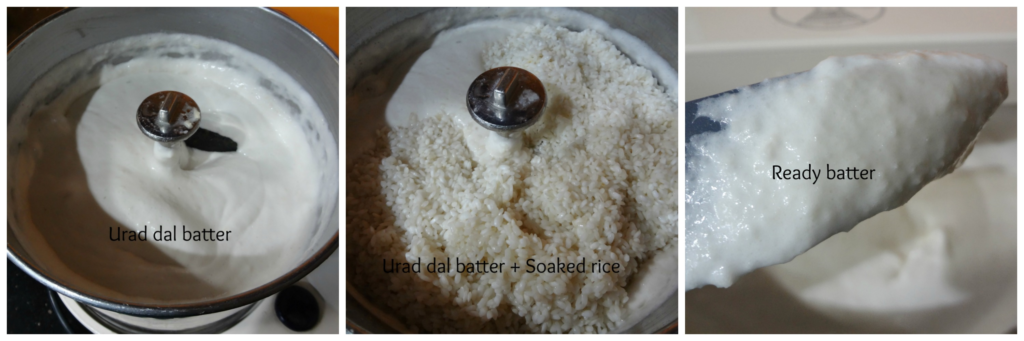
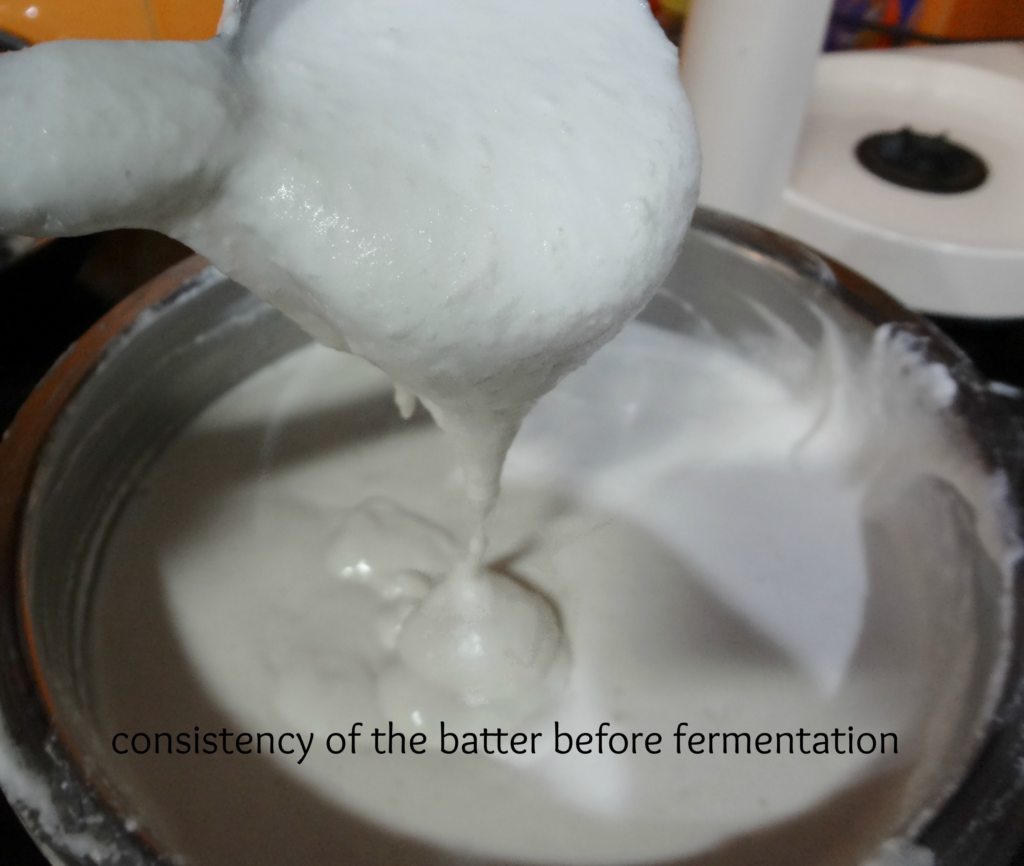
It is basically normal idly batter which is poured in these cups, which is made by any one of these leaves and steam cooked in a water bath and served with chutney or any sambar.

I usually prepare this by bringing these leaf cups, from One of the many Mangalore stores, spread across Bangalore, during festival season. Sometimes I do prepare by lining a stainless-steel cup with small pieces of plantain leaves. This also works just fine like any other leaf cup.

pic main

Ingredients:

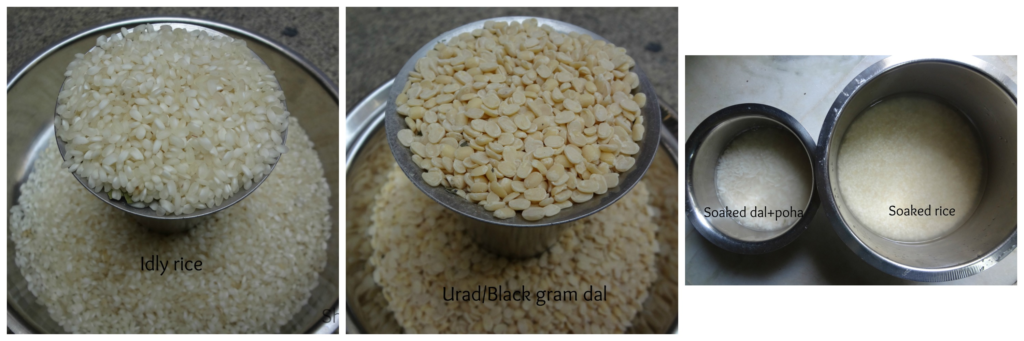
Idly Batter – Fermented

Tall steel glasses

Plantain leaves – as needed

Method:

Hold plantain leaves on gas flame and wilt a little. It will help while folding or rolling the leaves.

If you don’t wilt it, it will tear very easily.
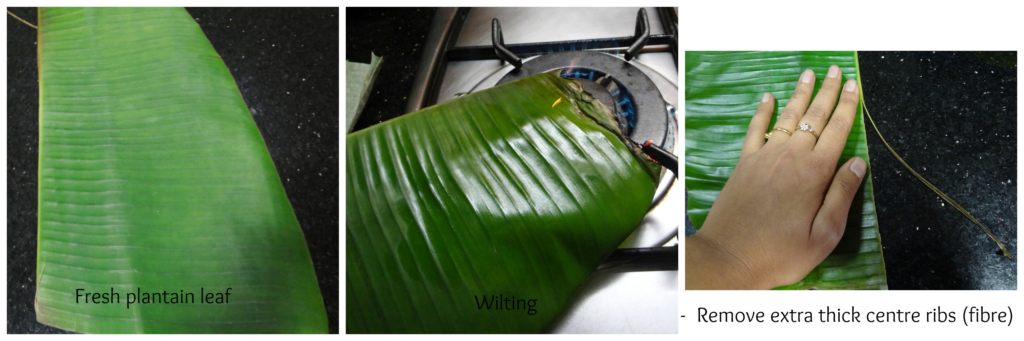
collage 1

Take one wet cloth and wipe plantain leaves (you should move your hand from centre rib to edge as ridges moves in the leaves) and clean the leaves.

 Remove extra thick centre ribs (fibre) by holding your left palm to support over the leaf and pull the fibre by right hand.

-Cut this into small rectangle pieces.

 It is now ready to roll and place inside the steel glass.
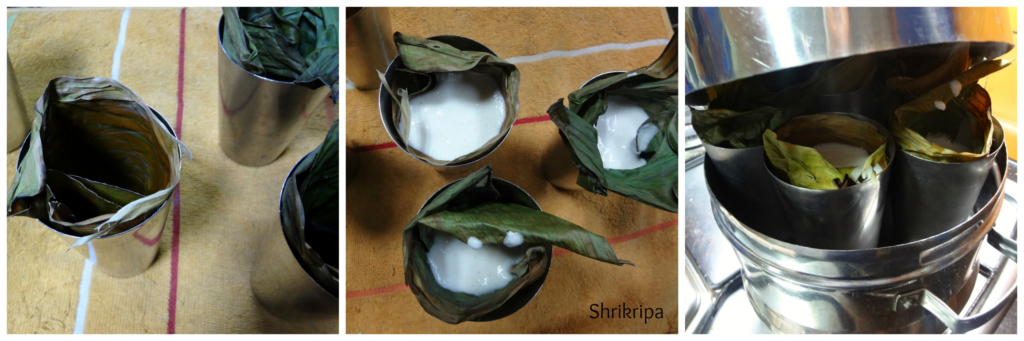
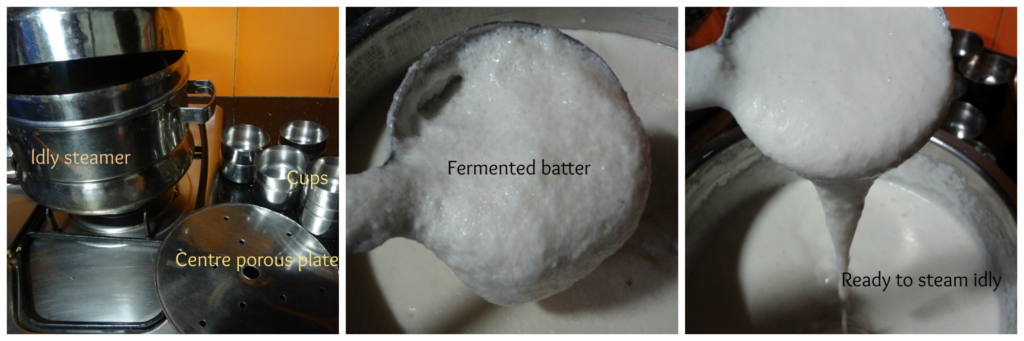
collage 2

Keep idly steamer ready, when water starts boiling, pour the batter to the moulds.

In these cups, usually 2 to 2 ½ serving spoons of batter will hold.

 If batter is more, cooking time should increase according to that.
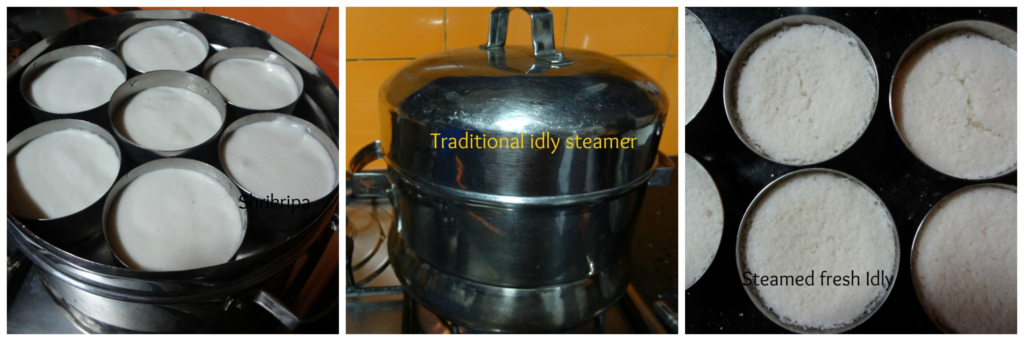
Keep it in a steamer, cook in a high fire for 10 minutes and when you feel the steam is uniformly distributed inside the steamer, reduce the flame and cook for 40 to 50 minutes in a very low flame.
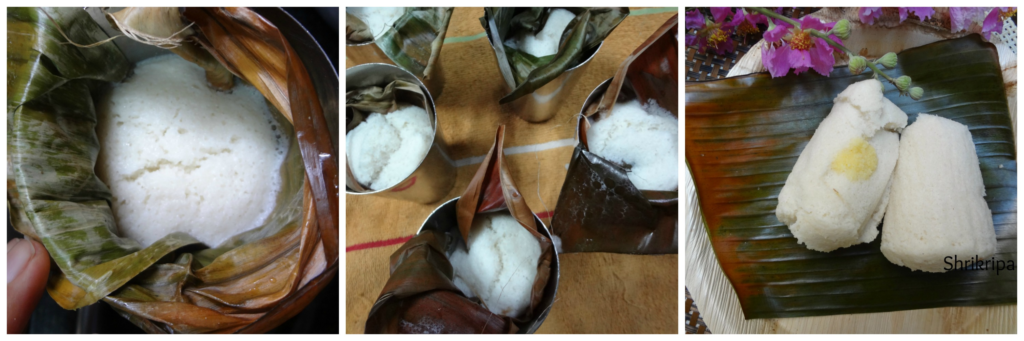
After it is done, switch off the gas, don’t open the lid and keep it for some more time.

When you want to serve this, open the lid, remove the glass mould and pull the banana leaves out and serve with pouring little ghee and any side dish of your choice.
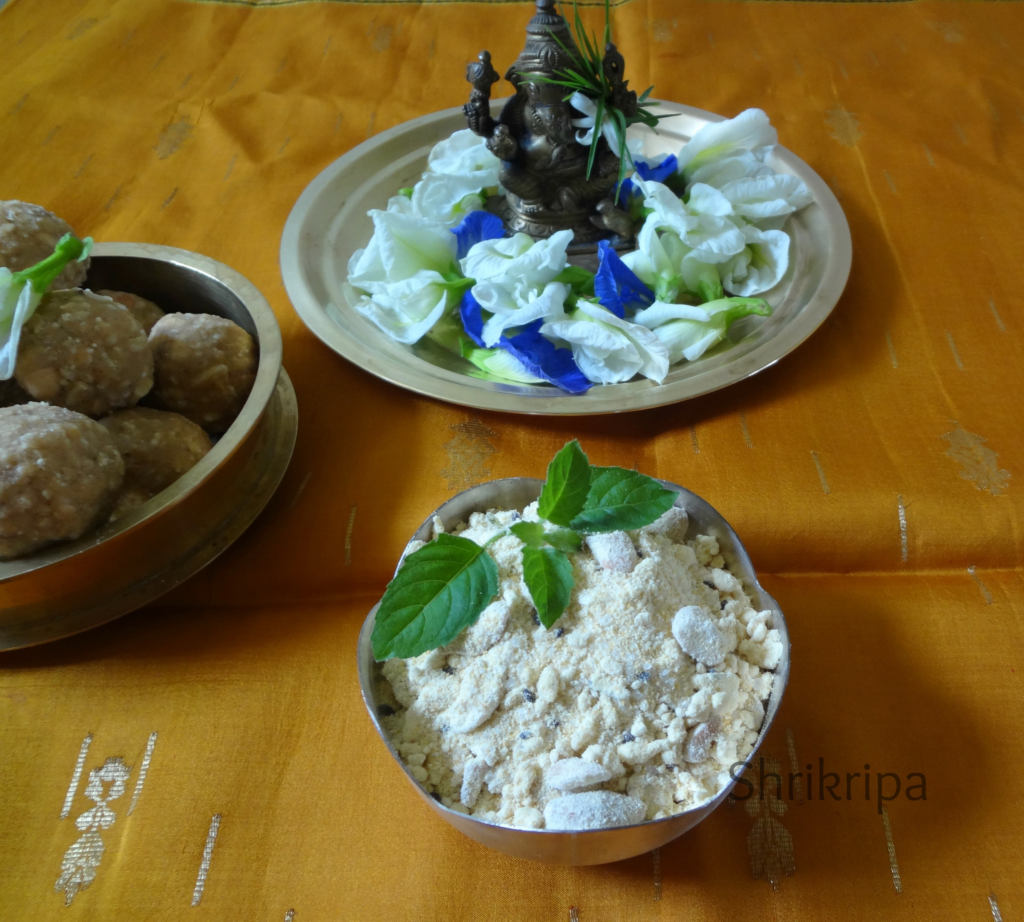
collage 3

Usually on festival days, we make coconut based sambar or chutney and totally avoid garlic and onion on any auspicious day.

Our traditional side dish is called menthe kodilu and we relish these kadubu’s with menthe kodilu or sweetened cardamom flavoured coconut milk(kayi halu) and coconut chutney .

Panchakajjaya /Naivedym which offered to lord Ganapathi:

Panchakajjaya is integral part of Ganesh Chaturthi Naivedyam. Pancha means Five. As the name suggests it is made up of five ingredients. Chana dal, sugar, coconut, Ghee, black sesame seed. cashew nuts are optional. This powdery Prasadam is a treat which we look forward to every year on this auspicious day.

pic 8

Ingredients:

Chana dal / Bengal gram dal – 1 cup

Grated fresh coconut – 1cup

Sugar – 1cup

Black sesame seed – 2 tbl sp

Cashew bits – ½ cup

Cardamom powder – ½ tsp

Ghee – ½ tsp

Method:

         Dry roast Chana dal until it is light golden and fragrant. Cool and make powder by using small mixer jar. Sieve and collect fine powder. Do this in small batches, little by little.

collage 1

         Powder sugar.

         Dry roast sesame seed and cool.

         Dry roast coconut gratings until light golden. Cool this.

         Fry cashew bits in ghee and keep aside.

collage 2 

         Now take one bowl, mix everything together, and sprinkle cardamom powder. Offer to God.

Idly/Idli Batter:

Idli is very basic, staple breakfast of south India. It is very healthy steam cooked rice and lentil cake which is very nutritious too. Each place has their own rice and lentil ratio or proportion and grinding technique also changes from region to region. In Mangalore, we soak rice and dal separately and grind very fine paste of urad dal and either we mix rice rawa or we are grinding the rice, we keep it a little coarse, hence this batter will be a little coarse. After fermenting the batter, the next day we proceed to make idlies by using either idly stand or idly cups. In our region, idly cups are regular and very common in every house hold and we use special type of idly steamer and invariably we use this for so many kinds of steam cooking.

pic 14

Ingredients for idli batter:

Idly rice or Idly rawa – 2 cups

Urad/Black gram dal – 1 cup

Poha – 1 fist full

salt

Method:

-Wash and soak rice in one vessel. If you are using idli rawa, you can wash idly rawa and put very little water and keep aside.

collage 1

-Wash Urad dal and poha in another vessel and soak for 3 to 4 hours.

-At first, drain excess water from urad dal and put this into wet grinder.

-Grind this into smooth paste by adding water in-between while grinding.

-When urad dal batter becomes fine and smooth, its consistency becomes almost double and colour of the batter looks milky white.

collage 2

– When you think urad dal batter is ready, add soaked rice or rice rawa by draining its soaked water.

-You can use this water while grinding or adjusting the consistency of the batter or to wash wet grinder at first to remove the dough that is stuck on the stone.

-Grind this into small rawa consistency by adding salt and remove this ready batter into big vessel. If you are using rice rawa ,allow batter to mix for couple of minutes and then remove.

-I usually grind urad dal first, then mix in drained rice so that batter mixes uniformly and becomes light and airy. 

– Batter consistency should be a little thick and when u hold and drop the batter it should not drop very easily and it should stick to the spoon.

pic 7

-Close the lid and keep this batter for 8 to 10 hours or more (according to outside weather where you live) for fermentation.

-Next day morning fill idly steamer or pressure cooker with sufficient water, place the porous plate at the centre of the vessel and keep this on the fire.

collage 3

-Mix fermented batter vigorously, if needed add water and adjust the consistency keep it ready.

-Rinse the idly moulds in fresh water once, it will act as a non-sticky layer between idly and mould.

-When water starts boiling, pour one spoon of batter into respective moulds and steam cook.

collage 4

-If you are using cups, cook this in a steamer for 15 to 20 minutes. Cups holds more batter than idly stand.

-If you are using idly stand, 7 to 8 minutes of steam cooking is sufficient.

-When it is done, switch off the gas, open the lid and remove moulds outside.

-Once it is cool, remove idly and serve with chutney or sambar or with your choice of side dish.

NOTE:

-Use wet grinder to get awesome soft idlies.

– Use soaked and drained water from the dal or rice while grinding. It will enhance the taste.

-Always mix and pour the batter to the moulds, only after water starts boiling.


Guacamole / Mexican Avocado or Butter fruit dip:

I tasted my first fresh and authentic Guacamole which was prepared by a native Mexican couple in Key west during my recent trip. Personally, I had never liked it before. It was by accident that we spotted a cart over there, due to my tiny niece who loves her dose of Guac at any time of the day, and that is the reason why we picked up one.

pic main

We got an opportunity to taste Authentic key lime pie and visited “Peppers of Key west” which is a small pepper bar. We sat at the pepper bar and did a taste test as well. They had more than thousands of varieties of sauces and dips with spice levels ranged or ranked from 0 to 10 and my daughters and sister who enjoyed this tasting session earned their ” I have the Hottest tongue in this island” badge as well.

collage 1

At Mallory square, one will get to see lots of things like Magic shows, tarot reading or some amazing food in different kinds of carts. We browsed a bit and decided to taste Budapest special Chimney cake, Caribbean grilled corn and this Guacamole. After all these experiences and eating sessions, we enjoyed the sunset over there.

pic 8

Now we will see how I tried to replicate their recipe and I want to dedicate this recipe to that couple.

Ingredient:

Avocadoes/ Butter fruit – 2 (small size)

Garlic cloves – 5 to 6

Crystal cooking salt – as needed

Tabasco chilli sauce – 1 tea spoon

Tomato ketch up – 1 teaspoon

Tomato – 1 (big)

Spring onion greens – 2 table spoons

Fresh Lemon juice – as needed

Method:

-Make a paste of garlic, salt and Tabasco sauce by using pestle and mortar.

– it should be like a semi ground paste and it takes little time and energy of yours.

collage 2

-Now cut open the fruit, remove seed and scoop out the flesh and mash this into fine texture.

collage 3

– Mix in tomato ketch up and ground garlic and salt paste.

-Garnish with finely chopped spring onion, tomato and juice of lime .

pic 7

Serve fresh with tortilla chips or with some other choice of yours.


Soba Noodles with Vegetables in Honey based sauce:

Once again testing period for me. Yes!! I was keeping and not at all interested to cook these dull Soba noodles. My sister gave me this pack of soba noodles “to experiment” when I visited her this summer. Last week, she had asked about Soba and told me, she is waiting for the foolproof recipe. I had no option but to cook. I was hesitant at the beginning, by thinking about my ever-choosy daughter’s palate.

On the eve of Independence Day, I was thinking about something special for our menu. So, I thought of cooking this special noodle for the first time and made my own mixture by using Honey as a base.

pic main

Honey did help to uplift the taste of soba noodles, which is otherwise very bland in taste.

First, we will see, what are Soba noodles. Soba noodles are Japanese noodles that are made from buckwheat flour. Buckwheat flour is greyish in colour so the noodles have that dull grey colour and it is gluten-free as well. Due to this, noodle is very brittle in nature.

As 100% buckwheat, gluten-free noodle tends to break, people do add some wheat flour when preparing their noodles. What I had was 100 % with buckwheat flour and needed extra caution while boiling and cooling.

Ingredients:

Soba noodles – 3 serving bundles

Vegetables – 1 bowl of your choice

white sesame seeds – 1 tablespoon

Corn flour – 1 tablespoon

Water – 3 tablespoons

Salt

Oil – 2 tablespoons

Sauce Mixture:

Sriracha sauce – 2 tablespoons

Rice/ plain vinegar – 2 tablespoons

Light soy sauce – 2 tablespoons

Honey – 5 to 6 tablespoons

Garlic – 1 ½ tablespoons (sliced)

Ginger – 2 teaspoons (grated)

Red chilli flakes – ½ teaspoon

Method:

 Make sauce mixture by Combining Sriracha, vinegar, soy sauce, honey, red chilli flakes, garlic and ginger in one bowl and keep aside to release its flavour.

pic 4

  Mix cornflour and water and keep aside.

   Dry roast sesame seeds and reserve this for garnishing.

  Boil water with one spoon of salt and oil. Put noodle, cook until al dente (it should cook and texture should be firm)

collage 1

  Drain the water, rinse the noodle in cold tap water.

  Collect one small cup of the drained water and keep it aside for next use.

   Chop vegetables according to your taste. Here I have used broccoli, beans, carrot, baby corn and zucchini.

   Take one wide Kadai, add oil. When it is hot, add chopped veggies and a little salt and fry for a while.

collage 2

  Add all the sauce mixture, cornflour mixed water and fry vigorously to avoid this to burn.

  If the mixture becomes very thick, add a little reserved cooked and drained water of noodles. Check for the salt. If needed add and adjust.

  When it starts boiling, add noodles and mix.

collage 3

Garnish with dry roasted sesame seeds and serve.


Chavli kai palya /Cluster beans and chana dal dry curry:

Like any other veggie, even most neglected high fibre, low calorie, nutrition filled Cluster beans also has many names like, Gorikayi, chavlikai, Guvar, Kothavarangai, Goru chikkudi etc. in different Indian languages.

It is a type of green beans, which is short, flat and little bitter in nature. It is a “power house of goodness” but neglected in-between  all kinds of veggies.

Yes, it needs some other vegetable, dal or potato to enhance its taste or to tone down the bitterness. Here in this recipe, we use soaked Chana dal and little bit masala to enhance the taste and this recipe is handed down to me by my dear aunty who is a super human being.

pic 12

It is a perfect side dish for any kind of Indian flat breads or with hot rice.

Ingredients:

Cluster beans – ½ kg

Chana dal – 1 cup

Onion – 2

Fresh Coconut gratings – 1 fist full

Seasoning:

Oil – 3 to 4 tbl sp

Mustard – 1 tsp

Red chillies – 2

Hing – ¼ tsp

Curry leaves – 1 string

For masala:

Green chillies – 6 to 7

Cinnamon – 1” piece

Ginger – 1” piece

Garlic – 8 cloves

Coriander leaves – 10 strings

Method:

-Wash, soak chana dal in water for half to one hour.

-Cut cluster beans in to bit size pieces after washing and removing both the ends.

collage 1

– Cook soaked dal and chopped beans for 2 whistles in two separate vessels by adding very little water.

– Put aside one serving spoon of cooked chana dal and pulse remaining amount of dal.

– Dry grind all the items under masala and keep aside.

collage 2

– Chop onions.

– Take one thick bottomed tawa, Put oil, splutter mustard, hing, red chillies and curry leaves.

– Add onion, turmeric and fry nicely.

collage 3

– Add ground masala,required amount of salt and fry nicely.When its raw smell vanishes, add roughly ground dal and fry for a while.

collage 4

– Lastly add cooked cluster beans and dal which we have kept aside.

-Cook this until water becomes dry and garnish with fresh coconut. Mix nicely and heat this mixture for a couple of minutes.

collage 6

-Serve either with rotti, phulka or hot rice.

Breadfruit chips:

Breadfruit is commonly known as Jeegujje or Deevi halasu in our native language. It is a staple food in many tropical region and considered as an exotic veggie and wonder food only because of its richness either in its taste, fragrance, its high source of gluten free carbohydrate, protein and minerals.

pic 4

Breadfruit is a seasonal, much-loved veggie in our coastal region of Karnataka. It can be consumed when it is mature, but still firm and can be cooked and eaten in many forms. Today I am going to write about its chips. How we can make this exotic savoury and enjoy the gloomy weather.

I got this fresh Breadfruit from my cousin brother’s farm and got an opportunity to make these chips and had them after ages. Guidance was given by my lovely co sister who prepares this in our native, during every season.

pic 2

Ingredients:

Breadfruit – 2

Salt -1 table spoon

Turmeric – ½ tea spoon (optional)

Water – 1 small cup

Coconut oil – To deep fry

Chips slicer – to slice

Method:

– Apply some oil to your hand. To some extent it will protect your hand from blackening.

– Take fresh breadfruit, wash properly. Take one sharp knife and remove outer skin as thin as possible.

– Make four longitudinal pieces, remove inner pith (which is slightly harder and rubbery in nature)

– Immerse these pieces in bowl of water.

collage 1

– Take one small bowl of water and mix salt, turmeric powder and keep aside. It is your salted water, which is used while frying and addition of turmeric will enhance the colour of the chips.

– Now you can keep coconut oil for heating. When it is very hot, start making chips. To test the hotness of oil, drop one small piece of breadfruit, if it pops up immediately, it is ready.

collage 2

– Take out breadfruit from water, remove traces of water by wiping it out. Make each quarter into half and now you will get 8 total pieces from one bread fruit.

– Take each piece and start slicing directly to the hot oil by using slicer. Keep gas flame at medium.

– When the breadfruit slices cook, the bubbling sound of the oil becomes faint. Now you can add 1 to 2 tsp of salted water.

collage 3

– You will hear lot of bubbles and bubbling sound immediately after adding salted water to the hot oil.

– When the sound reduces, the chips are ready to be removed from the oil.

pic 1

– Remove the chips from the oil and keep them on a tissue paper laid plate.

– After cooling store it in an air tight container and proceed with the remaining bread fruit.

Healthy Chocolate Brownie:

Here healthy refers to ‘No maida’ and personally I prefer to include healthy flours instead of maida and experiment with the same. Today I made this multi millet flour brownie. These brownies turned out to be a soft, fudgy and delicious and no one cribbed about the altogether elimination of all-purpose flour in this bake. It was so delicious, and my dear hubby was all into praise!!! That was the highlight and I don’t get this every day. Yes!!! I need to work hard for it.: D He usually doesn’t prefer to compromise on basic taste. Today I did achieve to get that “classic brownie” taste without any compromising.

This is an excellent,an easy recipe which you can prepare in advance when you are entertaining guests and have many other stuffs to prepare. It is a perfect dessert option along with an ice cream. Re- heat before serving to give an extra zing with cold ice cream.

Ingredient:

Sprouted finger millet/ragi flour – 1 cup

Mix millet flour – 1 cup

Walnuts – 1 cup

Eggs – 2

Cooking Milk chocolate slab – 300 grams

Cocoa powder – 2 table spoons

Butter – 100 grams

Curd – ½ cup

Light brown sugar – 1  cup

Method:

  • Assemble all the materials and keep it ready.
  • Put butter and cooking chocolate in a sauce pan and melt.

  • Add sugar and switch off the gas.
  • Cool this mixture for 2 minutes.
  • Add in beaten eggs and curd. Mix thoroughly.

collage 2

  • This is your wet ingredient and keep it aside.
  • Break walnuts into tiny chunks.
  • Now mix all the dry ingredients, two flours, cocoa powder and walnut chunks in one bowl.

collage 3

  • Dry mix all the dry ingredients and pour wet ingredient mixture into this bowl and fold in.
  • Pre-heat oven at 180 C

collage 4

  • Pour this batter in a greased, butter paper lined baking tin for 40 to 50 minutes or until knife comes out clean while checking the doneness.
  • After it is done, remove from the oven and cool.

 -Serve hot brownies as it is or with vanilla ice cream.

Note: If your cooking chocolate has sugar, please reduce the sugar quantity to ¾ cup.

Bendekayi/Okra Palya:

Bendekai/lady’s finger/okra/bhindi- so many names for this simple, high fibre, low calorie vegetable. Some people just avoid this slimy vegetable without knowing how to cook. It is just simple, if you know the right technique.

We normally don’t use any onion, garlic or tomato in festive cooking. In Mangalore, we prefer this simple coconut based side dishes for any weddings or festivities.

Here we use tamarind base to cook Bendekai to remove its slime. To avoid sliminess , you should remember 2 to 3 things. First thing, drops the veggie, only after tamarind water starts boiling. secondly, don’t over mix the veggie, while cooking. Thirdly, don’t cover the lid, while cooking lady’s finger. These are all the tricks I learnt from my elder’s while learning cooking from over the years.

You can use any varieties of lady’s finger for this recipe. Here I have used local variety from Mangalore which I have grown and harvested from my terrace garden. It is Red Okra and after cooking, it becomes like any other okra.

pic 1

Ingredients:

Ladies’ finger – ½ kg

Tamarind – 1 tsp

Salt

Jaggery

Red chilli powder – ½ tsp

To grind:

Fresh Coconut – 1 small cup

Red chillies – 2 to 3

Mustard – ½ tsp

Hing – very little

Seasoning:

Coconut oil – 1 tbl sp

Mustard – 1tsp

Urad dal – 1 tsp

Red chilli – 1

Curry leaves – 1 string

Method:

-Wash and cut the bhindi into half inch pieces.

collage 2

-soak tamarind in one cup of water.

-Roast red chillies and hing in a drop of coconut oil.

-Dry grind coconut, roasted red chillies, hing, mustard and keep it aside.

– Take one tawa, do the seasoning by putting oil, mustard seeds, urad dal, red chilli.

collage 3

-When mustard starts spluttering, add curry leaves and pour tamarind water (squeeze soaked tamarind in water and use)

-Add required amount of salt, jaggery and red chilli powder.

-When it starts boiling, add chopped Bendekai and cook this in a low flame.

-when water drains or Bendekai cooks, add ground coconut mixture and mix thoroughly and keep this in a simmer for couple of minutes.

pic 3

-serve this as a side dish with hot rice or Chapati.

Homemade Vegetable stock /Broth:

Vegetable stock is always handy while preparing clear soups or any other soups, as a base and is one of the main key ingredients for any Chinese gravy and one pot meal etc.  I especially like my vegetable stock in soups and Chinese gravy. It gives a depth and enhances the flavour of the dish in any sorts of cooking. Making this at a home is very easy job and not at all time consuming. It can be stored in the fridge for up to one week.

vegetable stock main

Here comes my recipe – Take a cooker, add roughly chopped veggies and herbs like Lemon grass, leek outer leaves and leaf tops (you can use fresh ones in a leek soup), carrot, tomato, beans, cabbage, cauliflower stalk or couple of heads, Coriander stalk (stalk gives very nice aroma) celery stalk -2, pepper corns -5 and garlic cloves -4.      

stock      

Add water (till veggies immerse in water) pressure cook for two whistles, when pressure releases, strain it and collect the stock, keep it in handy for soup making or cooking.

Note:

-You can add or delete any of the ingredients. I personally like lemon grass flavour and try to incorporate it every time.