Guacamole / Mexican Avocado or Butter fruit dip:

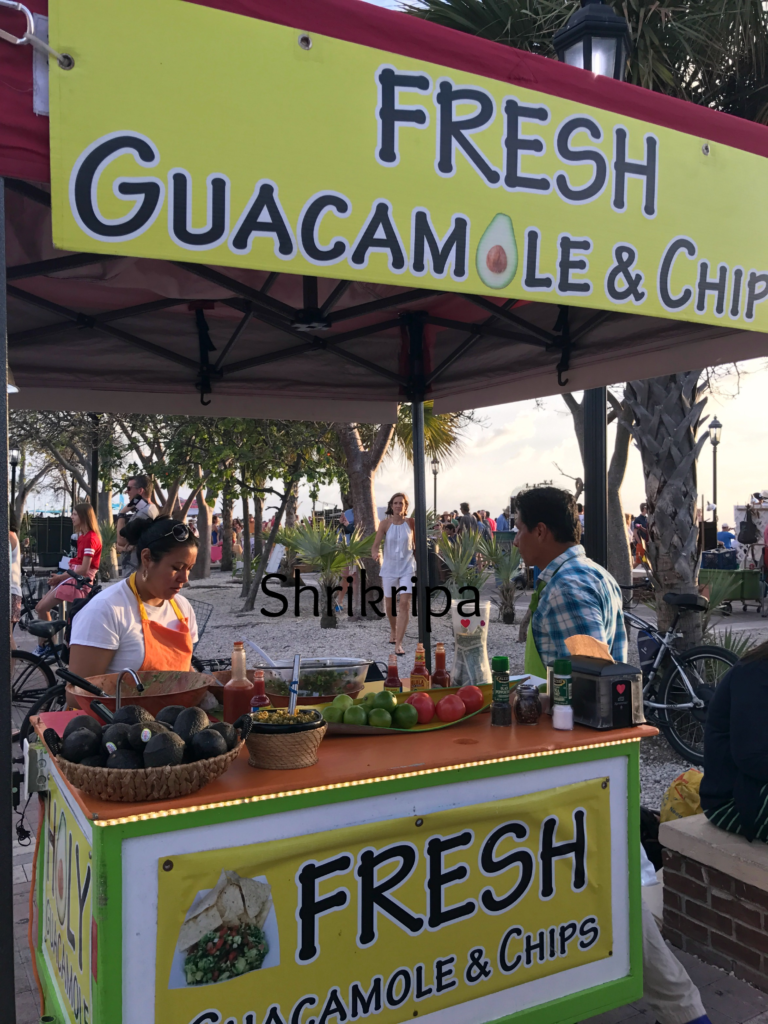
I tasted my first fresh and authentic Guacamole which was prepared by a native Mexican couple in Key west during my recent trip. Personally, I had never liked it before. It was by accident that we spotted a cart over there, due to my tiny niece who loves her dose of Guac at any time of the day, and that is the reason why we picked up one.

pic main

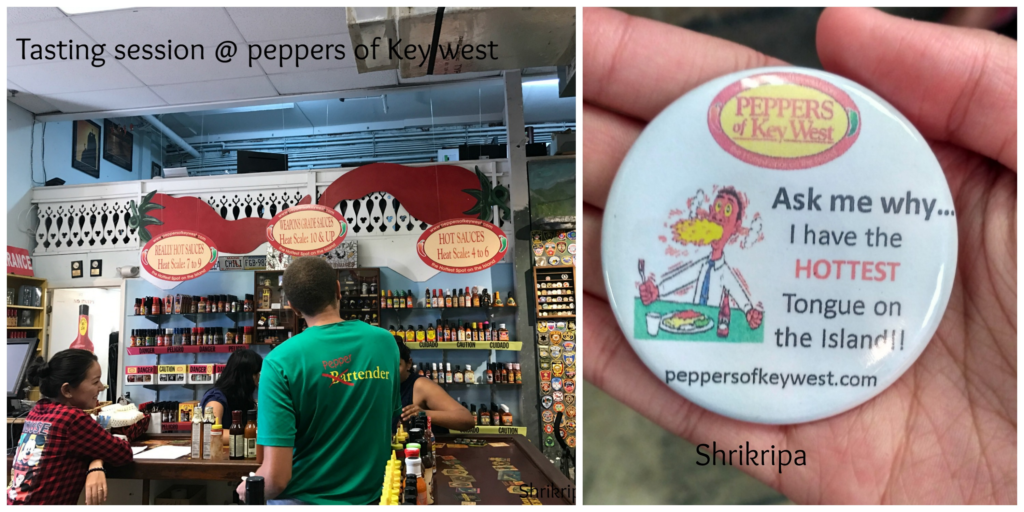
We got an opportunity to taste Authentic key lime pie and visited “Peppers of Key west” which is a small pepper bar. We sat at the pepper bar and did a taste test as well. They had more than thousands of varieties of sauces and dips with spice levels ranged or ranked from 0 to 10 and my daughters and sister who enjoyed this tasting session earned their ” I have the Hottest tongue in this island” badge as well.

collage 1

At Mallory square, one will get to see lots of things like Magic shows, tarot reading or some amazing food in different kinds of carts. We browsed a bit and decided to taste Budapest special Chimney cake, Caribbean grilled corn and this Guacamole. After all these experiences and eating sessions, we enjoyed the sunset over there.

pic 8

Now we will see how I tried to replicate their recipe and I want to dedicate this recipe to that couple.

Ingredient:

Avocadoes/ Butter fruit – 2 (small size)

Garlic cloves – 5 to 6

Crystal cooking salt – as needed

Tabasco chilli sauce – 1 tea spoon

Tomato ketch up – 1 teaspoon

Tomato – 1 (big)

Spring onion greens – 2 table spoons

Fresh Lemon juice – as needed

Method:

-Make a paste of garlic, salt and Tabasco sauce by using pestle and mortar.

– it should be like a semi ground paste and it takes little time and energy of yours.

collage 2

-Now cut open the fruit, remove seed and scoop out the flesh and mash this into fine texture.

collage 3

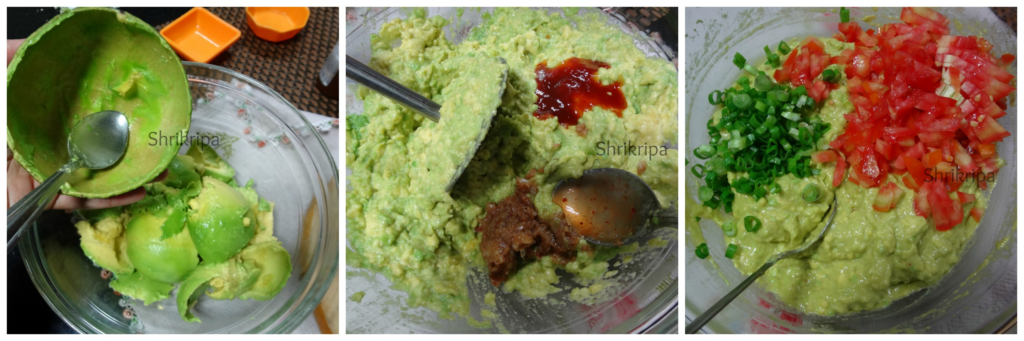
– Mix in tomato ketch up and ground garlic and salt paste.

-Garnish with finely chopped spring onion, tomato and juice of lime .

pic 7

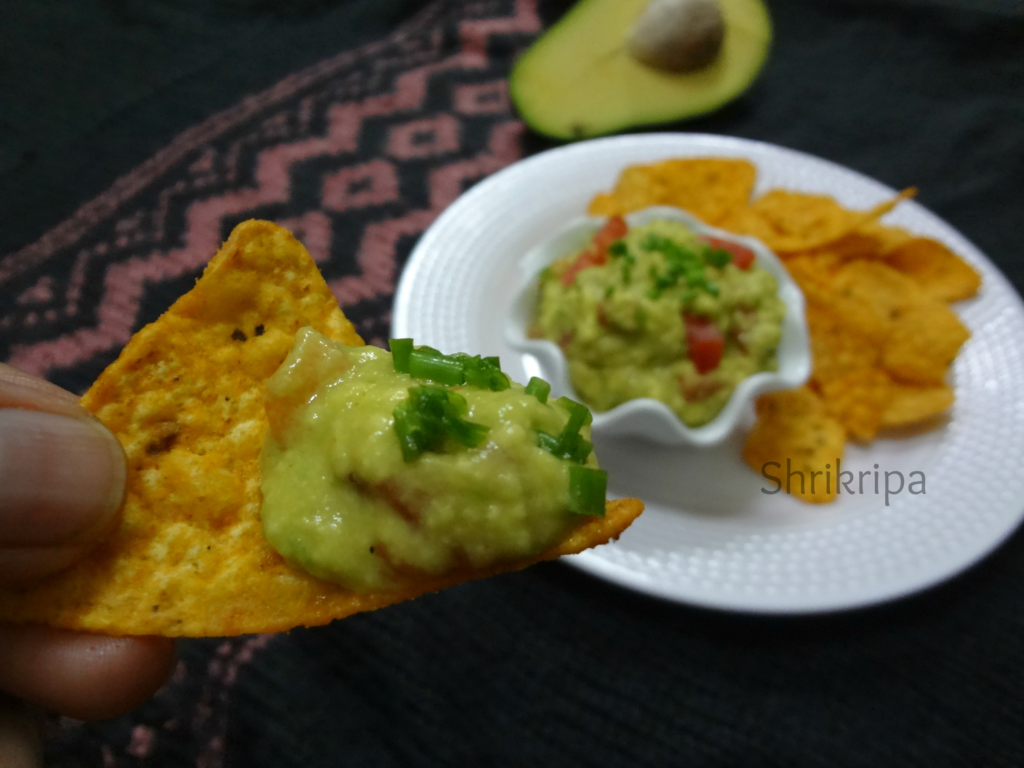
Serve fresh with tortilla chips or with some other choice of yours.


Instant Oats-Rava Idli:

This is how I prepare oats idli/idly at home. This recipe is so handy, healthy and a very good option to finish off our stock of sour curd. I usually roast rawa and oats the previous night and proceed directly to prepare in the morning, so that one can save time and it also gets enough time to cool down properly. I don’t use any seasoning and make it exactly like our regular normal idly and serve either with hing or onion and coconut chutney.

pic main

Ingredients:

Quick cooking oats – 1 ½ cup

Normal rava/semolina – 1 cup

Sour Curd – 2 cups

Water -1 cup

Eno fruit salt – 1tsp

Salt

Ghee /clarified butter – 1 table spoon

Method:

          Take one tawa and roast rava by adding ghee.

          When rawa becomes white, sandy in texture, add oats and proceed frying it for 2 to 3 minutes and switch off the gas.

collage 1

          Cool this properly. (I usually do this the previous night)

          Mix curds, water, required amount of salt (around 1 tsp) and Eno.

          Add roasted rawa and oats mixture. Consistency should be like regular idly batter.

          Set cooker for steam cooking, by adding 1 to 2 cups of water and keep it on a fire.

          Rinse idly moulds or stand with clean water (This will help as a non-sticky coating)

collage 2

          Pour 1 serving spoon of a ready batter, steam cook for 8 to 10 minutes.

          Serve with any chutney of your choice.


Chavli kai palya /Cluster beans and chana dal dry curry:

Like any other veggie, even most neglected high fibre, low calorie, nutrition filled Cluster beans also has many names like, Gorikayi, chavlikai, Guvar, Kothavarangai, Goru chikkudi etc. in different Indian languages.

It is a type of green beans, which is short, flat and little bitter in nature. It is a “power house of goodness” but neglected in-between  all kinds of veggies.

Yes, it needs some other vegetable, dal or potato to enhance its taste or to tone down the bitterness. Here in this recipe, we use soaked Chana dal and little bit masala to enhance the taste and this recipe is handed down to me by my dear aunty who is a super human being.

pic 12

It is a perfect side dish for any kind of Indian flat breads or with hot rice.

Ingredients:

Cluster beans – ½ kg

Chana dal – 1 cup

Onion – 2

Fresh Coconut gratings – 1 fist full

Seasoning:

Oil – 3 to 4 tbl sp

Mustard – 1 tsp

Red chillies – 2

Hing – ¼ tsp

Curry leaves – 1 string

For masala:

Green chillies – 6 to 7

Cinnamon – 1” piece

Ginger – 1” piece

Garlic – 8 cloves

Coriander leaves – 10 strings

Method:

-Wash, soak chana dal in water for half to one hour.

-Cut cluster beans in to bit size pieces after washing and removing both the ends.

collage 1

– Cook soaked dal and chopped beans for 2 whistles in two separate vessels by adding very little water.

– Put aside one serving spoon of cooked chana dal and pulse remaining amount of dal.

– Dry grind all the items under masala and keep aside.

collage 2

– Chop onions.

– Take one thick bottomed tawa, Put oil, splutter mustard, hing, red chillies and curry leaves.

– Add onion, turmeric and fry nicely.

collage 3

– Add ground masala,required amount of salt and fry nicely.When its raw smell vanishes, add roughly ground dal and fry for a while.

collage 4

– Lastly add cooked cluster beans and dal which we have kept aside.

-Cook this until water becomes dry and garnish with fresh coconut. Mix nicely and heat this mixture for a couple of minutes.

collage 6

-Serve either with rotti, phulka or hot rice.

Bendekayi/Okra Palya:

Bendekai/lady’s finger/okra/bhindi- so many names for this simple, high fibre, low calorie vegetable. Some people just avoid this slimy vegetable without knowing how to cook. It is just simple, if you know the right technique.

We normally don’t use any onion, garlic or tomato in festive cooking. In Mangalore, we prefer this simple coconut based side dishes for any weddings or festivities.

Here we use tamarind base to cook Bendekai to remove its slime. To avoid sliminess , you should remember 2 to 3 things. First thing, drops the veggie, only after tamarind water starts boiling. secondly, don’t over mix the veggie, while cooking. Thirdly, don’t cover the lid, while cooking lady’s finger. These are all the tricks I learnt from my elder’s while learning cooking from over the years.

You can use any varieties of lady’s finger for this recipe. Here I have used local variety from Mangalore which I have grown and harvested from my terrace garden. It is Red Okra and after cooking, it becomes like any other okra.

pic 1

Ingredients:

Ladies’ finger – ½ kg

Tamarind – 1 tsp

Salt

Jaggery

Red chilli powder – ½ tsp

To grind:

Fresh Coconut – 1 small cup

Red chillies – 2 to 3

Mustard – ½ tsp

Hing – very little

Seasoning:

Coconut oil – 1 tbl sp

Mustard – 1tsp

Urad dal – 1 tsp

Red chilli – 1

Curry leaves – 1 string

Method:

-Wash and cut the bhindi into half inch pieces.

collage 2

-soak tamarind in one cup of water.

-Roast red chillies and hing in a drop of coconut oil.

-Dry grind coconut, roasted red chillies, hing, mustard and keep it aside.

– Take one tawa, do the seasoning by putting oil, mustard seeds, urad dal, red chilli.

collage 3

-When mustard starts spluttering, add curry leaves and pour tamarind water (squeeze soaked tamarind in water and use)

-Add required amount of salt, jaggery and red chilli powder.

-When it starts boiling, add chopped Bendekai and cook this in a low flame.

-when water drains or Bendekai cooks, add ground coconut mixture and mix thoroughly and keep this in a simmer for couple of minutes.

pic 3

-serve this as a side dish with hot rice or Chapati.

Homemade Vegetable stock /Broth:

Vegetable stock is always handy while preparing clear soups or any other soups, as a base and is one of the main key ingredients for any Chinese gravy and one pot meal etc.  I especially like my vegetable stock in soups and Chinese gravy. It gives a depth and enhances the flavour of the dish in any sorts of cooking. Making this at a home is very easy job and not at all time consuming. It can be stored in the fridge for up to one week.

vegetable stock main

Here comes my recipe – Take a cooker, add roughly chopped veggies and herbs like Lemon grass, leek outer leaves and leaf tops (you can use fresh ones in a leek soup), carrot, tomato, beans, cabbage, cauliflower stalk or couple of heads, Coriander stalk (stalk gives very nice aroma) celery stalk -2, pepper corns -5 and garlic cloves -4.      

stock      

Add water (till veggies immerse in water) pressure cook for two whistles, when pressure releases, strain it and collect the stock, keep it in handy for soup making or cooking.

Note:

-You can add or delete any of the ingredients. I personally like lemon grass flavour and try to incorporate it every time.


Vegetarian Thai Noodles: Gluten free and Vegan

This time when I had visited my sister, who stays in America, I got an opportunity to experiment with some new ingredients, veggies etc and I bought a couple of new items back home as well. This gluten free, Brown rice & millet ramen noodle is one of them.

When we were shopping, my eyes went to this noodle pack. I love to work with new ingredients and wanted to pick it up. After trying a couple of recipes, my daughter told me, how it should be. She asked me to prepare this as a little wet, soup kind. She said, regular kind of preparations tastes bland and it needs some flavoured soup to enhance the taste of this kind of sticky noodles and she was right. Ramen is a Japanese dish, consisting of a clear broth containing thin white noodles and sometimes vegetables, meat etc.

Finally, I came up with this, and got a green signal from my super-efficient critic!!! She said, hmmm yummy, go ahead and post: D

pic 10

Ingredients:

Noodles – 3 cakes

Shallots – 10

Baby corn -4

Carrot-1

Broccoli- couple of small florets

Ginger garlic paste – ½ tsp

Tomato sauce – 1tbl sp

Thai sweet chilli sauce – 1tbl sp

Sriracha sauce -1 tbl sp

Soy sauce -1 tbl sp

Cooked broth – 1 small cup

Salt

Sesame oil – 2 tbl sp

Basil leaves – 5 to 6

Roasted peanut halves – 1 table spoon

Method:

-Boil water with one spoon of salt and oil. Put noodle, cook until al dente (it should cook and texture should be firm)

collage 1

-Drain the water, rinse the noodle in cold tap water.

-Collect one small cup of drained water and keep aside for next use.

– Chop vegetables according to your taste.

collage 2

– wash basil and roast peanuts, remove skin and make halves and keep aside.

– Mix all the sauces in one small bowl and keep it ready

-Take one wide kadai, add sesame oil. When it is hot, add chopped shallots and fry for a while.

-Next, drop in all the veggies and fry for a while.

collage 3

-Add ginger garlic paste, fry until veggies are fried.

-Add all the sauce mixture and fry vigorously to avoid this to burn.

-Add reserved cooked and drained water of noodles. Check for the salt. If needed add and adjust.

collage 4

-When it starts boiling, add noodles and mix.

-Garnish with torn basil leaves and sprinkle roasted peanuts and serve.

pic 11

Note:

-You can use any noodles instead of gluten free noodle.

Marakesavu Pathrode:

Pathrode, name itself will make any Mangalorean drool. That too if it is marakesavu leaf, fun is even more. Marakesavu is non-itchy, seasonal colocasia leaves. It is one more classic monsoon special from Mangalore. Pathrode is usually served with coconut oil either plain or pan fried by slicing.

pic main

Marakesavu is commonly known as hitchhiker elephant ear and botanical name of this leaf is Remusatia vivipara. Leaf is large, oval, leathery textured, glossy on both the sides. Foliage disappears in winter and emerges after the first rain during monsoon. Grows widely on big tree trunks or in-between the stones, mainly emerges from the moss bed. The name itself suggests about its habitat. Here, “Mara” is Tree and “Kesavu” is colocasia.

collage 1

We will see the Procedure-

Ingredients:

Dosa rice – 3 cups

Fresh Coconut – 1 ½ cup

Dried red chillies – 12 (Roasted)

Hing – ¼ teaspoon

Salt

Jaggery – 1 table spoon

Tamarind – 1 table spoon (if normal colocasia use little more)

Marakesavu – 3 bundles

Coconut oil – for serving

Method:

Wash the leaves, remove stem and trim.

  Wash and soak rice for 3 hours.

  Fry red chillies by putting very little oil.

collage 2

Grind soaked rice, coconut, tamarind, jaggery, salt, roasted red chillies into smooth paste by adding sufficient water.

  Batter consistency should be like Dosa batter.

  Now, we are ready to make Pathrode.

collage 3

  Take biggest leaf from the lot, place upper glossy part downwards and apply ground batter on back side of the leaf. (pc:step 1)

 After applying on the first leaf, keep second one (slightly smaller than the first one)

Proceed with the application. After applying on second leaf, keep the third leaf then fourth one and proceed.(pc: step 2&3)

collage 4

  Now lift sideways, and fold. Make it like a mat. Apply some batter on these folds as well.

  Roll from the tip and proceed until the end and apply some batter on outer shell and keep this in a water filled idly steamer.

collage 5

  Cook this for 45 minutes to one hour, depending on the quantity of the content inside the vessel, in a low fire.

collage 6

  Serve fresh with coconut oil by slicing these cooked rolls or apply coconut oil and fry these in an iron tawa on both the sides and enjoy as it is for breakfast or with lunch or dinner.

NOTE:

-Tamarind is a key ingredient while making Pathrode.

– If it is Mara Kesavu, it is non-itchy and quantity of the tamarind doesn’t matter.

– If you are using normal colocasia leaves, tamarind plays a very crucial part, in removing the itchiness of the leaves. Use little more quantity than normal.

– You can prepare this same recipe by using big spinach leaves as well.

Plantain stem and Moringa Rasam:

Where to start about the benefits of these two super foods? From my childhood, we used to relish banana stem and its flower in various dishes. Every part of banana plant is useful, be it its leaves, flower, stem, its outer fibre or fruit. No wastage of any part. Usually after the harvest of Banana fruit bunch, we should remove that plant and should allow its baby plant to grow and fruit. Usually after the harvest, banana plant is chopped off, outer fibre is peeled off and it is dried under the sun and used as a thread in tying Jasmine flowers. Inner core or pith is divided into 3 parts. Top most part, which is very slender and less fibrous will be used in raw salads. Middle portion is little more fibrous and used in cooking and making Dosa’s. Bottom part, which is more fibrous, mature and hard to chew will be used in juices, soups or Rasam’s.

Plantain stem is one of the best, natural high fibre vegetable. It also maintains fluid balance in our body and acts as a coolant, especially in Summer season.

Moringa or Drumstick leaves are considered as a “Power food” for its nutritionally rich nature.

Here I have combined these two ingredients and made Rasam and trust me it is very tasty and can be used as an appetizer shot as well.

pic4

Ingredients:

Plantain stem – 6- 8 inches long

Drumstick leaves – 1 cup

Tomatoes – 2

Tamarind – ½ tsp

Garlic – 8 cloves

Cumin – 1 tsp

Green chillies – 2 to 3

Salt

Jaggery – 1tsp

Coriander leaves – 1 table sp.

Seasoning:

Coconut oil – 2 tsp

Mustard – 1 tsp

Cumin – ½ tsp

Hing – one pinch

Red chilli-1

Curry leaves – 1 spring

Method:

  Slice plantain stem into discs, remove thread like fibre while slicing.

  Chop the roundels into thin slices.

pic 1   pic 2

  Wash drumstick leaves, here you can use as it is, with its sticks intact. No need to remove intact stalks of these tiny leaves.

  Cook plantain stem pieces, drumstick leaves, chopped tomatoes, green chilli, tamarind in a pressure cooker for one whistle. Cool this mixture, grind and sieve. Discard the fibrous part.

pic 3  pic4

  Dry grind garlic and cumin. Add this to collected solution, add salt, jaggery and boil for a while.

  Garnish with coriander leaves and do the seasoning.

  Heat coconut oil, add mustard, when it starts to splutter, add broken red chilli, cumin and curry leaves.

  Serve this as an appetizer shot before food or as a Rasam with hot rice.


Creamy Mushroom Curry:

This curry is very dear to my heart; I had dished out this recipe almost eighteen years back. At that time, I was not very familiar with cooking mushrooms. I wanted to try mushrooms at the same time; I had no clue how. I decided to keep the curry leaves’ flavour and creamy texture dominant, mainly because of my hubby’s fondness towards these two aspects.

This lightly spiced curry is very easy, and it has no frills attached. It is super simple with mind-blowing flavours of southern Indian spices. It takes less than 30 minutes to make. It is healthy, low fat, mild, and a perfect side dish for any roti, pulka or even bread.

For a vegan and tastiest version, you can use coconut milk and replace milk with coconut milk and if it is thick, avoid adding cornflour. 

Ingredients:

Mushroom – 200 grams

Onion – 1 (big)

Green chillies – 1 or 2

Curry leaves – 2 springs

Coconut oil – 1 tablespoon

Cumin – ½ teaspoon

Turmeric – ½ teaspoon

Salt

Pepper powder – ½ teaspoon

Garam masala – ¼ teaspoon

Milk – 1 cup

Corn starch – 1 ½ teaspoon

Method:

-Wash, wipe and slice the mushrooms.Chop onion and green chillies as well.

-Mix cornflour to milk and keep it aside. (If you are using coconut milk, avoid this step)

-Heat oil in a skillet, add cumin, curry leaves.

-Then add chopped onions and green chillies, turmeric and fry for a while.

-When onion becomes transparent, add in sliced mushrooms and fry for two to three minutes.

-When it starts wilting, sprinkle little salt and mix.

-Pour milk and cornflour mixture or Coconut milk and cook until it reaches a creamy texture.

-Lastly, garnish with a little pepper powder and garam masala.

-Enjoy with any flatbread.


Instant Paddu:

This Recipe happened by fluke and I felt it was a very good option for kid’s tiffin boxes and basically my daughters loved it and they were asking me to include this as a regular item. So, I was thinking of sharing it with you all, lovely readers.

Last week when I made some biryani for kids and hubby’s tiffin box, no one was interested to carry a raita with them and I was left with one big bowl of onion and tomato raita. I wanted to utilise that sweetish raita in some way and thought of preparing rawa Paddu.

I took an inspiration from rawa idly mix and proceeded like that. Instead of adding only Rawa, I included millet idly rawa too and believe me, it was so tasty and the kids were saying “it was oozing with flavour and no side dish or chutney was needed” for this.

pic 7

Now we will see, how I proceeded –

Ingredients:

Normal Rawa – 1 cup

Millet rawa- 1 cup

Ghee – 1 table spoon

Mustard – 1 tsp

Urad dal- 1 tsp

Cumin- ½ tsp

Hing- ¼ tsp

Curry leaves – 1 or 2 springs(chopped)

Eno fruit salt – 1 Tsp

Curd – 2 cups

Chopped onion -1

Chopped tomato – 1

Chopped coriander – little

Salt

Sugar

Method:

-Make seasoning by taking ghee in one pan, when it is hot, add mustard. After mustard splutters, add urad dal, cumin, hing, chopped curry leaves and fry for a minute.

-Add plain rawa and millet rawa fry until it becomes grainy in texture.

pic 1

-Remove from the flame and cool the mixture into room temperature.

– Before preparing batter, take the curds, chopped onions, tomato, coriander leaves, salt and sugar mix nicely by adding Eno fruit salt.

pic 2   pic 3

– Now add seasoned, cooled rawa mix and give a stir. Mixture should be little watery kind at this point. Keep aside for 5 to 10 minutes so that batter will become thick now due to soaking of all the moisture by rawa.

-If batter is too thick you can add little more curds and adjust the consistency. It should be like idly batter and consistency should be little thick.

pic 4   pic 6

-Keep Appam or Paddu tawa, when it is hot keep it in a simmer, pour ½ tsp of ghee to every hole and pour the required amount of ready batter.

pic 5  pic 8

-Close the lid, cook for a while. Then flip and cook other side as well and then serve either as it is or with any chutney.

Note:

-Here I have used little millet idly rawa, you can use any millet rawa as well.

-If you don’t have access to millet rawa, you can use only rawa too.

– Here I have used Uppittu rawa/plain semolina/Bombay rawa.

-I did seasoning part on previous night and kept it aside for cooling. So that, morning it will be easy to mix and proceed to make Paddu.

-You can make this rawa mix and store it for a future use.