Lemon thumb print cookies:

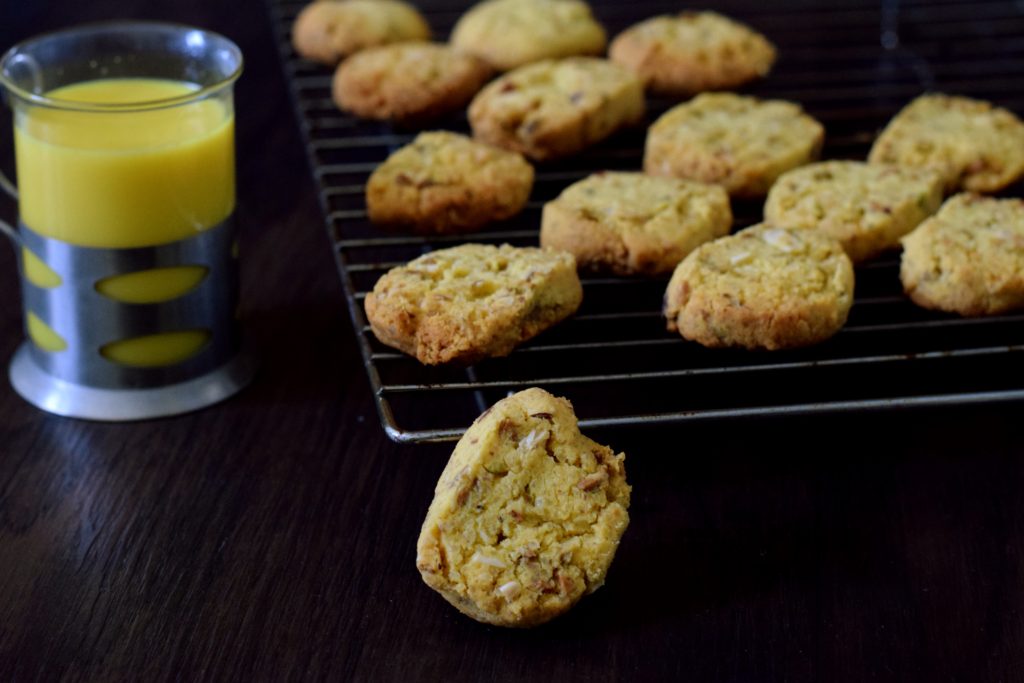
When I have homemade lemon curd, I use it in my baking and enjoy the tangy taste. Usually I make lemon thumb print cookies by using All-purpose flour and now a days, due to my healthy baking concept wanted to use healthy flour. I thought of using my Oats cookies recipe as a base and proceeded. It worked out and I am sharing the procedure of thumb print cookies using lemon curd.  I have already shared my home-made lemon curd recipe as well as oats cookies recipe separately in my blog. Link will be open, if you enter the highlighted words.

Now we will see how I made this.

Ingredients:

Whole wheat flour -1 cup

Powdered oats – 1 cup

Sugar -1 cup

Baking soda -1 tsp.

Vanilla essence – 1 tsp.

Ghee /Clarified butter – ½ cup

Milk – 2 table sp to 3 tbl sp (to bind)

Lemon curd to fill the indent.

Method:

-In a mixer jar, powder oats, measure and keep aside.

-powder sugar and keep aside.

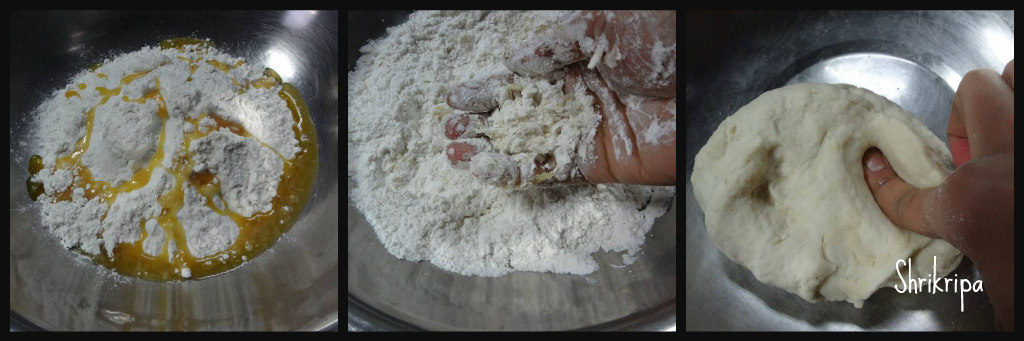
-Now take one mixing bowl, take all the dry ingredients like whole wheat flour, oats powder, sugar powder, baking soda, vanilla essence and mix it thoroughly by using hand ,so that flavor will spread uniformly.                

-Now mix in melted ghee and bind it together. If it is a little dry, add one to two table spoons of milk, if it binds and holds a shape well and good. Otherwise add one more table spoon of milk and make a ball like Chapati dough.               

-Now pre-heat your oven in 170°C. Line the baking tray with butter paper.

-Line your cookie tray with butter paper or aluminium foil and keep it ready.

-Take one small cookie scoop or a Table spoon to shape the dough into semi-circle balls and place at a lined tray.

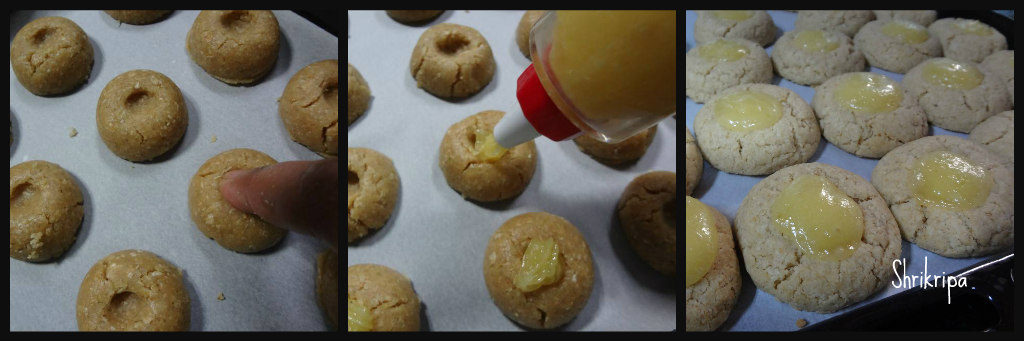
-Make an indent at the centre, by pressing your index finger.

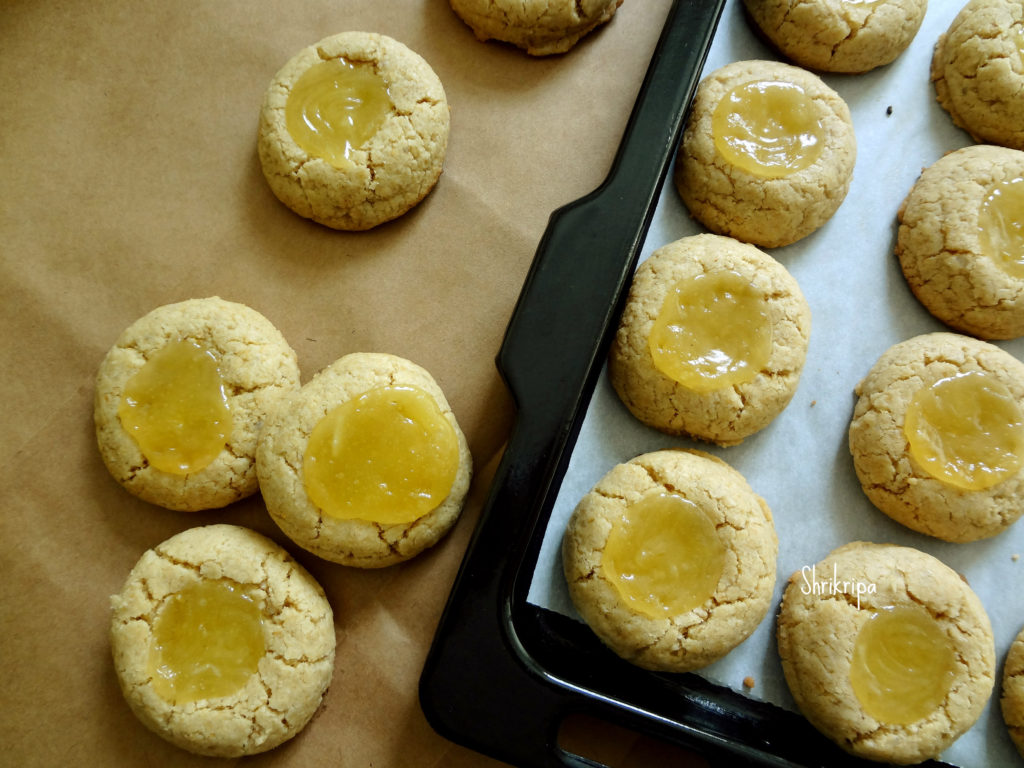
-Fill the indent with lemon curd.

-Bake 12 to 15 minutes or until base becomes light brown in colour and seeing some cracks around the edges.                  

-Now don’t disturb these beauties and allow them to cool completely. Then you can store this in an airtight container.


Broken wheat Huggi:

Huggi is a very popular, semi solid dessert of North Karnataka and each house has its own method. It is a sort of homely recipe and you would not find in any restaurant. Broken wheat is known as Godhi nucchu in Kannada language. I learnt Some of my favourite North Karnataka recipes from my previous neighbour aunty, who hails from Solapur near Gulbarga. I used to enjoy whatever she used to offer, starting from simple triangle chapati, obbattu, obbattu saru, chapparadavarekai palya, chavlikai palya and khara byale saru to Godhi nucchina Huggi, which she used to offer to God, every Friday evening and used to offer as a prasadam to us.

Aunty used to use hardly 3 ingredients and it used to taste divine. It is no coconut dessert and you can feel the texture of wheat as well as flavour. Preparation is very quick and simple and needs hardly any pre-preparation.

Recipe goes like this-

Ingredients:

Broken wheat – 1 cup

Jaggery – ¾ cup

Salt – ¼ tsp

Ghee – ¼ cup

Cardamom powder – 1 tsp

Cashew pieces – Roasted (Optional)

Method:

-Wash broken wheat twice. Cook with 3 cups of water and a pinch of salt for 2 to 3 whistles.

-Mean time, heat jaggery by adding ½ cup of water. Strain the liquid and remove the impurities.

-Add strained jaggery syrup to cooked wheat and cook further at a very low temperature.

-When raw smell of jaggery vanishes, add ghee and cook further by mixing in between.

-Lastly when mixture becomes like a mass, add cardamom powder, garnish with roasted cashew and serve.

Indian broad beans with ground nut:

It is a very tasty vegetable and is known as Chikdikayi, chapparadavare or Indian broad beans. This subzi/dry curry is one of our favourite and whoever tastes this subzi, usually asks for the recipe. So, I thought of sharing this recipe in my blog as well. I learnt this from our family friend who hails from Gulbarga, Northern part of Karnataka.

How it is made –

Ingredients:

Indian broad beans – 500 Gms

Garlic – 10 -12 cloves

Red chilli powder – 1 to 2 tsp.

Salt

Crushed roasted groundnut – ½ cup

Oil- 2 tbl sp.

Method:

-Remove both side’s fibre and slit open, to see. Slit at the centre and keep aside.

-Now keep one pot of water for boiling, add little salt to it. When it starts boiling, add broad beans including bean as well.

-When it changes colour, drain the water and keep aside.

– Keep one thick bottomed kadai, put oil. When oil becomes hot, add crushed garlic and fry a little. Now add cooked and drained beans.

-Add sufficient amount of salt and red chilli powder and mix nicely. Cook until oil leaves from the sides.

-Now add crushed or roughly powdered ground nut and mix for a while.

-Serve with Chapati/phulka’s or rice.

Note: I usually add ready ground nut chutney powder (which has red chilli powder, salt and garlic)

If you are using chutney powder like me, decrease the amount of salt and red chilli powder while adding at the beginning.


DATE CAKE:

I must say, this cake is my Signature dish and very close to my heart. When I was trying my hand in baking, I experienced a lot of failures, but this recipe has uplifted my faith in trying and achieving my goal.

Whenever I made this, everyone liked it for its soft, moist texture. As a little treat to help you relax and settle into Christmas mood, I will share my very easy Date cake recipe with very minimal ingredients. If anyone wants to try their hand at baking, this is just the recipe for you. Just go ahead and try this, you will never regret it.

Now we will see how to make this,

Ingredients:

Dates – 1 cup

Butter /oil – 1 cup

Sugar – 1 cup

All purpose flour – 2 cups (you can mix whole wheat and all purpose too)

Eggs –  2 (beaten)

Water – 1 cup

Cooking soda – 1 tsp or little less.

Method:

– De-seed the dates and chop it either by using food processor or knife, keep aside.

-Grease the baking tray (you can use bread tin as well). Line this with butter paper, keep it ready.

– Take water in a small bowl and boil. When it starts boiling switch off the gas, add chopped dates, butter, sugar, and cooking soda to boiled water and keep aside at least for 20 min.

– After it cools, add beaten eggs and mix nicely.                          

-Now fold in All-purpose flour, mix gently and pour this batter to greased and lined baking vessel.                                              

-Bake this in a pre- heated oven for 35 -40 min or until done at 180 C.

-If you want to check its doneness, use tooth pick or knife. Insert this, if it comes out clean, remove the tin, keep it outside.

-After some time, remove butter paper and cool further.                  

-When it reaches room temperature, you can slice it or cut according to your wish and enjoy with cup of coffee or tea.

Note: For the Eggless Version, use 1/2 cup of flax gel and you can refer my earlier post for the preparation.


Peek a Boo “Baked Gulab Jamun cheese cake”:

Long ago, I mean in and around 2015 I tried the No bake cheese cake with hidden Jamun inside on the event of my hubby’s birthday. I was wondering what to make, and I thought, why not a mix of what he likes? He loves Badam milk and Gulab jamun; so, I thought of combining these two flavours and made a jamun cheese cake and he did wonder about the flavour. The upper layer of almond milk flavour went well with the Gulab jamun and the cheese cake was a very big hit! At that time, my recipes used to publish on Readoo and you can see it over here.

Today, we are celebrating our 20th year of marriage as well as 2nd year of my blogging. So, I thought of improvising my idea and went ahead with the same flavour but baked version as well as non-baked top layer.

To mark the occasion, I made my signature cheese cake flavour with a little additional twist and here is the recipe-

Ingredients:

For the first layer (Crust):

Choice of any crackers biscuits – 1 ½ cup to 2 cups (powdered)

Sugar – 5 to 6 table spoons

Melted butter – 1/3 cup

Gulab Jamuns – Dried (sugar syrup removed)

Method:

-Pre- heat oven at 165°C

-Combine all the ingredients from biscuits powder, sugar and melted butter. It becomes like a wet crumb.

-Take a 9 to 10” spring-form baking dish, press this crumb at the base by using any one of your measuring cups.

-Crumb should be slightly above the base at the edges.

-Before heading towards the second layer, arrange all the Gulab jamuns according to your wish.

For the second layer (Filling):

Cream cheese – 3 tubs (238 grams or 250 grams)

Sugar – 1 ½ cup

Eggs – 4 (separated)

Lemon juice – 1 table spoon

Vanilla extract – 1 tea spoon

Method:

-Mix together Cream cheese, sugar, 4 egg yolks, lemon juice and vanilla.

-In another bowl, beat 4 egg whites until frothy and little stiff as well as creamy.

-Fold egg white with cream cheese and pour the mixture over the first layer/Gulab jamun layer.

-Bake for 45 minutes to 1 hour or until done, in a preheated oven at 165°C.

-When it is done, you will find a raised dome like a structure and 2 to 3 slits at the centre. After switching off the oven, leave the cake inside the oven at least for an hour with the oven door closed.

-After an hour, remove it and chill in the refrigerator by enclosing it in cling wrap, if you are not adding the 3rd layer immediately or proceed for a third layer.

For the 3rd Layer (Glaze):

Milk – 1 ¼ cup

-Veg gelatin -1 tsp

Badam milk – 4 tsps

Custard powder – 1 tsp (vanilla flavour)

Saffron strands – generous amount

Method:

-Dissolve gelatin in ¼ cup of milk.

-Dissolve custard powder, Badam milk powder and add saffron to one cup of milk and start heating.

-When it is hot, add in gelatin added milk and boil for 2 minutes.

-Pour the mixture over the ready cooled cake. When it is set and becomes cool, cover the cling wrap and keep it a refrigerator to cool.

-It needs at least an overnight or 8 hours of cooling. I kept it for 20 hours. It tasted as I was expecting and loved the outcome and it surely made my special day a memorable one.


Chole Bhature (Chana Bhatura) and Alu subzi:

Do I need to introduce every one’s favourite dish? It is basically a deep-fried bread with the fermented / proofed flour dough which Is served with semi dried chick pea curry and potato dry Subzi. This is how we eat or were introduced to this loved-by-all dish.

To prepare we need –

For Chole:

Ingredients:

Chana / white chickpea – 1 cup (soaked and swelled)

Black salt – 1 table spoon

Amla powder / Anardana powder – 1 tea spoon

Oil – 1 table spoon

Ghee – 1 table spoon + 1 tea spoon

Onion – 1 (chopped)

Green chilli – 1 (slit)

Ginger – ½ inch (sliced)

Garlic – 4 (crushed)

Tomatoes – 2 (chopped)

Turmeric – 1 ½ tea spoon

Red chilli powder – 1 tea spoon

Coriander powder – 2 tea spoons

Cumin powder – 1 tea spoon

Garam masala – 1 ½ tea spoon

Kasuri methi – 1 table spoon

Salt

Coriander leaves – chopped

Method:

-Cook soaked chana with enough water, black salt and amla powder. It would take any where between 5 to 6 whistles in the pressure cooker.

-Take one tawa, Heat oil and 1 table spoon of ghee. Add onion, green chilli, garlic and ginger fry until it is transparent and light brown.

-Add in all the masalas, from turmeric to Kasuri methi and salt fry for a while. Add tomato, continue frying until tomato wilts. If needed sprinkle some cooked water from the chana and cook tomato well.

-Cool this mixture and grind this into a smooth paste by adding ladle of cooked chana as well. (it would help gravy to thicken)

-Now mix in this paste with cooked chana and start boiling until oil oozes out and garnish with chopped coriander leaves and 1 tea spoon of ghee.

 Now we will move towards Bhature / Bhatura :

Ingredients:

Whole wheat – 2 ½ cups

Maida – 1 cup

Chiroti Rava – 1 cup

Curd – ½ cup

Water – ½ cup

Salt

Sugar – 1 tea spoon

Yeast – 1 tea spoon

Oil – 2 tea spoons

Method:

-Take Luke warm water- mix in curd, sugar, salt and yeast. Close the lid and wait until it proofs and bubbles.

-Dry mix all the flours or you can take only Maida as well. Make a dough by using yeast water and apply an oil and keep aside for 2 to 3 hours or until doubles the volume.

-When it is ready or time to serve, roll a small disc and deep fry.

Now one more dish, which is purely an optional item:

Alu Subzi / potato dry:

Ingredient:

Potatoes – 5 to 6

Mustard oil – 2 table spoons

Sun flower oil – 2 table spoons

Cumin – 1 tea spoon

Turmeric – ½ tsp

Coriander powder – 1 to 2 tsp

Red chilli powder – 1 to 2 tsps.

Amchur powder – 1 tsp

Garam masala – 1 tsp

Little Subzi masala – 1 tsp (optional)

Sugar – 1 pinch

Salt

Coriander leaves – chopped (to garnish)

Method:

-Cook potato in pressure cooker for 1 whistle. Peel the skin and dice.

-Take one tawa, heat oil, cumin, diced potatoes, all the powders and fry until masala is coated and becomes little crispy.

Garnish with coriander greens.

For deep fried chillies and Onions :

I normally slit the chillies, put a drop of lemon and salt inside and marinate. While frying bhature, deep fry and serve.

Half the onion, slice width wise and separate the layers by hand and sprinkle some salt and chopped coriander.

While plating, place Bhature, chana , potato, little onions and one chilli and serve with love 😊


Lemon pickle with Green pepper corns and Mango ginger:

It is a plain, no masala pickle. You can feel the freshness of each ingredient in every bite. Taste of the pickle activates your taste buds and instantly uplifts the mood.  It is a perfect pair for plain curd rice, without even the added seasoning. It is very hard to explain the goodness of this pickle in words.

This pickle needs hardly any preparation. A cup of sea salt and couple of glasses of water. That is it.

Raw material can be mixed and matched according to the availability.

I had home grown Mango ginger rhizomes with me, hence added. It can be replaced by a plain, regular ginger and raw green pepper can be with chopped green chillies or small bird eye chillies.

When I saw these home-grown green peppers at my in-law’s place, I couldn’t resist and plucked some of the strings while returning. I used to love this pickle during my childhood and felt nostalgic by thinking about its taste. Wanted to introduce the same to my daughters and planned to prepare the same.

Green pepper corns are unripe pepper corns, which are berries. It has mild peppery flavour compared to black pepper. Pepper creepers are very common in our coastal houses. It will be seen hugging and climbing into either jack fruit tree or Areca tree.

We all know the goodness of pepper corns. If we mix this with Mango ginger and lemon, nothing like it. Mango ginger is known for its anti-oxidant and anti-inflammatory properties and lemon is for Vitamin C. It is an overall package of goodness which we feed to our body. 

This is how we normally prepare this pickle and it stays good for six months even without any refrigeration or added oil.

Ingredients:

Lemon – 12 -15

Green pepper corns – 10 -12 strings

Mango ginger – 100 – 150 grams

Salt – 1 cup

Water – 2 cups

Method:

-Wash, all the three raw materials. Dry and keep it ready by air drying or wiping on a clean cloth.

-Chop Lemon into 8 pieces, mango ginger rhizomes into bite size pieces and remove pepper corns from its stalk.

-Boil water, salt until you see a white salty layer at the sides of the vessel.

-Add lemon, mango ginger and pepper to boiling salt water, cook for 2 minutes or until lemon peel is slightly bent outwards or pepper corns turns little lighter in shade.

-Switch off the gas. Cool completely and store it in a clean, glass jar.

-Within 4 to 5 days, it will be ready to consume.


Steel cut Oats and lentil Dosa:

It is a no rice urad dal Dosa. I have used Steel cut oats  or broken Oats instead of rice and avoided rice fully in this batter. These oats are considered as cut pieces of original grain. It is healthy compared to quick cooking oats. It takes much longer time to cook but when it is soaked and ground, almost tastes like rice and you can’t figure out the difference. This is Gluten free, high in fibre, protein and iron. It is low in glycaemic index.

I have bought Kosh broken oats to try out my experiment and it is whole oat grains cut into smaller pieces. It looks like broken wheat. When it is cooked, tastes like our broken wheat with outer thick skin with nutty taste. Loaded with insoluble fibre which helps in our gut health as well. Because of its low glycaemic property, it is a very good option for diabetic people and its fibre level will help to keep them full for longer hours.

I have used my regular plain Dosa batter recipe. I simply avoided rice and added broken oats.

Ingredients:

Steel cut Oats – 2 cups

Urad dal – ½ cup

Methi – 1 tea spoon

Chana dal – 2 table spoons

Poha – 1 fist full (optional)

Salt

Method:

-Wash oats, urad dal, methi, chana dal twice and soak this with poha (if you are using) for 3 to 4 hours.

-Grind this soaked ingredient by adding soaked water little by little with added salt.

-Ferment this batter over night or 8 to 10 hours according to the climatic condition.

-When it is ready, mix nicely, adjust the consistency of the batter and start making dosas by heating iron griddle.

-Take one ladle spoon of batter, spread into thin Dosa, pour oil or ghee and roast on one side, then flip and cook the other side, remove and serve with chutney or sambar.

Eggless- Gluten free -Almond and Pista Cookies:

This Diwali, I tried to make some variations in egg-less Indian cookie, which is known as Nankatai. It is basically egg-less and has no usage of baking soda or powder in it. It is very old, home style traditional recipe. I wanted to try out Green gram flour in baking and tried a very basic recipe. In India, we normally don’t use eggs in the festival time.

Ingredients:

Green gram flour / moong dal flour – 1 cup

Butter – 100 grams

Sugar – ½ cup

Almond bits – ¼ cup

Pista bits – ¼ cup

Cardamom powder – ½ tsp

Method:

-Beat butter and sugar until fluffy and soft, either by using hand or Food processor.

-Now add Cardamom powder and beat one more time until it is mixed.

-Now add flour and mix until u gets uniform mass. Add in Pista and almonds and make a dough.

-Now take one cling film sheet and keep this dough over it, on a flat surface and make squarish or round log, maintain uniform shape and cover with wrapping. Keep it under refrigeration for an hour.

-Now take your baking tray and line with a butter paper.

-After one hour, remove this dough from the fridge and unwrap the Clingfilm cover, make slices of ½” thickness and arrange these pieces in a lined baking tray.

– Bake in a pre-heated oven at 170°C for 14 to 18 minutes.

-This cookie is totally gluten free, hence initially it would be very fragile, and will be firm after it comes to room temperature.

-Cool this on a wire rack and store this in an airtight container.

-My family just loved it and hope you also like it as much as we did.


Gujiya / Dry fruits Karanji/ Karjikai:

Deepavali aka Diwali is an important festival of India and is spread between three days. Indian festivals are incomplete without sweets and savouries. In India, each festival has its own significance in celebration as well as its menu. Gujiya is one of them and has a very important role during Diwali.

Gujiya is a deep-fried flour-based delicacy, with different fillings in different regions. It is known by a different name in each region. Outer cover will be the same and inner stuffing varies from Rava – sugar, coconut – jaggery, coconut – sugar, mawa (milk solids) with dry fruits or with only dry fruits are traditionally seen. Nowadays you get to see so many variations from chocolate to cheese filling as well as baked version.

In North India, after frying the Gujiya, they usually dip it in a sugar syrup and outer cover would be wet and shiny. In south India, we normally deep fry and serve as it is and it’s known as Karanji / Karjikai.

I used to follow Chef Sanjeev Kapoor and learnt so many recipes from him and this is one such recipe. Over the years, I tweaked it a little and adjusted it according to our taste and it has one added advantage of longer shelf life, due to the usage of milkmaid instead of khoya.

Ingredients:

For the outer cover / shell:

All-purpose flour – 2 ½ cups

Salt – ¼ tsp

Ghee – 6 table spoons

Water – As needed (normal water)

Oil – for Deep frying

For the stuffing /filling:

Desiccated coconut – 200 grams

Semolina – 2 table spoons

Almonds – ¼ cup

Cashew – ¼ cup

Raisin – ¼ cup

Cardamom – 1 tsp

Condensed milk – 1 tin (400 grams)

Method:

For the outer cover-

-In a bowl, add flour and pour ghee. Rub the ghee and flour by using your hand for 5 to 10 minutes. 

-After a while, flour would resemble like a semi wet crumb.

-Now add required amount of water to make a firm dough.

-Cover the dough with wet cloth and keep aside for half an hour.

Note: Dough approximately holds ½ cup of water.

In the meantime, prepare the stuffing –

-Roast semolina in a low flame, switch off the gas. Mix in all the other ingredients from almond to condensed milk.

-Keep it until mixture is non-sticky while touching. 

-Now comes the actual procedure. You can use three methods.

  1. Use Gujiya mould.

     2.Take a dough, roll into big thin circle, use cookie cutter to make small, uniform circle.

  1. Take little dough, make small poori like discs.

Here I have followed the third method.

This quantity has yielded 28 Gujiya.

-Divide the dough, make roundels, fill the stuffing, close into half.

-Dip your hand in water, now, start folding the edges from one corner and go on folding like a half diamond shape at regular intervals until you reach the other end.

-Keep this ready, stuffed, yet to fry Gujiya to air dry.

-Repeat the procedure and finish off the filling work.

-Heat the oil for deep frying in low temperature.

-When oil is hot, drop one by one Gujiya, fry in a low flame to get good results.

-When everything is fried and cooled, store it in an air tight container.

NOTE:

To get a perfect Gujiya – these points are very important. 

1- Rubbing the ghee + flour. 

2-Frying in a low fire