Manni / Porridge-Initial Baby Food:

Regarding baby food lots and lots of notions are there. What to feed, when to start solids, which age is ideal etc. According to me, each situation or each baby is different than the other. In my condition, it was twin babies and almost 20 days pre-mature too.

With two babies, breast feeding was not sufficient, and I started this porridge in a very diluted form (For 200 ml of water, I used to use 1 tsp of powder) as early as 40 days of their birth. Yes, my father who is a doctor himself, advised me to start this instead of any packaged milk powder or cow’s milk. I used to feed them this a couple of times in a day (100ml at a time) as a top food to suffice their needs.

Jaggery is very good for infants and this is the only way they get their iron supplement, if they are on top food. This is what our paediatrician told me. According to her suggestion, I used to add tiny jaggery piece while preparing porridge.

When days passed by I did increased the quantity of porridge powder and when they became 4 to 5 months old, I started feeding them one small bowl of porridge by using spoon.

If you are raising your brows while reading this, Yes!!! My daughters are healthy grown up teenagers now. I personally never ever recommend readymade food over natural food.

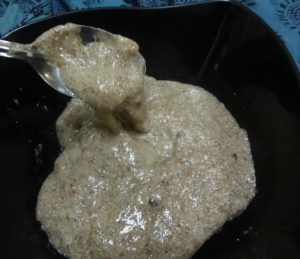
How to Prepare Porridge Powder:

pic 1_Fotor

Ingredients:

Finger millet / Ragi – 500 gms

Whole wheat – 500 gms

Almonds- 100 gms

Method:

  • Clean Ragi and whole wheat by rinsing couple of times with water.
  • Drain water completely.
  • Spread this on a clean cloth and dry in the shade.
  • When it is dry, take little by little and dry roast for a couple of minutes to remove any remaining moisture.
  • You can use almond by roasting or without as well.
  • Cool this by spreading it again.
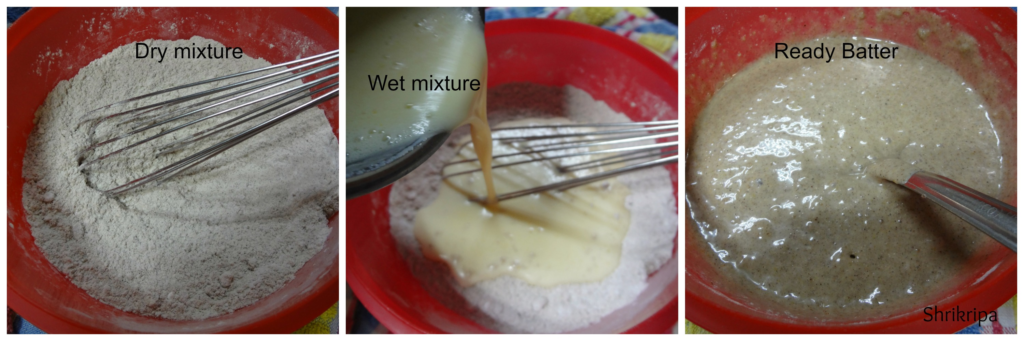
  • Take a mixer jar and powder it, sieve it and collect the fine powder and proceed.
  • Cool this and store this powder in an air tight container.
  • If you want to store this for too long, keep it in a fridge.

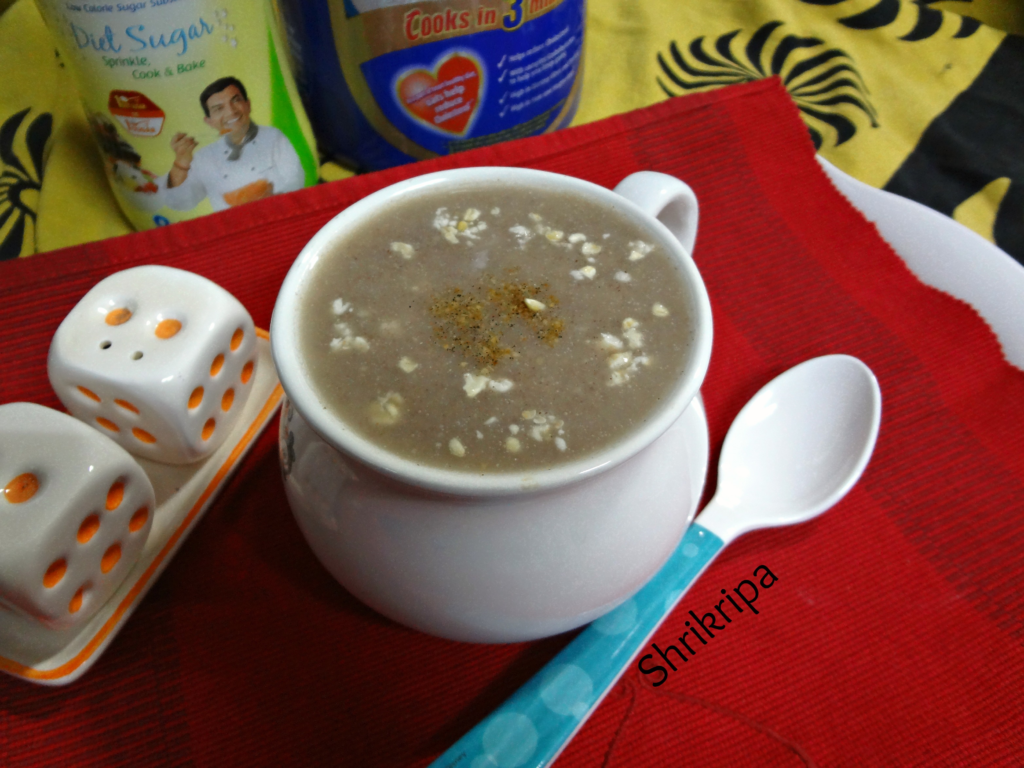
How to prepare porridge:

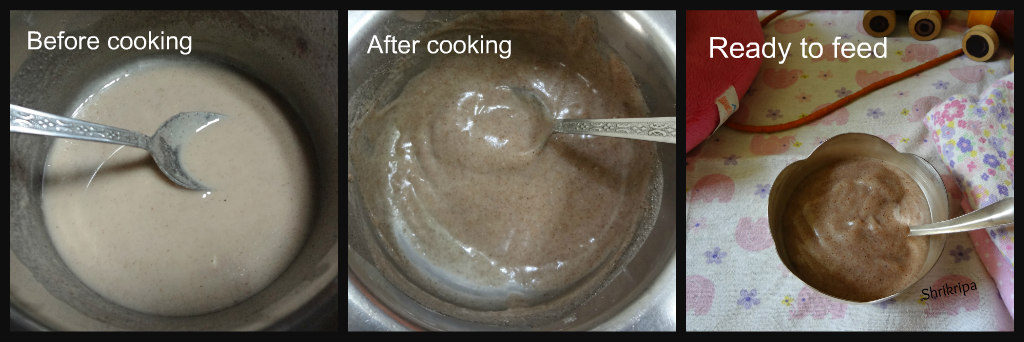
  • Take water according to your requirement, add powder and mix thoroughly.

Ribbet collage 2

  • If you are feeding for two to three-month-old, by using feeding bottle, take ½ to 1 tsp of powder,100 ml of water and boil. (adjust according to the requirement)
  • If you want a little thicker consistency, take 2 tsp of powder and 100 ml of water and boil.

Ribbet collage 3

  • Add jaggery or rock candy (kallu sakkare)
  • Boil this by stirring in a low flame, when it is cooked, it becomes a little shiny and transparent (top becomes glossy).
  • Remove from the fire. If you are okay with addition of milk, add couple of spoons of milk and adjust the consistency, or adjust with water and feed the baby either by feeding bottle or spoon.


Mixed millet Masala Cookies:

Millets are a very good alternative to normal All-purpose flour or whole wheat flour in gluten free baking. You can’t even recognize the core ingredient. It is gluten free as well as high in nutritional value too.

When I was trying out some recipes for the 2017 Millet calendar, I dished out a couple of recipes, which had turned out super tasty, and at the same time, healthy, filling and as an alternate snack for kid’s tiffin boxes as well.

I tried pizza based seasoning in this cookie recipe and it tasted super delicious.

pic main

Ingredients:

Mixed Millet flour – 1 cup

Butter – 50 grams

Sugar – 2 table spoons

Salt – ½ teaspoon

Baking powder – ½ teaspoon

Baking soda – ½ teaspoon

Curd – 2 table spoons

Pizza seasoning or Oregano – 1 tea spoon

Chilli flakes – 1 tea spoon

Cumin – 1 tea spoon

Grated cheese – to decorate.

Method:

  • Mix flour, salt, baking powder, baking soda, pizza seasoning, chilli flakes and cumin and keep aside.
  • Now beat butter and sugar until it becomes fluffy and creamy. Add in curd and beat once again.
  • Mix in flour mixture and bind all the ingredients together, the resultant dough will be like Chapati dough.

Ribbet collage 1

  • Take dough little by little, roll it into half inch thickness and take a cookie cutter and cut.
  • Arrange this in a lined baking tray.
  • Sprinkle grated cheese on top.
  • Bake this in a pre-heated oven at 170 ºC for 10 to 12 minutes.

pic 2

Note:

  • Here mixed millet flour is store bought pre- mixed flour.
  • Alternately one can mix two to three millet flours and make their own flour or use all purpose flour as well.


Healthy Chocolate Brownie:

Here healthy refers to ‘No maida’ and personally I prefer to include healthy flours instead of maida and experiment with the same. Today I made this multi millet flour brownie. These brownies turned out to be a soft, fudgy and delicious and no one cribbed about the altogether elimination of all-purpose flour in this bake. It was so delicious, and my dear hubby was all into praise!!! That was the highlight and I don’t get this every day. Yes!!! I need to work hard for it.: D He usually doesn’t prefer to compromise on basic taste. Today I did achieve to get that “classic brownie” taste without any compromising.

This is an excellent,an easy recipe which you can prepare in advance when you are entertaining guests and have many other stuffs to prepare. It is a perfect dessert option along with an ice cream. Re- heat before serving to give an extra zing with cold ice cream.

Ingredient:

Sprouted finger millet/ragi flour – 1 cup

Mix millet flour – 1 cup

Walnuts – 1 cup

Eggs – 2

Cooking Milk chocolate slab – 300 grams

Cocoa powder – 2 table spoons

Butter – 100 grams

Curd – ½ cup

Light brown sugar – 1  cup

Method:

  • Assemble all the materials and keep it ready.
  • Put butter and cooking chocolate in a sauce pan and melt.

  • Add sugar and switch off the gas.
  • Cool this mixture for 2 minutes.
  • Add in beaten eggs and curd. Mix thoroughly.

collage 2

  • This is your wet ingredient and keep it aside.
  • Break walnuts into tiny chunks.
  • Now mix all the dry ingredients, two flours, cocoa powder and walnut chunks in one bowl.

collage 3

  • Dry mix all the dry ingredients and pour wet ingredient mixture into this bowl and fold in.
  • Pre-heat oven at 180 C

collage 4

  • Pour this batter in a greased, butter paper lined baking tin for 40 to 50 minutes or until knife comes out clean while checking the doneness.
  • After it is done, remove from the oven and cool.

 -Serve hot brownies as it is or with vanilla ice cream.

Note: If your cooking chocolate has sugar, please reduce the sugar quantity to ¾ cup.

Vegetarian Thai Noodles: Gluten free and Vegan

This time when I had visited my sister, who stays in America, I got an opportunity to experiment with some new ingredients, veggies etc and I bought a couple of new items back home as well. This gluten free, Brown rice & millet ramen noodle is one of them.

When we were shopping, my eyes went to this noodle pack. I love to work with new ingredients and wanted to pick it up. After trying a couple of recipes, my daughter told me, how it should be. She asked me to prepare this as a little wet, soup kind. She said, regular kind of preparations tastes bland and it needs some flavoured soup to enhance the taste of this kind of sticky noodles and she was right. Ramen is a Japanese dish, consisting of a clear broth containing thin white noodles and sometimes vegetables, meat etc.

Finally, I came up with this, and got a green signal from my super-efficient critic!!! She said, hmmm yummy, go ahead and post: D

pic 10

Ingredients:

Noodles – 3 cakes

Shallots – 10

Baby corn -4

Carrot-1

Broccoli- couple of small florets

Ginger garlic paste – ½ tsp

Tomato sauce – 1tbl sp

Thai sweet chilli sauce – 1tbl sp

Sriracha sauce -1 tbl sp

Soy sauce -1 tbl sp

Cooked broth – 1 small cup

Salt

Sesame oil – 2 tbl sp

Basil leaves – 5 to 6

Roasted peanut halves – 1 table spoon

Method:

-Boil water with one spoon of salt and oil. Put noodle, cook until al dente (it should cook and texture should be firm)

collage 1

-Drain the water, rinse the noodle in cold tap water.

-Collect one small cup of drained water and keep aside for next use.

– Chop vegetables according to your taste.

collage 2

– wash basil and roast peanuts, remove skin and make halves and keep aside.

– Mix all the sauces in one small bowl and keep it ready

-Take one wide kadai, add sesame oil. When it is hot, add chopped shallots and fry for a while.

-Next, drop in all the veggies and fry for a while.

collage 3

-Add ginger garlic paste, fry until veggies are fried.

-Add all the sauce mixture and fry vigorously to avoid this to burn.

-Add reserved cooked and drained water of noodles. Check for the salt. If needed add and adjust.

collage 4

-When it starts boiling, add noodles and mix.

-Garnish with torn basil leaves and sprinkle roasted peanuts and serve.

pic 11

Note:

-You can use any noodles instead of gluten free noodle.

Millet Choco chip cookie:

Millets are a very good alternative to normal All-purpose flour or whole wheat flour in gluten free baking. You can’t even recognize the core ingredient. It is gluten free as well as high in nutrition too.

When I was trying out some recipes for 2017 Millet calendar, I dished out a couple of recipes, which has turned out super tasty, and at the same time, healthy too.

At first, I tried Chocolate based cookie and it tasted good and here is the recipe-.

pic 1

Ingredients:

 Mixed millet flour -1 cup

Ragi flour – ¾ cup

Cocoa powder – 2 tbl sp.

Salt – ¼ tsp

Baking powder – ¾ tsp

Baking soda – ¾ tsp

Egg -1

Sugar – ¾ cup

Butter – 100 gms

Curd – 2 tbl sp

Vanilla essence – 1 tsp

Choco-chip – 2 tbl sp

Powdered sugar – to roll the dough.

Method:

-Put all the dry ingredients- flours, cocoa powder, salt, baking powder and soda, Choco chip in one bowl, mix nicely and keep aside.

– Take another bowl and put butter and sugar, beat until sugar dissolves and butter becomes smooth.

-Add in egg and beat, add vanilla essence, curd and beat until batter is smooth.

– Now add dry ingredient flour mixture and make cookie dough by mixing like Chapati dough.

– Take one round spoon and make uniformly sized ball, dip in a sugar powder and arrange in a lined baking tray.

– Bake this in a pre- heated oven at 170º C for 12 to 14 minutes or until base becomes light brown.

-When it is done, remove and cool. Store this in an air tight container.

pic 2

Note: This measurement yields around 28 cookies of this size.

Chocolate cake from Ghee Residue:

Ghee residue is a moist, brown coloured by-product formed after preparing ghee from white butter.

Ghee residue is a rich source of essential fatty acids, natural anti-oxidants and proteins.

In olden days, people used this as a natural body scrub. When I was a child, my mum used to rub this on me, before bath and I now feel nostalgic while seeing this brown sediment and so I make it a point to use this without throwing by using either in Atta kneading or in baking.

This time, I had a couple of Pea protein powder packs in my hand, which was given by my lovely co-sister who is a Ayurvedic doctor. So, I included that as well in this brownie kind of chocolatey cake.

pic main

Ingredients:

All-purpose flour – 1 cup

Whole wheat flour – ½ cup

Mixed millet flour – ½ cup

Choco chip – ¼ cup

Protein powder – ½ cup

Milk powder – ¼ cup

Cocoa powder – ¼ cup

Sugar – 1 cup

Ghee Residue – 2 table spoons

Milk – 1 ¼ cups

Vanilla essence- 1 tea spoon

Baking soda – 1 teaspoon

Method:

  • Measure everything and keep it ready. Pre-heat oven at 180 C.
  • Mix all the dry ingredients like, flours, protein powder, milk powder, cocoa powder and sieve couple of times and mix in Choco chip and stir nicely. Keep it aside.
  • If you coat Choco chips with dry flours, it will not sink in the bottom while baking.
  • Now take ghee residue, put milk and heat it. When ghee residue is mixed nicely with milk, switch off the gas.

pic 2      pic 1

  • Add sugar, vanilla essence and baking soda and keep aside for 5 minutes.
  • After 5 minutes, beat this wet mixture thoroughly until mixture forms a bubble at the upper layer.
  • Fold in dry ingredient and make a batter. (don’t beat or over mix in this step)

pic 3     pic 4

  • Bake this in a lined baking dish in a pre-heated oven at 180 C for 30 to 40 minutes or until done (when you insert a tooth pick or knife in the centre of cake, it should come out clean)

pic 5     pic main 1

NOTE:

-You can use only All-purpose flour or mixture of any flour.

-If you don’t have any protein powder in hand, instead of protein powder, use milk powder.

Plantain Upside down Cake:

This is my trial in egg less as well as butter less baking. Here I have used raw flax seed gel as a replace for an egg as well as fat and it worked out just fantastic.

pic 1

Ingredients:

Finger millet flour/Ragi – 1 cup

Whole wheat flour –½ cup

Sugar – ¾ cup

Mashed banana – 1 cup

Flax gel – ½ cup

Baking powder – ¾ tsp

Cooking soda – ¾ tsp

Salt – ½ tsp

Cinnamon powder – one pinch.

Vanilla essence – 1 tsp

Curd – 1/3 cup to ¼ cup (according to requirement)

For Caramelized base:(Optional)

Brown sugar – ½ cup

Butter – 2 table spoon (chilled)

Banana roundels – As needed.

Method:

How to make flax gel: Take 2 tsp of flax seed, make powder. Put this powder in thick bottomed small pan, add one cup of water and boil until it is thick, slimy and reduced to almost half.

pic 3

-Now make banana slices (half inch thick), keep it ready.

– Take one baking tin in which you want to bake this cake. Brush some oil at the base. Spread brown sugar uniformly and take butter, make small cubes and place it here and there.

pic 4

-Place this in a pre-heated oven at 180C for 6 to 8 minutes until the sugar has melted. Remove from the oven, mix this liquid nicely and place banana roundels in regular intervals and keep aside.

– Now Take all dry ingredients like flour, baking powder, baking soda, salt, cinnamon powder and sieve together couple of times or mix using dry wire whisk.

– Now take another bowl, beat all the wet ingredients like, flax gel, vanilla, sugar, mashed banana

-. When it becomes frothy, fold in the dry ingredient mixture. If you feel this batter is too thick, then adjust the consistency by adding curds.

– Pour this ready batter to the cake tin in which you placed banana slices.

-Bake this in a pre-heated ready oven at 180C for 40 to 50 minutes or until done. If you insert knife, it should come out clean.

-Remove once it is done. When it is cool, de-mold and serve.

pic 1

NOTE:- Here I took caramel which was stuck on the base of the baking dish, put it in a microwave cup, re heated it and poured as a sauce to give saucy texture. (You can see that in the picture)

-If you want to make this as a vegan,avoid caramelized base.


Millet and Oats porridge:

A low calorie Diet is very difficult to manage. You feel constantly hungry and can’t concentrate on your work. To attain fullness, we should think of adding millets in our diet as it is very nutritious, gives strength and increases immunity. It is low on starch, high on minerals and fibre.

This is a 3 spoon miracle filling diet. If you have this porridge in the morning, you will surely not feel hungry until your lunch.

ragi porridge

Ingredients:

Mixed millet flour – 1 spoon

Finger millet flour – 1 spoon

Oats – 1 spoon

Water – 1 ½ cups

Salt- ¼ teaspoon

Cardamom powder – ¼ teaspoon

Sugar free natura – 1 teaspoon

Method:

  • Take one thick bottomed vessel, mix all the ingredients.
  • Boil this mix by stirring in-between.
  • While boiling, mixture becomes glossy, when it is done.
  • Switch off the gas and serve.
  • It is a very good breakfast option for weight loss or diabetic patients.
  • Adjust the consistency by adding extra water if you want a runny texture.

Orange – Nutella Swirl cupcakes:

These millet cupcakes are healthy and delicious at the same time,  a very good snack for all the kids who are studying hard for exams.

picture main

Ingredients:

Mixed millet flour- ½ cup

Whole wheat flour- ¼ cup

All-purpose flour – ¾ cup

Ghee – ¼ cup

Egg – 1

Sugar – ¾ cup

Salt – ¼ tsp

Baking powder – ¾ tsp

Baking soda – ¾ tsp

Curd – ¾ cup

Orange zest – 1 tsp

Nutella – as required

Method:

  • Pre-heat oven in 170 C. Line cupcake baking tray with paper liners.

collage 1

  • Mix all the dry ingredients like millet flour, whole wheat flour and all-purpose flour, baking powder and soda, sieve 2 to 3 times or mix with dry whisk.
  • Now take one more bowl or food processer, put egg, curd, sugar, ghee, salt and beat nicely.
  • Grate orange zest from outer surface of the orange (Don’t add any white part) and add this to liquid and beat one more time.
  • Now pour this wet mixture into dry ingredient mixture and fold in and mix everything lightly.
  • Don’t over mix.
  • Pour this mixture into cupcake tray by using the spoon.

collage 2

  • Drop Nutella on the top of each batter filled cupcake mould, swirl a little.
  • Bake this in a pre-heated oven for 15 minutes or until done.

picture main 2

  • Enjoy with evening tea. It is a good option as a snack as well.

Millet and spinach khichdi:

Millet’s are tiny cereals, which are low in Carbohydrates and a very good source of Protein, fibre and Vitamins. This is a very tasty, easy to make, healthy one pot meal which makes a very light meal.

millet-1

Ingredients:

Saame rice/Foxtail millet – 1 cup (you can use normal rice as well)

Moong/green gram dhal – ½ cup

Spinach – 1bunch

Cumin seeds – 1 tsp.

Hing – ½ tsp

Ginger – 1” piece

Green chillies – 1 to 2 (slit)

Salt- to taste

Ghee – 1 to 2 tbl sp

Water – 4 to 6 cups

Method:

-Soak dhal and millet rice after washing, for 10 minutes.

-Wash and grind spinach into puree.

-Heat ½ table spoon of ghee in a pressure cooker.

-Add Cumin seeds, hing, green chillies and ginger and fry for a minute.

-Now add spinach puree, water, salt and bring to boil. When it starts boiling, add soaked and drained dal and millet rice mixture.

-Check for salt and cook till 3 to 4 whistles.

-After the pressure releases, open the lid and pour in the remaining amount of ghee.

khichdi


-Enjoy with any crispy side dishes or raita!!!