Pirandai Thogayal/Adamant creeper Chutney:

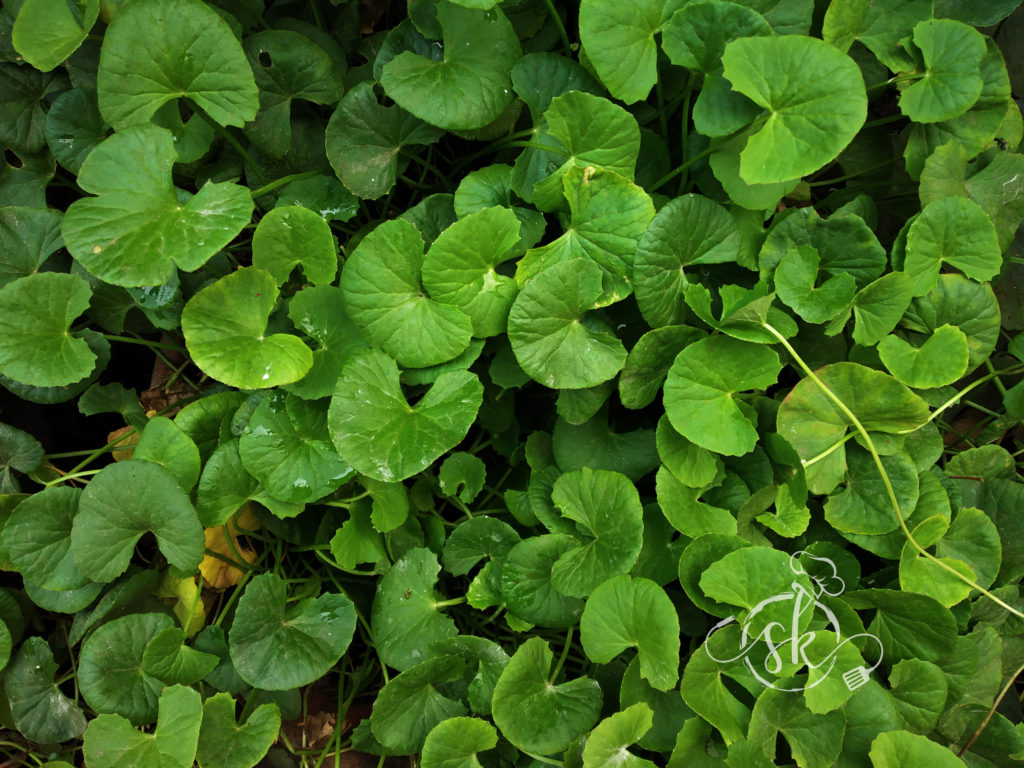
Pirandai is a creeper. It is called as Adamant Creeper / Devils Back Bone / Veldt Grape “ in English. Botanically known as Cissus Quadrangularis. Which refers to plants quadrangular sectioned  branches with internodes of 8 to 10 cm in length and 1.5 cm wide.

It has many names in different parts of our country. In Sanskrit: Asthisamhari, Vajravalli, Asthishrinkhala ,Kandavalli ,Vajrangi . In Hindi: Hadjod ,Hadjora ,Hadsankari Kandvel. In Kannada: Mangarahalli . In Tamil: Pirandai ,Vajravalli . In Malayalam: Peranta ,Cannalamparanta. In Telugu: Vajravalli ,Nalleru. In Gujrati: Chodhari , Hadsankal.

Adamant Creeper is a very well-known traditional herb in ancient ayurvedic medicine. which was used in setting bones/ bone fracture healing , gastric ulcer , piles ,anaemia ,menstrual problems as well as in de worming. It is a good source of Vitamin C and Calcium. Usage of the herb is usually by making Chutney or Kolambu or sundried and in powdered form.

If person wants to take it as a healing food, one should consume it weekly twice and mix with a little ghee either with hot rice or with Roti.

Till two years back, I had no idea regarding this plant or its usage. Due to our Foodie Facebook page, got to know about it. My Foodie friend Ashwini shared the plant cutting with me and guided me through. From then on, my experiments went on and I tried out many recipes. The chutney that I make and like is without coconut, mainly because it stays longer and can enjoy for many days. Here I will share both the version.

Pirandai has to be treated like Colocasia leaves and Yam. It is itchy in nature even while cutting as well as till the last stage of its cooking. So, quantity of tamarind plays a major role while cooking and application of oil to your hand will avoid itching while cleaning and chopping. One more thing what I have observed is, before using  keep it for one day ,after harvesting. This also helps in reducing the itchiness.

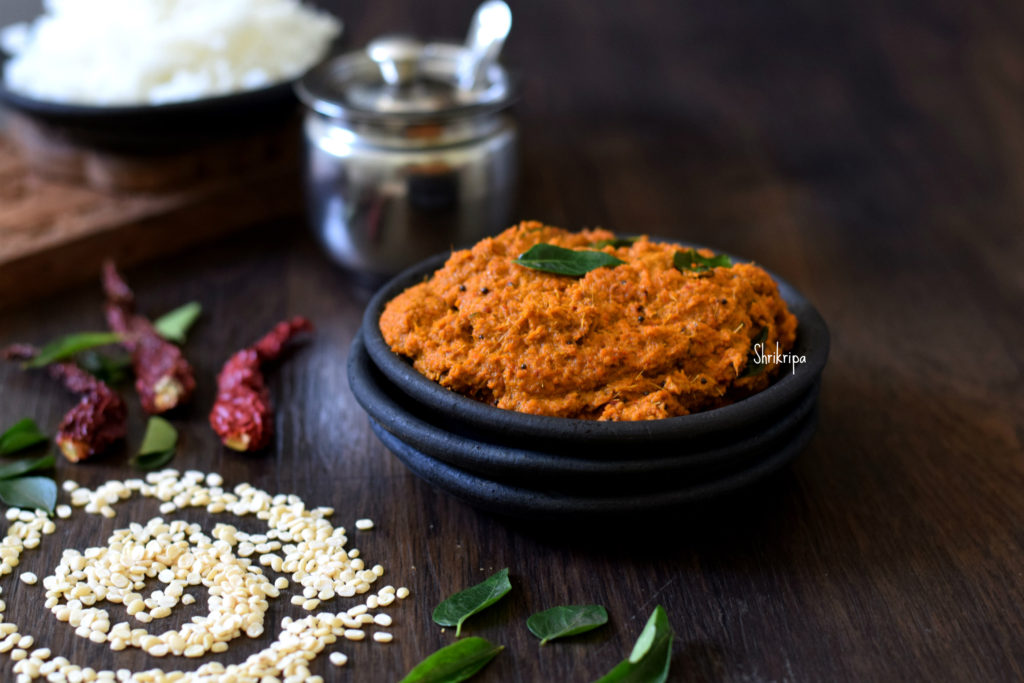
Now we will see the Thogayal/Chutney preparation:

Ingredients:

Pirandai – one bowl

Tamarind – lemon sized ball

Gingelly oil – 1 tablespoon

Urad dal – 1 tablespoon

Hing – ¼ tsp

Dried red  chillies – 3 to 4

Salt

Jaggery – 1tsp

For Seasoning:

Gingelly oil or any refined oil – 3 to 4tablespoons

Mustard – 1 tsp

Curry leaves – 2 springs

Method:

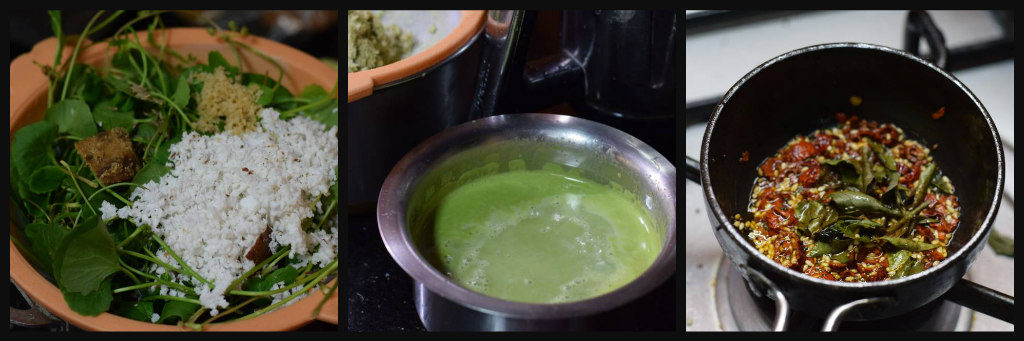
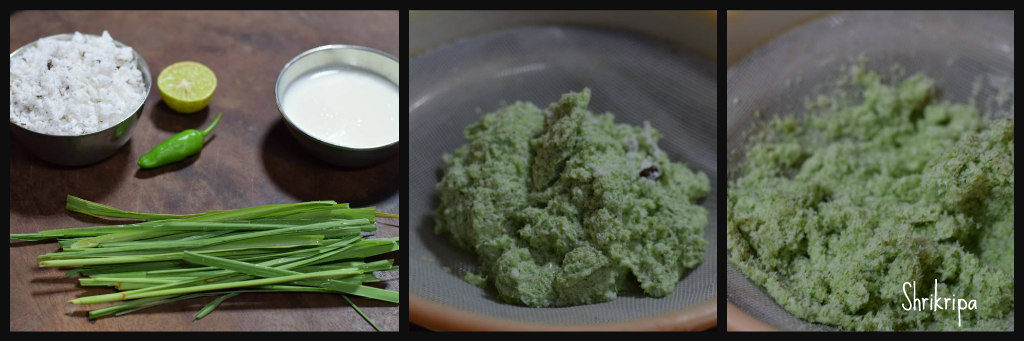
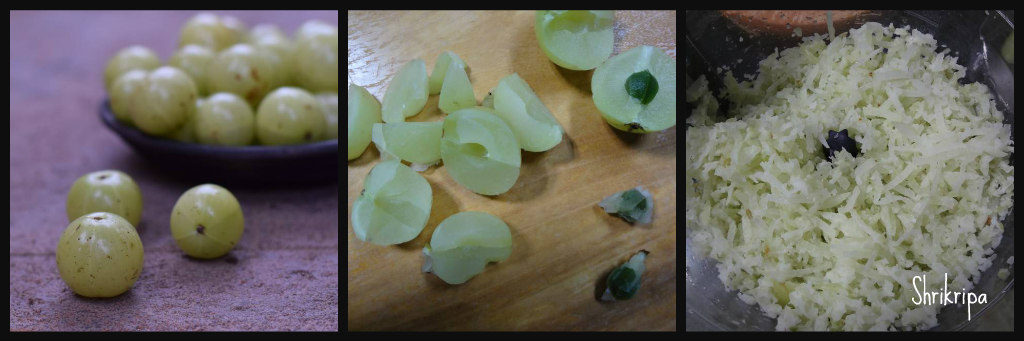
-Apply oil to your hand, cut every node and take out internal sticks, peel outer 4 corners and remove all the fibres.

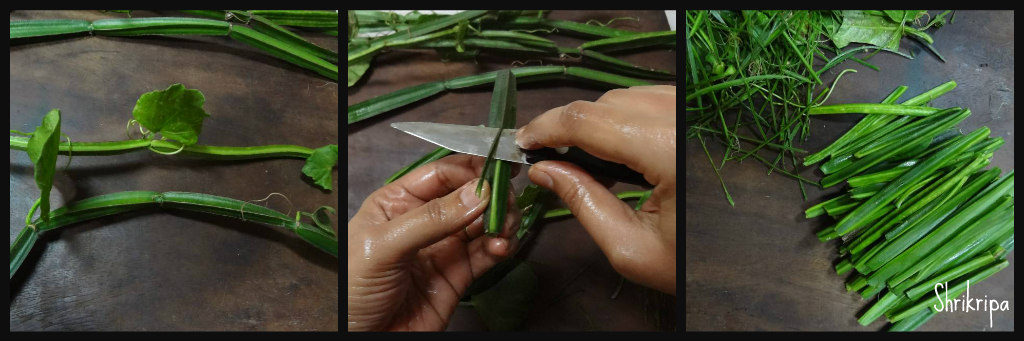
-Take diluted buttermilk water (add little curd to water and make) and wash these cleaned Pirandai nicely.

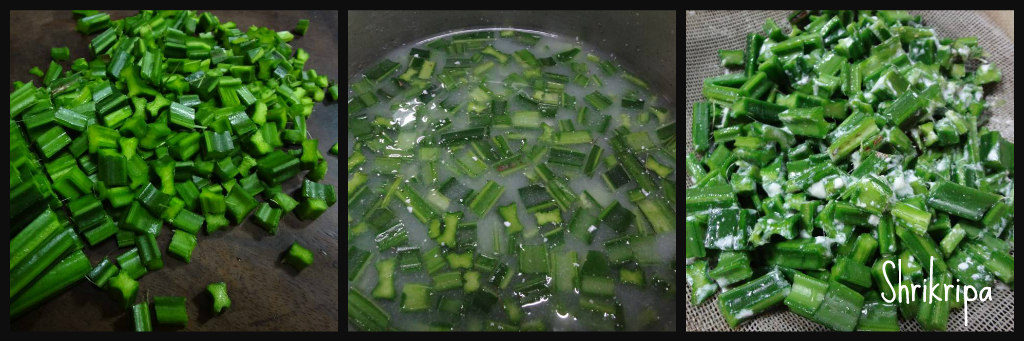
-Chop these sticks into tiny bits and immerse in diluted buttermilk or tamarind water.

-Soak tamarind in a little water.

-Now drain the water from chopped Pirandai and keep it ready for the seasoning.

-Now take 1 tbl spoon of oil, fry urad dal ,hing and red chillies. Add Pirandai choppings, fry until it is soft and turns pale in colour.

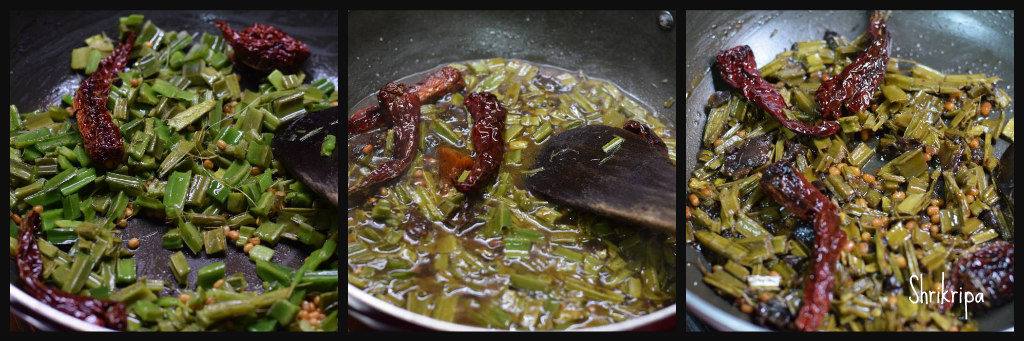
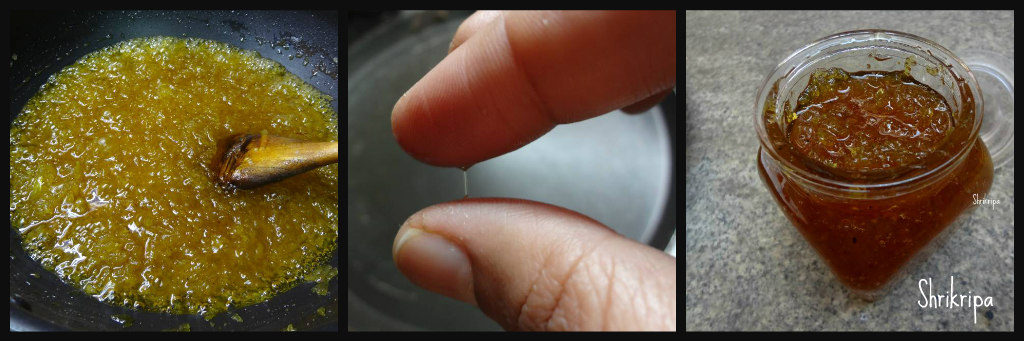
-Add tamarind water, salt, jaggery and cook until it is soft.

-Cool the mixture and grind into smooth paste by adding required amount of water. If you want to add coconut ,you can add coconut as well, while grinding .

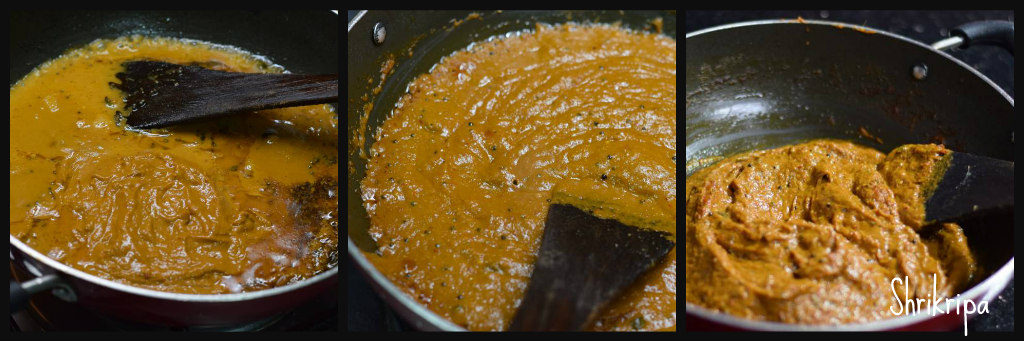
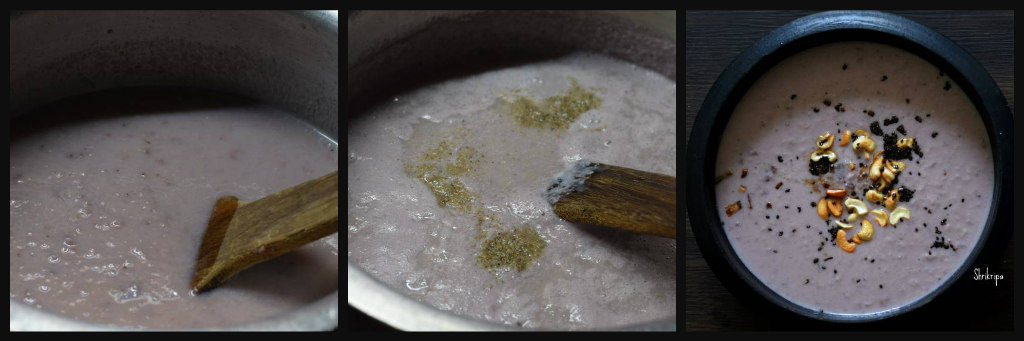
-Now prepare seasoning , take 2 to 3 tablespoons of oil , splutter mustard, curry leaves, add ground paste and boil until oil oozes out at the sides.

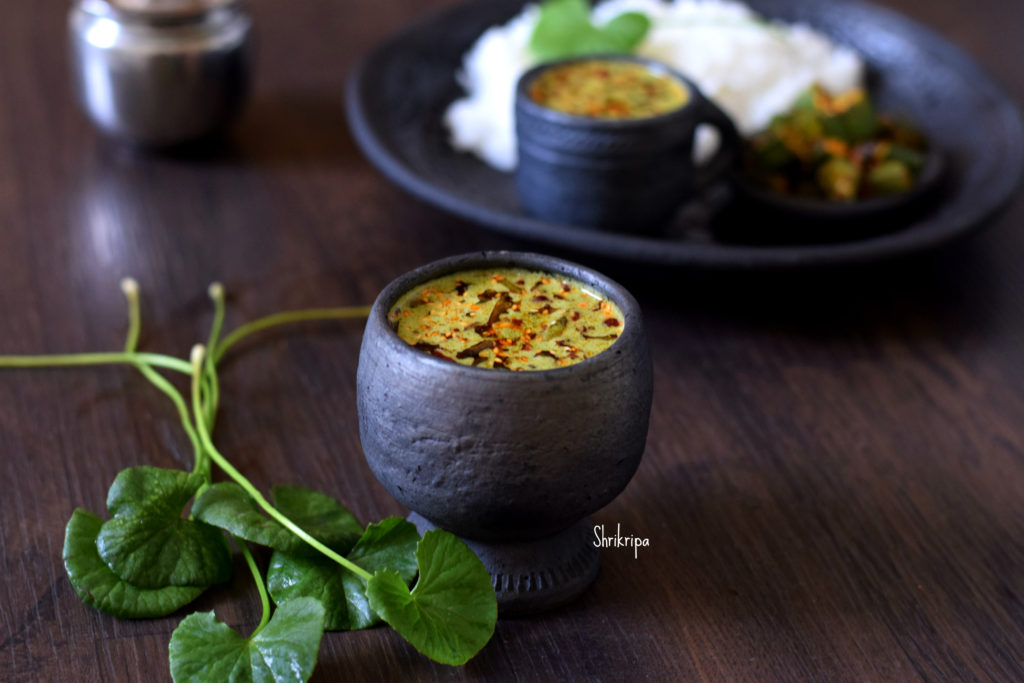
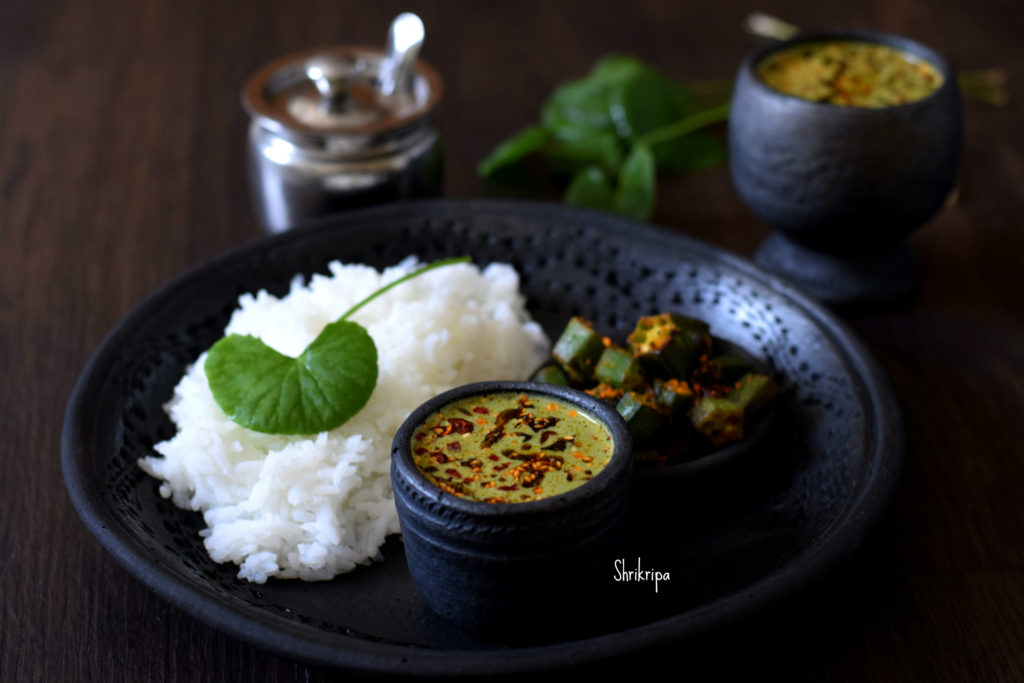
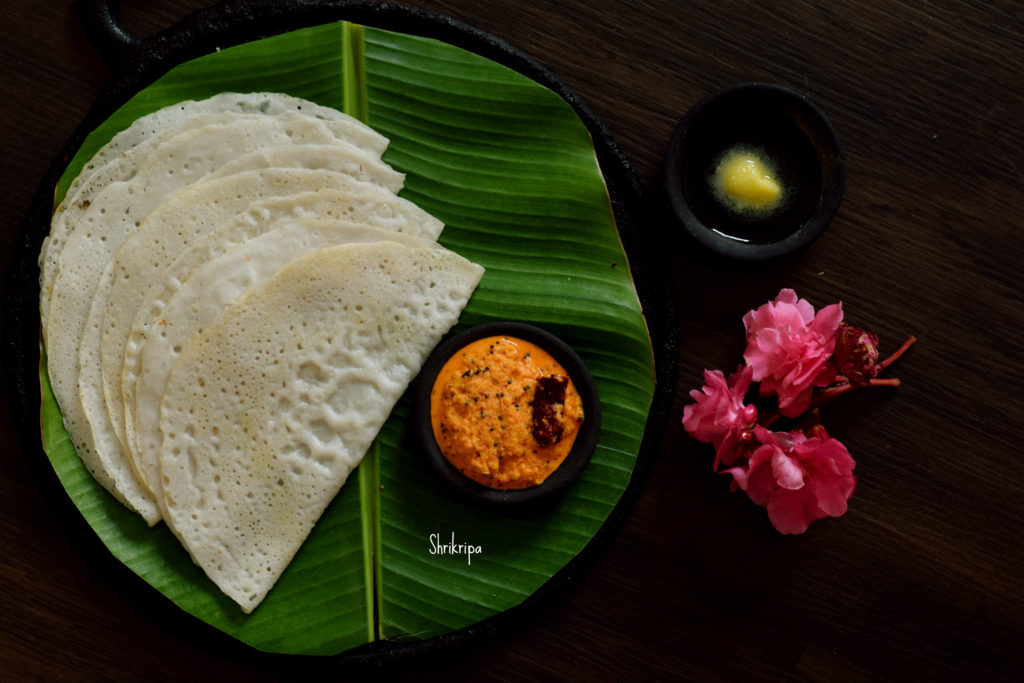
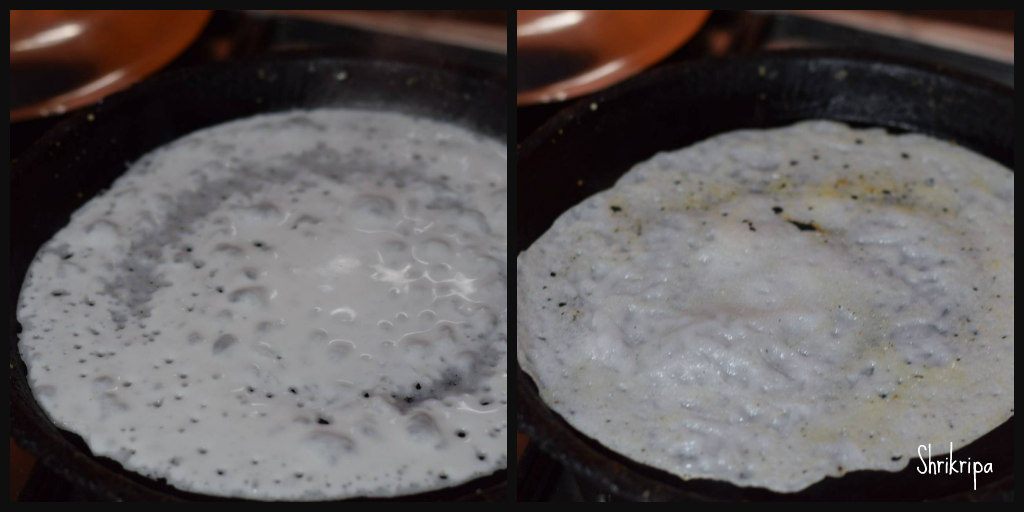
-Serve with hot rice , dosa or idlies. It can be stored for many days under refrigeration.

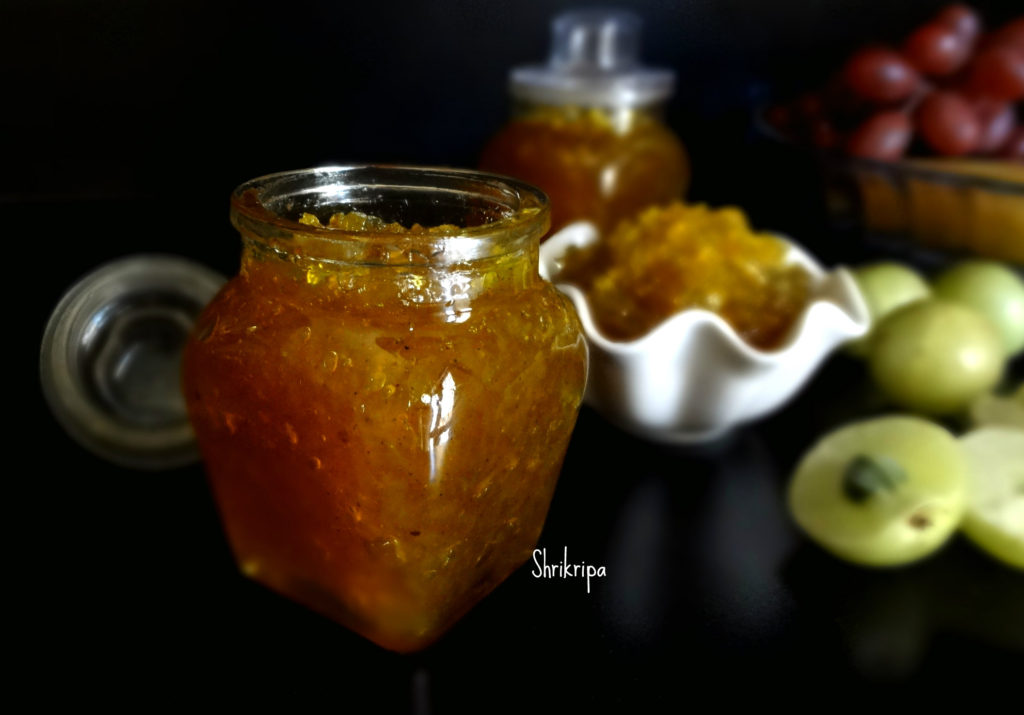
Note: Main picture is (with added coconut)


Mango- Guava Jam:

Homemade jams are full of flavours as well as without any chemicals and preservatives. Mango and guava turn out super delicious and texture of the jam would be little grainy and thick due to guava. If you want a silky-smooth texture, you can use only mango and proceed.

Now I will proceed towards the procedure-

Ingredients:

Mango’s – 600 Grams (roughly)

Guava – 500 grams (roughly)

Sugar- 1 kg (according to your taste)

lemon – 1

Method:

  • Wash, Peel the mangoes and chop.
  • Wash, chop guava into pieces.

  • Put all these pieces, with a little bit of water (till it immerses) and cook for 4 whistles.
  • -Mash the mixture by using masher. Don’t use mixer grinder for mashing. (it would crush the guava seeds)
  • Sieve this pulp to remove fibres and seeds.

  • Collect the smooth pulp and heat it in a low fire, until it starts boiling.
  • Add sugar, cook until it is done.
  • To check the doneness, take some water in a small bowl, drop the cooked mixture in it, immediately it should form a thick mass. If it dissolves, then you should proceed cooking.
  • When it is done, add lemon juice and cook for 2 minutes.

  • Remove from the fire and cool for a while and pour it into a glass bottles to set.
  • Don’t close the lid until it is cool. Store this in a clean, dry bottle and refrigerate.

NOTE:

-If you use very sweet mango, adjust the quantity of sugar.


Brahmi Tambli:

Centella Asiatica is commonly known as Centella /Gotu kola or Asiatic pennywort locally known as Thimare /Brahmi or Ondelaga in our region. Popularly known as a memory enhancer and from ages, it has been used as a brain tonic. In our coastal Brahmi is considered as a body coolant and used as a culinary herb during summer either by making chutney or Tambli.

Brahmi is a small runner/succulent herb and contains numerous fibrous roots at its every node. In our coastal belt, it grows widely in our paddy fields or Areca nut garden. It has small tiny seed-like flowers with a neutral colour. The whole plant including its roots can be used in cooking as well as medicinal purpose. It has little bitter sweetish taste when it is consumed in a raw form without any added taste enhancer. 2 teaspoons of Raw extract can be used for 3 to 7 days to enhance the overall health /to boost immune system/to reduce any inflammation of the body. Apart from this, it is very good for hair as well and I have shared the Hair oil recipe long ago by adding Brahmi and many other goodnesses. 

In our region, usually, we make Tambli or chutney and consumed as a raw form (not boiled) to get all the benefits of the greens. This particular recipe I learnt it from Kavya Bhat which she has shared with us in our Foodie Facebook group and I want to thank her for the wonderful tasty recipe.

How to make Tambli-

Ingredients:

Brahmi greens – 1 fistful (You can use with roots or without)

Coconut – ½ cup

Cumin – ½ tsp

Jaggery – 1 small piece

Curd – ½ cup

Salt

Seasoning:

Coconut oil – 1 tsp

Sesame seeds – 1tsp

Red chilli flakes – 1 tsp (or chopped red chilli)

Curry leaves – 1 spring

Method:

-Wash Brahmi greens and roots nicely.

-Put Brahmi, coconut, salt, cumin, jaggery and pour ½ cup of water and grind into a smooth paste.

-Sieve the content and extract the liquid.

-Take all the roughage, add curd and little water grind once again and sieve. Collect the liquid.

-Third time add little water and grind, sieve and extract the liquid and discard all the remaining roughage.

-Prepare seasoning- heat oil, add sesame, when it turns light brown switch off the gas. Add red chilli flakes, curry leaves and add to Tambli.

-Adjust the salt and enjoy either as an appetiser or with white or brown/ red rice.


Punarpuli sharbath/ Fresh Kokum Juice:

To start with this wonder fruit, I should introduce its plant, benefit, procedure to preserve the outer skin, to rest of the world. Kokum is belonging to Guttiferae family, same as mangosteen and its botanical name is Garcinia Indica, is a fruit bearing plant only found in western Ghats and coastal southern India.

It is a summer fruit, which is widely used for juices or Rasam in our region to quench thirst as well as to balance body heat. It has so many health benefits as well. It is a natural healer for acidity.

It is a ritual in our native to dry the outer skin in summer months to preserve to use whenever it is needed. Fresh fruit of Kokum is often halved, discard the inner pulpy white part which is a fleshy coating of real seed to make Kokum butter, which is used in medicinal as well as cosmetic products as a raw material. Then outer dark maroon skin will be sun dried and when it becomes crispy, it’s stored in an air tight manner. During this process, we used to prepare fresh pulp to make juice and I used to love fresh juice from its inner pulp. It is much tastier than the outer dried skin juice.

Last week found these cuties here in Mangalore stores. Picked up some and enjoyed my favourite drink after so many years.

How to prepare –

Ingredients:

Kokum fresh pulp – little

Water – as needed

Sugar – as needed

Salt – ½ tsp

Method:

-Soak fresh pulp and couple of outer shells in little water for some time.

-Mash everything by using clean hand and discard the seeds and outer shells.

-Add sugar, salt and required amount of water and mix everything and serve by adding couple of ice cubes.

-It is very good for our gut health as well as to keep us hydrated.


Kadu Mavina hannina Hasi Gojji/ Wild Mango Gojju:

Wild mangoes are known as Kadu mavina hannu in our local language. Which is very fibrous, tangy as well as sweet in taste. It has distinct taste; it is widely used in varieties of curries in our region. Hasi Gojju is nothing but, raw form of curry. Which can be prepared in a jiffy and doesn’t need any heating and is a perfect treat for summer. Usually we enjoy this with hot rice as well as devoured like a dessert :D. In Mango season, we do prepare varieties of curries like Sasame or Sasive, saaru and Gojju are the most loved dishes of our region.

Ingredients:

Wild mangoes -5-6

Salt – to taste

Jaggery – to taste

Green chillies – 1 or 2

Seasoning: Coconut oil – 1 tsp, mustard – 1 tsp, Red chilli – 1, Curry leaves – little.

Method:

  • Wash wild mangoes, remove top part of the mango, remove outer skin and keep this in a separate vessel. Keep inner fruit part in another vessel.

  • Add one cup of water to outer skin, mash nicely, collect pulpy water and add this to fruit.
  • Discard outer remaining skin. Add required amount of jaggery, salt and crush green chillies by using your hand.
  • Mix everything, check for the seasoning. If needed add some more grated jaggery or salt.
  • Season by using coconut oil. When it is hot, add mustard, after it splutters, add red chilli and curry leaves, add this to mango curry.

  • Enjoy this with hot rice.

NOTE:

-If you don’t have access to wild mango, don’t worry. Pick up any (little sour) varieties of mango, peel the outer skin and chop the fruit into bite size pieces or mash a little and proceed with above method.


Balehannina Berati Payasa / Payasam by plantain preserve:

First, I want to wish a very very happy “Ugadi” to all my readers.  Ugadi marks the beginning of the new Hindu lunar Calendar, which is based on the change in the moon’s orbit. Ugadi is a Lunar New year for us.

On the eve of this festival I made our traditional payasam and enjoyed with my family.

“Berati” is nothing but preserved fruit pulp, which is cooked until it forms into thick mass and usually made when it is in abundance and stored for future use.

How to preserve jackfruit and Banana / Berati is already shared in my blog. 

In Coastal region we love jack and Banana in many forms. Berati Payasa (preserved Banana or Jack)  is one of them.

Now we will see traditionally how it is made:

Ingredients:

Berati / Banana preserve – 1 bowl

Coconut – 1 (To extract milk)

-OR-

Thin coconut milk – 2cups

Thick coconut milk – ½ cup

Salt – ½ tsp

Cardamom powder – ½ tsp

For Seasoning:

Ghee – 1 tbl sp

Thin Coconut slices – 2 tbl sp

Cashew pieces – 2 tbl sp

OR

Toasted black sesame – 1 table spoon

Fresh coconut slices – 1 to 2 table spoons

Method:

  • Take out Berati from your freezer and keep aside for some time to attain room temperature.

  • Slice coconut by using small knife, chop these sliced pieces into small bits.
  • Toast black sesame and keep aside.
  • Take little ghee and fry coconut bits and keep aside.
  • If you want to, you can add ghee roasted cashew bits as well.
  • Grate coconut (coconut should be fresh), put one cup of water and grind this in a mixer jar and extract milk by sieving this ground mixture. This is thick coconut milk and you should keep this separately. We use this at the end stage of Payasa making.
  • Do this procedure a couple of times to get a thin extract and lastly discard coconut fibre.
  • If you are using readymade coconut milk, please skip this step.
  • Now take one thick bottomed vessel, put Berati, thin coconut milk and dissolve Berati and keep this on a gas stove to boil.
  • Usually while making Berati, we put Sugar, so no need of additional sugar.

  • Lastly add thick extract of coconut milk and give one boil. Don’t boil it much. Add Cardamom powder and mix.       
  • Remove from fire and add fried coconut pieces, toasted black sesame or cashew brittles to prepared Payasa.
  • Serve with lunch thali or as a dessert.

NOTE:

  • Traditionally only toasted sesame and coconut bits are added.
  • Vegans can omit ghee and roast all the items, instead of frying.


Lemongrass Tambli:

Lemongrass is used as a culinary as well as medicinal herb in the Asian continent. It has a mild citrus flavour with sweetish taste. It can be used in a dried, powdered or fresh form in various things like teas, soups and curries. This particular curry is called “Tambli” and it is prepared by grinding fresh leaves with coconut and mixing in buttermilk and it doesn’t need boiling. You can savour this like an appetiser or mixing with piping hot rice in this really hot summer. It has healing properties and is very good for the digestive system.

How to prepare this:

Ingredients:

Lemongrass sticks – 5-6

Fresh grated Coconut – ½ cup

Green chilli -1

Salt –to taste

Lemon – ½

Buttermilk – ½ cup

Method:

  • Chop lemongrass into bite size.
  • Take your mixer jar, grind lemongrass pieces, coconut gratings, green chilli and salt by adding ½ cup of water into smooth paste. Sieve this mixture to get smooth liquid. (Sieving is very important over here, otherwise lemongrass will irritate your throat)

  • Once again add half cup of water, do exactly like earlier and repeat this process for two or three times, so that we will remove all the traces of liquid and discard the remaining fibre.
  • Now mix in buttermilk, adjust the consistency by adding water. Check the salt and add lemon juice.
  • Now your Tambli is ready to savour.
  • If you want to add the seasoning, heat one tsp of ghee, fry little cumin and curry leaves and add to Tambli.
  • Beat the heat by having this either as an appetiser or with hot rice.

NOTE:

  • To make vegan version, please omit the buttermilk and rest you can proceed as it is.


Malabar spinach and Raw papaya curry:

Malabar spinach is commonly known as Basale in our coastal area. It is a common creeping vein in the backyard of every household.

Its leaf is very rich in iron, fibre, antioxidants and vitamins and low in calorie. Malabar spinach is a go getter veggie at any given point of time. You can harvest, as soon as the main stem is growing and spreads all over. Snip the leaves and use the stems as well.

On the other hand, raw papaya is also a power house of nutrients and it is a natural cleanser of intestine and colon.

Like Malabar spinach, Papaya tree also plays an integral part in our garden. May be because of the easy availability, we have a couple of traditional dishes with Raw papaya and one curry is this. Our elders had so much knowledge to include all the goodness in their cooking. One such recipe is Raw papaya and Malabar spinach with a freshly ground coconut masala. It can be relished with Boiled rice or white rice. It is an overall package of health benefits from both the veggies.

Ingredients:

Malabar spinach – one small bundle

Raw papaya – 1 small

Onion – 1

Salt

Jaggery (optional)

Red chilli powder – 1 tsp

Toor dal – ½ cup

For Masala paste:

Coriander – 1-2 tablespoon

Cumin – 1 tsp

Methi – ½ tsp

Dried red chillies – 5 to 6

Tamarind – 1 tsp

Coconut – 1 to 1 ½ cup

Seasoning:

Coconut oil – 1 tablespoon

Mustard – 1 tsp

Red chilli – 1

Small onion – 1

Curry leaves – 1 spring

Method:

-Wash Malabar spinach leaves, chop them and keep them aside. Cut it into 2 to 3-inch pieces if you are using its stem.

-Chop Raw papaya by removing the outer skin and the inner seeds. Dump in a water bowl to remove all the oozed latex and drain.

-Wash Toor dal; if you have chopped Malabar spinach stem, combine it and cook with dal by adding turmeric and salt.

-When toor dal is ready, remove the lid, add a little water, salt, jaggery, red chilli powder, Papaya pieces, and chopped leaves. Cook for one whistle.

-Now prepare masala by roasting methi, coriander, cumin and red chillies in a little oil. Grind into a paste by adding coconut, tamarind and water.

-Add the ground paste to cooked veggies, adjust everything, boil and add seasoning.

-To season, heat oil, splutter mustard, red chilli, curry leaves and chopped onion. When the onion becomes brown, add it to the curry.

-Serve with Hot rice.

Bannangayi Dosey /tender (young) coconut Dosa:

When I was a little girl, my mom used to work, and I used to spend the summer vacation at my grandparents’ house. I used to enjoy at the farm house by having an unlimited supply of Mangoes, tender coconut, pineapples etc.

There used to be abundant supply of fallen young coconuts, also called ‘bannangayi’ which have much harder flesh than what we get in the normal tender coconut carts over.

My aunt used to make a very tasty Dosa out of this and we used to relish this along with chutney and Jaggery syrup topped with homemade ghee.

Yesterday, when we had tender coconuts here in Bangalore, inner pulp was very thick and couldn’t eat. So, I thought about Dosa and prepared this after ages. It was such a nostalgic moment for me. Let us see how to make this tasty Dosa.

Ingredients:

Tender coconut – 1

Dosa rice – 2 cups

Salt

Method:

-wash and soak Dosa rice for 3 to 4 hours.

-Grate or chop tender /young coconut and keep aside.        


-Grind soaked rice with grated young coconut by adding little water and salt and make smooth paste. This batter must be like our regular Dosa batter and there is no need of fermentation.                           

-You can make use of this batter straight away. Usually we prepare this batter in the morning itself.

-If you want to prepare this batter in the evening, to make the Dosa in the morning, you can store the batter in the refrigerator.

-To prepare Dosa, heat iron Dosa tawa. When it is hot, don’t apply any oil. You can pour one serving spoon of batter and make Dosa like our regular Dosa. Pour ½ tsp of ghee and Close the lid.     


When it shows little brownish spots here and there, flip the side, cook upper side and serve with Coconut and onion chutney , jaggery syrup which is topped with ghee or honey.


Indian Gooseberry preserve/Amla Jam:

Indian gooseberry is a sour and tangy fruit with many medicinal values as it is a rich source of vitamin C, calcium etc. It is known as Nellikai in Kannada, Amla in Hindi. This berry has been used for years in Ayurvedic medicines as well as in Home remedies, because it is rich in antioxidants. I make it a point to store Amla in a couple of forms every year- normally by Sun drying and making a jam instead of doing traditional morabba etc.

Usually early morning, weekly 3 to 4 times I do include this jam in my breakfast. It is very good for hair, skin, eye sight and overall health of a human body.

How I make –

Ingredients: 
Amla/Gooseberry (grated)-1 cup 
Sugar -1 cup 
Water -1 cup 
Red Chilli powder-¼ tsp 
Black pepper powder -¼ tsp 
Kesar – 5 -6 strings 
jeera powder -½ tsp 
Turmeric -¼ tsp 
Salt -As per taste 

Method: 

– Wash, cut open and remove the seeds. Put gooseberry either in food processor or chopper. U will get nice uniform chunks, or you can directly grate it.

-Take one thick bottomed pan, add water, grated amla, sugar. Mix well. Cook in low heat.

-When it is half done, add all the other masalas, salt and cook further.

-When mixture becomes shiny and forms a single thread, when you touch in between your fore finger and thumb.

-Switch off, cool and store it in a glass bottle.

-Stays good for one year, in cool weather like Bangalore.